Miele CS 1312 Operating And Installation Instructions
Electric barbecue
Hide thumbs
Also See for CS 1312:
- Operating and installation instructions (37 pages) ,
- Installation instructions manual (21 pages) ,
- Operating and installation instructions (40 pages)
Table of Contents
Quick Links
See also:
Instruction and Installation Manual
Table of Contents

Related Manuals for Miele CS 1312


Summary of Contents for Miele CS 1312
- Page 1 Operating and Installation Instructions Electric Barbecue CS 1312 CS 1322 en - US To prevent accidents and machine damage, read these instructions before installation or use. M.-Nr. 07 346 950...
-
Page 2: Table Of Contents
Installation dimensions CS 1312 ........ -
Page 3: Important Safety Instructions
IMPORTANT SAFETY INSTRUCTIONS Only use this appliance for WARNING- When using your residential cooking, and for the appliance follow basic purposes described in this manual. precautions, including the Other uses are not permitted and can following: be dangerous. Persons who lack physical, sensory Read all instructions before or mental abilities, or experience with installation or use to prevent... - Page 4 Do not use an extension cord to connect this appliance to electricity. Defective components should be Extension cords do not guarantee the replaced by Miele original spare parts required safety of the appliance. only. Only with these parts can the manufacturer guarantee the safety of...
- Page 5 IMPORTANT SAFETY INSTRUCTIONS Safety Be aware of loose fitting or hanging garments when operating the DO NOT TOUCH SURFACE UNITS appliance, they may present a fire OR AREAS NEAR UNITS hazard. Surface units may be hot even though they are dark in color. Areas near Never leave an appliance surface units may become hot enough unattended at high settings or when...
- Page 6 IMPORTANT SAFETY INSTRUCTIONS To prevent burns and breathing difficulty, allow the appliance to cool before cleaning. Some cleaners may produce toxic fumes if applied to a hot surface. When wiping spills on a hot appliance with a wet sponge or cloth, be careful to avoid steam burns.
-
Page 7: Guide To The Electric Barbecue
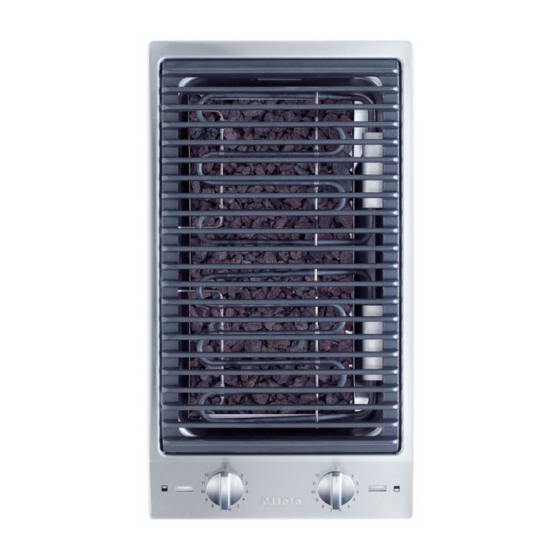
Guide to the Electric Barbecue CS 1312 a Grate Control knobs: b Heating element, front h front c Heating element, rear i rear d Lava rock container e Drain valve Indicators f Cooking zone indicators g Display j On/Off indicator... - Page 8 Guide to the Electric Barbecue CS 1322 a Grates Control knobs: b Heating element, front h front c Heating element, rear i rear d Lava rock container e Drain valve Indicators f Cooking area indicators g Display j On/Off indicator...
-
Page 9: Before Using For The First Use
Before using for the first use Clean the appliance Heat the appliance ^ Clean the water trough and grates Metal components of the appliance with a mild solution of warm water have a protective coating which may and liquid dish liquid, then dry with a give off a slight odor the first time the soft cloth (see "Cleaning and care"). -
Page 10: Use
Prepare the appliance Turning On/Off You can use the electric barbecue with The electric barbecue is divided into or without the lava rocks. two heating areas, which can be used Without the lava rocks: food will stay and adjusted separately. For large more moist, from the rising steam. -
Page 11: Grilling
Grilling Tips – To minimize splattering, dry moist While grilling, watch the level of foods with paper towels before water in the trough. If necessary, grilling. add more water. – Marinate food before grilling, to Do not use aluminum dishes, pans, enhance the flavors. -
Page 12: Grilling Times
Grilling times Food item Grilling time Food item Grilling time in minutes in minutes Meat and sausage Vegetables Boneless steak 8 - 10 Corn (parboiled) 5 - 8 Chicken breasts 16 - 18 Eggplant 6 - 8 Cutlets 8 - 12 Potatoes in foil 10 - 20 (parboiled) -
Page 13: Safety Feature
Safety Feature Overheat protection Safety cut-out feature If there is not enough water in the water The safety cut-off ensures that the trough, the overheat protection heating element will only work if it is automatically switches the appliance lowered. off. ^ Pour in cold water. -
Page 14: Cleaning And Care
Cleaning and care Stainless steel Under no circumstances should Clean stainless steel surfaces with you use a steam cleaner to clean warm water and liquid dish soap this appliance. Pressurized steam applied with a non-abrasive sponge could cause permanent damage to and then wipe dry with a soft cloth. -
Page 15: Lava Rocks
Cleaning and care Lava rocks Water trough ^ Let the water cool to a safe Clean the lava rocks on a regular basis. temperature to prevent burns. To do so, put the rocks in a container ^ Place a container (large enough to with mild solution of warm water and liquid dish soap. -
Page 16: Frequently Asked Questions
The overheat protection was triggered. See "Overheat protection" The fuse or breaker was tripped. Contact a qualified electrician or Miele Technical Service for assistance. What if food does not brown properly after pre-heating for 10 minutes at power level 12? The operating knob is not set precisely Correct the setting. -
Page 17: Technical Service
Technical Service In the event of a fault which you cannot easily fix yourself, please contact the Miele Technical Service Department at the address on the back of this booklet. When contacting Technical Service please quote the serial number and model of the appliance. - Page 18 Miele Service department, Extended Service Contracts offered by other providers for Miele products will not be recognized by Miele. Our goal is to prevent unauthorized (and untrained) service personnel from working on your Miele products, possibly doing further damage to them, you and/or your home.
-
Page 19: Additional Accessories
Additional Accessories Miele offers a variety of additional accessories for its appliances. All accessories can be ordered from Miele. Stainless steel and ceramic surface cleaners Help to remove soiling, lime spots, mild staining, fingerprints, etc. while maintaining the appearance of the appliance between cleanings. -
Page 21: Installation Instructions
Installation Instructions IMPORTANT: SAVE FOR THE LOCAL ELECTRICAL INSPECTOR'S USE Information is subject to change. Please refer to our website to obtain the most current product specification, technical & warranty information. To prevent accidents and appliance damage read these instructions before installation or use. -
Page 22: Important Installation Safety Instructions
IMPORTANT INSTALLATION SAFETY INSTRUCTIONS Note to the installer: You must ensure the power cable Please leave this instruction book for the appliance will not come under any mechanical strain once installed with the consumer for the local electrical inspector’s use. e.g., while the water is draining. - Page 23 IMPORTANT INSTALLATION SAFETY INSTRUCTIONS Safety distances above the appliance The minimum safety distance given by the hood manufacturer must be maintained between the electric barbecue and the hood above it. See the installation instructions of the hood for these safety measurements. If the hood manufacturers instructions are not available or if flammable objects are installed over the electric barbecue...
- Page 24 2" (50mm) 2" (50 mm) CS 1112 CS 1122 CS 1221 CS 1326 CS 1327 CS 1411 not recommended 8" (200 mm) CS 1312 CS 1322 10" (250 mm) for CS 1011 CS 1012 CS 1028 not permitted...
-
Page 25: Installation
Installation Safety distance from the wall covering If a wall covering is installed, a minimum safety distance must be maintained between the countertop cut-out and the covering, since high temperatures can damage these materials. If the covering is made of a combustible material (such as wood), the distance between the countertop cut-out and the wall covering must be a minimum of 2"... -
Page 26: Installation Dimensions Cs 1312
Installation Installation dimensions CS 1312 a Spring clips b Appliance front c Installation height d Power supply box with connection cable, L = 78 3/4" (2000 mm) e Drain valve f Rating label... -
Page 27: Installation Dimensions Cs 1322
Installation Installation dimensions CS 1322 a Spring clips b Appliance front c Installation height d Power supply box with connection cable, L = 78 3/4" (2000 mm) e Drain valve f Rating label... - Page 28 Installation Cut out If, during installation, the seal ^ Make the countertop cut-out for the around the frame does not sit flush desired number of appliances. with the countertop in the corners, Remember to maintain a minimum the corner radius, maximum "...
-
Page 29: Installation Of Multiple Appliances
Installation Installation of multiple Countertop cut-out appliances three appliances When installing more than one For the installation of three appliances combiset appliance, a support bar b the width of the countertop cut-out D is must be installed between the the sum of A and B and C. appliances. - Page 30 Installation Sample calculations for a countertop cut-out for three appliances appliance width appliance width appliance width Countertop minus 5/16" minus 5/16" cut-out (8 mm) (8 mm) 11" (280 mm) 11 5/16" (288 mm) 11" (280 mm) 33 3/8" (848 mm) 11"...
- Page 31 Installation a Spring clips b Support bars c Space between support bar and countertop d Cover The illustration represents the attachment of spring clips a and support bars b for 3 appliances. An additional support bar is required for each additional appliance. The position for attachment of an additional support bar depends on the width of appliance B.
-
Page 32: Attach The Spring Clips And Support Bars
Installation Attach the spring clips and support bars Wood or solid surface countertops ^ Place the supplied spring clips a and the support bars b at the marked positions as shown above, by laying them on the upper edge of the cut-out and then securing them with the "... - Page 33 Installation Granite countertop The screws are not needed for granite countertops. ^ Coat the side and lower edges of the spring clips between a and b with silicone. ^ Fill the space e between the support bars b and the countertop with ^ Position and attach the spring clips silicone.
- Page 34 Installation ^ Place the front edge of the next Installing the appliance(s) appliance into the cut-out. ^ Feed the power cord down through ^ Connect the appliance(s) to the main the cut-out. power supply (see "Electrical ^ Place the front edge of the appliance connection").
- Page 35 Installation After the appliance has been built in, the splash guard and protection plate(s) should be fitted. The protection plate(s) is only required if the barbecue grill is installed on its own, i.e. detached from a multiple combiset configuration or another appliance.
-
Page 36: Sealing
Installation Sealing Tiled surfaces The grouting a and shaded area under The appliance must not be permanently the appliance frame must be flat and sealed into the countertop when even so that the frame will lie evenly installed. The sealing strip under the and the sealing strip under the edge of edge of the appliance provides a the upper part of the appliance can... -
Page 37: Electrical Connection
Electrical connection Power supply CAUTION: Before installation or ^ Be sure your electrical supply servicing, disconnect the power matches the rating label. supply by either removing the fuse, shutting off the main power or The rating label is located on the manually "tripping"... -
Page 38: Help Protect Our Environment
Help protect our environment Disposal of packing materials Disposal of an old appliance The cardboard box and packing Old appliances contain materials that materials are biodegradable and can be recycled. Please contact your recyclable. Please recycle. local recycling authority about the possibility of recycling these materials. - Page 40 Alteration rights reserved / 1113 M.-Nr. 07 346 950 / 06 INFORMATION IS SUBJECT TO CHANGE. PLEASE REFER TO OUR WEBSITE TO OBTAIN THE MOST CURRENT PRODUCT SPECIFICATIONS, TECHNICAL & WARRANTY INFORMATION.