Samsung Gear VR User Manual
Hide thumbs
Also See for Gear VR:
- User manual (99 pages) ,
- Getting started (2 pages) ,
- User manual (83 pages)

Related Manuals for Samsung Gear VR


Summary of Contents for Samsung Gear VR
-
Page 1: User Manual
User Manual Please read this manual before operating your device and keep it for future reference. -
Page 2: Table Of Contents
Wearing the Gear VR ..........5 Making a Selection ..........29 Precautions ............... 6 Navigation - Home Screen ........30 Before Using the Gear VR Headset ..... 6 Navigation - App Screen ........31 About the Gear VR ..........7 Using the Universal Menu ........34 Additional Notifications ........... - Page 3 Health and Safety Information .......46 Seizures ..............46 General Instructions and Precautions ....46 Discomfort ..............48 Other Warnings ............49 Care and Maintenance .........50 Restricting Children’s Access to Your Mobile Device ............52 Additional Cautions ..........52 Other Important Safety Information ....53 Warranty Information ..........54 Standard Limited Warranty ........54...
-
Page 4: Support
Note: Mobile devices and software are constantly evolving—screen images you see here are for reference only. Note: The Gear VR and it’s connected mobile device should only be used with firmware versions that have been approved for use by the device manufacturer. -
Page 5: Read Me First
Read me first Please read this guide before using the Gear VR to ensure safe and proper use. The Gear VR is an Innovator Edition device intended specifically for developers and early adopters of technology. • Descriptions in this guide are based on the mobile device’s default settings. -
Page 6: Wearing The Gear Vr
Ensure that the lenses are not scratched and keep them clean for clear visibility. • The foam cushioning may get dirty if your face is sweating while wearing the Gear VR. Doing so may deteriorate the quality of the foam cushioning. Ensure that you keep your face clean and dry when wearing the Gear VR. -
Page 7: Precautions
Ensure that you have read the warnings below carefully before using the Gear VR to reduce the risk of personal injury, discomfort, or property damage. • The Gear VR should not be used by children under the age of 13. Watching videos or playing games with the Gear VR may affect the visual development of children. •... -
Page 8: About The Gear Vr
To prevent any injuries, take frequent breaks when using the Gear VR. • Make sure the Gear VR is level and secured comfortably on your head, and that you see a single, clear image. If you wear the Gear VR tilted to one side, you may feel discomfort. -
Page 9: Additional Notifications
• Heating The Samsung GALAXY Note 4 may become hotter than normal when used with the Gear VR since VR applications, especially if you use the devices to play games for an extended period. When the Gear VR detects a high temperature, the quality of the application may be degraded or VR applications may be terminated in order to prevent overheating. -
Page 10: Getting Started
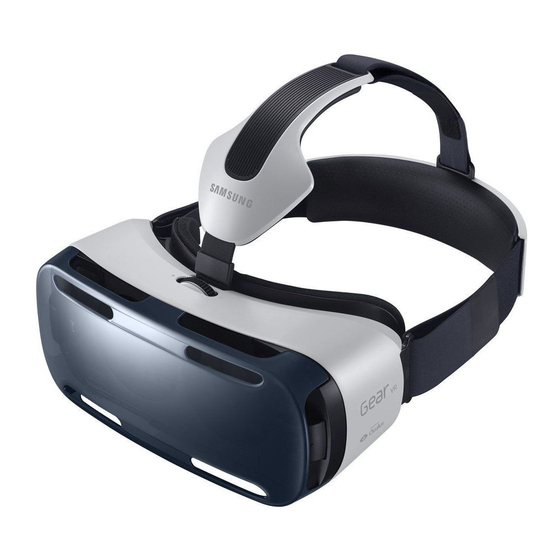
Getting Started Device Features Focus Adjustment Wheel Lens Main Head Strap Connector Phone Lock... - Page 11 Securing Slot Lenses Foam Cushioning Proximity Sensor Securing Slot...
- Page 12 Back Key Front Cover Touchpad Volume Key Note: The Gear VR does not require charging as it obtains power from the Samsung GALAXY Note 4.
-
Page 13: Function Overview
Function Overview Keys Function • Back Press to return to the previous screen. • Press and hold to access the Universal menu where you can then use features such as Camera Passthrough (to see outside the device using the mobile device’s rear camera), Reorient (to realign the viewing angle), Brightness, Do Not Disturb, and Comfort Mode options. -
Page 14: Device Installation And Set Up
Device Installation and Set Up Install the strap 1. Carefully insert the hook (from the top head strap) into the front bar of the Gear VR (1), then pull it upwards until it locks in place (2). The hook will snap once secured. - Page 15 (4). This end of the strap contains a smaller velcro strip. Note: The opposite end of this strap contains a longer velcro strip and is used to secure the top head strap to the front of the Gear VR frame.
- Page 16 Note: At this time, the Gear VR is only compatible with the Samsung GALAXY Note 4. 2. In a single motion, carefully insert the mobile device (face down) at an angle and insert the Gear VR connector (1) into the mobile device’s MicroUSB port. This process is similar to installing the mobile device into a standard charging port.
- Page 17 Note: Verify your mobile device is not on silent and volume is active. If the sound is not emitted when you insert the connector into the Samsung GALAXY Note 4, the Gear VR may not have recognized it. Reconnect the mobile device until you hear the sound.
- Page 18 Beginning the Software Installation 1. After connecting the mobile device and the Gear VR for the first time, the mobile device will notify you (via audio message) that it needs to now be removed. 2. Follow the procedures described in Initial Configuration.
- Page 19 1. Align your face and the foam cushioning and put on the Gear VR. Caution! Do not walk or drive while wearing the Gear VR. Always be aware of your surroundings while using the Gear VR to avoid injury to yourself or others.
-
Page 20: Removing The Mobile Device
Remove the mobile device from the Gear VR when you are not using it. 1. Take off the Gear VR and carefully remove the front cover. 2. Press the Phone Lock key on the left side of the Gear VR. You can now safely remove the connected mobile device. -
Page 21: Connecting A Headset
Note: You can connect a headset or a Bluetooth headset to the Samsung GALAXY Note 4 when using the Gear VR. A headset or a Bluetooth headset is not supplied with the Gear VR. For more information about connecting a Bluetooth headset, refer to the Samsung GALAXY Note 4’s user manual. -
Page 22: Replacing The Foam Cushioning
Caution! Do not stretch the replacement foam cushioning. Doing so may cause it to deform or tear. Do not use the Gear VR without the foam cushioning. Without the foam cushioning, the Gear VR may not sit properly on your face and may cause discomfort. -
Page 23: Initial Configuration
2. When a voice prompt requests for you to remove the mobile device from the Gear VR, follow the previous procedures to remove the mobile device (Removing the Mobile Device). - Page 24 Tap Browse Oculus Store to launch the Oculus Store app. When the software is installed, the Oculus Store app will appear on the All apps screen of the Samsung GALAXY Note 4 11. Carefully re-connect the mobile device back into the Gear VR. The next step checks whether or not you...
-
Page 25: Completing The Set Up Process
Gear VR. Note: If the screen appears tilted or skewed while using the Gear VR, take it off. Then, place the Gear VR on a flat surface with the lenses facing forwards and the Focus Adjustment wheel at the top. -
Page 26: Basic Navigation And Selection
Making Selections (Tapping) 1. Move your head to place the on-screen pointer atop the desired item. 2. Tap the Touchpad with your finger. Note: When you are not wearing the Gear VR, the touch pad does not work... - Page 27 Moving Around the screen (Swiping) • To move to the next item: – In a single motion, swipe forwards across the touch pad. • To move to the previous item: – In a single motion, swipe backwards across the touch pad. Swiping to next item (Forward) Swiping to previous...
- Page 28 • To move to the next item in a list: – In a single motion, swipe downwards across the touch pad. • To move to the previous item in a list Swiping to next list item Swiping to previous list item –...
-
Page 29: Moving The On-Screen Pointer
Moving the On-Screen Pointer The Gear VR recognizes your head movements and then translates that information as a location within your current screen environment. Some screens may not have a pointer available. • Moving your head around also changes the views and perspectives of the current screen. Pointer Pointer •... -
Page 30: Making A Selection
Making a Selection You can select items or apps by moving your head and then tapping the touch pad. 1. Move your head to place the on-screen pointer onto a desired on-screen selection. Pointer 2. Tap the Touchpad (on the right side of the unit). -
Page 31: Navigation - Home Screen
Screen Application Oculus Library Store Samsung Featured Content Access to different pages The Oculus Home screen is the starting point for accessing Apps, files, and features. From this Home screen you can navigate to any of the three main screens:... -
Page 32: Navigation - App Screen
• HOME screen: Provides access to the Oculus store, Samsung content, Recent apps, and Library (of apps) • STORE screen: Provides access to either All (new downloadable VR applications) or Samsung (providing Samsung Features content). Use either of the available category tabs (All/Samsung) to then swipe through the available downloads. - Page 33 Accessing Additional Application Functions 1. Navigate to the HOME screen, direct the pointer to the Store button and tap the Touchpad. 2. Select an application entry to view the Apps screen. – or – Current User Screen Ranking Comfort Application Rating Logo Launch...
- Page 34 3. This Apps screen provides both useful application information and additional related options such as: • Rating: View current user ranking for this application (1-5). • Comfort: View the current user comfort rating for this application (1-3). • Install/Launch/Play Now: Install an application that is not currently downloaded or Launch/Play the available app.
-
Page 35: Using The Universal Menu
Using the Universal Menu This menu can be accessed from within any active VR application screen and provides ready access to some very useful features. Accessing the Universal Menu 1. From within an active VR screen, press and hold the Back key. - Page 36 Notifications Charge Status Passthrough Brightness Camera Oculus Comfort Home Mode Do Not Reorient Disturb Note: These features may not be available in some apps.
- Page 37 Going to Oculus Home Back key. 1. From within an active VR screen or application, press and hold the 2. Place the pointer atop Oculus Home, to begin exiting the current app and return to the main Home screen. Using Passthrough Camera This feature activates the Note 4’s rear camera and projects it onto your screen so that you can see your surroundings while keeping the Gear VR on.
- Page 38 Reorienting the Gear VR There may be times when the viewing angle of the screen might change and not appear centered in your line of sight. Reorienting the screen “resets” the viewing angle to match your current line of sight and orientation by “resetting the forward location”.
- Page 39 To deactivate the Do Not Disturb Mode: Back key. 1. From within an active VR screen, press and hold the Do Not Disturb and tap the Touchpad to deactivate the feature. The screen 2. Place the pointer atop will display Do Not Disturb: Off. Note: Once deactivated, you will now hear new notifications such as those for new incoming calls.
- Page 40 Using Comfort Mode There might be times when you need to soften the brightness or intensity of the background blue light. This is accomplished by activating the Comfort Mode feature. To activate the Comfort Mode: 1. From within an active VR screen, press and hold the Back key.
-
Page 41: Calls
► You can reject the call, by using the pointer atop your selection and tapping the Touchpad. Caution! The Samsung GALAXY Note 4 may become hotter than normal when it is used with the Gear VR. To avoid overheating of the Samsung GALAXY Note 4, it is recommended you answer incoming calls by connecting an audio headset or by using a speakerphone to avoid overheating. -
Page 42: Viewing Notifications
While using the Gear VR, you can view general notifications, such as events, messages, and alarms when they appears as a pop-up notification on the screen. To see more notification details, review them on the Samsung GALAXY Note 4 after you separate it from the Gear VR. -
Page 43: Applications
Loading via the Store 1. Navigate to the HOME screen, direct the pointer to the Store button and tap the Touchpad. 2. Select an application type (All or Samsung). 3. Swipe through the available pages and select an application entry. -
Page 44: Uninstalling Existing Applications
Loading via the Note 4 Apps > Oculus. 1. From the Home screen, tap 2. Tap Menu and select either Library or Apps. 3. Scroll to an available application and select Install. 4. Once successfully installed, place the Note 4 securely back into the VR compartment and install the cover (Install the Mobile Device). -
Page 45: Oculus Cinema
Multiscreen: View a video downloaded from Oculus Store on a three-sided screen. • My Videos: View an available video recorded by the Samsung GALAXY Note 4. 4. Select a video and then choose an available surrounding for your movie watching experience. -
Page 46: Oculus 360 Videos
Oculus 360 Videos This application provides 360 degree views of available panoramic videos. 1. Navigate to the HOME screen, direct the pointer to the Library button and tap the Touchpad. 2. Select All and then swipe across your Touchpad until the Oculus 360 Videos app is visible. 3. -
Page 47: Health And Safety Information
Always be aware of your surroundings when using the Gear VR and remain seated at all times. Take special care to ensure that you are not near other people, objects, stairs, balconies, windows, furniture, or other items that you can bump into or knock down when using —... - Page 48 • Ease into the use of the Gear VR to allow your body to adjust; use for only a few minutes at a time at first, and only increase the amount of time using the Gear VR gradually as you grow accustomed to virtual reality.
-
Page 49: Discomfort
• Do not wear the Gear VR without a phone attached. • Do not use the Gear VR while in a moving vehicle such as a car, bus, or train, as this can increase your susceptibility to adverse symptoms. Discomfort •... -
Page 50: Other Warnings
Gear VR without first consulting your doctor or the manufacturer of your medical device. Note: The Gear VR does not come with a power adapter and receives its power from the connected mobile device. -
Page 51: Care And Maintenance
Gear VR. Care and Maintenance Your Gear VR is a product of superior design and craftsmanship and should be treated with care. The suggestions below will help you fulfill any warranty obligations and allow you to enjoy this product for many... - Page 52 – Ensure that the strap is kept clean. Caution! The factory lens protectors are pre-installed on the Gear VR. Remove the mobile device screen protector to get clear visibility. Caution! Ensure that the lenses are not scratched and keep them clean for clear visibility.
-
Page 53: Restricting Children's Access To Your Mobile Device
Keep the mobile device and all its parts and accessories out of the reach of small children. The Gear VR headset should not be used by children under the age of 13, as these children may be at increased health and safety risk. -
Page 54: Other Important Safety Information
Other Important Safety Information • When using a Gear VR in dry environments, static electricity can build up in the Gear VR and cause a small quick static electrical shock. To minimize the risk of electrostatic discharge from the Gear VR avoid using the Gear VR in extremely dry environments or touch a grounded unpainted metal object to discharge static electricity before inserting a headset. -
Page 55: Warranty Information
Warranty Information SAMSUNG TELECOMMUNICATIONS AMERICA, LLC (“SAMSUNG”) warrants that SAMSUNG’s devices and accessories (“Products”) are free from defects in material and workmanship under normal use and service. Samsung Telecommunications America, LLC 1301 E. Lookout Drive Richardson, Texas 75082 Phone: 1-800-SAMSUNG (726-7864) - Page 56 Warranty does not cover any battery if (i) the battery has been charged by a battery charger not specified or approved by SAMSUNG for charging the battery; (ii) any of the seals on the battery are broken or show evidence of tampering; or (iii) the battery has been used in equipment other than the SAMSUNG device for...
- Page 57 To obtain assistance on where to deliver the Product, please call SAMSUNG Customer Care at 1-888-987- 4357. If SAMSUNG determines that any Product is not covered by this Limited Warranty, you must pay all parts, shipping, and labor charges for the repair or return of such Product.
- Page 58 MERCHANTABILITY AND FITNESS FOR A PARTICULAR PURPOSE, ARE LIMITED TO THE DURATION OF THIS LIMITED WARRANTY. IN NO EVENT SHALL SAMSUNG BE LIABLE FOR DAMAGES IN EXCESS OF THE PURCHASE PRICE OF THE PRODUCT OR FOR, WITHOUT LIMITATION, COMMERCIAL LOSS OF ANY SORT;...
- Page 59 What is the procedure for resolving disputes? ALL DISPUTES WITH SAMSUNG ARISING IN ANY WAY FROM THIS LIMITED WARRANTY OR THE SALE, CONDITION OR PERFORMANCE OF THE PRODUCTS SHALL BE RESOLVED EXCLUSIVELY THROUGH FINAL AND BINDING ARBITRATION, AND NOT BY A COURT OR JURY.
- Page 60 $5,000.00 or less (“Small Claim”), the arbitrator may, if you prevail, award your reasonable attorney fees, expert witness fees and costs as part of any award, but may not grant SAMSUNG its attorney fees, expert witness fees or costs unless it is determined that the claim was brought in bad faith. In a Small Claim case, you shall be required to pay no more than half of the total administrative, facility and arbitrator fees, or $50.00 of such fees, whichever is less, and SAMSUNG shall pay the remainder of such fees.
- Page 61 To avoid unintended information leaks and other problems of this sort, it is recommended that the device be returned to Samsung’s Customer Care Center for an Extended File System (EFS) Clear which will eliminate all user memory and return all settings to default settings. Please contact the Samsung Customer Care Center for details.