Siemens HiPath 500 Operating Instructions Manual
Hide thumbs
Also See for HiPath 500:
- Operating instructions manual (178 pages) ,
- User manual (142 pages) ,
- Operating manual (106 pages)
Table of Contents
Quick Links
Table of Contents

Related Manuals for Siemens HiPath 500


Summary of Contents for Siemens HiPath 500
- Page 1 HiPath 500 HiPath 3000 HiPath 5000 optiPoint 600 office Operating Instructions...
-
Page 2: Before You Begin
An obligation to provide the respective characteristics shall only exist if expressly agreed in the terms of contract. The trademarks used are owned by Siemens AG or their respective owners. Never allow the telephone to come into contact with staining or aggressive liquids such as coffee, tea, juice, or soft drinks. -
Page 3: Marks
Before You Begin Marks The device conforms to the EU guideline 1999/5/EG, as attested by the CE mark. This device has been manufactured in accordance under a certified environ- mental management system (ISO 14001). This process ensures that energy consumption and the use of primary raw materials are kept to a minimum, thus reducing waste production. -
Page 4: Table Of Contents
Contents Contents Before You Begin ......2 Important Notes ......... . . 2 Marks . - Page 5 Assigning a Station Number (Not for U.S.) ..... . 37 Trunk Flash (Not in HiPath 500) ....... 38 Associated Dialing/Dialing Aid .
- Page 6 Dialing from the Internal Directory......50 Dialing from the Telephone Database (LDAP) (Not in HiPath 500) ..51 Dialing from the Personal Directory.
- Page 7 Contents Saving Station Numbers, Functions, Procedures and Appointments ....... . 66 Saving Repertory Dialing Numbers on a Key .
- Page 8 Service (Not in HiPath 500) ........96...
- Page 9 Different Displays in a HiPath 4000 Environment (Not in HiPath 500) ....... 118 Graphic Interface Applications.
- Page 10 Contents Applications in the Alternative Graphic Interface ......159 Overview ..........159 Telephone Application .
- Page 11 Contents Advanced Options for Telephone Operation ..207 Using an External Keyboard....... . . 207 External Keyboard .
-
Page 12: Basic Operating Instructions
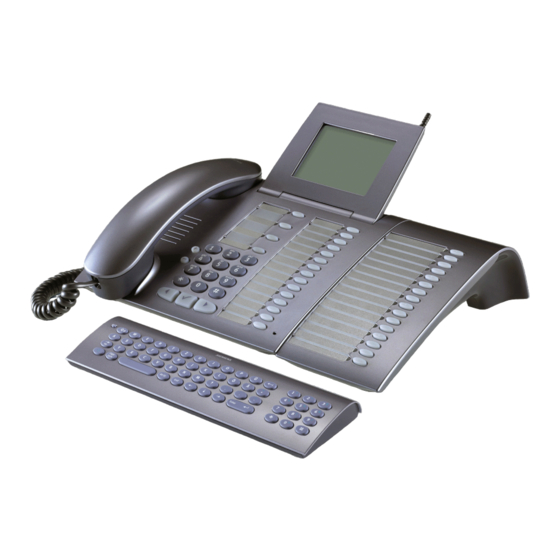
Basic Operating Instructions Basic Operating Instructions optiPoint 600 office Control Panel – Key field fixed function keys: Illuminated touchscreen display, 320 x 240 pixel Program/Service Redial Operating pen Mute or Internal Speaker LEDs – Key field Keypad freely program- mable keys Hand- Speaker for open... -
Page 13: How To Use These Operating Instructions
Basic Operating Instructions Step by Step How to Use these Operating Instruc- tions You will find a graphic representation of the steps in log- ical sequence in the left column. Below is an explana- tion of the symbols: Lift the handset. Replace the handset. -
Page 14: Screen Displays
Basic Operating Instructions Step by Step Screen Displays The graphics-enabled touchscreen display shows: • Data from the page 50internal page 48telephone directory or the caller list • Requests and acknowledgement messages, de- pending on the situation • Selection options for functions that you can confirm Please dial with . -
Page 15: With Function Keys
Frequent opera- tions, such as, initiating a conference, are much easier to perform in this way. You can use the Siemens keyboard for optiPoint 600 of- fice, any USB keyboard or else your PC’s keyboard and mouse function. -
Page 16: Display With Touchscreen Functionality
Basic Operating Instructions Step by Step Display with Touchscreen Functionality In addition to situation-dependent functions, you can also use and access local applications in optiPoint 600 office, such as, the personal telephone di- rectory, for example, via the large graphics-enabled dis- play with touchscreen functionality. -
Page 17: Different Connection Types
• Via HFA (not in HiPath 500): the optiPoint 600 office is connected to the corporate intranet by a LAN ca- ble and this network is then connected to the com- munication platform. -
Page 18: Functions You Can Use
Basic Operating Instructions Step by Step Functions You Can Use Basic and Enhanced Functions You can use all basic and enhanced communications platform functions that appear interactively on the screen, in the Program/Service menu, and when you press function keys. Additional Team and Executive/Secretary Functions page 99f. -
Page 19: Using The Telephone Efficiently
Basic Operating Instructions Step by Step Using the Telephone Efficiently • You probably have certain colleagues or external par- ties with whom you talk on the phone especially fre- quently. To dial these numbers faster and more con- veniently, you can save them on keys (Saving station numbers for repertory dialing on keys page 66). -
Page 20: Making And Answering Calls
Making and Answering Calls Step by Step Making and Answering Calls Special default ring signaling is set for your telephone: • When you receive an internal call, your telephone rings once every four seconds (single-tone se- quence). • When you receive an external call, your telephone rings twice in rapid succession every four seconds (dual-tone sequence). -
Page 21: Open Listening In The Room During A Call
Making and Answering Calls Step by Step Press the key. Release Notes on speakerphone mode: • Tell the other party that you are using speakerphone mode. • The speakerphone works best at a low receiving vol- ume. • The ideal distance between the user and the tele- phone set in speakerphone mode is about 50 cm (approx. -
Page 22: Switching To Speakerphone Mode
Making and Answering Calls Step by Step Switching to Speakerphone Mode Precondition: You are conducting a call with the hand- set. Hold down the key and replace the handset. Speaker Then release the key Continue the call. Switching to the Handset Precondition: You are engaged in a call in speaker- phone mode. -
Page 23: Preventing And Allowing Call Waiting (Automatic Camp-On)
Press the key. The LED lights up. Program/Service > Select and confirm #490=Call wait.term.off? > 490=Call wait.term.on? rhmd Enter the code for "off" or "on". qhmd [1] "Different Displays in a HiPath 4000 Environment (Not in HiPath 500)" page 118... -
Page 24: Turning The Call Waiting Tone On And Off
Accept call? If you know the number of the telephone that is ringing, enter it directly. Press the flashing key. Accepting calls in a team page 108. [1] "Different Displays in a HiPath 4000 Environment (Not in HiPath 500)" page 118... -
Page 25: Rejecting Calls
Making and Answering Calls Step by Step Rejecting Calls You can reject calls which you do not wish to take. The call is then signaled at another definable telephone (contact your service personnel). The telephone rings. The caller is displayed. Press the key. -
Page 26: Using Timed Reminders
Making and Answering Calls Step by Step Using Timed Reminders Precondition: You must have saved a timed reminder page 74. The current time is the time stored. The telephone rings. The timed reminder appears on Reminder at 15:46 the screen. Press the key twice. -
Page 27: Enabling And Disabling Handsfree Answerback
Making and Answering Calls Step by Step Enabling and Disabling Handsfree Answer- back > Select and confirm. HF answerback on? > HF answerback off? Enter the code for "on" or "off". Answering a Call with the Headset Precondition: Your telephone rings. If the "Headset"... -
Page 28: Turning Ringer Cutoff On And Off
Select and confirm. 84=Trace call? Enter the code. After you have finished tracing the call, the data is stored on the carrier’s system. Now contact your service personnel. [1] "Different Displays in a HiPath 4000 Environment (Not in HiPath 500)" page 118... -
Page 29: Turning The Microphone On And Off
Making and Answering Calls Step by Step Turning the Microphone On and Off To prevent the other party from listening in while you consult with someone in your office, you can temporari- ly switch off the handset microphone or the handsfree microphone. -
Page 30: Answering Calls From The Entrance Telephone And Opening The Door
Making and Answering Calls Step by Step Answering Calls from the Entrance Telephone and Opening the Door If an entrance telephone has been programmed, you can use your telephone to speak to someone at the en- trance telephone and to activate a door opener. If you have the proper authorization (contact your ser- vice personnel), you can activate the door opener, en- abling visitors to open the door themselves by entering... -
Page 31: Accepting A Call From An Answering Machine
Making and Answering Calls Step by Step Opening the door with a code (at the door): After ringing the bell, enter the five-digit code (using the keypad or a DTMF transmitter). Depending on how the door opener has been programmed, a doorbell call sig- nal may or may not be forwarded. -
Page 32: Display Number Of Waiting Calls And Overload Indication
Making and Answering Calls Step by Step Display Number of Waiting Calls and Overload Indication You can show the number of external waiting calls on the display by pressing the "View number of calls" key page 69. Press the "Select Option" key. If the number of waiting calls exceeds a preset limit while you are engaged in another call (overload), the LED on the key lights up. -
Page 33: Making Calls
Making Calls Step by Step Making Calls Off-Hook Dialing Lift the handset. Internal: Enter the station number. External: enter external code and station number. The called party does not answer or is busy: Replace the handset. On-Hook Dialing Internal: Enter the station number. External: enter external code and station number. -
Page 34: En-Bloc Sending/Correcting Numbers
Making Calls Step by Step En-Bloc Sending/Correcting Numbers If this feature is configured (contact your service per- sonnel), a connection is not attempted immediately when a station number is entered. This means that you can correct the number if necessary. The station number is only dialed at your specific re- quest. -
Page 35: Caller Id Suppression
Press the key. The LED lights up. Program/Service > Select and confirm 80=Speaker call? Enter the code. Enter the station number. Responding to a speaker call page 26. [1] "Different Displays in a HiPath 4000 Environment (Not in HiPath 500)" page 118... -
Page 36: Activating Tone Dialing/Dtmf Suffix-Dialing
Lift the handset. Depending on the setting, the connection is either set up immediately or only after a preset period of time (hotline after a timeout). [1] "Different Displays in a HiPath 4000 Environment (Not in HiPath 500)" page 118... -
Page 37: Reserve Trunk
Press the key. The LED lights up. Program/Service > Select and confirm 41=Temporary MSN? Enter the code. Enter the DID number you wish to use. Dial the external number. [1] "Different Displays in a HiPath 4000 Environment (Not in HiPath 500)" page 118... -
Page 38: Trunk Flash (Not In Hipath 500)
Making Calls Step by Step Trunk Flash (Not in HiPath 500) To activate ISDN-type services and features (such as, "consultation hold") through the network carrier’s analog trunks or those of other communication platforms, you must send a signal to the trunks before dialing the ser- vice code or telephone number. -
Page 39: Associated Dialing/Dialing Aid
Making Calls Step by Step Associated Dialing/Dialing Aid If this function has been configured (contact your ser- vice personnel), you can use a dialing aid to dial num- bers and set up calls for your telephone. The operating procedure depends on whether the dial- ing aid is connected to the S bus or the a/b (T/R) port. -
Page 40: Calling Multiple Parties
Calling Multiple Parties Simultaneously Step by Step Calling Multiple Parties Simultaneously Calling a Second Party (Consultation Hold) You can call a second party while engaged in a call. The first party is placed on hold. Confirm. Enquiry? Call the second party. Return to the first party: Confirm. -
Page 41: Conducting A Conference
Calling Multiple Parties Simultaneously Step by Step Conducting a Conference In a conference call, you can talk to as many as four oth- er parties at the same time. These may be internal or external users. Call the first party. >... -
Page 42: Checking Which Parties Are In The Conference (Initiator Only)
Press the key. The LED lights up. Enter the code. The Program/Service LED goes out. Removing the ISDN Central Office Party From the Conference (Only for U.S., Not in HiPath 500) > Select and confirm. Drop last conf. party? Press the key. The LED lights up. Enter the code. The... -
Page 43: Transferring A Call
Enter the group’s station number. Announce the call. When a member of the group accepts the call page 26, you are connected to this party. Replace the handset. [1] "Different Displays in a HiPath 4000 Environment (Not in HiPath 500)" page 118... - Page 44 Select and confirm Transfer? If the connection between the two other parties is not established within 45 seconds, the call from the first party returns to you (recall). [1] "Different Displays in a HiPath 4000 Environment (Not in HiPath 500)" page 118...
-
Page 45: Parking A Call
If a parked call is not picked up, after a specific period of time the call is returned to the tele- phone from where it was parked (recall). [1] "Different Displays in a HiPath 4000 Environment (Not in HiPath 500)" page 118... -
Page 46: Placing External Calls On Hold
Calling Multiple Parties Simultaneously Step by Step Placing External Calls on Hold If you have programmed a key on your telephone as a hold key page 69, you can place external calls on hold. This enables all other parties to retrieve the call on the assigned line. -
Page 47: Making Calls To Stored Destinations
Making Calls to Stored Destinations Step by Step Making Calls to Stored Destina- tions Redialing a Number The last three external telephone numbers dialed are stored automatically. You can redial them simply by pressing a key. The station number appears on your screen for two sec- onds and is then dialed. -
Page 48: Using A Caller List
Scroll to move to the next or previous entry. Ending a retrieve operation > Select and confirm. End? Press the key. The LED goes out. Program/Service Press the key. The LED goes out. Speaker [1] "Different Displays in a HiPath 4000 Environment (Not in HiPath 500)" page 118... -
Page 49: Checking The Call Time/Additional Call Information
Making Calls to Stored Destinations Step by Step Checking the Call Time/Additional Call Infor- mation Precondition: You have retrieved the caller list, the call you want is displayed. > Select and confirm. Add’l information? Press the key. Page Dialing a Station Number from the Caller List Precondition: You have retrieved the caller list, the call you want is displayed. -
Page 50: Dialing From The Internal Directory
Making Calls to Stored Destinations Step by Step Dialing from the Internal Directory If this function has been configured (ask the service per- sonnel), all internal station numbers and central speed- dial numbers for which a name was assigned are stored in your internal directory. -
Page 51: Dialing From The Telephone Database (Ldap) (Not In Hipath 500)
Making Calls to Stored Destinations Step by Step Dialing from the Telephone Database (LDAP) (Not in HiPath 500) If configured (ask your service personnel), you can search for directory data in the LDAP database and dial the number of any subscriber you find there. - Page 52 Making Calls to Stored Destinations Step by Step If applicable If configured (ask your service personnel), you can also search for surname and first name. To separate sur- name and first name by a space, enter "0". You can en- ter incomplete names, e.g.
- Page 53 Making Calls to Stored Destinations Step by Step In this case it is advisable to narrow down the search so that all corresponding names can be displayed. Confirm, to view the incomplete list. Show results? For further procedure, see above. or Narrow the search down.
-
Page 54: Dialing From The Personal Directory
Making Calls to Stored Destinations Step by Step Dialing from the Personal Directory An external keyboard is required for this proce- dure. For a detailed description (for users without ex- ternal keyboard), see page 122 and page 165. For more information on using an external key- board, see page 207. -
Page 55: Using Repertory Dialing Keys
If this feature is configured, a suffix is automatically di- aled (for example, "0" for the exchange) if no entries are made within 4 or 5 seconds. [1] "Different Displays in a HiPath 4000 Environment (Not in HiPath 500)" page 118... -
Page 56: Displaying And Assigning Call Charges
Five seconds later, the total accumulated connection charges appear. Press the key. The LED lights up. Program/Service > Select and confirm 65=Show call charges? Enter the code. [1] "Different Displays in a HiPath 4000 Environment (Not in HiPath 500)" page 118... -
Page 57: Displaying Call Charges For Another Telephone (Not For U.s.)
Displaying and Assigning Call Charges Step by Step Displaying Call Charges for Another Telephone (Not for U.S.) If this function is configured (contact your service per- sonnel), you can display and print the chargeable calls for other telephones (such as, a pay phone). Precondition: You have programmed the function "View call charges"... -
Page 58: Dialing With Call Charge Assignment
May be necessary, depending on how your system is configured; contact your service personnel for details. Enter the number of the external station. You can also enter the account code during an external call. [1] "Different Displays in a HiPath 4000 Environment (Not in HiPath 500)" page 118... -
Page 59: If You Cannot Reach A Destination
Checking and Canceling a Saved Callback > Select and confirm View callbacks? Enter the code. > Select and confirm the displayed function to display ad- Display next? ditional entries. [1] "Different Displays in a HiPath 4000 Environment (Not in HiPath 500)" page 118... -
Page 60: Call Waiting (Camp-On)
If You Cannot Reach a Destination ... Step by Step Deleting a displayed entry: Confirm. Delete? Ending callback display: > Select and confirm. End? Press the key. The LED goes out. Program/Service Press the key. The LED goes out. Speaker Call Waiting (Camp-On) Precondition: You have dialed an internal number and hear a busy signal. -
Page 61: Busy Override - Joining A Call In Progress
If You Cannot Reach a Destination ... Step by Step Busy Override - Joining a Call in Progress This function is only available if it has been configured. (contact your service personnel). Precondition: You have dialed an internal number and hear a busy signal. -
Page 62: Telephone Settings
Telephone Settings Step by Step Telephone Settings For information on other settings for optiPoint 600 office, see page 149. Adjusting the Ring Volume Press one of these keys while the phone is idle. Confirm. Ringer volume? Raise or lower the volume. Keep pressing the keys until the desired volume is set. -
Page 63: Adjusting The Speakerphone To The Room Acoustics
Telephone Settings Step by Step Adjusting the Speakerphone to the Room Acoustics To help the other party understand you clearly while you are talking into the microphone, you can adjust the tele- phone to the acoustics in your environment: "Quiet room", "Normal room"... -
Page 64: Locking The Telephone To Prevent Unauthorized Use
Telephone Settings Step by Step Locking the Telephone to Prevent Un- authorized Use You can prevent unauthorized persons from using your telephone and its electronic notebook during your ab- sence. Precondition: You must have configured a personal identification number (PIN) for your telephone page 65. -
Page 65: Saving Your Pin
Enter the new PIN. Repeat the new PIN. If you forget your PIN, contact your service per- sonnel, who can reset your PIN to "00000". [1] "Different Displays in a HiPath 4000 Environment (Not in HiPath 500)" page 118... -
Page 66: Saving Station Numbers, Functions, Procedures And Appointments
Saving Station Numbers, Functions, Procedures and Appointments Step by Step Saving Station Numbers, Func- tions, Procedures and Appoint- ments You can save a frequently-dialed number, or frequently- used functions/procedures (comprising several operat- ing steps) to any free key on your telephone or add-on device. - Page 67 Saving Station Numbers, Functions, Procedures and Appointments Step by Step The system telephone automatically recognizes if you want to save an internal or an external station number. The options "Save without LED" or "Save with LED" are only available for internal station numbers. Confirm.
-
Page 68: Storing Station Speed-Dial Numbers
Select and confirm. This deletes all digits entered. Previous? Confirm. Next entry? > Select and confirm. Change entry? > Select and confirm. Delete? > Select and confirm. [1] "Different Displays in a HiPath 4000 Environment (Not in HiPath 500)" page 118... -
Page 69: Assigning Functions To Keys
Saving Station Numbers, Functions, Procedures and Appointments Step by Step Assigning Functions to Keys Press the key. The LED lights up. Program/Service > Select and confirm. 91=Prog. feature key? Enter the code. Press the key. If the relevant key is already pro- grammed, the programmed function appears on the screen. - Page 70 UK: Hunt group join/leave, Caller ID suppression, Call wait.term., Camp on tone OFF, Ring Transfer, Door opener on/off, Control Relay (not in HiPath 500), Ringing group on, Shift Key, UCD (Available on/off, Work on/off, Night answer on/off): Saved function is not active.
- Page 71 Temporary Phone, Override, Call Park, Pickup - di- rected, Pickup - group, Account code, Show call charg- es, Page (not in HiPath 500), Answer page, Timed re- minder, Open door, DTMF dialing, Recall-key, Room monitor, Hold key, Enquiry, Associated dial, Associated serv., Tel.
-
Page 72: Assigning A Procedure (Operating Steps) To A Key
Saving Station Numbers, Functions, Procedures and Appointments Step by Step Assigning a Procedure (Operating Steps) to a Key Station numbers and functions which require additional inputs, i.e. comprise several operating steps, can be saved to a single key on your telephone. Using the associated dial function, for example page 39, you can save all the remaining inputs re- quired (station number of the calling party + the station... - Page 73 Saving Station Numbers, Functions, Procedures and Appointments Step by Step Select the stored procedure by pressing a key. Procedures containing functions which can be switched on/off can be activated by pressing the key, and deactivated by pressing the same key again.
-
Page 74: Saving Appointments
Saving Station Numbers, Functions, Procedures and Appointments Step by Step Saving Appointments You can tell your telephone to give you a call when you want to be reminded of an appointment page 26. To do this, you need to save the time you want the call to be made. -
Page 75: Testing The Telephone
Testing the Telephone Step by Step Testing the Telephone Testing the Telephone Functions You can test your telephone functions. Precondition: Your telephone is idle. Press the key. The LED lights up. Program/Service > Select and confirm. 940=Phone test? qmhd Enter the code. If everything is OK, •... -
Page 76: Call Forwarding
Call Forwarding Step by Step Call Forwarding Using Variable Call Forwarding You can immediately forward internal or external calls to different internal or external telephones (destinations). (External destinations require special configuration in the system.) Special features must be taken into consider- ation if your telephone operates with HiPath 5000 (system networking via PC net- work) -
Page 77: Using Call Forwarding No Reply (Cfnr)
Call Forwarding Step by Step When call forwarding is active, a special dial tone sounds when you lift the handset. If DID DTMF is active (contact your service per- sonnel), you can also forward calls to this desti- nation. Destinations: fax = 870, DID = 871, fax DID = 872. -
Page 78: Using Night Answer
Call Forwarding Step by Step Using Night Answer If appropriately authorized, you can activate night an- swer mode to forward all external calls straight to a spe- cific internal telephone (night station), for example, dur- ing your lunch break or after office hours. The night station can be defined by the service personnel (default night answer service) or by you (temporary night answer service). -
Page 79: Call Forwarding In The Carrier Network And Forwarding Multiple Subscriber Numbers (Msn) (Not For U.s.)
Call Forwarding Step by Step Call Forwarding in the Carrier Network and Forwarding Multiple Subscriber Numbers (MSN) (Not for U.S.) If this function has been configured (contact your ser- vice personnel), you can forward calls to your assigned multiple subscriber number (MSN) (DID number) direct- ly within the carrier network. -
Page 80: Call Forwarding In The Event Of A Telephone Malfunction
Call Forwarding Step by Step Call Forwarding in the Event of a Tele- phone Malfunction Only for HFA connections (ask the service per- sonnel). If this feature is configured (ask the service personnel), you can define an internal or external call forwarding destination that becomes effective when your tele- phone is not working. - Page 81 Call Forwarding Step by Step Change the station number of the destination. Confirm. US: Save entry? UK: Save?
-
Page 82: Using Other Functions
Using Other Functions Step by Step Using Other Functions Sending a Message You can send short text messages (infotexts) to single users or groups of users who have system telephones. On system telephones with no display (for example, optiPoint 500 entry), on ISDN, pulse or tone dialing tele- phones, transmitted text messages will be saved as a callback request. -
Page 83: Deleting/Displaying The Message Sent
Using Other Functions Step by Step Deleting/Displaying the Message Sent > Select and confirm. View sent message? Enter the code. > Follow the display prompts. Texts sent to groups can be deleted only by the originator. Answering Messages "Messages received:" appears on your screen, along with an indication of the length. -
Page 84: Leaving An Advisory Message
Using Other Functions Step by Step Leaving an Advisory Message You can leave an advisory message on your telephone screen for internal callers who want to reach you while you are away from your desk. When another party calls you, the message appears on the caller’s screen. -
Page 85: Using Another Telephone Like Your Own For A Call
Dial the external number. This state is canceled at the end of the call. [1] "Different Displays in a HiPath 4000 Environment (Not in HiPath 500)" page 118... -
Page 86: (Mobility)
Using Other Functions Step by Step Using Another Telephone Like Your Own for an Extended Period of Time (Mobility) Only for HFA connections (ask the service per- sonnel). For U connections, see page 87. P0/E If this feature is configured, you can use a random as your own telephone. -
Page 87: Change Station Number (Relocate)
Using Other Functions Step by Step Change station number (Relocate) Only for U connections (ask the service per- P0/E sonnel). For HFA connections, see page 86. You can put your station number on every other avail- able telephone when it is set up (ask the service per- sonnel). -
Page 88: Moving With An Hfa Connection
Using Other Functions Step by Step Moving with an HFA connection You can connect your telephone to any other LAN con- nection within a subnet (ask your system administrator) and can make and receive calls immediately. Fax Details and Message on Answer- ing Machine If a fax or answering machine is connected to your sys- tem and you have assigned the "Fax details"... -
Page 89: Resetting Services And Functions (System-Wide Cancellation For A Telephone)
Enter the code. Enter the internal station number. [1] "Different Displays in a HiPath 4000 Environment (Not in HiPath 500)" page 118... -
Page 90: Monitoring A Room
Using Other Functions Step by Step Monitoring a Room A telephone can be used to monitor a room. The func- tion must be activated on the telephone that you want to monitor. Calling this telephone lets you hear what is going on in the room. -
Page 91: Activating Functions For Another Telephone
Using Other Functions Step by Step Activating Functions for Another Tele- phone This feature is also known as associated service. • Do not disturb, code: 97/#97 page 27 • Call forwarding, code 13/#1 page 76 • Locking and unlocking telephone, code: 66/#66 page 64... -
Page 92: Locking Another Telephone To Prevent Unauthorized Use
Enter the code. Enter the internal number of the telephones that you want to lock or unlock. Confirm. *=lock phone? #=unlock phone? Enter the code. [1] "Different Displays in a HiPath 4000 Environment (Not in HiPath 500)" page 118... -
Page 93: Using System Functions From The Outside (Disa: Direct Inward System Access)
Using Other Functions Step by Step Using System Functions from the Outside (DISA: Direct Inward System Access) If this function has been configured (contact your ser- vice personnel), you can set up external outgoing calls from outside the system, just like an internal user. You can also activate and deactivate the following functions in your system: •... - Page 94 Using Other Functions Step by Step Wait for a dial tone and then enter the code, such as, 97 , for "Do not disturb on". Make other inputs as nec- essary; (refer to the operating instructions for pulse and DTMF telephones). Dial the external number.
-
Page 95: Using Functions In Isdn Via Code Dialing (Keypad Dialing)
Contact your network provider to find out which ISDN functions can be code-controlled in your country. Siemens AG shall not be liable for damages/ costs which may be incurred by fraudulent activ- ities or remote operation (for example, toll fraud). -
Page 96: Controlling Connected Computers Or Other Programs And Telephone Data
Step by Step Controlling Connected Computers or Other Programs and Telephone Data Ser- vice (Not in HiPath 500) If this function has been configured (contact your ser- vice personnel), you can control connected computers or programs running on them, such as hotel services or information systems, from your telephone. -
Page 97: Controlling Relays (Not In Hipath 500)
Using Other Functions Step by Step Controlling Relays (Not in HiPath 500) If this function has been configured (contact your ser- vice personnel), you can turn up to four relays on and off to control different facilities (such as a door opener). -
Page 98: Simple Paging Equipment
Using Other Functions Step by Step Simple Paging Equipment Paging: To be paged, you must have activated a call ringing group page 109, call forwarding page 76, or call re- direction (ask the service personnel) to the internal sta- tion number of your paging equipment. A call request is then signaled automatically. -
Page 99: Team And Executive/Secretary Functions With
Team and Executive/Secretary Functions with Trunk Keys Step by Step Team and Executive/Secretary Functions with Trunk Keys If this function has been configured (contact your ser- vice personnel), you belong to a team of users for whom special keys were programmed: •... -
Page 100: Answering Calls With Trunk Keys
Team and Executive/Secretary Functions with Trunk Keys Step by Step Answering Calls with Trunk Keys Precondition: Your telephone is ringing and/or the trunk key is flashing rapidly. if necessary Press the rapidly flashing trunk key. This is not necessary if the trunk is automatically as- signed to you when you lift the handset or press the "Loudspeaker"... -
Page 101: Switching Between Phone Calls On Multiple Trunks
Team and Executive/Secretary Functions with Trunk Keys Step by Step Retrieving the call: Press the slowly flashing trunk key. Switching Between Phone Calls on Multiple Trunks Precondition: You are conducting a call over a trunk in your group. Another trunk key starts flashing. Press the flashing trunk key. - Page 102 Team and Executive/Secretary Functions with Trunk Keys Step by Step > 2=external calls only? > 3=internal calls only? Enter the code. Enter the destination number. Confirm. US: Save entry? UK: Save? If available. Press the "Forward Line Key" key. (You have stored the call forwarding type and destination on the "Forward Line Key"...
-
Page 103: Using Dss Keys
Team and Executive/Secretary Functions with Trunk Keys Step by Step Using DSS Keys Each team member has a DSS key for every other member in the team. This enables every team member to reach all other members of the team directly, simply by pressing a key. meaning of LED indications;... -
Page 104: Transferring A Call In Progress
Team and Executive/Secretary Functions with Trunk Keys Step by Step Transferring a Call in Progress Press the DSS key and announce the call, if desired. Replace the handset or press the key. Release Accepting a Call for Another Team Member Press the flashing DSS key or trunk key. -
Page 105: Transferring Calls Directly To The Executive (Only In An Executive/Secretary Group)
Team and Executive/Secretary Functions with Trunk Keys Step by Step Transferring Calls Directly to the Executive (Only in an Executive/ Secretary Group) Normally, audible signaling of all calls for the executive is heard only in the secretary’s office. You can activate audible signaling so that calls are only signaled on the executive telephone and on a second telephone assigned to it. -
Page 106: Using Other Team Functions
Using Other Team Functions Step by Step Using Other Team Functions Turning Group Call On and Off If this function has been configured (contact your ser- vice personnel), you belong to one or more user groups that can all be reached at a hunt group or group station number. - Page 107 This turns off the audible tone for the displayed group or trunk. > Select and confirm Join hunt group? This turns off the audible tone for the displayed group or trunk.or [1] "Different Displays in a HiPath 4000 Environment (Not in HiPath 500)" page 118...
-
Page 108: Accepting A Call For Another Member Of Your Team
Confirm. Pickup - group? Press the key. The LED lights up. Program/Service Enter the code. [1] "Different Displays in a HiPath 4000 Environment (Not in HiPath 500)" page 118... -
Page 109: Activating And Deactivating A Ringing Group
(lower line) station number or name are dis- played. Removing all telephones in call ringing group: > Select and confirm. Ringing group off? Enter the code. [1] "Different Displays in a HiPath 4000 Environment (Not in HiPath 500)" page 118... -
Page 110: Uniform Call Distribution (Ucd)
Press the key. The LED lights up. Program/Service > Select and confirm. UCD? > Confirm. #402=Not available? 402=Available? qhdf Enter the code for "Not available" or "Available". rhdf [1] "Different Displays in a HiPath 4000 Environment (Not in HiPath 500)" page 118... - Page 111 Using Other Team Functions Step by Step Requesting and activating a work time: If you want to follow-up on the last call you answered without being disturbed, you can request and activate a work time. This removes your telephone from the call distribution cycle for a programmable period of time un- til you log back on.
-
Page 112: Special Lan-Based Functions
Special LAN-Based Functions (Not in HiPath 500) Step by Step Special LAN-Based Functions (Not in HiPath 500) If your telephone is operating in a HiPath 5000HiPath 3000 environment, multiple are interconnected via a LAN (Local Area Network, e.g. pro- prietary PC network). Your telephone calls are conduct- ed via the LAN (PC network). -
Page 113: Transferring Call Forwarding
Special LAN-Based Functions (Not in HiPath 500) Step by Step Transferring Call Forwarding You can activate/deactivate call forwarding HiPath 5000 for your telephone from other page 76 telephones. > Select and confirm. DISA internal? Enter the code. Enter the (DISA) station number of the HiPath 3000 to which your telephone is connected. -
Page 114: Using Night Answer
Special LAN-Based Functions (Not in HiPath 500) Step by Step Using Night Answer If authorized (contact your service personnel), you can define telephones in other HiPath 3000 communica- tions platforms as the night answer page 78. > Select and confirm. -
Page 115: Activating And Deactivating A Ringing Group
Special LAN-Based Functions (Not in HiPath 500) Step by Step Activating and Deactivating a Ringing Group You can have calls for your telephone signaled audibly at external telephones or at telephones in other HiPath 3000 communications platforms page 109. Saving, displaying, and deleting telephones for the ringing group: Press the key. -
Page 116: Controlling Relays
Special LAN-Based Functions (Not in HiPath 500) Step by Step Controlling Relays If this feature is configured (contact your service person- nel), you can also control relays page 97 in other HiPath 3000communications platforms. > Select and confirm. DISA internal? Enter the code. -
Page 117: Opening The Door
Special LAN-Based Functions (Not in HiPath 500) Step by Step Opening the Door If this feature is configured (contact your service personnel), you can also activate the door opener page 30 in otherHiPath 3000 communication plat- forms. > Select and confirm. - Page 118 Different Displays in a HiPath 4000 Environment (Not in HiPath 500) Step by Step Different Displays in a HiPath 4000 Environment (Not in HiPath 500) Depending on the system configuration, not all func- tions may appear on the display exactly as shown in this document.
- Page 119 Different Displays in a HiPath 4000 Environment (Not in HiPath 500) Step by Step Menu Function Description More features? DTMF dialing? page 36 Speaker call? page 35 Retrieve call? page 45 Pickup - directed? page 24 Account code? page 58...
-
Page 120: Graphic Interface Applications
Graphic Interface Applications Step by Step Graphic Interface Applications Display Menu A number of functions can be activated in the lower field of the display. Phone Personal Telephone Additional application applications Menu key Status information Touchscreen keypad The Telephone application provides situation-specific information from the communication platform on the idle or talk state of your optiPoint 600 office page 14. - Page 121 Graphic Interface Applications Step by Step Configuring the applications Corporate, Web access and Programs requires additional knowl- edge not covered in this manual. For any ques- tions, please consult your service personnel. The Menu key opens the menu for selecting one of the other applications and creating the softkey for quick ac- cess to other applications.
-
Page 122: Personal Directory
Graphic Interface Applications Step by Step Personal Directory Dialing from the Personal Directory The optiPoint 600 office function in your Personal Direc- tory application enables you to save telephone numbers and further information about other parties, e.g. addresses and fax numbers of calling parties. Three different station numbers and four additional in- formation items can be entered for each name/entry. -
Page 123: Creating A New Entry
Graphic Interface Applications Step by Step Creating a New Entry Click the tab. Personal The personal directory opens. Click the softkey. Editor If the "Editor" softkey does not appear, press "Cancel", "Menu" or "Exit" until the softkey is dis- played. if necessary Enter the password (default password: 123456) and confirm with "OK"... - Page 124 Graphic Interface Applications Step by Step On page 1 you can enter a name and up to three tele- phone numbers, on page 2 you can enter any additional information such as company and department names. • "Name" is the only field that may not be left empty. You can enter any combination of letters, numbers and symbols in this field •...
-
Page 125: Selecting/Finding An Entry To Be Modified Or Deleted
Graphic Interface Applications Step by Step Selecting/Finding an Entry to be Modified or Deleted Precondition: The personal directory contains entries/ names with station numbers page 123. Click the tab. Personal The personal directory opens. Click the softkey. Editor If the "Editor" softkey does not appear, press "Cancel", "Menu"... - Page 126 Graphic Interface Applications Step by Step Mark the name you want. A scroll bar is displayed if more than six names are saved. You can browse the list by dragging the scroll bar. Enter the name you want or just the initial letters in the "Search by name:"...
-
Page 127: Editing/Deleting/Changing An Entry
Precondition: You have marked an entry/name and clicked the "Edit" softkey page 54 or page 125. The name is displayed with all additional information: Edit directory entry Selected entry is: Sanders, Thomas Siemens Werk Süd Dept. Manager 08912345678 Cancel Editor Delete Change... - Page 128 Graphic Interface Applications Step by Step Changing an entry Click on the softkey. Change The first page of the two-page "Change directory entry" in- put form appears. Change directory entry 1 of 2 Name Sanders, Thomas Office: Default 089-012345678 Mobile 0170-701071170 Private 089-876543210...
- Page 129 Graphic Interface Applications Step by Step The following softkeys are available: Cancel the display. If you have made any changes, con- Cancel firmation will be requested. The display changes to the directory list page 54 or the search list page 125. Cancel the display.
-
Page 130: Displaying An Entry
Graphic Interface Applications Step by Step Displaying an Entry Precondition: You have marked an entry/name and clicked the "Details" softkey page 54. The first page of the two-page "Directory entry details" appears showing detailed information. Directory entry details 1 of 2 Name Sanders, Thomas Office:... -
Page 131: Displaying The Number Of Existing Entries
Graphic Interface Applications Step by Step Displaying the Number of Existing Entries Click the tab. Personal The personal directory opens. Click the softkey. Editor If the "Editor" softkey does not appear, press "Cancel", "Menu" or "Exit" until the softkey is dis- played. -
Page 132: Importing Or Exporting A Personal Directory Via Usb
The "ENB Update Tool" program and a detailed description of how to transfer data can be down- loaded from the Internet page www.siemens.de/hipath. [1] USB cable part number: S30267-Z360-A30-1, the necessary USB driver (included in the "CallBridge TU" program) is available at the following Internet address:... -
Page 133: Importing/Exporting The Personal Directory Via Lan
Graphic Interface Applications Step by Step Importing/Exporting the Personal Directory via LAN You can transfer all personal directory entries from a server in your LAN to your optiPoint 600 office and use your to save these entries on the LAN server. Precondition: LAN-based transmission must have been configured correctly page 134. - Page 134 Graphic Interface Applications Step by Step Settings for data transfer via LAN Incorrect settings for the transfer of data via LAN will cause problems when importing and export- ing personal directory data page 132! Click the tab. Service Click on the "Personal options" menu item or enter the code.
-
Page 135: Changing Captions
Graphic Interface Applications Step by Step Changing Captions You can change the captions, such as, "Name" or "Mo- bile" that designate the details of a directory entry page 130. Click the tab. Service Click on the "Personal options" menu item or enter the code. - Page 136 Graphic Interface Applications Step by Step The following softkeys are available: Cancel the display. If you have made any changes, con- Cancel firmation will be requested. The display changes to the "Personal directory options" menu. Save changes to data (page 1 and 2 of the form). This Save softkey is only available if changes have actually been made.
-
Page 137: Corporate Directory
Graphic Interface Applications Step by Step Corporate Directory The "Corporate directory" application’s start display fea- tures a search mask which provides a simple and user- friendly means of finding entries in your corporate direc- tory and dialing them directly. Precondition: You can access a corporate directory via LAN;... -
Page 138: Advanced Search
Graphic Interface Applications Step by Step Advanced Search In comparison to the fast search page 137, the ad- vanced search provides options for searching on the ba- sis of additional corporate directory fields ( max. 5). Click the tab. Corporate The corporate directory opens. - Page 139 Graphic Interface Applications Step by Step The following softkeys are available: Cancel the display. Cancel The display changes to fast search page 137. Delete the texts in the input fields (apart from the de- Clear fault entries "*"). Start the advanced search page 138.
- Page 140 Graphic Interface Applications Step by Step Display detailed information on an entry that supports Details station number dialing page 140. Displaying an entry Precondition: You have marked an entry/name and clicked on the "Details" softkey page 54 or page 140. The first page of the two-page "Corporate directory"...
-
Page 141: Wap Browser
Graphic Interface Applications Step by Step WAP Browser The "Web access" application provides access to infor- mation on the corporate intranet. Precondition: You can access corporate WAP via LAN. If you have any questions regarding availability, please contact the responsible experts. The WAP browser can be password-protected on your optiPoint 600 office. - Page 142 Graphic Interface Applications Step by Step Your WAP browser can be configured in a way that the browser shows continually changing WAP pages ("WAP-Push"). Address any questions about WAP-Push to your service personnel. WAP browser Options menu The following functions can be performed on every WAP page via the WAP browser’s Options menu (ex- ample): PreviousBack...
-
Page 143: Using Java Midlets
Graphic Interface Applications Step by Step Using Java Midlets Java midlets are small programs that are executed local- ly in the optiPoint 600 office and which serve to provide different functions. These may include applications with notepad, calculator or phone directory functions, for example. General operation of the "... - Page 144 Graphic Interface Applications Step by Step Properties display Information such as file size, version, etc., which is of- Details fered for every midlet, is displayed. To cancel the dis- play, press the "Cancel" softkey. Deleting a midlet The selected midlet is permanently deleted from the Delete memory of the optiPoint 600 office without requesting confirmation.
-
Page 145: Sample Application: Speed Dial List
Graphic Interface Applications Step by Step Sample Application: Speed Dial List Installed in your optiPoint 600 office is an example ap- plication for creating and selecting speed dial entries (if not, please ask your service personnel). The midlet shown here can deviate from the ver- sion installed on your optiPoint 600 office. - Page 146 Graphic Interface Applications Step by Step Creating/changing an entry First you will see the following display with all speed dial fields empty. Speed Dial Applet 1 of 5 empty empty empty empty empty empty empty empty Previous Next Exit Edit Back to menu Phone Ext.
- Page 147 Graphic Interface Applications Step by Step Enter the name to be displayed for this number (max. 11 digits; for information on entering characters page 157). Enter a dialable number which you wish to be able to call using the speed dial key and confirm. Save the entry.
- Page 148 Graphic Interface Applications Step by Step Import an entry from the Personal directory Precondition: There are already entries in your Person- al directory page 123. Start the "SpeedDialApplet" midlet page 145 and ac- tivate the Edit Mode. Select any field to import an entry and select "Import empty Entry from ENB"...
-
Page 149: Local Settings
Graphic Interface Applications Step by Step Local Settings Besides options for personal directory settings (Service onwards), the " page 131" application features op- tions for making optiPoint 600 office-specific settings. For other telephone settings, please see page 62. Adjusting the Display Contrast You can adjust the display contrast to any of nine levels to suit your individual lighting conditions. -
Page 150: Calibrating The Touchscreen
Graphic Interface Applications Step by Step Calibrating the Touchscreen By calibrating the touchscreen of your optiPoint 600 office you can customize the dimension- ing and alignment between your input and the image on the display. This helps to eliminate problems in opera- tion such as, those caused by parallax. -
Page 151: Selecting Your Operating Language
Graphic Interface Applications Step by Step Selecting your Operating Language You can change the language of the menus and text out- put in local applications. The following languages can be selected (language group A): • UK English • US English •... -
Page 152: Selecting A Language For The External Keyboard
Graphic Interface Applications Step by Step Selecting a Language for the External Key- board Your optiPoint 600 office tries to automatically detect the language type used by the external keyboard con- nected via USB page 207. If this is not possible, you can set the keyboard language manually. -
Page 153: Setting A Password For Personal Options
Graphic Interface Applications Step by Step Setting a Password for Personal Options You can change or delete the default password for ac- cessing the "Personal options" areas and the directory editor. If a password is not set, password-protection is not en- abled for these areas. -
Page 154: Setting Web Access Parameters
Graphic Interface Applications Step by Step Setting Web Access Parameters If WAP server access is password-protected, you must enter the access data here. Click the tab. Service Click on the "Personal options" menu item or enter the code. if necessary Enter the password (default password: 123456) and click "OK". -
Page 155: Setting Dialing Rules
Graphic Interface Applications Step by Step Setting Dialing Rules The station numbers in your corporate directory page 137 are available in the internationally-standard- ized canonical format. In order for optiPoint 600 office to be able to dial these numbers correctly, the dialing rules (conversion information) must be defined. -
Page 156: Graphic Interface Touchscreen Keypad
Graphic Interface Applications Step by Step Graphic Interface Touchscreen Keypad You can enter text, digits, and symbols in graphic inter- face in any of the following ways: – • via an external keyboard connected via the USB in- terface (recommended) page 207. - Page 157 Graphic Interface Applications Step by Step Switch to diacritical marks. The option for entering characters, such as, "è", is active when the relevant softkeys appear on the touchscreen (for example, "e" is displayed as "è") and by the inversion of the switching softkey (softkey is black). In addition to the alphabetical softkeys, the following softkeys are available: Shift to upper case.
-
Page 158: Applications In The Alternative
Applications in the Alternative Graphic Interface Step by Step Applications in the Alternative Graphic Interface This interface is available with the HFA connec- tion type and after updating the telephone soft- ware (consult your service personnel). This primary difference between the alternative inter- face and the standard interface page 120 is the graphic display. -
Page 159: Telephone Application
Step by Step Telephone Application When you pick up the handset to dial or accept an incoming call, the display indicator automati- cally switches to the Telephone application. System bar Phone 10 : 49 FR 6 MAY 05 SIEMENS > Application bar... -
Page 160: Application Menu
Applications in the Alternative Graphic Interface Step by Step Application Menu System bar Applications Phone LDAP Browser Programs Display Admin Select Application bar Icons for starting applications You can save up to 640 entries in your optiPoint 600 office’s local database. You can individual- ly configure the personal directory and exchange data between the PC and optiPoint 600 office page 165. - Page 161 Applications in the Alternative Graphic Interface Step by Step Access to the administration area is reserved for the rel- evant service personnel. Admin Configuring the applications LDAP, Browser, and Programs requires additional knowledge not covered in this manual. For any questions, please consult your service personnel.
-
Page 162: System And Application Bar
Applications in the Alternative Graphic Interface Step by Step System and Application Bar Information and display keys repeatedly appear in differ- ent situations on the system and application bar page 163 on your optiPoint 600 office. The display keys perform standard functions when clicked. -
Page 163: Dialog Messages
Applications in the Alternative Graphic Interface Step by Step Dialog Messages In different situations, optiPoint 600 office prompts the user to confirm information in a dialog window. The but- tons "OK", "Yes", "No", and "Cancel" appear depending on the contents. Answer the question by clicking one of the two but- tons. -
Page 164: Personal Directory
Applications in the Alternative Graphic Interface Step by Step Personal Directory The ENB application in your optiPoint 600 office en- ables you to save telephone numbers and further infor- mation about other parties, for example, addresses and fax numbers of calling parties. Four different station numbers and four additional infor- mation items can be entered for each name/entry. - Page 165 Applications in the Alternative Graphic Interface Step by Step Scroll bar Entry field Directory abl| Abbot Nicola Abbots Richard Ablett, Natalie Acid Raban Ackroyd John Adams, Robert Dial View Existing entries/ names If a different display appears when you open the personal directory, press "Cancel", "Menu"...
-
Page 166: Creating A New Entry
Applications in the Alternative Graphic Interface Step by Step Dialing the default station number Precondition: One of the station numbers entered for the marked name was set as the default station number page 169. Otherwise select the station number to be dialed page 167. - Page 167 Applications in the Alternative Graphic Interface Step by Step The "Name" tab "Last name:" is the only field that must contain an entry. You can enter any combination of letters, numbers, and symbols in this field. Edit entry Mueller Karl Last name: Mueller First name:...
- Page 168 Applications in the Alternative Graphic Interface Step by Step The "Numbers" tab You can use the option fields to set which of the station numbers entered should be automatically dialed when dialing from the personal directory (default station num- ber) page 54.
- Page 169 Applications in the Alternative Graphic Interface Step by Step The "Notes" tab Edit entry Name Numbers Notes Address1: Musterstr. 185 Address2: Konradstr.| Company: Mueller GmbH Position: Dept. Manager Save View Click the relevant field and make your entries (for infor- mation on entering characters page 157).
-
Page 170: Searching For An Entry
Applications in the Alternative Graphic Interface Step by Step Searching for an entry Precondition: The personal directory contains entries/ names page 123. Mark the name you want. A scroll bar is displayed if more than six names are saved. You can browse the list by dragging the scroll bar. -
Page 171: Importing Or Exporting A Personal Directory Via Usb
The "ENB Update Tool" program and a detailed description of how to transfer data can be down- loaded from the Internet page www.siemens.de/hipath. [1] USB cable part number: S30267-Z360-A30-1, the necessary USB driver (included in the "CallBridge TU" program) is available at the following Internet address: www.siemens.com/hipath. -
Page 172: Importing/Exporting The Personal Directory Via Lan
Applications in the Alternative Graphic Interface Step by Step Importing/Exporting the Personal Directory via LAN You can transfer all personal directory entries from a server in your LAN to your optiPoint 600 office and use your to save these entries on the LAN server. This is im- portant, for example, for backing up or restoring data. - Page 173 Applications in the Alternative Graphic Interface Step by Step Click the softkey on the application bar. Next Export 2/2 File details File: enbdata.csv Folder: Export Click the relevant field and make your entries (for infor- mation on entering characters page 157). •...
- Page 174 Applications in the Alternative Graphic Interface Step by Step Importing the directory Precondition: There is already an exported file in the relevant FTP directory (for example, enbdata.csv), see page 173. Click the icon on the system bar. The context menu opens.
-
Page 175: Corporate Directory
Applications in the Alternative Graphic Interface Step by Step Corporate Directory The "LDAP" application’s start display features a search mask which provides a simple and user-friendly means of finding entries in your corporate directory and dialing them directly. Precondition: You can access a corporate directory via LAN and the dialing rules are entered correctly. - Page 176 Applications in the Alternative Graphic Interface Step by Step The "Basic Search" tab Entry field Opens the advanced search page 178 LDAP Basic Search Last name First name Advanced Search Search Enter the name you want or the initial letters in the input field (for information on entering characters page 157).
- Page 177 Applications in the Alternative Graphic Interface Step by Step The "Advanced Search" tab LDAP Basic Search Advanced Search Last name: First name: Position: Country: Department: Search Click the relevant field and make your entries (for infor- mation on entering characters page 157).
-
Page 178: Wap Browser
Applications in the Alternative Graphic Interface Step by Step WAP Browser The "Browser" application provides access to informa- tion on the corporate intranet. Precondition: You can access corporate WAP via LAN. If you have any questions regarding availability, please contact the responsible experts. Opening the WAP Browser Click the icon on the system bar. -
Page 179: Wap Settings
Applications in the Alternative Graphic Interface Step by Step WAP Settings Click the icon on the system bar. The context menu opens. Select "Settings". The "WAP settings" window opens. Settings The "Web access settings" tab WAP settings Web access settings For WAP gateway/proxy access User name: Password... -
Page 180: Favorites
Applications in the Alternative Graphic Interface Step by Step The "Home page" tab WAP settings Web access settings Home page Home page URL for web access wap.teamone.de| Save Click the relevant field and make your entries (for infor- mation on entering characters page 157). - Page 181 Applications in the Alternative Graphic Interface Step by Step Favourites favorites: You have saved the following Favourites. Back Favourites Enter the required WAP address in the input field, for example, wap.teamone.de. The address entered is printed in bold. Set the cursor outside the input field. The address en- tered is displayed in normal font.
- Page 182 Applications in the Alternative Graphic Interface Step by Step Managing favorites You can assign an appropriate name to the saved WAP addresses. You can also edit an already saved WAP ad- dress. Click the icon on the system bar. The context menu opens.
- Page 183 Applications in the Alternative Graphic Interface Step by Step • Name: Enter the name you want for your WAP ad- dress. • URL: Enter the appropriate WAP address here. < Delete characters to the left of the cursor one by one. Press the key shown to save the entry.
-
Page 184: Using Java Midlets
Applications in the Alternative Graphic Interface Step by Step Using Java midlets Java midlets are small programs that are executed local- ly in the optiPoint 600 office and which serve to provide different functions. These may include applications with notepad, calcula- tor, games or phone directory functions, for example. - Page 185 Applications in the Alternative Graphic Interface Step by Step Add Midlet 1/2 FTP parameters Server: 192.168.1.103 User: anonymous| Password Account: Next Click the relevant field and make your entries (for infor- mation on entering characters page 157). • Server: Enter the IP address of the FTP server here. •...
-
Page 186: Searching For Java Midlets
Applications in the Alternative Graphic Interface Step by Step < Delete characters to the left of the cursor one by one. Click the softkey on the application bar. An information Add Midlet window opens. The import operation is active. Add Midlet Please waitÖ... -
Page 187: Deleting All Entries
Applications in the Alternative Graphic Interface Step by Step Deleting all Entries All Java midlets saved on your optiPoint 600 office are irreversibly deleted. Click the icon on the system bar. The context menu opens. Select "Delete ALL". A warning appears. Delete ALL Delete ALL Confirm. - Page 188 Applications in the Alternative Graphic Interface Step by Step Creating/editing an entry First you will see the following display with all speed- dial fields empty (factory setting). Run entry Speed Dial Applet 1 of 5 empty empty empty empty empty empty empty empty...
- Page 189 Applications in the Alternative Graphic Interface Step by Step The name and the station number of a speed-dial key can be up to 15 characters long. • Text To display: Enter the name you want for the speed-dial key. • Number To Dial: Enter the associated station num- ber for the speed-dial key.
- Page 190 Applications in the Alternative Graphic Interface Step by Step Importing an entry from the ENB Precondition: There are already entries in your Person- al directory page 123. Start the "SpeedDialApplet" midlet page 187 and ac- tivate Edit mode page 189. Select a field for importing an entry.
-
Page 191: Display Settings
Applications in the Alternative Graphic Interface Step by Step Display Settings You can use the "Display" application to customize the touchscreen display layout to suit your environments. You can configure a display lock to protect your device against unauthorized use. Depending on the time you set, the lock activates when you stop working and can only be deactivated by entering the personal password. - Page 192 Applications in the Alternative Graphic Interface Step by Step The "Screen lock time" tab The display lock is deactivated by default and only activates after you make the appropriate set- tings. Settings Display Screen lock time Screen lock disabled 30 seconds 5 minutes 1 minute 10 minutes...
- Page 193 Applications in the Alternative Graphic Interface Step by Step • Current : This field is visible the first time you define the password. Enter the password currently valid if you want to change the password. • New: Enter the new password here to deactivate the display lock (at least eight characters).
-
Page 194: Graphic Interface Touchscreen Keypad
Applications in the Alternative Graphic Interface Step by Step Graphic Interface Touchscreen Keypad You can enter text, digits, and symbols in graphic inter- face in any of the following ways: – • via an external keyboard connected via the USB in- terface (recommended) page 207. - Page 195 Applications in the Alternative Graphic Interface Step by Step Switch to diacritical marks. " The option for entering characters, such as, "è", is active when the relevant softkeys appear on the touchscreen (for example, "e" is displayed as "è") and by the inversion of the switching softkey (softkey is black).
-
Page 196: Web-Based Management Tool
Applications in the Alternative Graphic Interface Step by Step Web-Based Management Tool These functions are available for HFA and U P0/E connections. However, in the case of U , these functions P0/E only work if LAN connection to the intranet al- ready exists (consult your service personnel). -
Page 197: Preparatory Steps
Applications in the Alternative Graphic Interface Step by Step Preparatory Steps Opening the Web-Based Management tool To evoke the interface, open a web browser and enter the following URL: http://[IP of the telephone]:8085 Where [IP of the telephone] stands for the IP address of the optiPoint 600 office that you want to map. -
Page 198: Web-Based Management Structure
Applications in the Alternative Graphic Interface Step by Step Web-Based Management Structure Performing configuration in this area requires a level of know-how not covered in this manual. For any questions, please consult your service per- sonnel. The user menu offers the following menu items with submenus: •... -
Page 199: File Transfer
Applications in the Alternative Graphic Interface Step by Step File Transfer Click a field in one of the interface images to obtain more information about the field. LDAP FTP Settings... -
Page 200: Wap Favourites
Applications in the Alternative Graphic Interface Step by Step Java FTP Settings ENB FTP Settings WAP Favourites Click a field in one of the interface images to obtain more information about the field. -
Page 201: Configuration Parameters Explained
Applications in the Alternative Graphic Interface Step by Step Configuration Parameters Explained Clicking the icons will bring you to the relevant function descriptions: • Using the icons on the optiPoint 600 office • Operated via the Web-Based Management tool Action on submit •... - Page 202 Applications in the Alternative Graphic Interface Step by Step FTP password • Enter the password that was set on the FTP serv- er as the password for this server. • The password must be suitable for FTP user- name. • Permitted values: Alphanumeric •...
- Page 203 Applications in the Alternative Graphic Interface Step by Step LDAP template filename • If an LDAP server is set, enter the name of the LDAP template file used in connection with this server. • The file must be on the FTP server in a defined directory ( FTP server address).
-
Page 204: Glossary Of Configuration Parameters
Applications in the Alternative Graphic Interface Step by Step Glossary of Configuration Parameters Abbreviation for "Domain Name System". Internet service for converting spoken address names into IP addresses. Personal directory in optiPoint 600 office. Abbreviation for "File Transfer Protocol". Used to transfer files in networks, for example, to load Java midlets. - Page 205 Applications in the Alternative Graphic Interface Step by Step LDAP Abbreviation for "Lightweight Directory Access Protocol". Simplified protocol for accessing standardized directory systems, for example, a corporate directory. Abbreviation for "Private Branch eXchange". Private telephone system that connects various internal devices with the ISDN network.
-
Page 206: Advanced Options For Telephone Operation
Operation Using an External Keyboard Keyboard functions on different applications can be op- erated easily and conveniently via the optional external Siemens keyboard, any USB keyboard or in combination with a PC page 209. External Keyboard General: Executes the selected function. -
Page 207: Example Of User-Friendly Operation
Advanced Options for Telephone Operation Step by Step In text fields: Moves the cursor to the end of the line. In lists: Jumps to the last entry. In text fields: Edits alphanumeric characters and symbols (in the ex- ample: the characters " a", "1" and "%"). In the Telephone application Activates the functions associated with the program- mable keys in optiPoint 600 office. -
Page 208: Use Of Pc Mouse And Keyboard
• The program "PCUserClient.exe" must be installed on your PC. The program is available on the Internet at www.siemens.com/hipath > Downloads > Software > optiPoint updates / Tools > All > Resource Sharing Application. Activating the user interface After starting the program "PCUserClient.exe" on your... - Page 209 Advanced Options for Telephone Operation Step by Step Enter one of the required values or addresses, for ex- ample, the IP address of the optiPoint 600 office (avail- able from your service personnel). Only one of these values is needed for communi- cation between optiPoint 600 office and your PC.
-
Page 210: Operation
Advanced Options for Telephone Operation Step by Step The "Siemens K&M Client" orientation window for the mouse pointer appears. Operation The following functions are available: • Inputs over the PC keyboard are transferred to the optiPoint 600 office if the client window is active (the program is "on top"). -
Page 211: Entering Characters Via The Keypad
Advanced Options for Telephone Operation Step by Step Entering Characters via the Keypad The table shows how to enter characters in a graphic application’s text fields (for example, in the personal di- rectory) using the keys on the dialing keypad page 122. -
Page 212: Using Lists In The Telephone Application
Advanced Options for Telephone Operation Step by Step Using Lists in the Telephone Applica- tion Your optiPoint 600 office displays lists in various differ- ent situations: • when polling the caller list page 48 • when dialing from the internal telephone directory page 50 •... -
Page 213: Exporting Data From Microsoft Outlook
Exporting Data from Microsoft Outlook Step by Step Exporting Data from Microsoft Outlook You can import the contents of the Microsoft Outlook "Contacts" folder into the personal directory in your optiPoint 600 office. The data must be saved in "CSV" format (Comma Separated Values) before you can import your contacts. - Page 214 Exporting Data from Microsoft Outlook Step by Step The following appears in the dialog window: 4. Select "Comma Separated Values (Windows)" from the list and confirm with "Next >“ . The following appears in the dialog window: 5. In the menu tree, select the folder you want to export, for example, "Contacts"...
- Page 215 Exporting Data from Microsoft Outlook Step by Step The following appears in the dialog window: 6. Where applicable, change the path and name of the CSV file to suit your requirements. Change the path in- formation by hand or click the "Browse" button to select a destination folder.
- Page 216 Exporting Data from Microsoft Outlook Step by Step The following appears in the dialog window: Browse data sets Outlook list List 8. Click the "Clear Map" button to remove the default map. 9. Holding the mouse button down, drag those fields that you want to export to your personal directory in your optiPoint 600 office from the Outlook window to the CSV window.
- Page 217 Exporting Data from Microsoft Outlook Step by Step If you have already exported the required fields, you can make the following changes in the CSV list: • You can change the term that appears for a field in optiPoint 600 office. Do this by selecting an entry in the "Field"...
-
Page 218: Labeling, Documentation And Accessories
• with a computer: You have avail of a CD Rom (ask the service personnel) with the elec- tronic operating instructions for your HiPath 500 and HiPath 3000/5000 Page 220. You can label your keypads for each PC. • with a computer via the Internet: You will find the "Online Key Labelling Tool"... -
Page 219: Attaching A Station Number Label
Documentation You can find these operating instructions in the Internet in PDF format under http://www.siemens.com/hipath and on CD-ROM (ask the service personnel) in HTML and PDF format. In order to look at and print the operating instructions in PDF format, you need a computer on which the free Acrobat Reader software package is installed by Adobe. -
Page 220: Accessories
Labeling, Documentation and Accessories Accessories The following accessories help you customize your telephone to your indi- vidual preferences. optiPoint adapters are modules which can be plugged into the option bays at the bottom of optiPoint. optiPoint key module: Key module with 16 programmable keys. You can connect up to two key modules to your telephone. -
Page 221: Fixing Problems
Fixing Problems Fixing Problems Telephone Maintenance • Always use a damp or antistatic cloth to clean the telephone. Never use a dry cloth. • If the telephone is very dirty, clean it with a diluted neutral cleaner con- taining surfactants, such as a dish detergent. Afterwards remove all traces of the cleaner with a damp cloth (using water only). -
Page 222: Responding To Error Messages On The Screen
Fixing Problems Step by Step Responding to Error Messages on the Screen Possible cause: US: Invalid entry UK: Incorrect entry. The station number is incorrect. Possible response: Enter a correct station number. Possible cause: US: Not authorized UK: Access denied You tried to activate a disabled function. -
Page 223: Restart The Telephone
Fixing Problems Step by Step Possible response: Confirm "Delete other layer" to program the station number/function. Possible cause 2: If "Delete LED support" appears on the menu: you tried to program a station number without LED or an external station number on a key that is already pro- grammed with an internal station number with LED. -
Page 224: Index
Index Index call charge assignment ......58 call charges for another telephone ..56 call charges for your telephone ....56 call duration ..........56 Call Forwarding ........... 62 abbreviations ........205 call forwarding ..........76 accessories ..........221 in the event of telephone malfunction account code .......... - Page 225 Index display lock operation ..........162 deleting advisory messages ....84 distributing calls ........110 desk microphone ........221 ............205 dial input editing ......... 34 do not disturb ..........27 dialing door opener ..........31 en-bloc ............. 34 download from the caller list ........
-
Page 226: Labeling Key Fields
Index group call labeling key fields ........... 106 ....... 12, 219 in a team ..........104 ............. 205 LAN telephony .......... 112 language selection for the external USB keyboard ... 152 handsfree answerback ......26 LDAP ............206 .............. 27 template filename ..... - Page 227 Index open listening radio paging equipment PSE ..........21 ....97 opening door recall ..........30 ............. 44 with a code redialing a number ..........31 ........47 operating instructions via the caller list ........49 HTML format relays ........220 ............
- Page 228 Index status information trunk flash ........121 ............ 38 suffix-dialing trunk keys in a team ..........36 ........99 automatic trunk keys, MULAP ..........55 ........99 switches trunk, reserving ............97 .......... 37 system bar ..........163 system speed-dialing ........
- Page 229 Index...
-
Page 230: Overview Of Functions/Codes
Call wait.term.on Call wait.trm.off #490 CFSS on 9411 CFSS off #9411 code dialing in ISDN; keypad dialing conference Start conference Add party End conference View conf parties Remove party Drop last conf. party (not for U.S., not in HiPath 500) - Page 231 < > < > Code consultation hold Return to held call Quit and return Transfer/Accept call Control Relay On (not in HiPath 500) Control Relay Off (not in HiPath 500) Directory 1=internal 2=LDAP (not in HiPath 500) DISA DISA intern.
- Page 232 Mobile Logoff Monitoring Mute on Mute off Night answer on Night answer off Open door override Page (not in HiPath 500) Answer page (not for U.S.) Phone test Pickup - directed Pickup - group Accept call Prog. feature key Redial...
- Page 233 Show call charges (own telephone) View call charges (other party’s tele- phone) Speaker call Suppress call ID Restore caller ID Tel. data service (not in HiPath 500) Temporary MSN (not for U.S.) Temporary Phone Timed reminder on Timed reminder off toggle...
- Page 234 (display) menu function actively Program/Service < > < > Code trace call Transfer Trunk flash sent (not in HiPath 500) Log on Log off #401 Available Not available #402 Work on Work off #403 UCD night on UCD night off...
- Page 235 Overview of Functions/Codes...
- Page 236 An obligation to provide the respective characteristics shall only exist if Ref. No.: A31003-H1012-C125-7-7619 expressly agreed in the terms of contract. The trademarks used are owned by Siemens AG or their respective own- Subject to availability. Right of modification reserved. ers.