Kenwood DNN991HD Quick Start Manual
Hide thumbs
Also See for DNN991HD:
- Quick start manual (68 pages) ,
- Instruction manual (178 pages) ,
- Instruction manual (36 pages)
Table of Contents
Quick Links
You can update the system by connecting a USB device containing an
update file.
For updating the system, visit
Puede actualizar el sistema conectando un dispositivo USB que incluya
un archivo de actualización.
Para actualizar el sistema, visite
Take the time to read through this instruction manual.
Familiarity with installation and operation procedures will help you obtain the best
performance from your new GPS Navigation System.
For your records
Record the serial number, found on the back of the unit, in the spaces designated on the warranty card,
and in the space provided below. Refer to the model and serial numbers whenever you call upon your
Kenwood dealer for information or service on the product.
Model DNN991HD/ DNN9710BT Serial number
US Residence Only
Register your Kenwood product at www.Kenwoodusa.com
© 2014 JVC KENWOOD Corporation
DNN991HD
DNN9710BT
CONNECTED NAVIGATION SYSTEM
Quick Start Guide
SISTEMA DE NAVEGACIÓN CONECTADO
Guía de inicio rápido
Register Online
LVT2542-001B (KN/RN)
Chapters
Table of Contents

Related Manuals for Kenwood DNN991HD


Summary of Contents for Kenwood DNN991HD
-
Page 1: Quick Start Guide
Record the serial number, found on the back of the unit, in the spaces designated on the warranty card, and in the space provided below. Refer to the model and serial numbers whenever you call upon your Kenwood dealer for information or service on the product. Model DNN991HD/ DNN9710BT Serial number... -
Page 2: About The Quick Start Guide
Precautions ..............3 For functions not described in this Guide, refer to the Instruction Manual on the following website: Safety Precautions and Important http://manual.kenwood.com/edition/im383/ Information .............. 5 Features of Connected systems ......6 First Step ............... 7 Functions of the Buttons on the Front Panel ..........10... -
Page 3: Precautions
Kenwood dealer. Ñ Precautions on using this unit • When you purchase optional accessories, check with your Kenwood dealer to make sure that they work with your model and in your area. • 8-cm (3 inch) discs cannot be used. -
Page 4: To Reset Unit
Ñ Acquiring GPS signal Ñ How To Reset Your Unit The first time you turn on this unit, you must wait If the unit or the connected unit fails to operate while the system acquires satellite signals for the properly, reset the unit. first time. -
Page 5: Information
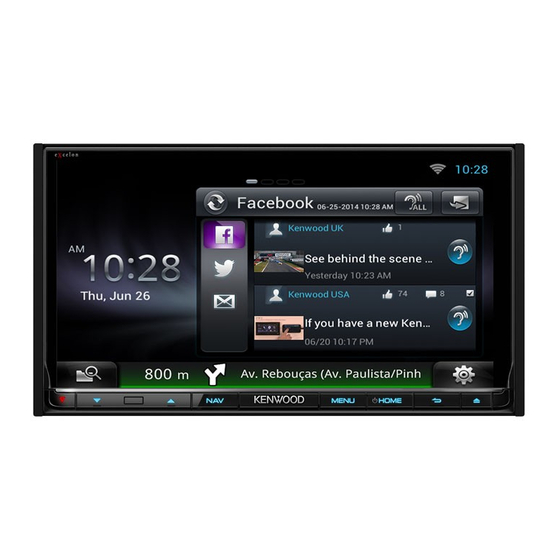
It does not reflect road follow the instructions in this manual. Neither closures or road conditions, weather conditions, or Kenwood nor Garmin shall be liable for problems other factors that may affect safety or timing while or accidents resulting from failure to observe the driving. - Page 6 Facebook and Twitter. • Information (weather*, traffic*, RSS, etc.) service. 4G, 3G, LTE or EDGE Ñ 4G/ 3G Dongle (DNN991HD) • Connect to the Internet directly with 4G/3G Dongle. The Internet device like smartphone is not necessary. Ñ Wi-Fi access point ✎...
-
Page 7: First Step
Press the <8HOME> button. the list. 4) Enter the Password. 5) Touch [Connect]. After setting, press the < 6 > button. Mobile Network settings (DNN991HD) Set the direct Internet connection with 4G/3G Dongle. 1) Touch [Mobile Network settings]. 2) Touch [Mobile Network configuration]. - Page 8 Types of accounts Touch [Next]. Administrator Touch the corresponding key and set the As Administrator, you can create an owner account item. and perform initial setup. You can log in to the system if you have not created an owner account. Guest An account for guests such as your friends.
- Page 9 OEM SETUP (North America Sales area only) Insert two “AAA”/“R03”-size batteries with the This function requires a commercial adaptor. poles aligned properly, following the illustration Consult your Kenwood dealer for details. inside the case. DEMO Set the demonstration mode. Default is “ON”.
-
Page 10: On The Front Panel
• Displays the navigation screen. SD card slot • Pressing for 1 second switches camera view display on/off. • DNN991HD: A slot to insert an SD card. • DNN9710BT: An SD card slot for MENU upgrading the map. For how to upgrade •... - Page 11 Ñ How to insert an SD card Ñ List screen There are some common function keys in the list 1) Press < > button for 1 second. screens of most sources. The panel fully opens. 2) Hold the SD card as the illustration in the right and insert it into the slot until it clicks.
-
Page 12: Login
Login Press thebutton to turn the power on. Select the login user. Enter the password. (Password) Enter the registered password. If you selected Administrator or Guest, this screen is not displayed. [Auto Login?] 1 Service panel Checking this checkbox allows you to log in to the Weather widget: Displays the weather forecast for system automatically from the next time. -
Page 13: How To Use The Navigation System
Adding of a shortcut icon to Source Ñ Source launcher panel launcher panel (Shortcut) 1) Touch [ ] in Source launcher panel. You can register sources you use frequently so that 2) Touching the icon continuously to display you can start them quickly. the Source launcher panel screen. -
Page 14: Manually Avoiding Traffic On Your Route
Garmin and 1) While navigating a route, touch [ ] and JVC KENWOOD will not be responsible for any traffic then touch [Where To?]. fines or citations that you may receive for failing to 2) Search for the extra stop. -
Page 15: How To Play Music
Playback starts. update. Updating maps You can purchase updated map data from Garmin or ask your Kenwood dealer or Kenwood service center for details. 1) Go to www.garmin.com/Kenwood. 2) Select [Order Map Updates] for your To disconnect the device: Kenwood unit. -
Page 16
• SD card (DNN991HD) E F or move the cursor in the center 1) Press the
button for 1 second to open the front panel. Fast forwards or Fast backwards (Disc media, 2) Hold the SD card as the diagram below and CD, USB device, SD card only): insert it into the slot until it clicks. -
Page 17: How To Play Movie
How to Listen to the Radio/ HD Radio™ tuner/ SiriusXM® You can play DVD video, Video CD (VCD), movie files from disc media, iPod and USB storage device. HD Radio tuner/ SiriusXM only by the DNN991HD. ✎ NOTE Press thebutton twice to the For details on playable file format, device format, etc.,... -
Page 18: How To Make A Phone Call
✎ NOTE Connect your cell-phone to the unit. • For other operations, see Radio, HD Radio™ tuner 1) Touch the device name you want to connect Operation (P.94) and SiriusXM® Satellite in the Bluetooth SETUP screen. Radio Operation (P.102) in the Instruction 2) Touch [ON] of [TEL(HFP)] in the BT Manual. -
Page 19: Installation
Call using the phonebook Installation 1) Touch [ Ñ Before Installation 2) Select the name from the list. 3) Select the number from the list. Before installation of this unit, please note the 4) Touch [ following precautions. Call using the preset number WARNINGS 1) Touch [Preset #] to start calling the •... - Page 20 (3 m) 6 ...6 ~ ...1 M4 x 8mmMAX iDalalink WiFi iPod/ N/OUT Recever AV-IN2 5V=500mA WI-FI receiver POWER HOME (M5x6mm) • Install the WI-FI receiver besides the place enclosed by the metal. 7 ...6 DNN991HD only (M5x7mm) ñ English...
- Page 21 4) Connect the wiring harness wires in the following order; ground, battery, ignition. 5) Connect the wiring harness connector to the General Motors cars (DNN991HD) unit. 6) Install the unit in your car. 1) Cut out accessory 4 to meet the shape of 7) Reconnect the ¤...
- Page 22 Ñ Microphone unit and Push-To-Talk Switch 1) Check the installation position of the microphone (accessory -) and the Push-To-Talk switch (accessory = : DNN991HD only). 2) Clean the installation surface. 3) Install the microphone. 4) Wire the microphone cable up to the unit with it secured at several positions using tape or other desired method.
- Page 23 Ñ Removing the trim plate Ñ Removing the unit 1) Remove the trim plate by referring to step 1 in 1) Engage the catch pins on the extraction key “Removing the trim plate”. (accessory3) and remove the two locks on the lower level.
- Page 24 Ñ Connecting wires to terminals HDMI/MHL M4 x 8mmMAX iDalalink iPod/ AV-IN/OUT AV-IN2 AV-OUT AUDIO POWER Ignition key switch Accessory 1 Red (Ignition wire) Speaker impedance: 4-8 Ω White/Black Yellow (Battery wire) To front left speaker Car fuse box Black (Ground wire) ¤ Car fuse box White (Main fuse)
-
Page 25: System Connection
Ñ System connection Accessory =: Push-To-Talk Switch Accessory 9: Accessory -: (DNN991HD only) GPS Antenna Bluetooth Microphone FM/AM antenna input WI-FI receiver - Reception may drop if there are metal objects near the WiFi Bluetooth antenna and WI-FI Receiver receiver. - Page 26 AV-OUT AUDIO POWER Lightning to USB Cable (Charging) (accessory of the iPod/iPhone) iPod iDatalink connector (sold separately) (DNN991HD only) SiriusXM Connect Vehicle Tuner (sold separately) USB terminal (0.8m) (DNN991HD only) KCA-iP102 (Optional Accessory) D: Music C: Video and Music (analog) AV Output (1.8m)
-
Page 27: Ipod/ Iphone/ Android Setup
Connectable iPod/iPhone The following models can be connected to this USB device 4G/ 3G Dongle unit. (sold separately) (sold separately) (DNN991HD only) Made for Type • iPhone 5 A B E • iPhone 4S C D E • iPhone 4 C D F •... -
Page 28
iPod/iPhone connection setup C To listen music and watch video with 30-pin connector device (analog) When you first select iPod as a source, the setting – KCA-iP202 screen of the iPod/iPhone connection will appear. – iPod connection setup: USB + AV-IN (P.28) D To listen music with 30-pin connector device Press the
... - Page 29 Select the way to connect the device with this unit. When selecting [iPod/iPhone] If a connectable Bluetooth device is not displayed, touch [Search] and do the pairing of the devices. • “iPod connection setup” also appears when the unit is reset. For the setting items refer to iPod/iPhone •...
-
Page 30: About This Unit
• A Pandora account (if you do not have an account, the Bluetooth SIG, Inc. and any use of such marks by create one for free using the mobile app or on JVC KENWOOD Corporation is under license. Other www.pandora.com). trademarks and trade names are those of their •... - Page 31 • PANDORA, the PANDORA logo, and the Pandora • BlackBerry®, RIM®, Research In Motion® and related trade dress are trademarks or registered trademarks trademarks, names and logos are the property of Pandora Media, Inc., used with permission. of Research In Motion Limited and are registered •...
- Page 32 This KENWOOD Route Network Service “Route issues between Users. Collector” User’s Agreement (“Agreement”) sets forth the terms and conditions for use of the KENWOOD (4) Should any third parties suffer losses or damages Route Network Service “Route Collector” provided by as a result of the User’s use of the Service, we shall...
- Page 33 similar acts by the User are prohibited. Further, should other property rights of the information, text, image, we determine that the User has violated the terms of program, layout, design, architecture, and others this Agreement, we reserve the right to suspend use related to the Service are owned by us, or provided of the Service by the User without prior notice, or take to us under license from the rights holder except for...
- Page 34 • iPhone, iPod, iPod classic, iPod nano, and iPod touch • BlackBerry®, RIM®, Research In Motion® and related trademarks, names and logos are the property are trademarks of Apple Inc., registered in the U.S. and other countries. of Research In Motion Limited and are registered Lightning is a trademark of Apple Inc.
- Page 35 Usuarios. Network Service “Route Collector” (el “Contrato”) (4) Si un tercero sufre pérdidas o daños como define las condiciones de uso de KENWOOD Route resultado del uso del Servicio por parte del Usuario, Network Service “Route Collector” suministrado no asumimos ningún tipo de responsabilidad por por JVCKENWOOD Corporation (el “Servicio”) a...
- Page 36 o de adoptar cualquier otra medida que pueda el diseño, la arquitectura y los demás derechos ser necesaria. En este caso, no tenemos ninguna relacionados con el Servicio son de nuestra propiedad obligación de revelar nuestros motivos para ello. o se nos han suministrado bajo licencia por el titular de los derechos, con excepción de los derechos (1) Acciones con fines comerciales o ganancias realizados por el Usuario.
- Page 37 • Consult the dealer or an experienced radio/TV are reproductions of labels on, or inside the product technician for help. relating to laser product safety. JVC KENWOOD Corporation • Contains Transmitter Module 2967-3, ISHIKAWA-MACHI, FCC ID : YZP-RBFAC21XX HACHIOJI-SHI, TOKYO, JAPAN •...
-
Page 38: Laser Product
About QAU0568, W02-5613 (USB Wi-Fi® Información acerca de la eliminación de Adapter) (DNN990HD) equipos eléctricos y electrónicos al final de la vida útil (aplicable a los países que hayan About QAU0569 (USB Wi-Fi® Adapter) adoptado sistemas independientes de (DNN9710BT) recogida de residuos) The Wi-Fi Adapter is attached to this unit when shipped from the factory. - Page 40 Record the serial number, found on the back of the unit, in the spaces designated on the warranty card, and in the space provided below. Refer to the model and serial numbers whenever you call upon your Kenwood dealer for information or service on the product.
- Page 41 Return to the Top page What Do You Want To Do? Thank you for purchasing the KENWOOD CONNECTED NAVIGATION SYSTEM. In this manual, you will learn various convenient functions of the system. Click the icon of the media you want to play.
-
Page 42: Table Of Contents
Wi-Fi Setup ________________________ 32 DVD/Video CD (VCD) Wi-Fi Hotspot Setup _________________ 34 Operation 4G/ 3G Dongle Setup (DNN991HD) ____ 35 DVD/VCD Basic Operation ____________ 60 Clock and Date Setup DVD Disc Menu Operation ____________ 63 Clock and Date Setup ________________ 36... - Page 43 DVD Language Codes _______________ 164 Bluetooth Unit _____________________ 118 Playing Bluetooth Audio Device _______ 121 Specifications ______________________ 165 Trademarks ________________________ 168 Using Hands-Free Feature ____________ 122 Safety precaution ___________________ 171 Hands-Free Setup ___________________ 126 Voice Control (DNN991HD) Voice Control ______________________ 128...
-
Page 44: Before Use
• When you purchase optional accessories, • Do not use disc type accessories. check with your Kenwood dealer to make • Clean from the center of the disc and move sure that they work with your model and in outward. - Page 45 Return to the Top page Before Use Ñ Erase the personal information Enter owner password. Touch [Rest]. Before giving or selling this unit to others, be sure to delete the information (mail, search logs, etc.) stored in this unit by yourself and confirm that the data has been deleted.
-
Page 46: How To Read This Manual
Return to the Top page How To Read This Manual ñ ow to Read this Manual Link header Return to the Top page You can refer each section or top page with CD/Audio and Visual Files/iPod/Apps Operation one-click. Search Operation Operation title Introduces the function. - Page 47 Return to the Top page How To Read This Manual...
-
Page 48: Features Of Connected Systems
• STT (by Nuance) To use the following services, you need to register the corresponding free or paid accounts. • Aupeo! • Facebook • Twitter • Gmail (by Google) • Google calendar (by Google) • Dropbox • iHeartRadio* * DNN991HD only... - Page 49 Kenwood Wireless Link. 4G, LTE, 3G or EDGE Wi-Fi (11n/g/b) HOME 4G/ 3G Dongle (DNN991HD) • Media player for DVD video, CD, USB • Connect to the Internet directly memory, SD card*, iPod, etc. with 4G/3G Dongle. The Internet •...
-
Page 50: Basic Operations
Return to the Top page Basic Operations ñ asic Operations ñ unctions of the Buttons on the Front Panel HOME NOTE • The panels shown in this guide are examples used to provide clear explanations of the operations. For this reason, they may be different from the actual panels. - Page 51 A slot to insert a disc media. slot SD card slot • DNN991HD: A slot to insert an SD card. • DNN9710BT: An SD card slot for upgrading the map. For how to upgrade the map, refer to the instruction manual of the navigation system.
-
Page 52: Turning On The Unit
Return to the Top page Basic Operations ñ urning on the Unit The method for turning on the power varies between different models. Press thebutton. HOME The unit is turned on. ö To turn off the unit: Press the button for 1 second. If it is your first time turning the unit on after installation, it will be necessary to perform Initial setup (P.14). -
Page 53: Select The Login User
Return to the Top page Basic Operations Login Select the login user. When the owner has not been registered When the owner has been registered Enter the password. When you selected Administrator or Guest, you do not need to enter a password. [Auto Login?]: Checking this checkbox allows you to log in to the system automatically from the next time. -
Page 54: Initial Setup
6 After setting, press the < 6 > button. Wi-Fi Setup (P.32). For details on operation, see Mobile Network settings (DNN991HD) Set the direct Internet connection with 4G/3G Dongle. 1 Touch [Mobile Network settings]. 2 Touch [Mobile Network configuration]. 3 Enter the network information. - Page 55 Return to the Top page Basic Operations Date Setup Set the date and time. 1 Touch [Date Setup]. 2 Touch [Select time zone]. 3 Select a time zone. 4 After setting, press the < 6 > button. Clock and Date Setup (P.36). For details on operation, see Account Setup Set the information about the user of this unit.
- Page 56 Return to the Top page Basic Operations Set each item as follows. Locale Select the country for the navigation system. The language, the distance unit, and the gasoline unit are set. 1 Touch [SET]. 2 Select the desired country. 3 Touch [Enter]. Language Select the language used for the control screen and setting items.
- Page 57 Camera Setup (P.137). For details on operation, see OEM SETUP (North America Sales area only) This function requires a commercial adaptor. Consult your Kenwood dealer for details. DEMO Set the demonstration mode. Default is “ON”. 1 Touch [ON] or [OFF]. Touch [Finish].
-
Page 58: How To Play Media
Return to the Top page Basic Operations ñ USB device ow to Play Media Connect the USB device with the Music CD and disc media USB cable. Press thebutton. HOME The panel opens. Insert the disc into the slot. The unit reads the device and playback starts. -
Page 59
Return to the Top page Basic Operations iPod SD card (DNN991HD) Connect the iPod. Press the
button for 1 second to open the front panel. NOTE • For the details of the necessary cable and adapter Music/ to connect with iPod/iPhone, refer to Video Basic Operation (P.68). -
Page 60: Operation On The Home Screen
Return to the Top page Basic Operations ñ peration on the Home Screen Most functions can be operated on the Home screen. Press thebutton. HOME Home screen appears. Flick the screen left or right to select the Service panel, Media panel, Source launcher panel, or Network contents panel. - Page 61 Return to the Top page Basic Operations Source launcher panel and Network contents panel (Shortcut) You can register sources and applications you use frequently so that you can start them quickly. (All source list/ All apps list) Displays all sources and applications. All source list/ All apps list (All source list/ All apps list) You can scroll the list screen by flicking the...
-
Page 62: Service Panel
Summary Board, and photo frame. Summary Board Widget (P.58), Photo Frame Widget (P.58). Service panel Weather widget DNN991HD: Displays the today's weather Weather Widget (P.42). forecast. See DNN9710BT: Displays the clock and date. Network widget Touching [ ] allows you to switch between Schedule, RSS, and SNS. - Page 63 Return to the Top page Basic Operations Change the skin for home screen You can select a home screen skin from 3 types. Press the
-
Page 64: Common Operation
Return to the Top page Basic Operations ñ ommon Operation Introduces the common operation. General There are some functions which can be operated from most screens. (Mixed Media Search) Touch to display the Mixed Media Search (P.59) screen. (Quick menu) Touch to display the quick menu. - Page 65 Return to the Top page Basic Operations Flick scrolling You can scroll the list screen by flicking the screen up/down or right/left.
-
Page 66: Navigation Operation
Return to the Top page Basic Operations ñ Touch [ ] or [ ] in the avigation Operation navigation screen. For details on the navigation function, please refer to the Navigation Instruction Manual. Display the navigation screen Press the - Page 67 Return to the Top page Basic Operations ö To return to the full navigation Where To function screen: You can set the destination of the navigation Touch [ easily by setting the destination of the Route Collector site from your PC or your NOTE smartphone.
- Page 68 Return to the Top page Basic Operations Come Here function When you go to pick up your family or friends, send them the mail to decide the meeting point. After they enter the meeting point you can easily set it as the destination of your navigation.
- Page 69 • To get the correct information we recommend using 4G/3G Dongle. (DNN991HD only) • For the operation of the Route Collector site refer to the instruction in its website.
-
Page 70: Oem Feature Operation
Return to the Top page Basic Operations ñ EM Feature Operation By connecting this unit to the bus system of the vehicle using an iDataLink (commercially available), this unit can access the satellite radio source provided for the vehicle and vehicle information can be displayed on this unit. - Page 71 Return to the Top page Basic Operations : Displays information about the : Displays information about the air instruments such as a speedometer. conditioner of the vehicle. : Displays information about the tire : Displays information about the pressures of the vehicle. Parking Distance Sensor of the vehicle.
-
Page 72: Network Setup
Wi-Fi Setup (P.32) • Wi-Fi Hotspot Setup (P.34) • 4G/ 3G Dongle Setup (P.35) • (DNN991HD) Wi-Fi Setup Touch [Wi-Fi]. You can connect to a Wi-Fi access point to connect to Internet. Preparation • Make preparations for using the Wi-Fi access point for Internet connection through use of the tethering function of the smartphone. - Page 73 Return to the Top page Network setup Register the Wi-Fi access point Confirm the MAC address manually Press the
-
Page 74: Wi-Fi Hotspot Setup
Wi-Fi Hotspot Setup If there is no Wi-Fi access point, this unit becomes a Wi-Fi access point. You can connect your smartphone and your tablet PC, and enjoy Kenwood Wireless Link function. (P.90) Preparation • When Wi-Fi Hotspot is in use you can not connect to the Internet via Wi-Fi. -
Page 75: 3G Dongle Setup (Dnn991Hd)
Return to the Top page Network setup Touch [Mobile Network configuration]. 4G/ 3G Dongle Setup (DNN991HD) This unit is designed to work with 4G/3G Dongle by Verizon (sold separately). You can connect to the Internet without a smartphone. With 4G/3G Dongle you can use the following functions. -
Page 76: Clock And Date Setup
Return to the Top page Clock and Date Setup ñ lock and Date Setup Set each item as follows. Clock and Date Setup Press thebutton to display the Home screen. Note • To display the Network contents panel, Press the ... - Page 77 Return to the Top page Clock and Date Setup Adjust the date and time manually. Adjust the date. Touch [Automatic date & time] to remove the check. Touch [Set]. Touch [Set time]. Touch [Select time zone]. Adjust the time. Select a time zone. Touch [Set].
-
Page 78: Account Setup
Return to the Top page Account setup ñ ccount Setup Ñ Account registration About Account procedure To use this unit, you must register an Create an account in the Route account. Collector site. Ñ Types of accounts Create User Create an account refering to Account (P.38) or the Route Collector You can create accounts to maintain privacy... -
Page 79: Set Owner Account
Return to the Top page Account setup Touch [Create Account]. Set Owner Account You can register an owner account for the person who manages this system. Preparation • You must have a connection with the internet. Network Setup (P.32). • First create an account in the Route Collector site. Create User Account (P.38). -
Page 80: Set User Account
Return to the Top page Account setup Set User Account Switch the User Login You can register a user account for the user You can switch to a different account from of this unit. the one currently logged in. Press thebutton to display Preparation the Home screen. -
Page 81: Delete User Account
Return to the Top page Account setup Delete User Account Reset Owner Account You can delete a previously registered user You can delete previously registered owner account. and user accounts. Preparation Preparation • You can set a user account when you have •... -
Page 82: Widget And Application Operation
Return to the Top page Widget and Application Operation ñ idget and Application Operation Ñ City select Weather Widget (DNN991HD) Touch [(City name)] in the Weather Displays the weather forecast for the Widget. selected region. Preparation • You must have a connection with the internet. -
Page 83: Weather Application (Dnn991Hd)
Return to the Top page Widget and Application Operation Ñ Menu Weather Application (DNN991HD) Press the - Page 84 Return to the Top page Widget and Application Operation Ñ Ñ Delete City Weather setup You can delete a region from the City list. Performs setup when using Weather Application. Press the
-
Page 85: Today Widget
Return to the Top page Widget and Application Operation Today Widget SNS Widget You can display the today’s schedule You can use Facebook, Twitter, Gmail, and registered in Google Calendar. email (IMAP). Preparation Preparation • To use this service, a Google account is required. •... -
Page 86: Rss Widget
Return to the Top page Widget and Application Operation RSS Widget Schedule Application Displays the RSS news. You can edit schedules on the internet. In addition, you can also synchronize the Press thebutton. schedule with Google Calendar. Flick the screen left or right to select Preparation the Service panel. -
Page 87
Return to the Top page Widget and Application Operation Ñ Schedule Operation Detailed schedule view. Press the
button. Flick the screen left or right to select the Network contents panel. Touch [ Touch [ Schedule]. Perform desired operation as follows. (Text-to-speech) Reads out the content of the schedule by voice. - Page 88 Return to the Top page Widget and Application Operation Ñ Ñ Add event Notification Adds an event to the schedule. Displays a notification icon in the status bar when the set time is reached. Touch [ ] in the Schedule application. Drag the status bar downward.
-
Page 89: Facebook (Sns Application)
Return to the Top page Widget and Application Operation Perform desired operation as follows. Facebook (SNS Application) Displays the screen for using Facebook. Preparation • You must have a connection with the internet. Network Setup (P.32). • To use a Facebook service, the corresponding account is required. -
Page 90: Twitter (Sns Application)
Return to the Top page Widget and Application Operation Ñ Menu Twitter (SNS Application) Press the - Page 91 Return to the Top page Widget and Application Operation Ñ Menu Perform desired operation as follows. Press the
-
Page 92: E-Mail (Sns Application)
Return to the Top page Widget and Application Operation Ñ Operation E-mail (SNS Application) Press thebutton. Displays the screen for using E-mail. Flick the screen left or right to select Preparation the Network contents panel. • You must have a connection with the internet. Touch [ Network Setup (P.32). - Page 93 Return to the Top page Widget and Application Operation Ñ Add to post Detailed article or message view. Create an article to be posted to the SNS service of the selected category. Touch [ ] in the SNS application. Create an article to post. : Creates a reply mail.
-
Page 94: Rss Application
Return to the Top page Widget and Application Operation Detailed article view. RSS Application Displays an RSS feed. Preparation • You must have a connection with the internet. Network Setup (P.32). • You can use a user account when you have logged in the Owner or User. - Page 95 Return to the Top page Widget and Application Operation Ñ Ñ Add RSS feed Delete RSS feed Add an RSS feed. Delete an RSS feed. Touch [ ] in the RSS application. Press the
-
Page 96: Now Playing Widget
Return to the Top page Widget and Application Operation Radio source such as Radio, HD Radio Now playing Widget Technology or SiriusXM Displays the information about the song or station you are listening to, and allows you to perform simple operations. Press the... - Page 97 Return to the Top page Widget and Application Operation Ñ Ñ Posting the information about Preset select the song you are listening to Touch illustrated area. You can post the information about the song you are listening to, on Twitter, Facebook, or Route Collector site.
-
Page 98: Summary Board Widget
Return to the Top page Widget and Application Operation Summary Board Widget Photo Frame Widget Summary Board Widget shows your favorite You can display the photos stored in the USB songs, the playback history of YouTube, the memory or SD card as a slide show. charts information, etc. -
Page 99: Mixed Media Search
Return to the Top page Widget and Application Operation Ñ Select the photo you want to Mixed Media Search display. You can search media like USB,iPod for the Touch [ song by artist or album name and play it. Touch [ Select whether you search for the song by artist name or album name... -
Page 100: Dvd/Video Cd (Vcd) Operation
Return to the Top page DVD/Video CD (VCD) Operation ñ VD/Video CD (VCD) Operation DVD/VCD Basic Operation Most functions can be controlled from the source control screen and playback screen. NOTE Switching the operation • Set the remote controller mode switch to DVD mode before starting operation, see mode (P.151). - Page 101 Return to the Top page DVD/Video CD (VCD) Operation 5 Sub function menu The following functions can be performed by using keys in this area. • Repeats the current content: Touch [ ]. Each time you touch the key, repeat mode switches in the following sequence;...
- Page 102 Return to the Top page DVD/Video CD (VCD) Operation Ñ Multi function menu The functions of each key are as follows. [E] [F] Searches the previous/next content. [DH] Plays or pauses. [¼] or [½] (DVD only) Plays in slow motion forward or backward. Stops playback.
-
Page 103: Dvd Disc Menu Operation
Return to the Top page DVD/Video CD (VCD) Operation Enters selected item DVD Disc Menu Operation Touch [Enter]. You can set up some items in the DVD-VIDEO Enables direct operation disc menu. Touch [Highlight] to enter the highlight control Highlight control (P.63). -
Page 104: Zoom Control For Dvd And Vcd
Return to the Top page DVD/Video CD (VCD) Operation Ñ DVD Play Mode Setting Zoom Control for DVD and VCD You can select DVD play mode. You can enlarge Playback screen for DVD and Touch [Next] in the Menu Control VCD. -
Page 105: Dvd Setup
Return to the Top page DVD/Video CD (VCD) Operation Set each item as follows. Switches zoom ratio Touch [Zoom]. For DVD, changes the zoom ratio at 4 levels; Off, 2 times, 3 times, 4 times. For VCD, changes the zoom ratio at 2 levels; Off, 2 times. -
Page 106: Language Setup
Return to the Top page DVD/Video CD (VCD) Operation Ñ Language setup Parental Level* Parental level (P.67). This setting is for the language used in the menu, subtitle, and voice. You cannot setup DISC SETUP these items during DVD playback. Disc setup (P.67). - Page 107 Return to the Top page DVD/Video CD (VCD) Operation Ñ Ñ Parental level Disc setup Set a parental lock level to prohibit children Performs setup when using disc media. to watch video. You cannot set a parental Touch [SET] of [DISC SETUP]. lock level during DVD playback.
-
Page 108: Cd/Audio And Visual Files/Ipod/Apps Operation
Return to the Top page CD/Audio and Visual Files/iPod/Apps Operation ñ D/Audio and Visual Files/iPod/Apps Operation Music/Video Basic Operation Most functions can be controlled from the source control screen and playback screen. NOTE Switching the operation • Set the remote controller mode switch to AUD mode before starting operation, see mode (P.151). - Page 109 Return to the Top page CD/Audio and Visual Files/iPod/Apps Operation See the following sections for each source operation. • Music CD (P.69) • USB device (P.71) • Pandora (P.79) • Disc media (P.69) • SD Card (P.71) • Apps (P.82) •...
- Page 110 Return to the Top page CD/Audio and Visual Files/iPod/Apps Operation 7 Sub function menu Sub function Various functions can be performed by using keys in this area. For details on the keys, see menu (P.73). 8 Sub function/ List switching key Touch to display “Sub function menu”...
- Page 111 Ñ USB device, SD card and iPod NOTE • SD card is for DNN991HD only. • The screen shot below is for USB device. It may be different from the one for iPod and SD card. Simple Control screen List Control screen 1 Information display Displays the following information.
- Page 112 Return to the Top page CD/Audio and Visual Files/iPod/Apps Operation Playback screen 10 11 9 Searching file area (Video file only) • Touch to search the next/previous file. • During slide show in USB mode, touching each area searches the next/previous music file. •...
- Page 113 Return to the Top page CD/Audio and Visual Files/iPod/Apps Operation ] (Only for disc media, USB device, and SD card) Searches previous/next folder. [ 4 ] (Like) (Audio file only) Saves the artist name and the title by pressing it while your favorite song is being played. After saving, you can search for the song and play it from the list of the Summary Board using YouTube.
-
Page 114: Search Operation
Return to the Top page CD/Audio and Visual Files/iPod/Apps Operation Ñ Other search Search Operation There are other search methods in order to You can search music or video files by the narrow search for a song. following operations. This function is not available when music CD is the current source. - Page 115 Return to the Top page CD/Audio and Visual Files/iPod/Apps Operation Category search (Only for iPod, USB Link search (Only for iPod, USB device, device, and SD card) and SD card) Touch the desired category from the Touch the desired link from the left left part of the screen.
- Page 116 Return to the Top page CD/Audio and Visual Files/iPod/Apps Operation Ñ Search from album artwork Folder search (Only for disc media, USB device, and SD card) (Only for iPod, USB device, and SD card) Touch the desired folder. You can search music files by selecting the album artwork.
- Page 117 Return to the Top page CD/Audio and Visual Files/iPod/Apps Operation Touch [ D ] on the selected artwork. Touch the desired artwork in the favorite list. The first song in the album is played. In addition, you can create your original playlist from this screen.
-
Page 118: Movie Control
Return to the Top page CD/Audio and Visual Files/iPod/Apps Operation Movie Control You can adjust the movie playback. In the playback screen, touch illustrated area. Movie control screen appears. Touch [Disc CTRL]. (Disc media only) Movie Control screen appears. Perform desired operation as follows. Changes subtitle language Touch [Subtitle]. -
Page 119: Pandora® Operation
Return to the Top page CD/Audio and Visual Files/iPod/Apps Operation Pandora® Operation You can listen to the Pandora® on this unit by controlling the application installed in the iPhone, Android or BlackBerry. NOTE (P.170) • Install the latest version of the Pandora® application on your iPhone, Android or BlackBerry. iPhone: Search for "Pandora"... - Page 120 Return to the Top page CD/Audio and Visual Files/iPod/Apps Operation 7 Sub function menu Sub function Various functions can be performed by using keys in this area. For details on the keys, see menu (P.80). 8 Sub function/ List switching key Touch to display “Sub function menu”...
- Page 121 Return to the Top page CD/Audio and Visual Files/iPod/Apps Operation Ñ Ñ Genre list screen Station list screen You can perform the following functions You can perform the following functions from this screen. from this screen. The selected genre is created as a new Selects the station station.
-
Page 122: Apps Operation
Return to the Top page CD/Audio and Visual Files/iPod/Apps Operation Apps Operation You can listen to music or watch video from the Apps operating on iPod touch/iPhone or Android. NOTE • When you first select APPS as a source, the setting screen for the connection with the device installed the apps Application link setup (P.85). -
Page 123: Usb/Sd/Ipod/Divx/Apps Setup
Return to the Top page CD/Audio and Visual Files/iPod/Apps Operation Ñ USB setup USB/SD/iPod/DivX/Apps Setup Set each item as follows. You can perform setup when using USB/SD/ iPod/ DivX/ Apps. Touch [ Quick menu appears. Touch [SETUP]. SETUP Menu screen appears. Touch [Source]. - Page 124 Return to the Top page CD/Audio and Visual Files/iPod/Apps Operation Ñ iPod setup Touch [iPod Connection Setup] in the iPod SETUP screen. Set each item as follows. iPod connection setup screen appears. Touch [CHANGE]. AudioBook Speed Set each item as follows. Set the audio book playback speed.
-
Page 125
Return to the Top page CD/Audio and Visual Files/iPod/Apps Operation Application link setup NOTE Press the
button twice to the • For the details of the necessary cable and adapter Source launcher panel. Music/ to connect with iPod/iPhone, refer to Video Basic Operation (P.68). - Page 126 Return to the Top page CD/Audio and Visual Files/iPod/Apps Operation When selecting [Android/Other] Select the way to connect the device with this unit. When selecting [iPod/iPhone] HDMI/MHL + BT Select when connecting with KCA-MH100. USB + AV-IN Bluetooth Select when connecting with KCA-iP202. Select when connecting via Bluetooth only.
- Page 127 Return to the Top page CD/Audio and Visual Files/iPod/Apps Operation Ñ DivX® VOD This feature is available only for Central and South America sales area. Set each item as follows. DivX(R) Registration Code Checks the registration code. This code is needed when making a disc which has DRM (Digital Rights Management).
-
Page 128: Cloud Storage Operation
Return to the Top page Cloud Storage Operation ñ ñ loudñStorageñOperation Starting procedure Music Basic Operation Make preparations for allowing this unit to The music files uploaded to Dropbox can be play the music files uploaded to Dropbox. played. Preparation Preparation •... -
Page 129: Category Search
Return to the Top page Cloud Storage Operation Category search Touch to switch the multi function menu. You can search music files by the following operations. Touch to display “Sub function menu”. Touch [ ] in the control screen. Touch and hold to switch between the file list and the current file information. -
Page 130: Kenwood Wireless Link Operation
Return to the Top page Kenwood Wireless Link Operation ñ enwood Wireless Link Operation Media Server function Starting procedure Plays the content stored in the USB memory or SD card connected to this unit via another By using the Wi-Fi function, media files can network media player (client device). -
Page 131: Media Server Function
Connect from the client device. connect. Operate the client device to connect to the server. Select the content to play. Server name: DNN991HD or DNN9710BT. Select the category of the content to play. A list of detected content is displayed. -
Page 132: Media Controller Function
Return to the Top page Kenwood Wireless Link Operation Ñ Plays screen Media Controller function Allows you to handle the content stored in another media server device via this unit and play them on another network media player (client device). -
Page 133: Media Renderer Function
Flick the screen left or right to select the Source launcher panel. Touch [ Touch [ Wireless Link]. Touch [DMR]. The Rendering function is turned on. Establish connection from the media controller. Operate the media controller to connect to this unit. This unit:DNN991HD or DNN9710BT. -
Page 134: Radio, Hd Radio™ Tuner Operation
Return to the Top page Radio, HD Radio™ tuner Operation ñ adio, HD Radio™ tuner Operation About HD Radio™ Technology • Program Service Data provides song name, artist, station ID, and other relevant data streams This HD Radio receiver enables: •... -
Page 135: Radio/ Hd Radio Tuner Basic Operation
(P.151). • HD Radio broadcasting can be received only by the DNN991HD. • HD Radio broadcasting is for North American sales area only. • The screen shot below is for tuner. It may be different from the one for HD Radio broadcasting. - Page 136 Return to the Top page Radio, HD Radio™ tuner Operation 6 Preset list Displays the list of preset stations or channels and the information. 7 Sub function menu The following functions can be performed by using keys in this area. •...
-
Page 137: Memory Operation
Return to the Top page Radio, HD Radio™ tuner Operation Memory Operation Selecting Operation Ñ Ñ Auto memory Preset select You can automatically store stations with You can list and select memorized station or good reception to memory. channel. Selecting from the multi function NOTE menu •... - Page 138 Return to the Top page Radio, HD Radio™ tuner Operation Ñ Ñ Search by program type Direct search (HD Radio tuner only) You can tune to a station with a specific program type when listening to FM. You can tune in by entering the desired frequency or channel number.
-
Page 139: Traffic Information (Hd Radio Tuner Only)
Return to the Top page Radio, HD Radio™ tuner Operation Ñ Category/Channel search Traffic Information (HD Radio tuner only) (HD Radio tuner only) You can specify the desired category and select a channel. You can listen and watch the traffic information automatically when a traffic Touch [ ] in the control screen. -
Page 140: Receive Mode (Hd Radio Tuner Only)
Return to the Top page Radio, HD Radio™ tuner Operation Receive Mode Bookmark (HD Radio tuner only) Stores tag information (title, artist, album, URL, and description) about the song you are You can set the radio broadcasts receive listening to now. mode. - Page 141 Return to the Top page Radio, HD Radio™ tuner Operation Select the desired bookmark from the Touch [Delete List]. list. The Bookmark Delete List appears. The bookmark infomation appears. Select the bookmark to delete from the list. Deletes the bookmarks being displayed. Select all bookmarks.
-
Page 142: Siriusxm® Satellite Radio Operation (Dnn991Hd)
Return to the Top page SiriusXM® Satellite Radio Operation ñ iriusXM® Satellite Radio Operation (DNN991HD) SiriusXM® Basic Operation Most functions can be controlled from the source control screen. Before use • SiriusXM Satellite Radio operation requires the connection of the optional SiriusXM Connect Vehicle Tuner. To activate the SiriusXM Vehicle Connect tuner, you will need the Radio ID. - Page 143 Return to the Top page SiriusXM® Satellite Radio Operation 3 Multi function key Multi function menu (P.104). Touch to switch the multi function menu. For details on the menu, see 4 Preset key/Multi function menu Recalls the memorized channel. When touched for 2 seconds, the current channel being received is stored to the memory.
- Page 144 Return to the Top page SiriusXM® Satellite Radio Operation Ñ Multi function menu The functions of each key are as follows. [P1] - [P6] Select the preset channel. Touch for 2 seconds to store the current station into the preset memory. Select search method from preset channel selection or category/channel search.
-
Page 145: Memory Operation
Return to the Top page SiriusXM® Satellite Radio Operation Selecting from the preset list Memory Operation Touch illustrated area. Ñ Manual memory You can store the current receiving station or channel in memory. Select a station or channel you wish to store in memory. - Page 146 Return to the Top page SiriusXM® Satellite Radio Operation Ñ Ñ Direct search Category/Channel search You can tune in by entering the desired You can specify the desired category and frequency or channel number. select a channel. Touch [ Touch [ ] in the control screen.
-
Page 147: Content Alert
Return to the Top page SiriusXM® Satellite Radio Operation Content Alert When a broadcast program related to the registered artist, song, team or city starts, a message appears to allow you to switch the current channel to the relevant channel. When the broadcast of the registered content starts, an Alert screen appears. -
Page 148: Siriusxm Replay
Return to the Top page SiriusXM® Satellite Radio Operation Touch [ ] to display a program list. SiriusXM Replay™ You can replay up to the last 60 minutes broadcasting of current channel Simple Control screen or List Control screen. Program list Touching this plays back the displayed program. -
Page 149: Smart Favorites, Tunestart
Return to the Top page SiriusXM® Satellite Radio Operation Smart Favorites, TuneStart™ TuneScan™ Station memory number 1 though 6 of TuneScan™ is a feature that plays samples current band are Smart Favorite channels. from the starts of multiple buffered songs SiriusXM Vehicle Tuner automatically from each of the Smart Favorite channels buffered the broadcast audio content of the... -
Page 150: Siriusxm Setup
Return to the Top page SiriusXM® Satellite Radio Operation Ñ Parental code SiriusXM Setup You can set a SiriusXM parental code. Touch [ Touch [Change] of [Parental Code] in Quick menu appears. the SiriusXM SETUP screen. Parental Pass Check screen appears. Touch [SETUP]. - Page 151 Return to the Top page SiriusXM® Satellite Radio Operation Ñ Parental control Touch each channel list and set on or off. Parental control is a feature that provides the user with the ability to prevent unauthorized access to mature content and user selected channels.
- Page 152 Return to the Top page SiriusXM® Satellite Radio Operation Ñ Ñ Skip channel select Content alerts Content Set You can set the undesired channels to skip. You can set a content for Content alerts. Touch [SET] of [Skip Channel Select]. Touch [SET] of [Content alerts Content Set] in the SiriusXM SETUP screen.
- Page 153 Return to the Top page SiriusXM® Satellite Radio Operation Ñ City select for Traffic & Weather Jump You can select a city for which traffic information or weather forecast is to be received with the Content alerts function. Touch [C] and [D] of [Traffic Weather Jump City Select] to select a city.
-
Page 154: Streaming Service Application
Return to the Top page Streaming Service Application ñ treaming Service Application Ñ Keyword Search Streaming Video Application Touch [Keyword Search]. You can play videos uploaded to YouTube. Perform desired operation as follows. Preparation Network • You need to connect to Internet. See Setup (P.32). - Page 155 Return to the Top page Streaming Service Application Ñ Ñ Video screen My YouTube By logging into YouTube, you can use My In the playback screen, touch Favorites and My-Videos. illustrated area. Press the
-
Page 156: Aupeo! Application
Return to the Top page Streaming Service Application Ñ Log in AUPEO! Application By registering an account, you can listen to You can listen to music on the online radio your favorite songs. AUPEO!. Touch [log in]. Preparation Enter the User Name and Password. Network •... - Page 157 Return to the Top page Streaming Service Application Ñ Ñ Play screen Editing Favorites You can edit the titles registered in Loves and Bans. Preparation • You can only use this function when you have logged in this service. Touch [ Plays or pauses.
-
Page 158: Bluetooth Control
See the following section for each setting. • For the smartphones/cell-phones verified for • Registering from this unit (P.119) compatibility, access the following URL: http://www.kenwood.com/cs/ce/bt/. • Connecting the Bluetooth unit (P.119) • The units supporting the Bluetooth function have • Registering from the Bluetooth unit been certified for conformity with the Bluetooth (P.120) - Page 159 Return to the Top page Bluetooth Control Ñ Ñ Registering from this unit Connecting the Bluetooth unit Touch the name of device to connect. Preparation Profile select screen appears. • You cannot register the Bluetooth unit when you are using the following sources: NOTE iPod, Bluetooth Audio, APPS, Pandora If you want to register the Bluetooth unit while...
- Page 160 Return to the Top page Bluetooth Control Ñ Ñ Registering from the Change the PIN code Bluetooth unit Touch [PIN Code Set]. Search the unit (“DNN****”) from your smartphone/cell-phone. Input the PIN code in your smartphone/ cell-phone. PIN code is set to “0000” as the default. SSP (Secure Simple Pairing of Bluetooth 2.1 or later) Search the unit (“DNN****”) from your...
-
Page 161: Playing Bluetooth Audio Device
Return to the Top page Bluetooth Control Playing Bluetooth Audio Device Ñ Bluetooth basic operation Simple Control screen List Control screen 1 Information display Displays the name of the content information. If the information is not available, Bluetooth unit name is displayed. -
Page 162: Using Hands-Free Feature
Return to the Top page Bluetooth Control Select a dialing method. Using Hands-Free Feature You can make or answer a call with Hand- Free by connecting a smartphone/cell-phone with built-in Bluetooth connected to this unit. Ñ Making a call Press and hold the < 6 > button. See the following table for each method. -
Page 163: Voice Recognition
Return to the Top page Bluetooth Control Ñ Voice Recognition *1 You can sort the list to begin with touched character. You can access the voice recognition function of the smartphone/cell-phone connected to this unit. You can search a phone number in the smartphone/cell-phone phonebook by pronouncing a name. -
Page 164: Answering A Call
Return to the Top page Bluetooth Control Ñ Answering a call Call waiting You can answer a second call while talking Touch [ ] to answer a call or with the first caller by placing the first call ] to reject a call. on hold and switching to the second call. - Page 165 Return to the Top page Bluetooth Control Ñ Phone Number Search When searched by Phonebook name You can search the address book in your cell phone for the number or the name, and make a call. Touch [ Select whether you search by Phonebook name or Phone number...
-
Page 166: Hands-Free Setup
Return to the Top page Bluetooth Control Set each item as follows. Hands-Free Setup You can perform various setup about hands- free function. Touch [ ] on any screen. Touch [SETUP]. SETUP Menu screen appears. Touch [Bluetooth]. Bluetooth SETUP screen appears. Touch [TEL SETUP]. - Page 167 Return to the Top page Bluetooth Control Sort Order Set how to arrange the cell-phone phonebook. First: Arranges in the order of first name. Last (Default): Arranges in the order of last name. Echo Cancel Level Adjust the level of echo cancellation. Default is “1”.
-
Page 168: Voice Control (Dnn991Hd)
Return to the Top page Voice Control ñ oice Control (DNN991HD) The unit is equipped with Advanced Voice Speak the command. (Ex: Speak “HD Recognition function which allows you to RADIO” .) operate it with your voice. The supported languages are US English, UK English, French, German, Dutch, Italian, and Spanish. -
Page 169: Camera Control
Return to the Top page Camera Control ñ amera Control When a CMOS-3xx (optional accessory) is Switching the View Camera connected, the camera can be controlled from this unit. Switching between the front view camera and the rear view camera. Preparation Press the -
Page 170: Setting Up
Return to the Top page Setting Up ñ etting Up Bright / Tint / Color / Contrast / Black / Monitor Screen Setup Sharpness You can adjust image quality of playback Adjusts each item. screen, background screen, etc. Dimmer Select dimmer mode. Touch and hold the lower left area of any screen. -
Page 171: System Setup
Return to the Top page Setting Up Language System Setup Select the language used for the control Language setup screen and setting items. See NOTE (P.132). • Each operation in this section can be started from the multi function menu. Touch [ ] on any screen. - Page 172 Security screen appears. Touch [ON] or [OFF] of [SI]. GUI Language Select Select the language used for the GUI and input methods. ASR (DNN991HD) Select the language used for voice control function. Navigation Language Select Select the language used for navigation.
- Page 173 Return to the Top page Setting Up Ñ Ñ EXT SW setup Setup memory Set up the external switch power mode. Audio Control, AV-IN SETUP, Camera, and Audio SETUP settings can be memorized. The Touch [EXT SW] in the System Menu memorized settings can be recalled at any screen.
-
Page 174: Display Setup
Return to the Top page Setting Up Follow the instruction on the screen. Display Setup Touch [ ] on any screen. Touch [SETUP]. SETUP Menu screen appears. Touch [Display]. Recall Recalls the memorized settings. Memory Memorizes the current settings. Clear Display screen appears. - Page 175 Return to the Top page Setting Up Ñ Panel color coordinate Registering original color You can register your original color. You can set the button illumination color. The selectable items differ depending on the Touch [Adjust] in the Panel Color unit.
-
Page 176: Navigation Setup
Return to the Top page Setting Up Navigation Setup External Device Control You can set navigation parameters. Control the external device power supply. Touch [ ] on any screen. Touch [ ] on any screen. Touch [SETUP]. Touch [EXT SW]. SETUP Menu screen appears. -
Page 177: Camera Setup
Return to the Top page Setting Up Rear Camera* Camera Setup Select the type of rear camera to use. You can set camera parameters. CMOS-310: When the CMOS-3xx series with ID 1 set is connected. Touch [ ] on any screen. Other (Default): When the other camera is Touch [SETUP]. -
Page 178: Software Information
Return to the Top page Setting Up Minor update Software Information If it is the minor update you can update the program via the Internet. Check the software version of this unit. Drag the status bar downward. Touch [ ] on any screen. Touch [SETUP]. -
Page 179: Av Input Setup
Return to the Top page Setting Up AV Input Setup AV Output Interface Setup You can set AV input parameters. You can select an AV source to be output at the AV OUTPUT port. Default is “VIDEO1”. Touch [ ] on any screen. Touch [ ] on any screen. -
Page 180: Controlling Audio
Return to the Top page Controlling Audio ñ ontrolling Audio Setting Audio NOTE • Each operation in this section can be started from the multi function menu. Touch [ ] on any screen. Touch [Audio]. You can adjust the various settings such as audio balance or subwoofer level. - Page 181 Return to the Top page Controlling Audio Ñ Speaker setup Tweeter You can select a speaker type and its size to You can set the tweeter when you are get the best sound effects. selecting front speakers. None, Small, Middle, Large When the speaker type and size are set, the speaker crossover network is set X’over...
- Page 182 Return to the Top page Controlling Audio Ñ Car type setup Crossover network setup You can set a crossover frequency of You can setup the car type and speaker speakers. network, etc. Touch the speaker to set the crossover Touch [Car Type] in the Audio SETUP in the Speaker Select screen.
-
Page 183: Controlling General Audio
Return to the Top page Controlling Audio Ñ DSP select Set each item as follows. You can select whether using DSP (Digital Signal Processor) System. Touch [Bypass] or [Through] of [DSP Select] in the Audio SETUP screen. Fader # / Balance # Adjust the volume balance around the touched area. -
Page 184: Equalizer Control
Return to the Top page Controlling Audio Controlling equalizer manually Equalizer Control The Graphic Equalizer cannot be set when you select [iPod] in the Equalizer screen. You can adjust equalizer by selecting the optimized setting for each category. Touch [EQ] in the Equalizer screen. Touch [ ] on any screen. -
Page 185: Zone Control
Return to the Top page Controlling Audio [Single Zone] Zone Control Touch to turn off the dual zone function. You can select different sources for both front and rear positions in the vehicle. NOTE Touch [ ] on any screen. •... -
Page 186: Sound Effect
Return to the Top page Controlling Audio Ñ Space Enhancer Sound Effect Touch [Space Enhancer] in the Sound You can set sound effects. Effect screen. Touch [ ] on any screen. Touch [Audio]. Audio screen appears. Touch [Sound Effect]. Space Enhancer screen appears. Touch [Small], [Large], or [OFF]. - Page 187 Return to the Top page Controlling Audio Ñ Ñ Drive Equalizer + Realizer and Supreme The sound quality is automatically optimized You can restore the sound lost due to audio to meet the current car speed by GPS. compression to a realistic sound. Touch [ON] or [OFF] of [Drive EQ+].
-
Page 188: Listening Position
Return to the Top page Controlling Audio Ñ Position DTA Control Listening Position You can fine-adjust your listening position. You can adjust the sound effects according In Position screen, touch [Adjust]. to your listening position. Select the speaker you wish to adjust Touch [ ] on any screen. - Page 189 Return to the Top page Controlling Audio NOTE • Make fine adjustment of the delay time of the speaker output specified here to have a more suitable environment for your vehicle. • If you specify the distance from the center of the currently set listening position to every speaker, the delay time will be automatically computed and set.
-
Page 190: Remote Control
Return to the Top page Remote Control ñ emote Control This unit can be operated using the remote control. #CAUTION • Put the remote control in a place where it will not move during braking or other operations. A dangerous situation could result, if the remote control falls down and gets wedged under the pedals while driving. -
Page 191: Functions Of The Remote Control Buttons
Return to the Top page Remote Control Functions of the Remote Control Buttons Ñ Ñ Switching the operation mode Direct search mode The functions operated from the remote Using the remote control, you can jump control differ depending on the position of directly to the desired file, track chapter, etc. - Page 192 Return to the Top page Remote Control Location of the mode Function Name switch AUD, DVD Switches to the source to be played. In hands-free mode, hangs up the phone. − Switches between the navigation and the source screens. MENU Stops playing and memorizes the last point where the disc stopped.
- Page 193 Return to the Top page Remote Control Location of the mode Function Name switch ROUTE M Screen mode changes each time you press this key during video playback. Returns to the DVD top menu. Displays Route Option menu. VOICE Switches navigation display on/off. Displays the DVD menu.
-
Page 194: Troubleshooting
Return to the Top page Troubleshooting ñ roubleshooting Problems and Solutions If any trouble occurs, first check the following table for possible problems. • Some functions of this unit may be disabled by some settings made on this unit. • What might seem to be a malfunction in your unit may just be the result of slight misoperation or miswiring. -
Page 195: Error Messages
Mecha Error The disc player is malfunctioning. Eject the disc and try inserting it again. Contact the Kenwood dealer if this indicator continues blinking or the disc cannot be ejected. Disc Error An unplayable disc is inserted. Change the disc. - Page 196 Push the unit’s Reset button. If the “Error due to some reason or other. 07−67” message does not disappear, see your nearest Kenwood dealer. No Device (USB The USB device is selected as a Change the source to any source other than...
-
Page 197: Resetting The Unit
Return to the Top page Troubleshooting Ñ SiriusXM Error Message Cause Solution Check Tuner A SiriusXM tuner is not connected Check the connection to the SiriusXM tuner. to this navigation system. Touch [ 6 ] to clear the error message. Subscription The SiriusXM subscription has been Updated - Press... -
Page 198: Appendix
Return to the Top page Appendix ñ ppendix Playable Media and Files You can play various kinds of media and files on this unit. Ñ List of playable discs Disc types Standard Support Remark DVD Video DVD Audio × DVD-VR ×... - Page 199 ¡P of media or device. • An online manual about audio files is posted on the site, www.kenwood.com/cs/ce/audiofile/. On this online manual, detailed information and notes which are not written in this manual are provided. Make sure to read through the online...
- Page 200 Changing the browse item will display a correct title, etc. • When the iPod is connected to this unit, “KENWOOD” or “ä” is displayed on the iPod to indicate that you cannot operate the iPod.
-
Page 201: Status Bar Indicator Items
Return to the Top page Appendix Status Bar Indicator Items Shown below is a list of indicators displayed on the status bar in the screen. Current status of this unit is displayed on the bar. Status bar öGeneral öVCD 1chLL/2chLL The attenuator is active. - Page 202 Return to the Top page Appendix öUSB SD öHD Radio reception FO-REP AUTO1 The folder repeat function is on. Seek mode is set to AUTO1. VIDEO AUTO2 Identifies the video file. Seek mode is set to AUTO2. MUSIC MANU Identifies the music file. Seek mode is set to MANUAL.
-
Page 203: Region Codes In The World
Return to the Top page Appendix Region Codes in the World The DVD players are given a region code according to the country or area it is marketed, as shown in the following map. öDVD disc marks öOperation regulatory marks With this DVD, some functions of this unit such as the play function may be restricted depending on the location where the DVD is playing. -
Page 204: Dvd Language Codes
Return to the Top page Appendix DVD Language Codes Code Language Code Language Code Language Afar Interlingua Kirundi Abkhazian Interlingue Romanian Afrikaans Inupiak Russian Amharic Indonesian Kinyarwanda Arabic Icelandic Sanskrit Assamese Italian Sindhi Aymara Japanese Sangho Azerbaijani Javanese Serbo-Croatian Bashkir Georgian Singhalese Byelorussian... -
Page 205: Specifications
Number of Pixels Audio Decoder : 1,152,000 (800H x 480V x RGB) : MP3/ WMA/ AAC/ WAV/ FLAC Effective Pixels : 99.99 % öSD (DNN991HD) Pixel Arrangement SD Standard : RGB striped arrangement : SD/ SD-HC Back Lighting Compatible File System... - Page 206 • SPP (Serial Port Profile) • SDP (Service Discovery Profile) Frequency Range • A2DP (Advanced Audio Distribution Profile) DNN991HD: 2.401 – 2.473 GHz • AVRCP (Audio/Video Remote Control Profile) DNN9710BT: 2.401 – 2.483 GHz • PBAP (Phonebook Access Profile) Transfer rates (MAX) •...
- Page 207 Full Bandwidth Power (Front & Rear) (4 Ω, 14.4 V, 1 Frequency Range % THD) DNN991HD : 87.9 MHz – 107.9 MHz (200 kHz) : 22 W x 4 DNN9710BT : 87.5 MHz – 108.0 MHz (50 kHz) Preout Level (V) Usable Sensitivity (S/N : 30 dB) : 5 V/ 10 kΩ...
-
Page 208: Trademarks
• The Bluetooth word mark and logos are owned by : High-sensitivity GPS receiver the Bluetooth SIG, Inc. and any use of such marks Reception Frequency by JVC KENWOOD Corporation is under license. : 1575.42 MHz (C/A code) Other trademarks and trade names are those of their Acquisition Times respective owners. - Page 209 Return to the Top page Appendix • Manufactured under license from Dolby Laboratories. LLC in the United States and other countries. Dolby and the double-D symbol are trademarks of Dolby Laboratories. • MHL and the MHL logo are a trademark or registered trademark of MHL, LLC.
- Page 210 Return to the Top page Appendix • AVC STRICT LIABILITY, OR TORT (INCLUDING NEGLIGENCE THIS PRODUCT IS LICENSED UNDER THE AVC PATENT OR OTHERWISE) ARISING IN ANY WAY OUT OF THE PORTFOLIO LICENSE FOR THE PERSONAL USE OF A USE OF THIS SOFTWARE, EVEN IF ADVISED OF THE CONSUMER OR OTHER USES IN WHICH IT DOES NOT POSSIBILITY OF SUCH DAMAGE.
-
Page 211: Safety Precaution
In compliance with Federal Regulations, following are reproductions of labels on, or inside the product relating to laser product safety. JVC KENWOOD Corporation 2967-3, ISHIKAWA-MACHI, HACHIOJI-SHI, TOKYO, JAPAN THIS PRODUCT COMPLIES WITH DHHS RULES 21 CFR SUBCHAPTER J IN EFFECT AT DATE OF MANUFACTURE. - Page 212 Return to the Top page Appendix öInformación acerca de la eliminación DNN9710BT : öThe marking of products using lasers de equipos eléctricos y electrónicos al final de la vida útil (aplicable a los CLASS 1 países que hayan adoptado sistemas LASER PRODUCT independientes de recogida de residuos)
- Page 213 Return to the Top page Appendix About QAU0568, W02-5613 (USB Wi-Fi® Adapter) (DNN991HD) About QAU0569 (USB Wi-Fi® Adapter) (DNN9710BT) The Wi-Fi Adapter is attached to this unit when shipped from the factory. When the adapter is removed, store it in a safe place.
- Page 215 CONNECTED NAVIGATION SYSTEM DNN991HD GPS NAVIGATION INSTRUCTION MANUAL © IM383_Nav_K_En_00...
- Page 216 Contents Navigation End-User License Agreements Starting a Route Previewing Multiple Routes Following a Route Getting Started Using the Navigation Map Using the Navigation System Using Multi-touch Controls Help When You Need It Adding a Point to a Route Searching Help Topics Taking a Detour Status Bar Icons Stopping the Route...
- Page 217 Using the Apps Customizing the Settings About the Apps Customizing the Navigation System About ecoRoute Changing the Map Settings Creating a Vehicle Profile Enabling Maps Resetting Your Vehicle Profile Changing the Navigation Settings Calibrating Fuel Economy Adjusting the Display Settings Taking the ecoChallenge Route Preferences About ecoChallenge Scores...
-
Page 218: Software License Agreement
Software License Agreement treaties. The Garmin Products are licensed, not sold. The structure, organization and code of BY USING THE DNN991HD, YOU AGREE TO BE the Software and Application are valuable trade BOUND BY THE TERMS AND CONDITIONS OF THE secrets of Garmin and/or its third-party providers. - Page 219 with vehicles, and which are capable of dispatch, in your business’ internal operations, and not fleet management or similar applications where for service bureau, time-sharing, resale or other similar purposes. Accordingly, but subject to the the Content is used by a central control center in dispatching a fleet of vehicles.
- Page 220 End-User License Agreements (if applicable), or (iii) as long as Garmin receives providers, channel partners, suppliers and affiliated Content from its third party content supplier, companies of Garmin and its licensors, DISCLAIM whichever of the three periods is shortest. A ANY WARRANTIES, EXPRESS OR IMPLIED, OF Garmin device’s “useful life”...
- Page 221 THROUGH THE SOFTWARE IS DONE AT YOUR or other Content by trade name, trademark, OWN DISCRETION AND RISK. YOU WILL BE manufacturer, supplier or otherwise does not SOLELY RESPONSIBLE FOR ANY DAMAGE TO YOUR necessarily constitute or imply its endorsement, ELECTRONIC COMMUNICATION DEVICE OR ANY sponsorship or recommendation by Garmin or LOSS OF DATA THAT MAY RESULT FROM THE...
- Page 222 End-User License Agreements reason, including, but not limited to, if Garmin by the laws of Kansas, without giving effect to (i) its finds that you have violated any of the terms of conflict of laws provisions, or (ii) the United Nations this Agreement.
- Page 223 access to Location Platform Services, by accessing such Location Platform Services you agree to application of the Nokia Terms of Service at http:// here.com/services/terms and the Nokia Privacy Policy at http://www.nokia.com/global/privacy/ privacy/policy/privacy-policy/. English...
- Page 224 agree to use it at your own risk. HERE or TPTP (and Traffic End User License Agreement their respective affiliates) and Garmin Ltd. (and Your Garmin product may be equipped to receive its subsidiaries) make no warranty of fitness or traffic data.
- Page 225 terms of this Agreement. Your traffic subscription agency, or any federal official refuses to use the may not be transferred to another person or legend provided herein, the Contracting Officer, another Garmin product. Traffic services are in federal government agency, or any federal official part geographically restricted to the reception must notify HERE prior to seeking additional or and transmission range of the radio transmitters in...
-
Page 226: Getting Started
Getting Started The first time you use your Kenwood Navigation System, you need to set up your system. The Help menu provides additional information. Help When You Need It WARNING See "Safety Precautions and Important Information" Select Apps > Help to view information in the Quick Start Guide for product warnings and about using the device. -
Page 227: Satellite Signals
Adding a Shortcut Satellite Signals You can add shortcuts to the Where To? menu. A After your vehicle is turned on, the navigation shortcut can point to a location, a category, or a system begins acquiring satellite signals. The search tool. The Where To? menu can contain up to system may need a clear view of the sky to acquire 36 shortcut icons. -
Page 228: Finding Locations
Finding Locations The navigation system offers many methods for finding locations. The detailed maps loaded in your navigation system contain locations, such as restaurants, hotels, and auto services. You can use categories to browse for nearby businesses and attractions. Finding a Location by Category Enter a search term. -
Page 229: Finding Fuel Stations And Prices
Finding Fuel Stations and Prices Finding a City Before you can use this feature, you must Before you can find a city, you must add a subscribe to the Fuel Price service, and your shortcut to the cities search tool (page 13). -
Page 230: Finding A Location Using Coordinates
Finding Locations Finding a Location Using Coordinates Select an option: Before you can find a location using coordinates, • Select a location marker. you must add a shortcut to the coordinates • Select a point, such as a street, intersection, or search tool (page 13). address location. You can find a location using latitude and If necessary, select the location description longitude coordinates. -
Page 231: Going Home
Going Home Select an area on the map. Select Where To? > Go Home. The address of the location appears at the bottom of the screen. Editing Your Home Location Information Select the location description. Select Where To? > Saved > Home. Select Set Location. Select > > Edit. Saving a Location Enter your changes. -
Page 232: Starting A Route To A Saved Location
Finding Locations Starting a Route to a Saved Location Assigning Categories to a Saved Location You can add custom categories to organize your Select Where To? > Saved. saved locations. ⁄ If necessary, select a category, or select All Saved Places. •... -
Page 233: Voice Command
Voice Command Voice Command allows you to use your device by saying words and commands. The Voice Command menu provides voice prompts and a list of available commands. Listen for the voice prompt, and speak the ⁄ name of the location. •... -
Page 234: Navigation
Navigation You can create, customize, and edit your routes. Starting a Route Using the Navigation Map Search for a location (page 14). From the main menu, select View Map. Select a location. If the zoom controls are hidden, select the map to display the zoom controls. -
Page 235: Adding A Point To A Route
Adding a Point to a Route Using Suggested Routes Before you can use this feature, you must save at While navigating a route, select least one location and enable the travel history return to the main menu. feature (page 17). Using the myTrends feature, your device predicts ™... -
Page 236: Navigating To An Exit
Navigation Navigating to an Exit Adding a Custom Avoidance Area Custom avoidances allow you to avoid specific From the map, select > Exit Services > areas and sections of road. You can enable and disable custom avoidances as needed. Select an exit service. Select Settings >... -
Page 237: Deleting Custom Avoidances
Deleting Custom Avoidances Select Settings > Navigation > Custom Avoidances. Select an option: • To delete all custom avoidances, select • To delete one custom avoidance, select the avoidance, and select > Delete. Enabling Advanced Detours Select Settings > Navigation > Advanced Detours. Taking a Detour Around Specified Areas You can take a detour for a specified distance along your route or detour around specific roads. -
Page 238: The Map Pages
The Map Pages You can customize which data appear on the map and view upcoming turns and current location information. Customizing the Map Layers Changing the Map Perspective You can customize which data appear on the Select Settings > Map & Vehicle > Driving map, such as icons for points of interest and road Map View. -
Page 239: Viewing A List Of Turns
Viewing a List of Turns Viewing Junctions When you are navigating a route, you can view all While navigating a route, you can view the of the turns and maneuvers for your entire route junctions on major roadways. When you approach and the distance between turns. -
Page 240: Resetting Trip Information
The Map Pages Resetting Trip Information From the map, select > Trip Computer. Select > Reset All. Select an option: • When not navigating a route, select Select All to reset every data field, except the speedometer, on the page. • Select Reset Trip Data to reset the information on the trip computer. • Select Reset Max. Speed to reset the maximum speed. • Select Reset Trip B to reset the odometer. Viewing Current Location Information You can use the Where Am I? page to view information about your current location. -
Page 241: Using The Apps
Traffic, Fuel Prices, Dynamic Parking, Real-Time Select Reset. Traffic Camera, Movie Times and more. The coverage of these services depends on availability in your region. For details, see other Kenwood Calibrating Fuel Economy system manuals. Use this feature when you refuel to maintain an accurate fuel economy. - Page 242 Using the Apps Viewing Your Fuel Economy ⁄ • To view detailed ecoChallenge scores, select the icon. Select Apps > ecoRoute™ > Fuel Economy. The leaf color on the driving challenge icon changes depending on your performance in the challenge. The graph along the bottom shows your average fuel economy for a period of About ecoChallenge Scores...
- Page 243 Exporting a Mileage Report Editing a Trip Itinerary Connect a USB mass storage device to your Select Apps > Trip Planner. Kenwood unit. Select a saved trip. Select Apps > ecoRoute > Mileage Report. Select an option: Select Export to export and save the •...
- Page 244 Using the Apps Importing Routes Using Dynamic Parking Trip Planner and the KENWOOD Route Collector Before you can use this feature, you must site can share information for up to 10 routes. You subscribe to the Dynamic Parking service, and...
- Page 245 Traffic information is not available on all models or in all areas. Traffic Data Using INRIX Traffic Service NOTICE Garmin and JVC KENWOOD is not responsible for You can purchase a traffic subscription to receive the accuracy or timeliness of the traffic information.
- Page 246 Traffic Information Traffic on Your Route Viewing Traffic on the Map When calculating your route, the navigation The traffic map shows color-coded traffic flow system examines the current traffic and and delays on nearby roads. automatically optimizes the route for the shortest From the map, select time.
-
Page 247: Customizing The Settings
Customizing the Settings You can customize the settings of your GPS navigation system. Customizing the Navigation System Changing the Navigation Settings Select Settings. Select Settings > Navigation. • Calculation Mode—sets route preference. Select a setting category. • Avoidances—sets road features to avoid on a route. •... - Page 248 Customizing the Settings Updating the Time Settings Restoring Settings You can restore a category of settings or all Select Settings > Units & Time. settings to the factory default values. • Current Time—select Automatic to update the time Select Settings. automatically.
- Page 249 Follow the on-screen instructions. WARNING Updating the Map Data Garmin and JVC KENWOOD are not responsible for You can purchase updated map data from Garmin the consequences of using custom POI databases, or ask your Kenwood dealer or Kenwood service or for the accuracy of custom POI databases.
- Page 250 For the latest free software updates (excluding map data) throughout the life of your Garmin products, visit the Garmin Web site at www.garmin.com/Kenwood. © 2014 Garmin Ltd. or its subsidiaries Garmin International, Inc. 1200 East 151st Street, Olathe, Kansas 66062, USA Garmin (Europe) Ltd.
- Page 251 CONNECTED NAVIGATION SYSTEM DNN991HD DNN9250DAB Voice Command Table 14DNN_IM383_VoiceCommand_en_00 (K/E) © 2014 JVC KENWOOD Corporation General opreration Voice Command Displaying Voice Commands Screen Operation US English UK English French German Dutch Italian Spanish The available voice commands depend on each screen and you can...