
Related Manuals for JVC CompactFlash LYT0143-001A


Summary of Contents for JVC CompactFlash LYT0143-001A
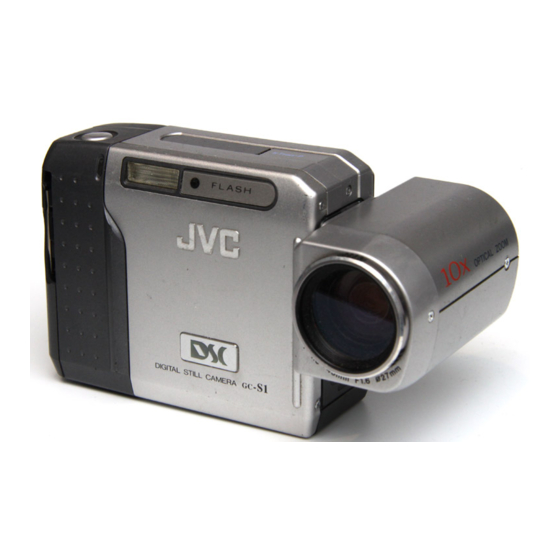
- Page 1 DIGITAL STILL CAMERA GC-S1 INSTRUCTIONS Please visit our CyberCam Homepage on the World Wide Web and answer our Consumer Survey (in English only): http://www.jvc-victor.co.jp/index-e.html STILL CAMERA LYT0143-001A ENGLISH...
-
Page 2: Safety Precautions
Dear Customer, Thank you for purchasing the Digital Still Camera. Before use, please read the safety information and precautions contained in the following pages to ensure safe use of your new camcorder. Using This Instruction Manual • All major sections and subsections are listed in the Table Of Contents ( •... - Page 3 CAUTION: To avoid electric shock or damage to the unit, first firmly insert the small end of the power cord into the AC Power Adapter until it is no longer wobbly, and then plug the larger end of the power cord into an AC outlet. SOME DO’S AND DON’TS ON THE SAFE USE OF EQUIPMENT This equipment has been designed and manufactured to meet international safety standards...
-
Page 4: Quick Start
BATTERY cover Load batteries. ( Slide the BATTERY cover slightly to open. Insert four LR6 (AA)-size batteries as indicated by the orientation marking inside the cover. Zoom Button Power Dial Play an image. ( pg. 31) Turn the Power Dial to “ •... -
Page 5: Major Features
MAJOR FEATURES 10X Zooming for Magnifying Faraway Subjects When a subject is located too far away to be approached, its image can be enlarged using 10X zooming. An image shot by zooming has much higher quality than a non- zoomed image enlarged using image processing software on a PC. Cordless Image Transfer Using Infrared Communication (IrTran-P Compatible) IrTran-P is the most advanced infrared communication protocol available today. -
Page 6: Table Of Contents
SAFETY PRECAUTIONS QUICK START MAJOR FEATURES CONTENTS GETTING STARTED Loading Batterirs ... 8 Unloading Batteries ... 8 Hand Strap Attachment ... 8 Houehold Power Supply ... 9 Date/Time Setting ... 10 BASIC OPERATION Lens Adjustment ... 12 Shutter Release Button ... 12 Brightness Control ... - Page 7 Applying Sepia/Black-and-White Effects ... 38 Magnifying the Playback Image (Zoom) ... 39 Types of Frames ... 40 Framing an Image ... 41 Multi-Image Screen ... 42 APPLIED OPERATIONS Compact Flash Card Operation ... 44 Installing a Compact Flash Card ... 44 Removing a Compact Flash Card ...
-
Page 8: Getting Started
Loading Batteries Use LR6 (AA)-size dry cell batteries. Slide the battery cover (BATTERY) slightly to open. • The battery cover opens. Insert batteries as indicated by the orientation marking inside the battery cover. Close the battery cover and slide it back. •... -
Page 9: Household Power Supply
Household Power Supply When using the camera indoors, it is more convenient and economical to power it from a household AC power outlet using an AC power adapter (optional). To AC outlet AA-V33 AC power adapter (optional) Core filter Connect the Power Cord to the AC Power Adapter. -
Page 10: Date/Time Setting
Date/Time Setting By setting the date and time, date/time data can be viewed along with your pictures. Date/time data is also convenient for categorizing pictures later. Power Dial Lock Buton LCD monitor CAMERA MENU CAMERA MENU CAMERA Screen P I CTURE MODE SYSTEM EX I T SYSTEM... - Page 11 LCD monitor DATE / T I ME DATE/TIME Setup DATE Screen 2 7 . 1 2 . 1 9 9 8 T I ME 9 : 3 0 EX I T DATE / T I ME DATE 2 7 . 1 2 .
-
Page 12: Basic Operation
Lens Adjustment To obtain the most stable position for shooting while viewing the LCD monitor, hold the lens so that it forms an angle of 45 degrees in relation to the camera body. The lens tilts up to 100 degrees forward and 90° backward. -
Page 13: Brightness Control
Brightness Control You can adjust the brightness of the LCD monitor by rotating the BRIGHT dial, except during manual focusing or menu adjustment. To darken the image . . . Rotate the BRIGHT dial upward. To brighten the image . . . Rotate the BRIGHT dial downward. -
Page 14: Shooting Mode Selection
Shooting Mode Selection Turning the Power Dial allows you to select the appropriate shooting mode from among the following: Full Auto mode ( ), Manual mode ( “ ” : Full Auto mode The camera will automatically control all items including exposure, shutter speed, focusing and white balance. -
Page 15: Picture Mode Selection
Pictrue Mode Selection The Picture Quality mode can be selected to best match your needs. Three Picture Quality modes are available: FINE, STD (standard) and ECONOMY (in order of quality). Power Dial Lock Button Turn the Power Dial, while pressing its Lock Button, to “... -
Page 16: Simple Shooting (Full Auto Shooting)
Simple Shooting (Full Auto Shooting) In the Full Auto mode, the camera controls focusing, shutter speed, exposure and white balance automati- cally to make your shooting simple and easy. Turn the Power Dial, while pressing its Lock Button, to “ ”. •... -
Page 17: Camera Setup Check
Camera Setup Check Camera setup items that can be checked include the image storage location (only when stored in a Compact Flash card), Picture Quality mode, number of shots taken, remaining battery power, date and time. For details, see “On-Screen Display During Shooting” ( DISPLAY Button Standard View mode (colour display) -
Page 18: Zoom Shooting
Zoom Shooting The camera incorporates a 10X zooming function that corresponds to a 43 mm to 430 mm lens of a 35 mm camera. Zooming allows you to shoot wide areas, as well as close-ups of subjects located far away, without changing the shooting position. -
Page 19: Self-Timer Shooting
Self-Timer Shooting When the Self-Timer is activated, the camera shutter is automatically released 15 seconds later. Once the camera is set, the camera operator can become part of the scene. This function can also be used to prevent blurring caused by subtle hand movements when the Shutter Release Button is pressed. Self-Timer Lamp Turn the Power Dial, while pressing its Lock Button, to “... -
Page 20: Flash Shooting
Flash Shooting Use the flash when the low light “ ” icon appears on-screen during indoor shooting or under low light. Power Dial Lock Button Make sure that the Power Dial is set to “ ”, “ ” or “ ”, then press the FLASH/TRANSFER Button. -
Page 21: Manual Shooting
MANUAL SHOOTING Exposure Control When the subject appears too dark or too bright on the LCD monitor, it may be necessary to compensate for the ambient brightness. This will make it possible to capture the contours of the dark and bright regions of the image more clearly. -
Page 22: White Balance Control
White Balance Control Adjusting the White Balance If the image appears greenish, reddish or bluish, it may be necessary to adjust the white balance of the camera. From the list of presets (“ the most natural. If the colours appear only slightly unnatural, select “AUTO”. Power Dial Lock Button LCD monitor... -
Page 23: Adjusting The White Balance Manually (M.w.b.)
Adjusting the White Balance Manually (M.W.B.) If none of the preset “ ”, “ adjust the white balance manually to obtain the most suitable colour tones possible. During indoor shooting ..the subject is exposed to a variety of light sources, including outdoor light, fluorescent light, candle light and so on. -
Page 24: Shutter Speed Selection
Shutter Speeds Selection Selecting the Shutter Speed The shutter speed of the camera can be selected manually, allowing a variety of expression in your pictures. Power Dial Look Button LCD monitor CAMERA MENU CAMERA P I CTURE MODE SYSTEM EX I T CAMERA MENU Screen Turn the Power Dial, while pressing its Lock Button, to “... -
Page 25: Shutter Speeds And Effects
Shutter Speeds and Effects Shutter Speed Automatically selects a shutter speed according to the subject lighting. AUTO Suitable for shooting night views. Lights from moving cars, etc. are photographed with 1/6 (sec.) motion streaks. Use a tripod to avoid blurring caused by subtle hand movements. 1/13 (sec.) Suitable for shooting in darkly lit environments. -
Page 26: Manual Focusing
Manual Focusing In contrast to auto focusing, where the camera automatically focuses on the subject, manual focusing can be used when you want to intentionally change the point of focus in an image. Power Dial Lock Button Turn the Power Dial, while pressing its Lock Button, to “... -
Page 27: View Mode Selection
View Mode Selection The Standard View mode displays a colour image on the LCD monitor, while the Quick View mode displays a black-and-white image, but updates it more quickly to show the actual motion of the subject more faithfully. Make sure that the Power Dial is set to “ ”, “ ” or “ ”, then press the DISPLAY Button. •Each press of the DISPLAY Button switches the screen as shown below. -
Page 28: Power Save Mode
Power Save Mode The Power Save mode switches the camera automatically off when no operation has been performed for more than 2 minutes. Power Dial Lock Button LCD monitor CAMERA MENU CAMERA P I CTURE MODE SYSTEM EX I T CAMERA MENU Screen Turn the Power Dial, while pressing its Lock Button, to “... -
Page 29: Flash Adjustment
Flash Adjustment If an image shot with the flash is too dark or too bright, adjust the flash intensity as described below. Power Dial Lock Button LCD monitor CAMERA MENU CAMERA P I CTURE MODE SYSTEM EX I T CAMERA MENU Screen Turn the Power Dial, while pressing its Lock Button, to “... -
Page 30: Playback
Playback Through a TV Monitor or VCR By connecting the digital still camera to a TV monitor or VCR and starting playback, images can be monitored on the TV screen or recorded onto a videotape. Digital Still Camera NOTES: For connections to a TV monitor or VCR, refer to their instruction manuals. The playback image can also be viewed on the LCD monitor of the camera without connecting it to a TV monitor or VCR. -
Page 31: Normal Playback
Normal Playback Images shot with the camera are automatically numbered, then stored in numerical order. You can view the stored images, one at a time, much like flipping through a photo album. Turn the Power Dial, while pressing its Lock Button, to “... -
Page 32: Index Screen
INDEX Screen The images you shot can be displayed together with their index information. Convenient for checking images shot beforehand, the INDEX Screen also shows the Picture Quality mode as well as which images are protected against accidental erasure. Index number 001 to 999: Index number Since this camera can store up to 999 images using a Compact Flash card, the index numbers range... -
Page 33: Index Playback
Index Playback You can view all images stored in memory six at a time. Use this mode when looking for a image you wish to view. Power Dial Lock Button LCD monitor PLAY MENU PLAY MODE F I LE COMM . MODE EX I T PLAY MENU Screen Turn the Power Dial, while pressing its Lock... -
Page 34: Protecting Images
Protecting Images The Protect mode helps prevent the accidental erasure of images. Put a padlock mark next to the desired image, and that image cannot be deleted. Power Dial Lock Button Turn the Power Dial, while pressing its Lock Button, to “ ”... - Page 35 I ND E X 0 0 1 F 0 0 2 S PRESS SHUTTER AFTER SELECT PROTECT Screen Rotate the MENU Jog Dial to select the image to be protected (against accidental erasure) and push it •A padlock mark appears on the selected image to indicate that it is protected.
-
Page 36: Deleting Images
Deleting Images Previously shot images can be deleted either one at a time or all at once. Power Dial Lock Button Turn the Power Dial, while pressing its Lock Button, to “ ” and push the MENU Jog Dial. • The PLAY MENU Screen appears. Rotate the MENU Jog Dial to select “FILE”... - Page 37 LCD monitor DELETE SELECTED EX I T D E LE TE 0 0 1 F 0 0 2 S 0 0 3 E PRESS SHUTTER AFTER SELECT DELETE EXECUTE EX I T Deletion Confirmation Screen To select an image by browsing images stored in memory .
-
Page 38: Applying Sepia/Black-And-White Effects
Applying Sepia/Black-and-White Effects A sepia or black-and-white effect can be applied to a previously shot image. Power Dial Lock Button LCD monitor PLAY MENU PLAY MODE F I LE COMM . MODE EX I T PLAY MENU Screen Turn the Power Dial, while pressing its Lock Button, to “... -
Page 39: Magnifying The Playback Image (Zoom)
Magnifying the Playback Image (Zoom) The zoom-in effect magnifies a selected area of image. Power Dial Lock Button LCD monitor PLAY MENU PLAY MODE F I LE COMM . MODE EX I T PLAY MENU Screen Turn the Power Dial, while pressing its Lock Button, to “... -
Page 40: Types Of Frames
PLAYBACK (cont.) Types of Frames An image can be displayed in 9 types of frames. The framed image can be printed out by transmitting the image data with the frame data to a printer. Frames can also be used in 4-split or 16-split screens. Preset frames (9 types) -
Page 41: Framing An Image
Framing an Image Power Dial Lock Button Turn the Power Dial, while pressing its Lock Button, to “ ” and push the MENU Jog Dial. •The PLAY MENU Screen appears. Rotate the MENU Jog Dial to select “PLAY MODE” and push it. •The PLAY MODE Screen appears. -
Page 42: Multi-Image Screen
Multi-Image Screen Multi-image screens that can be created are 4-split screens composed of the same image, 16-split screens composed of the same image and 4-split screens composed of different, user-selected images. Power Dial Lock Button Turn the Power Dial, while pressing its Lock Button, to select “... - Page 43 MULT I SAME 4 SELECTED 4 SAME 1 6 EX I T MULTI Setup Sreen Multi-image screen To Create a Multi-Image Screen Using the Same Image Before doing the following, perform steps 1 through pg. 42). Rotate the MENU Jog Dial to select “SAME 4” or “SAME 16”...
-
Page 44: Applied Operations
Compact Flash Card Operation Installing a Compact Flash Card A Compact Flash card increases the number images that can be stored. NOTES: Switch the camera off with the Power Dial before installing a Compact Flash card. Point the marking on the bottom of the camera and the one on the Compact Flash card upward, then point the marking on the Compact Flash... -
Page 45: Initializing The Storage Media
If the built-in memory is initialized, the preset frames ( consult your nearest JVC dealer. It is still possible to shoot and play back images without the preset frames. Turn the Power Dial, while pressing its Lock Button, to “... -
Page 46: Storing Images In A Compact Flash Card
Storing Images in a Compact Flash Card The number of images that can be shot can be greatly increased when a Compact Flash card is used in addition to the built-in memory. By preparing several cards, a single camera can be shared by several people, or they can be used to make a library of images sorted by category. -
Page 47: Copying Images Between The Built-In Memory And A Compact Flash Card
Copying Images Between the Built-in Memory and a Compact Flash Card Images can be copied from the built-in memory to a compact flash card or vice versa. This function can be used to store especially important images separately or to exchange images. NOTE: Switch the camera off with the Power Dial before installing or removing a Compact Flash card. - Page 48 To Copy Selected Images Only Before doing the following, perform steps 1 through 5 on page 47. COPY SELECTED EX I T COPY Screen Rotate the MENU Jog Dial to select “SELECTED” and push it. • The INDEX Screen appears. Rotate the MENU Jog Dial to select an image to be copied and push it.
- Page 49 To Copy All Images Before doing the following, perform steps 1 through 5 on page 47. COPY SELECTED EX I T COPY Screen COPY EXECUTE EX I T Copy Confirmation Screen Rotate the MENU Jog Dial to select “ALL” and push it.
-
Page 50: Image Copy Using Infrared Communication [Irtran-P]
Image Copy Using Infrared Communication [IrTran-P] Image data can be copied between this camera and another piece of IrDA (IrTran-P) infrared communication compatible equipment, regardless of its manufacturer. Power Dial Lock Button Turn the Power Dial, while pressing its Lock Button, to “... - Page 51 IrTran-P infrared communication compatible equipment < 50 cm Position the transmitting and receiving equipment so that their infrared transmitter and receiver face opposite each other. •The distance between them should be less than 50 cm, and the transmitter and receiver should be angled no more than 15°...
-
Page 52: Printing On A Digital Printer [Irda Transfer]
Printing on a Digital Printer [IrDA Transfer] Selected images can be transferred without using a cable to a digital printer that supports infrared communi- cation (IrTran-P), such as the JVC GV-DT1 and GV-HT1, for printing. Preparation The distance between the digital still camera’s IR transmitter and the digital printer’s IR receptor should be less than about 50 cm. -
Page 53: Pc Connection Operation
PC Connection Operation Picture Navigator Software (Provided) Image data in the camera can be sent to the RS-232C port of a Windows Macintosh ® or Mac OS-compatible computer. NOTE: Also read the instruction manuals of the provided “Picture Navigator” software. Connect the PC jack of the camera to the computer’s RS-232C port (Windows its modem or printer port (Macintosh... -
Page 54: Controls, Connectors And Indicators
CONTROLS, CONNECTORS AND INDICATORS Lock button &... -
Page 55: Front View
Front View Shutter Release Button ... Press when you wish to shoot. Flash ... Lights when shooting under low light or back light conditions. Flash Sensor ... Be careful not to cover this area when using the flash. Infrared Beam Sensor ... Transmits/receives image data via infrared beam. -
Page 56: Bottom View
CONTROLS, CONNECTORS AND INDICATORS Bottom View EJECT Button ... Press to eject the optional Compact Flash card. Tripod Mounting Socket When attaching a tripod, insert the threaded section of the tripod in this hole and turn to secure. Use only tripods not equipped with a stud that prevents the camera from rotating. - Page 57 On-Screen Display During Shooting When the Power Dial is set to “ ”, “ ” or “ ”, press the DISPLAY Button to change the View mode. Each press of the DISPLAY Button switches the screen as shown below. Standard View mode (colour display) Icon ...
- Page 58 CONTROLS, CONNECTORS AND INDICATORS On-Screen Display During Shooting (cont.) F I NE Information Displayed Between Shutter Release and Storage of Image in Memory Icon ... Appears when the image is stored in a Compact Flash card. Picture Quality Mode (FINE/STD/ ECONOMY) ...
- Page 59 On-Screen Display During Playback When the Power Dial is set to “ playback screen. Each press of the DISPLAY Button switches the screen as shown below. Playback image Icon ... Appears when an image stored in a Compact Flash card is played back. Picture Quality Mode ...
-
Page 60: Troubleshooting
In such a case, remove the power supply (batteries or AC power adapter), push the Reset Switch ( pg. 56) and retry using the camera. If the trouble still persists and it cannot be solved by referring to the following table, please consult your nearest JVC dealer. SYMPTOM Power No power is supplied. - Page 61 (black) or on (lit). This is not due to any defect of the camera. (Function- ing dots: more than 99.99%) If the built-in memory is initialized after the message “PLEASE FORMAT” appears, the preset frames are erased. Consult your nearest JVC dealer. PAGE — —...
-
Page 62: Display And Messages
Display NO IMAGES STORED CONTAINS PROTECTED IMAGES TRANSMISSION IN PROGRESS RECEPTION IN PROGRESS TOO MANY COPIES IMAGE COPYING IN PROGRESS FORMATTING IN PROGRESS TRANSMISSION TO BE STOPPED RECEPTION TO BE STOPPED TRANSMISSION FAILED RECEPTION FAILED PC MODE DELETING IN PROGRESS PLEASE INITIALIZE DISPLAY AND MESSAGES Description... -
Page 63: Cautions
... DO NOT modify or disassemble the AC power adapter. Never attempt to repair or check it yourself, as this is very dangerous. Consult your nearest JVC dealer for mainte- nance on the AC power adapter..DO NOT connect any power cord other than the one provided to the AC power adapter. -
Page 64: Main Unit
Built-in Rechargeable Battery To store the date/time in memory, a rechargeable battery is integrated in the camera. As long as the camera is connected to an AC outlet using the AC power adapter, or the batteries installed in the camera continue to supply power to the camera, the built-in battery is always charged. -
Page 65: Lcd Monitor
Serious malfunctioning If malfunctioning occurs, stop using the unit immediately and consult your local JVC dealer. -
Page 66: Major Specifications
Dimensions Power consumption Weight Power Flash LCD monitor Tripod mounting socket Storage media Compression system Focal distance Zoom Filter diameter Aperture (F-number) Minimum subject distance Photometry method Shutter system Shutter speeds White balance Focusing Picture quality Number of storable images PC jack Video output jack DC input jack... -
Page 67: Index
INDEX AC outlet ... pg. 9 AC power adapter ... pg. 9 Auto playback ... pg. 31 Battery power remaining ... pg. 8, 57, 59 Black-and-white effect ... pg. 38 Camera setup check ... pg. 17 Compact Flash card ... pg. 44 Copy ... - Page 68 VICTOR COMPANY OF JAPAN, LIMITED Printed in Japan EG/EK COPYRIGHT© 1998 VICTOR COMPANY OF JAPAN, LTD. 0398MNV...