NEC DT300 Series User Manual
Dt300/dt700 series terminals
Hide thumbs
Also See for DT300 Series:
- User manual (42 pages) ,
- Quick reference manual (16 pages) ,
- Quick reference manual (16 pages)

Related Manuals for NEC DT300 Series


Summary of Contents for NEC DT300 Series
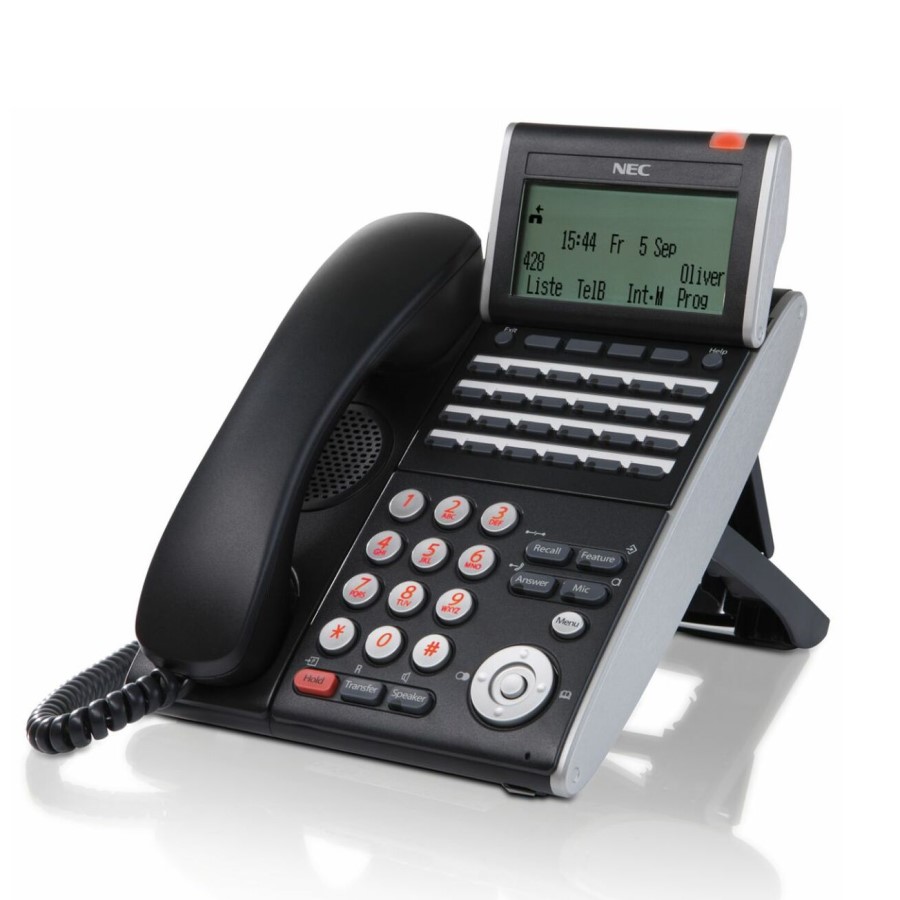
- Page 1 DT300/DT700 Series Terminals SV8300 USER’S GUIDE NEC Unified Solutions, Inc. February, 2008...
-
Page 2: Liability Disclaimer
NEC Unified Solutions, Inc. has prepared this document for use by its employees and customers. The information contained herein is the property of NEC Unified Solutions, Inc. and shall not be reproduced without prior written approval from NEC unified Solutions, Inc. All brand names and product names on this document are trademarks or registered trademarks of their respective companies. - Page 3 1.INTRODUCTION • General This guide explains how to operate DT300/DT700 Series terminals. CHAPTER 1 INTRODUCTION Explains the configuration of this guide and contains the following information. • Face layout of DT Series • Keys and Parts of DT Series • Icon Display •...
-
Page 4: Face Layout
• Face Layout DT310/710 (6-Button with LCD) DT310/710 (2-Button without LCD) - Page 5 DT330/DT730 (12-Button with LCD) DT330/DT730 (24-Button with LCD) Security button is equipped on DT730 only. Security button is equipped on DT730 only. Note: Note:...
- Page 6 DT330/DT730 (32-Button with LCD) DT330/DT730 (DESI Less 8-Button) Security button is equipped on DT730 only. Note: Security button is equipped on DT730 only. Note:...
-
Page 7: Keys And Parts
• Keys And Parts Server Administrator. When Telephony Server Administrator sets “One-Touch Speed Dial key” on the programmable keys, users can assign any DT310/DT710 numbers (ex. Telephone number, etc.) to the key (up to 24 (2-Button without LCD) digits). * For the assignment of the keys, confirm to the Telephony Server Administrator. - Page 8 (9) Message Press key to access the voice mail system. (10)Up/Down DOWN Used to adjust LCD contrast, speaker/receiver volume, and ringer volume. • LCD Contrast: Press ( ) or ( ) key while idle. • Speaker/Receiver Volume: Press ( ) or ( ) key during conversation. •...
-
Page 9: Dt330/Dt730 Overview
DT330/DT730 (1) Security Button (DT730 only) The user can prevent information leakage from (24-Button with LCD) terminal by simple operation. (2) Call Indicator Lamp Lamp at top corner of DT Series Display flashes when a call terminates to the terminal. Lamp lights steadily when a message has been left. - Page 10 (5) Soft Keys (10) Answer Any feature shown at the bottom of the LCD is When LED on this key is lit, press key to answer a available. The appropriate feature key is displayed waiting call. on the screen according to the call handling process. (11) Mic (6) Help Press key to respond hands free.
- Page 11 Feature Description (Menu) 1. Missed Call Access to history of Missed Call. Access to history of incoming Voice 1. Call History 2. Voice Mail Mail. 3. Directory 3. IM Not supported. Down Cancel Save 4. Presence Not supported. 5. Bluetooth Not supported.
- Page 12 DT330/DT730 (1) Security Button (DT730 only) The user can prevent information leakage from terminal by (DESI Less 8-Button with LCD) simple operation. (2) Call Indicator Lamp Lamp at top corner of DT Series Display flashes when a call terminates to the terminal. Lamp lights steadily when a message has been left.
- Page 13 (5) Soft Keys * Maximum 8 characters can be displayed. Any feature shown at the bottom of the LCD is available. The appropriate feature key is displayed on the screen according to ** The users can change the name displayed on the LCD. For the call handling process.
- Page 14 The icon flashes during events such as call Note 3: termination to a line key or call back. Example: (b) Feature Key Information Feature Key Information displays the followings. Maximum Description digits to be displayed Line Key - Name and Number Up to 8 digits.
- Page 15 number, etc.) to the key (up to 24 digits). When Station line/Trunk line are assigned. * For the assignment of the keys, confirm to the Telephony Server Administrator. Following picture shows LCD indication of Programmable keys. No icons are displayed. * Users can register name on each Speed Dial key.
- Page 16 (12) Answer When LED on this key is lit, press key to answer a waiting call. (13) Mic Press key to respond hands free. LED on this key lights during speakerphone operation. (14) Menu From this key, the user can access to the functions not normally used easily.
- Page 17 Feature Description 3. IM Not supported. 4. Presence Not supported. 5. .Bluetooth Not supported. (17) Speaker Controls the built-in speaker which can be used for Hands Free dialing/monitoring. LED on key lights when key is active. (18)Transfer Allows the station user to transfer established calls to another station, without attendant assistance.
-
Page 18: Icon Display
• ICON DISPLAY The LCD of DT730 Series displays Desktop Icons which provide notification when events (such as missed call and voice mail) occur. Note: DT310/DT330/DT710 Series does not support the icon display. Note 1: Currently unavailable. - Page 19 • Menu List • Simple Operation By Menu Key and Cursor Key From the Menu List, the user can use various By using Menu Key and Cursor Key, DT Series user can application features such as Directory and Call History. access to Call History, Directory and terminal settings with simple operation.
-
Page 20: Terminal Setup
TERMINAL SETUP This chapter describes operating procedures for terminal settings by the UP/Down Key and Feature Keys. Various terminal settings such as display, sounds, password, and language are also available from Menu Key. For detailed information on terminal settings from Menu Key, see SV7000 IP Peripheral Guide. -
Page 21: Terminal Setup With The Feature Key
Terminal Setup with the Feature Key To Select Ringer Tone DT Series has 10 kinds of ringer tones that you can Microphone On/Off select. LED on Mic key shows the status of the built-in microphone. Press Feature and 3. The LCD displays the selected tone number (n=1 ~ 14). - Page 22 To Adjust Transmission/Receiving Volume Handset volume can be changed. Press Feature and 4. The LCD displays the current volume. 4:26 PM TUE 13 APR 2008 Press Feature and 4 again to alternate between Small and Large volume. 4:26 PM TUE 13 APR 2008...
-
Page 23: Basic Operation
BASIC OPERATION Login (DT700 Series Only) Logout (DT700 Series Only) When login mode is activated, following procedure is Press the pre-assigned Logout Feature Key on the required. terminal. Enter login code and press Set Soft key. Note: This location is an example. (The station number is used as the Login code.) Note: Logout button is assigned by data setting at the ECP (Enterprise Communication Platform). -
Page 24: To Originate An Outside Call
To Originate an Outside Call Multiline Appearance Lift handset or press Speaker key, receive dial To Originate a Call tone. Press the MULTILINE APPEARANCE feature key. Dial the Central Office access code, e.g. 9. Lift handset or press Speaker. Dial the Central Dial desired telephone number. - Page 25 To Originate an Outside Call Press Hold. Held line wink flashes. Held station number HOLD 2001 4:26 PM TUE 13 APR 2008 Note: If held line appears on other DT Series stations, the associated LED flashes red slowly. To Retrieve Lift handset or press Speaker key.
-
Page 26: To Place A Call On Exclusive Hold
To Place a Call on Exclusive Hold Note: Exclusive Hold excludes any other phone from picking up your held call. Exclusive Hold shows as a flashing green LED on your phone. The same line Press Hold twice. Line appearance indicates on other phones appears as a solid red LED. -
Page 27: To Transfer A Call
To Transfer a Call After conversing, ask party to hold. Press Transfer. Receive interrupted dial tone. 2001 4:26 PM TUE 13 APR 2008 Dial destination station’s extension, hang up or wait for answer. 2001 4:26 PM TUE 13 APR 2008 If transferring party hangs up, that station’s number appears in the center of recipient’s display. -
Page 28: Feature Operation
FEATURE OPERATION To Originate a Call Using Speed Calling (One-touch Speed Calling keys) Press the desired Speed Calling key, or press Speaker and Speed Calling key. To program (Available only on DT Series with One-Touch Speed Calling key.) Press Feature button. Press desired Speed Calling key. - Page 29 LCD Indication of 8LD Display • Alphabetic character (Uppercase) Press the desired One-Touch Speed Calling key Digit and originate a call. Registered name will be Code displayed as follows. For the key to which no name information is registered, the character “SPD” will be &...
- Page 30 • European Character (Uppercase) • European Character (Lowercase) Digit Digit Code Code à è ì ñ ù À È Ì Ñ Ù á é í ò ú Á É Í Ò Ú â ê î ó û Â Ê Î Ó...
-
Page 31: To Originate A Call Using Speed Calling (-Station/Group)
To Originate a Call Using Speed Calling (-Station/Group) XXXX 4:26 PM TUE 12 FEB 2008 Press the Redial button. Press the desired speed calling number. If the DT Series does not have the “Speed Calling – System” key, dial the “Speed Calling – System” LNR[*]/SPD[_ _ ] access code, then the abbreviated call code. -
Page 32: Authorization Code
Account Code Authorization Code To Enter To Enter Without Account Code: Lift handset or press Speaker key, receive dial tone. Lift handset or press Speaker key, receive dial tone. Enter feature access code, receive service set tone. Enter feature access code, receive service set tone. Enter Account Code (up to 16 digits). -
Page 33: Originating A Voice Call
Originating a Voice Call To answer: AICM key flashes green indicating an incoming intercom call. Lift handset. Dial desired station number. Calling party Press Voice key or press 1. 2001 4:26 PM TUE 12 FEB 2008 2000 4:26 PM TUE 12 FEB 2008 Voice Call alert tone is heard. -
Page 34: Manual Intercom
Manual Intercom Dial Intercom To Initiate: To Initiate: Lift handset or press Speaker key, press MICM key, Lift handset or press Speaker key. ring back tone is heard. Press DICM key. Dial desired intercom station number (0-9). Tone Called party burst is sent. -
Page 35: Dial By Name Using Station Speed Dialing
Dial By Name Using Station Speed Dialing To Transfer A Call After conversing, ask party to hold. To Initiate: Press Transfer key. Receive interrupted dial tone. Press the Directory key. Enter up to the first four characters of a name using Transferred station the keypad. -
Page 36: To Place A Call On Remote Hold
If Unanswered: If Unanswered: After preprogrammed time, Automatic Recall is After preprogrammed time, Automatic Recall is initiated. initiated. Visual and audible signal (rapid flash and ring burst) Visual and audible signal (rapid flash and ring burst) is sent to station which placed call on Exclusive Hold. is sent to station that placed call on hold. -
Page 37: To Establish A Broker Call
To Retrieve At Destination: Option 2 Lift handset or press Speaker key. Press line on hold. Use handset to converse. With call in progress and third party on hold on another Line/Trunk key. NOTE: Any station with the destination line Press Conf key, Conf LED flashes. -
Page 38: Call Back (Station)
Call Back (Station) To Set Camp-On (Transfer Method) Lift handset or press Speaker. With call in progress, ask party to hold. Depress Dial desired station number and receive busy tone or Transfer button, feature dial tone is heard. ring back tone. Dial desired station number and receive busy tone. -
Page 39: Call Pickup (Group)
To Answer Call Waiting To Park A Call From Terminal Without LCD (Station 2000) While call in progress, press Transfer key and dial Hear burst of tone. LCD display indicates CW and the Call Park access code, or press Call Park key. Answer button flashes. -
Page 40: Call Pickup (Direct)
Call Pickup (Direct) Timed Queuing (Outside Line Only) Lift handset. Press Call Pickup Direct key or dial Call Pickup Direct Press Speaker key, receive dial tone. access code (may be stored on one-touch key). Dial Outside Line access code and desired number. Receive busy tone or ring no answer from distant Called Calling... -
Page 41: Last Number Redial
Last Number Redial To Search, Call Back, or Erase A Calling Number Without Using Soft-keys: To Recall The Last Number Dialed Lift the handset or press Speaker key. Press Redial key. Receive special dial tone. Press Message key. Dial 1 to search for desired number. REDIAL[#]/SPEED[ ] Dial 2 to call back desired number. -
Page 42: Cid Call Display
CID Call Display To verify(with multi-line phone) Press Speaker key. Receive extension dial tone. Press FD-A key or dial Call Forward-All access code. To Display Calling Party Information: Display indicates the station number calls are Press CID key, CID lamp lights. forwarded to. -
Page 43: Call Forwarding-No Answer
Call Forwarding-Busy To Cancel Press Speaker key. Receive dial tone. Press FD-B key plus * or dial Call Forward Busy To Set cancel code. Receive service set tone. LED goes out Press Speaker key. Receive dial tone. at your station. Press FD-B key or dial Call Forward Busy access code. -
Page 44: Call Forwarding Destination
To Verify To Cancel Press Speaker key. Receive extension dial tone. Press Speaker key. Receive dial tone. Press FD-N key or dial Call Forward-No Answer Press FD-DC key or dial Call Forward Destination access code. cancel code. Display indicates destination number of call forward. CNCL Forwarding station... -
Page 45: Internal Zone Paging With Meet-Me Page
Internal Zone Paging with Meet-Me Page Boss/Secretary Calling This allows a system user to page over built-in speaker Secretary of multi-line phone within the assigned zone or all zones. Lift handset, press boss' ringing line. Ask calling party to hold. Example: Station A can page Station B. -
Page 46: Boss/Secretary Override
Boss/Secretary Override Option 1 Boss presses Answer and converses with secretary. Outside line is placed on hold. Example: Station 2000 is boss, Station 2001 is secretary. Secretary hangs up. Boss is connected to Outside Boss is connected to 2003. Incoming call on Outside line line. -
Page 47: Do Not Disturb
Do Not Disturb Press Speaker key, Receive dial tone. Press DND key or dial DND access code. 4:26 PM TUE 12 FEB 2008 To Cancel Press Speaker key, Receive dial tone. Press DND key or dial DND cancel code. CNCL 4:26 PM TUE 12 FEB 2008 NOTE: When key is used the LED will light when DND is active. -
Page 48: Privacy Release
Privacy Release If 0 or 1: dial desired military time. Example: D term Station B is engaged in a conversation, IN:BACK 0900 and allows Dterm Station A to enter the call in progress. 4:26 PM TUE 12 FEB 2008 Station 2000, while engaged in conversation, presses Conf key. -
Page 49: Name Display
Name Display When the desired letter is displayed, depression of the Transfer key will change the letter to a lower case letter (default is upper case). Depress the Hold key to NOTE: Requires Display Phone enter that letter and advance to the next entry. Repeat the previous two steps until the desired name A name with up to 16 characters can be entered to is displayed and entered. -
Page 50: Whisper Page
Whisper Page System Clock Setup By Station Dialing To Initiate Press Speaker key or lift handset, Receive dial tone. Press System Clock Setup Key or feature access Option 1 code. Lift handset or press Speaker key. Dial new time in 24 hr format using 6 digits Dial desired station number. -
Page 51: To Change Security Password
To Change Security Password User Setting [1] Incoming Call Press Menu Key [2] Talk Display reads: [3] Display [4] Change Password [Menu] Security [1] History Peripherals [2] Directory [0] Setting Reset [3] Tool [4] Call Function [5] Setting Back Presence [#] Favorite [0] Config Using Up/Down arrows scroll down to [4]... -
Page 52: Directory Operation
Enter default password 0000 Directory Operation Press set, then enter New Password Press set, then enter the new password again This allows the user to access and program Press set station speed dials. [ [Change password 1 ] Press Menu key Display reads: Old Pass [ 0000... -
Page 53: History Operation
History Operation Press HIST (History) Soft Key [4081] 8:19 AM FRI 15 FEB 2008 (ABC) ENTRY PREV NEXT Display reads: [Call History} [4081] 8:19 AM FRI 15 FEB 2008 (OG) Press OG (To view Outgoing calls) or Press IC (To view Incoming Calls) Programming required in the PBX... -
Page 54: Quick Reference Guide
Quick Reference Guide Internal Zone Paging Group 0 Page Outside Line Group 1 Group 2 Queuing-Outside Line Group 3 Call Back Cancel Group 4 Call Forwarding-All Calls Entry Internal Zone Paging Group 0 Answer Cancel Group 1 Group 2 Call Forwarding-No Answer/Busy Entry Group 3 Line...