Table of Contents
Table of Contents

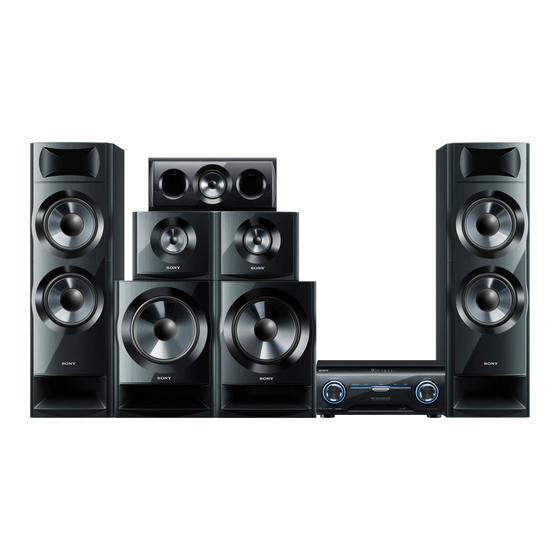
Related Manuals for Sony HT-M7


Summary of Contents for Sony HT-M7
- Page 1 4-415-789-11(2) Home Theatre System Operating Instructions HT-M7/HT-M5/HT-M3...
-
Page 2: About This Manual
To reduce the risk of fire or electric • The instructions in this manual are for models shock, do not expose this apparatus to HT-M7, HT-M5 and HT-M3. In this manual, the rain or moisture. HT-M7 is used for illustration purposes unless To reduce the risk of fire, do not cover the stated otherwise. - Page 3 States and other countries. “x.v.Color (x.v.Colour)” and “x.v.Color (x.v.Colour)” logo are trademarks of Sony Corporation. “BRAVIA” is a trademark of Sony Corporation. “PlayStation” is a registered trademark of Sony Computer Entertainment Inc. MPEG Layer-3 audio coding technology and patents licensed from Fraunhofer IIS and Thomson.
-
Page 4: Table Of Contents
Table of Contents About This Manual........2 Enjoying Surround Sound Supplied accessories........5 Description and location of parts....6 Selecting the sound field......40 Getting started ..........14 Resetting sound fields to the default settings ........... 42 Connections “BRAVIA” Sync Features 1: Installing the speakers ......15 What is “BRAVIA”... -
Page 5: Supplied Accessories
– Other models • AM loop antenna (aerial) (1) • Speaker cords Notes – HT-M7 (6, red/white/blue/grey/purple × 2) • Do not leave the remote control in an extremely hot – HT-M5 (4, red/white/purple × 2) or humid place. – HT-M3 (2, red/white) •... -
Page 6: Description And Location Of Parts
Description and location of parts Front panel * Except for South Africa and Argentina models. A ?/1 (on/standby) (page 29, 42) L SURROUND SPEAKER (page 30) B INPUT SELECTOR (page 31, 32, 34, 36, 37, 38, 39, 46, 55) C INPUT SELECTOR indicator Flashes when you turn the knob. - Page 7 Indicators on the display panel HDMI 96/24 PL II COAX LPCM SLEEP D.RANGE A Playback channel indicator D Input indicator The letters (L, C, R, etc.) indicate the channels Lights up to indicate the current input. being played back. Based on the speaker HDMI settings, the box around the letter(s) vary to show how the receiver downmixes the source...
- Page 8 K D.RANGE Lights up when dynamic range compression is activated (page 50). L SLEEP Lights up when the Sleep Timer is activated (page 13). * HT-M7 only. ** Except for South Africa and Argentina models.
- Page 9 Rear panel HT-M7 HT-M5 continued...
- Page 10 Red (R) COMPOSITE VIDEO INPUT/ OUTPUT jacks** (page 21, 25, VIDEO IN/OUT Yellow * You must connect the HDMI TV OUT or MONITOR OUT (HT-M7/HT-M5 only) jack to your TV to watch the selected input image (page 21). ** HT-M7/HT-M5 only.
- Page 11 C ANTENNA section (page 28) FM ANTENNA jack AM ANTENNA terminal D SPEAKERS section (page 17, 18,...
-
Page 12: Remote Control
Remote control Use the supplied remote control to operate this receiver and Sony TV. • RM-AAU136 (South Africa and • RM-AAU135 (Other models) Argentina models only) * The 5 and TV PROG + buttons have tactile dots. Use the tactile dots as references when operating the... -
Page 13: Input Buttons
Press V/v/B /b to select the settings, then press to enter/confirm the selection. Enters direct tuning mode. DISPLAY Views information on the display panel. To control a Sony TV K M-TURBO A TV ?/1 (on/standby) Turns the M-TURBO function on or off. Turns the TV on or off. -
Page 14: Getting Started
To output multi channel digital audio, check the digital audio output setting on the connected equipment. For a Sony Blu-ray Disc player, check that “Audio (HDMI)”, “Dolby Digital”, and “DTS” are set to Digital Analog “Auto”, “Dolby Digital” and “DTS” respectively (as of September 2011). -
Page 15: Connections
AFront speaker (left) BFront speaker (right) CCenter speaker DSurround speaker (left) * HT-M7 only. ESurround speaker (right) FSurround back speaker (left) Notes GSurround back speaker (right) • Do not install the speakers on a wall. - Page 16 Tips Installing the speakers on a flat • All the angles A should be the same. surface – HT-M7 only Attach the supplied foot pads to the bottom of the speakers and subwoofers to prevent vibration or movement. HT-M7: Center speaker, surround back speakers,...
-
Page 17: 2: Connecting The Speakers
2: Connecting the speakers Before connecting cords, be sure to disconnect the AC power cord (mains lead). HT-M7 Center Surround back speaker speaker Right Left Connector Right Left Right Left Surround speaker Front speaker Subwoofer A Speaker cord (supplied) continued... - Page 18 HT-M5 Center Surround speaker Front speaker Subwoofer speaker Right Left Right Left Connector A Speaker cord (supplied)
- Page 19 HT-M3 Center Surround speaker Front speaker Subwoofer speaker Right Left Right Left Connector A Speaker cord (supplied) continued...
- Page 20 Grey SURROUND R Brown SURROUND BACK L SURROUND BACK R Green CENTER * HT-M7 only. To connect the speakers correctly Check the speaker type by referring to the speaker label* on the rear panel of the speakers. Character on Speaker type...
-
Page 21: 3: Connecting The Tv
Audio signals signals A HDMI cable (not supplied) Recommended connection Alternative connection Sony recommends that you use an HDMI- authorized cable or Sony HDMI cable. B Component video cord (not supplied) C Video cord (not supplied) D Audio cord (not supplied) -
Page 22: 4A: Connecting The Video Equipment
• Connect a TV monitor or a projector to the HDMI Digital, DTS, and Linear PCM. For details, TV OUT or MONITOR OUT (HT-M7/HT-M5 only) jack on the receiver. You may not be able to see “Digital audio formats supported by the record even if you connect recording equipment. - Page 23 When connecting cords • Before connecting cords, be sure to disconnect the AC power cord (mains lead). • It is not necessary to connect all the cords. Connect according to the availability of jacks on the connected equipment. • Use a High Speed HDMI cable. If you use a Standard HDMI cable, 1080p, Deep Color (Deep Colour) or 3D images may not be displayed properly.
- Page 24 Blu-ray Disc player, Satellite tuner, PlayStation 3 TV, etc. DVD player cable TV tuner Audio/video Audio/video Audio/video Audio/video signals signals signals signals A HDMI cable (not supplied) Sony recommends that you use an HDMI- authorized cable or Sony HDMI cable.
- Page 25 Connecting equipment with jacks other than HDMI jacks HT-M7/HT-M5 PlayStation 3 Blu-ray Disc player, DVD player Satellite tuner, cable TV tuner Audio signals Video signals Audio signals Video signals Video signals Audio signals Not used A Optical digital cord (not supplied)
- Page 26 HT-M3 PlayStation 3 Blu-ray Disc player, DVD player Satellite tuner, cable TV tuner Audio signals Video signals Audio signals Video signals Audio signals Video signals To the VIDEO IN To the VIDEO IN To the VIDEO IN of the TV. of the TV.
-
Page 27: 4B: Connecting The Audio Equipment
A Audio cord (not supplied) B Video cord (not supplied) * If you want to record, you must make this connection (page 36). ** HT-M7/HT-M5 only. Note (HT-M3 only) A Audio cord (not supplied) Be sure to connect the video output of the VCR or... -
Page 28: 5: Connecting The Antennas (Aerials)
Connecting a USB device 5: Connecting the antennas (aerials) (Except for South Africa and Argentina models) Before connecting antennas (aerials), be sure to disconnect the AC power cord (mains lead). FM wire antenna (aerial) (supplied) AM loop antenna (aerial) (supplied) USB device A USB cable (not supplied) * The shape of the connector varies depending on... -
Page 29: Preparing The Receiver
Initializing the receiver Preparing the Receiver Before using the receiver for the first time, Setting the voltage initialize the receiver by performing the selector following procedure. This procedure can also be used to revert back to the factory default settings. If your receiver has a voltage selector on the Be sure to use the button on the receiver to rear panel, check that the voltage selector is set... -
Page 30: Selecting Surround Speaker Position
Selecting surround Adjusting the speaker speaker position levels and balance (TEST TONE) Select the surround speaker position according to the speaker configuration. You can adjust the speaker levels and balance while listening to the test tone from your MENU seating position. V/v/B/b Press AMP MENU. -
Page 31: Basic Operations
Press V/v repeatedly to select Basic Operations “AUTO xxx * ”. The test tone is output from each speaker Playing an input source in sequence. * xxx represent a speaker channel. equipment Adjust the speaker levels and balance. Use the LEVEL menu (page 50) to adjust the speakers to have the same sounding test tone level for each speaker. -
Page 32: Naming Inputs
Press MASTER VOL +/– to Naming inputs adjust the volume. You can enter a name of up to 8 characters for You can also use MASTER VOLUME on inputs (except TUNER) to appear on the the receiver. display panel. Press MOVIE, MUSIC or It is more recognizable having the equipment GAMING to enjoy the surround named on the display than the jacks. -
Page 33: Playing A Usb Device
• Operation may not always be ensured even when using these USB devices. You can use the following Sony USB devices • Some of these USB devices may not be available on this receiver. Other USB devices cannot be for purchase in certain areas. -
Page 34: Adjust The Volume
Other operations Operating the USB device Press Operation Starts/pauses play. Fast reverses or forwards. ./> Goes to the previous/next file. FOLDER +/– Goes to the previous/next folder. REPEAT Enters repeat mode. • RPT. OFF/RPT. ONE/ RPT. ALL/RPT. FLD MOVIE, MUSIC, Notes on the USB device GAMING •... -
Page 35: Viewing Information On The Display Panel
• Compatibility with all encoding/writing Viewing information on softwares, recording devices, and recording media cannot be guaranteed. Incompatible the display panel USB device may produce noise or interrupted audio or may not play at all. • Some time may be needed to start playback The display panel provides various when: information of the receiver status such as... -
Page 36: Recording Using The Receiver
In this case, set the “AUTO.STBY” to “STBY OFF” (page 52). • (HT-M7/HT-M5 only) Audio input signals via HDMI IN, DIGITAL IN and COMPONENT VIDEO IN jacks cannot be... -
Page 37: Tuner Operations
Tuning to a station Tuner Operations automatically (Automatic Tuning) Listening to FM/AM radio Press TUNER repeatedly (or You can listen to FM and AM broadcasts press FM or AM) to select the through the built-in tuner. Before operation, FM or AM band. make sure you have connected the FM and You can also use INPUT SELECTOR on AM antennas (aerials) to the receiver (page... -
Page 38: Presetting Fm/Am Radio Stations
Press the numeric buttons to Presetting FM/AM radio enter the frequency. stations Example 1: FM 102.50 MHz Select 1 b 0 b 2 b 5 b 0 Example 2: AM 1,350 kHz You can store up to 30 FM and 30 AM stations Select 1 b 3 b 5 b 0 as your favorite stations as preset stations. -
Page 39: Tuning To Preset Stations
Press the numeric buttons to Press V/v repeatedly to select select a preset number. “TUNER”, then press or b. You can also press PRESET + or Press V/v repeatedly to select PRESET – to select a preset number. “NAME IN”, then press or b. -
Page 40: Enjoying Surround Sound
Notes on sound fields • The sound fields for music and movie do not Enjoying Surround Sound work for signals with a sampling frequency of more than 48 kHz. Selecting the sound field • The effects provided by the virtual speakers may cause increased noise in the playback signal. - Page 41 Digital audio formats supported by the receiver Digital audio formats that this receiver can decode depend on digital audio output jacks of the connected equipment. This receiver supports the following audio formats. Connection between the playback Maximum number of equipment and the receiver Audio format channels COAXIAL/OPTICAL...
-
Page 42: Resetting Sound Fields To The Default Settings
MUSIC as TV, Blu-ray Disc/DVD player, AV amplifier, etc. that supports the Control for HDMI function. By connecting Sony equipment that is compatible with the “BRAVIA” Sync with an HDMI cable (not supplied), operation is simplified as follows: • One-Touch Play (page 44) •... -
Page 43: Preparing For The "Bravia" Sync
If your TV is not compatible with Preparing for the the “Control for HDMI-Easy Setting” function “BRAVIA” Sync MENU The receiver is compatible with the “Control for HDMI-Easy Setting” function. V/v/B/b • If your TV is compatible with the “Control for HDMI-Easy Setting”... -
Page 44: Playing Back Equipment With One-Touch Operation (One-Touch Play)
Playing back equipment Enjoying the TV sound with one-touch operation from the speakers connected to the receiver (One-Touch Play) (System Audio Control) By a simple operation (one-touch), equipment connected to the receiver with “BRAVIA” You can enjoy the TV sound from the speakers Sync function start automatically. -
Page 45: Turning Off The Receiver With The Tv (System Power-Off)
Turning off the receiver Enjoying optimum sound with the TV field for the selected scene (System Power-Off) (Scene Select) When you turn the TV off, using the POWER button on the TV’s remote control, the receiver The Scene Select function allows you to enjoy and the connected equipment turn off the optimum picture quality and switches the automatically. -
Page 46: Advanced Operations
Notes • Some audio input modes may not be set up Advanced Operations based on the input. • The Audio Return Channel (ARC) function Switching between does not work in the following cases. – Your TV is not compatible with the Audio digital and analog audio Return Channel (ARC) function. -
Page 47: Overview Of The Menus
Note Some parameters and settings may appear dimmed on the display panel. This means that they are either unavailable or fixed and unchangeable. Overview of the menus The following options are available in each menu. For details, see the referencing page in the parentheses. - Page 48 Menu Parameters Settings Default [Display] [Display] setting SPEAKER Surround speaker position FRONT, REAR FRONT [SPKR] [SUR SPK] (page 50) Front left speaker distance [FL DIST.] Front right speaker distance [FR DIST.] Center speaker distance [CNT DIST.] Surround left speaker distance [SL DIST.] Surround right speaker distance 1.00 m to 10.00 m (0.10 m interval)
- Page 49 For details, see “Naming inputs” [NAME IN] (page 32). xxx represent a speaker channel. – HT-M7 only: FL, FR, CNT, SL, SR, SBL, SBR, SW – HT-M3/HT-M5 only: FL, FR, CNT, SL, SR, SW HT-M7 only. Latin America, Argentina and Mexico models only.
-
Page 50: Speaker Menu
If both front speakers are not placed in equal surround left/right, surround back left/right*, distance from your seating position, set the subwoofer). distance to the closest speaker. * HT-M7 only. * HT-M7 only. x D. RANGE Lets you compress the dynamic range of the EQ menu soundtrack. -
Page 51: Audio Menu
For details, see “Switching between digital HDMI signals from the receiver’s HDMI TV and analog audio (INPUT MODE)” (page 46). OUT jack. Sony recommends this setting if you use a “BRAVIA” Sync compatible Sony TV. This setting saves power in the standby mode when compared with the “ON”... -
Page 52: System Menu
• OFF SYSTEM menu The receiver does not output HDMI signals when in the standby mode. Turn on the You can customize the settings of the receiver. receiver to enjoy the connected equipment’s source on the TV. This setting saves power in x DIMMER the standby mode when compared with the Lets you adjust the brightness of the display... -
Page 53: Additional Information
• Do not place anything on top of the cabinet that might block the ventilation holes and Additional Information cause malfunctions. • Do not place the receiver near equipment Precautions such as a TV, VCR, or tape deck. (If the receiver is being used in combination with a TV, VCR, or tape deck, and is placed too On safety... -
Page 54: Troubleshooting
Should any problem persist, consult If you have any questions or problems your nearest Sony dealer. Note that if service concerning your receiver, please consult your personnel changes some parts during repair, nearest Sony dealer. - Page 55 • Check that the connecting cords are away • Video input signals via HDMI IN and from a transformer or motor, and at least COMPONENT VIDEO IN (HT-M7/ 3 meters (10 feet) away from a TV set or HT-M5 only) jacks cannot be recorded.
- Page 56 • Check that the subwoofer is connected • The image resolution of the playback correctly and securely. equipment may need to be at certain settings before you can enjoy Multi There is no sound from a specific Channel Linear PCM. Refer to the equipment.
- Page 57 • Make sure “PASS.THRU” is set to “ON” The left and right sounds are in the HDMI menu if you connect unbalanced or reversed. equipment not compatible with the • Check that the speakers and equipment are “BRAVIA” Sync to the receiver (page 51). connected correctly and securely.
-
Page 58: Usb Device
Erroneous display. USB device • The data stored in the USB device may have been corrupted. Are you using a supported USB • The character codes that can be displayed device? by this receiver are as follows: • If you connect an unsupported USB –... -
Page 59: Error Messages
• Make sure the connected equipment is of the system by the message. If any problem compatible with the Control for HDMI persists, consult your nearest Sony dealer. function. If an error message appears while you use a • Check the Control for HDMI settings on USB device, see “USB message list”... -
Page 60: Specifications
Measured under the following conditions: Specifications Area Power requirements South Africa, Latin 240 V AC, 50 Hz America, India Amplifier section Middle East 127 V AC, 60 Hz Power Output Argentina, Thailand 230 V AC, 50 Hz • STR-KM7 Stereo mode output (rated) (6 ohms, 1 kHz, Reference power output for front, center, surround THD 1%) speakers and subwoofers. -
Page 61: Fm Tuner Section
8.1 kg (STR-KM3) (Except for South Africa and Argentina models) Supported bit rate* MP3 (MPEG 1 Audio Speaker section Layer-3): • Front speaker for HT-M7/HT-M5 32 kbps – 320 kbps, VBR (SS-MSP7M) WMA: 48 kbps – 192 kbps Speaker system 2-way, 3-driver, Bass AAC: 48 kbps –... - Page 62 6 ohms Dimensions (width/height/depth) (Approx.) 430 mm × 182 mm × 178 mm (with foot) Mass (Approx.) 3.3 kg • Surround back speaker for HT-M7/ Surround speaker for HT-M5/HT-M3 (SS-SRP7M) Speaker system Full range, Closed box Speaker unit Woofer: 100 mm, cone type...
-
Page 63: Index
Index Numerics 5 channel 15 Menu Satellite tuner 7 channel 15 AUDIO 51 connecting 24, 25, 26 EQ 50 Scene Select 45 HDMI 51 Sleep Timer 13 LEVEL 50 Sound fields Blu-ray Disc player SPEAKER 50 resetting 42 connecting 24, 25, 26 SYSTEM 52 selecting 40 TUNER 50... - Page 64 ©2012 Sony Corporation Printed in Malaysia...