
Related Manuals for GE 45234


Summary of Contents for GE 45234
- Page 1 45234 Home Monitoring Wireless Color Camera with Receiver User Manual www.jascoproducts.com 1-800-654-8483...
-
Page 2: Product Features
Thank you for purchasing the GE 45234 Wireless Color Camera System with Receiver. Please review these instructions carefully before attempting to operate the unit. PRODUCT FEATURES • “Wi-Fi” internet friendly wireless system—won’t interfere with home wireless networks • View up to two cameras automatically •... -
Page 3: Before You Install
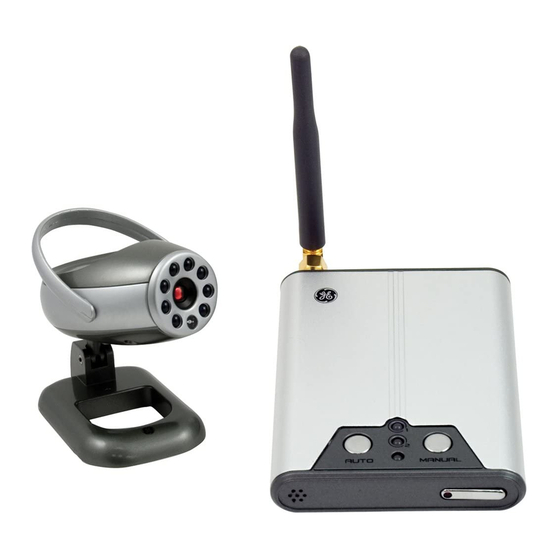
1. 45233 Wireless Color Camera 2. 45234 Wireless Receiver 3. Wall plate and mounting hardware for camera 4. 2 AC adapters 5. AV cable BEFORE YOU INSTALL When choosing the best location for the placement of the camera and receiver, it is best to avoid any sources of possible RF interference such as microwave ovens and cordless phones. - Page 4 indoor or outdoor use. When choosing a mounting location, please be advised: • Do not use in wet locations. If using outside, position camera in a sheltered location. • Do not position the camera so that it points directly into the sun or any bright light, as this may cause damage to the camera.
-
Page 5: Connecting To A Tv Or Monitor
CONNECTING TO A TV OR MONITOR To prepare for installation of the system, we recommend that you temporarily connect the 45234 Receiver to a TV or Monitor to help you choose the best location for installing the camera. The camera connects wirelessly and automatically to the receiver when both are powered on and within 200 ft (unobstructed view) of each other. -
Page 6: Channel Selection
plug to the yellow VIDEO IN jack and the white plug to the white AUDIO IN jack. 2. Plug the AC adapter into the power jack (marked on the back of the receiver, then into an AC outlet. 3. Rotate the antenna to a vertical position. Do not over-tighten. - Page 7 1 2 1/2 RECEIVER Channel Setting CAMERA 1 CAMERA 2 Channel Setting Channel Setting cancel out. Multi-Camera Operation This wireless surveillance system is designed to work with up to 2 cameras. Additional cameras are sold separately. IMPORTANT: When using more than one camera, each camera must be assigned to a specific channel using the channel selection switch located on the underside of the camera...
-
Page 8: Night Vision
To have the receiver automatically switch between two active channels, first check the receiver is set to 1/2 position. Next, press the AUTO button on the top panel of the receiver. The green LED will light and the receiver will automatically select between the two active cameras. -
Page 9: Camera Installation
Night Vision will Infra-Red appear as a Black and (IR) LEDs White image. When the image sensor detects enough light, color will return to the images. Sensor AUDIO DETECTION AND NOTIFICATION FEATURE This feature allows the system to emit an audio alert whenever sound is detected within a monitored area. -
Page 10: Wall Mount
Desktop Mount: 1. Place camera in desired location on a flat surface. 2. Set Channel switch on camera to 1 or 2. 3. Power ON the TV/monitor; reconnect AC adapter to the camera. 4. Select the channel (1 or 2) on the receiver that corresponds to the camera channel setting. - Page 11 USING THE 45234 WIRELESS COLOR CAMERA SYSTEM WITH A VCR or DVR You can connect the 45234 camera system to a VCR or DVR in order to record the images received from up to 2 cameras. The VCR or DVR must also be connected a TV/Monitor in order to see live or recorded images.
- Page 12 Power Video Audio Power Video Audio Audio Video Shown with optional rechargeable battery (Sold separately) OPTIONAL WIRELESS BATTERY PACK AVAILABLE (SOLD SEPARATELY) Rechargeable NiMH Battery is available for use with the 45233 Wireless Color Camera. AC adapter This 850mAh battery will charges the power the 45233 camera battery...
-
Page 13: Troubleshooting
TROUBLE SHOOTING If you are having trouble operating this product, please consult the guide below. If you have any questions or feel the camera system is not operating correctly, or you simply need additional information, please visit our web site www.jascoproducts.com, or contact our Technical Support Group 1-800-654-8483. -
Page 14: Specifications
range, and that no large obstructions are blocking the signal. 2. Try repositioning the camera, receiver or both to improve the reception quality. 3. If a camera is positioned close to the receiver point antenna away from the receiver. 4. Reposition other nearby equipment transmitting on the 900MHz frequency. - Page 15 Min. Illumination ......0 lux up to 3 feet, 0.5lux up to 10 ft Voltage ......................9VDC Current Consumption ..........150mA maximum Overall Size ..............2.35”W x2.74Hx3.16D Frequency Range ..............902 - 928 MHz Modulation ......................FM Channel Selection ................Manual Case Finish ............UV resistant ABS plastic RECEIVER Voltage ......................9VDC Current Consumption ..........100 mA maximum...
- Page 16 FCC STATEMENT WARNING This device complies with part 15 of the FCC rules. Operation Risk of fire and shock • Only use the supplied cUL listed AC to DC adapter. is subject to the following two • The supplied adapter is for indoor use only. conditions: •...