
Related Manuals for HP 620LX


Summary of Contents for HP 620LX
- Page 1 HP 620LX/660LX PALMTOP USER GUIDE HP Part Number F1270-90004 Printed in Singapore Edition 1 HP Palmtop PC User Guide - i...
- Page 2 Edition 1 ......May 1998 ii - HP Palmtop PC User Guide...
- Page 3 If you do not agree to the License Agreement, you may return the unopened package for a full refund. In return for payment of the applicable fee, HP grants the Customer a license in the software, until terminated, subject to the following: Use: •...
- Page 4 HP. Termination: HP may terminate this software license for failure to comply with any of these terms provided HP has requested Customer to cure the failure and Customer has failed to do so within thirty (30) days of such notice.
- Page 5 Ownership: The Software is owned and copyrighted by HP or its third party suppliers. Your license confers no title to, or ownership in, the Software and is not a sale of any rights in the Software. HP’s third party suppliers may protect their rights in the event of any violation of these License Terms.
- Page 6 - HP Palmtop PC User Guide...
-
Page 7: Table Of Contents
Introduction A Note on Models About This Guide 1. A Closer Look at the HP Palmtop PC 2. Using the HP Palmtop PC for the First Time Installing the Batteries Getting Started The Welcome Wizard Partnering with Your Desktop Computer 3. - Page 8 Starting the Translation Translating Appointment Data Translating Phone Book Data Reviewing Translation Status 5. Working with Pre-Installed Applications Overview of HP Palmtop PC Pre-installed Applications Information Manager for Windows CE – Calendar, Contacts, and Tasks Microsoft Pocket Word Microsoft Pocket Excel Microsoft Pocket Powerpoint Quicken®...
- Page 9 6. Reference Safety, Care, and Maintenance Tips and Troubleshooting Electrostatic Discharge Warning Warranty, Support, and Service Index HP Palmtop PC User Guide - ix Contents...
- Page 10 - HP Palmtop PC User Guide...
-
Page 11: Introduction
PC companion. A NOTE ON MODELS The HP Palmtop PC (600 Series) is available in two models, the HP 620LX and the HP 660LX. Both models are described in the guide. The HP 660LX includes all the features of the 620LX plus the following enhancements: •... - Page 12 This chapter describes the physical features of the HP Palmtop PC. Chapter 2: Using the HP Palmtop PC the First Time This chapter describes how to start the HP Palmtop PC for the first time, how to calibrate the touch screen with the stylus, and how to establish the partnership between your palmtop PC and your desktop computer using the Synch Cable or the Docking Cradle.
-
Page 13: A Closer Look At The Hp Palmtop Pc
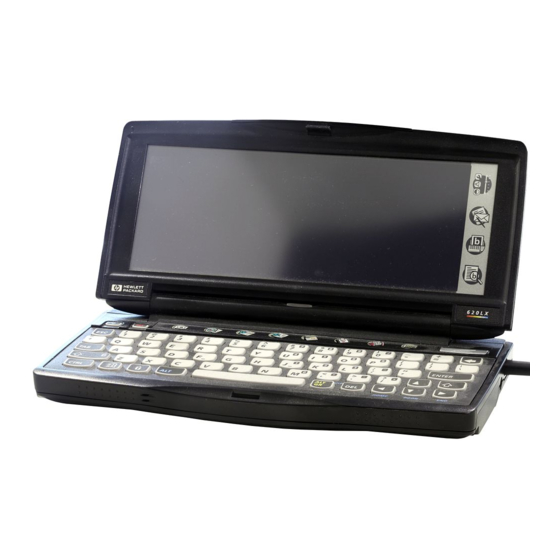
Hard Icon Panel On/Off Switch Microsoft Windows Key Serial Port Microphone Stylus Ejection Stylus Button Number Lock Key AC Adapter Port Compact Flash Memory Card Drawer A Closer Look at the HP Palmtop PC HP Palmtop PC User Guide - 3... - Page 14 External Features - Back view Back-up Battery Compartment IR (Infrared) Port Back-up Battery Red Reset Button Main Battery Compartment Battery Release Catch PC Card Eject Button PC Card Slot Docking Cradle Connector Lithium-Ion Main Battery Pack 4 - HP Palmtop PC User Guide...
- Page 15 The HP Palmtop PC comes with a Docking Cradle. Use the Docking Cradle to connect the HP Palmtop PC to a desktop PC, as described in Chapter 2, “Using the HP Palmtop PC for the First Time.” A Closer Look at the HP Palmtop PC...
- Page 16 6 - HP Palmtop PC User Guide...
-
Page 17: Using The Hp Palmtop Pc For The First Time
Chapter 2 – USING THE HP PALMTOP PC FOR THE FIRST TIME INSTALLING THE BATTERIES The HP Palmtop PC requires two types of batteries to operate as a portable unit: • Rechargeable Lithium-Ion main battery pack • 1 CR2032 3-volt coin cell backup battery... -
Page 18: Getting Started
The backup (lithium) battery can explode if it is inserted incorrectly. GETTING STARTED To begin using your HP Palmtop PC for the first time, do the following: 1. Power on the palmtop PC by pressing the key. -
Page 19: The Welcome Wizard
• Double-tap an icon to open an application • Drag the stylus across words or items to select them • Drag-and-drop a selection to another part of the screen Using the HP Palmtop PC for the First Time HP Palmtop PC User Guide - 9... - Page 20 Important Do not use any stylus other than the one that comes with your HP Palmtop PC to tap or write on screen. Using a different stylus or an ordinary pen is likely to damage the screen. Tips If you make a mistake while calibrating the touch screen, or if screen accuracy diminishes over time, you may not be able to use the stylus.
- Page 21 Using the World Clock control panel, you can change time zone, date, and time information whenever you want. You can also set alarms, apply daylight savings time, and display travel information. Using the HP Palmtop PC for the First Time HP Palmtop PC User Guide - 11...
-
Page 22: Partnering With Your Desktop Computer
PARTNERING WITH YOUR DESKTOP COMPUTER One of the most useful features of the HP Palmtop PC is the ease of connecting it to your desktop PC and transferring data back and forth between the two. You can also use your desktop PC to back up data from your HP Palmtop PC. - Page 23 2. Microsoft Schedule+ 7.0a 3. Microsoft Windows CE Services 2.0 4. Optional Components * Your computer will be restarted several times during the installation process ® Using the HP Palmtop PC for the First Time HP Palmtop PC User Guide - 13...
- Page 24 HP Palmtop PC and the desktop/notebook PC. After you have established the partnership, you are ready to transfer Microsoft Word, Excel and other files between your desktop computer and the HP Palmtop PC. You can also synchronize calendar, contact and task information from your desktop Information Manager data files with data from your Infor- mation Manager applications on your desktop computer.
-
Page 25: Working With The Hp Palmtop Pc
HP Palmtop PC. Tap on an item in the Start menu to launch an application, open the Control Panel to adjust custom settings, get on-line help, or explore the contents of your HP Palmtop PC. -
Page 26: Getting Help On-Line
• tapping the Help option on the Start menu • pressing to get window-specific help while an application is running 16 - HP Palmtop PC User Guide Tap here to minimize the active window (Power Properties). key while tapping... -
Page 27: Using Ac Power
If You Are Not Using the Docking Cradle… Plug the AC adapter into the adapter port at the side of your HP Palmtop PC and plug the other end into a wall socket. -
Page 28: Recharging Batteries
To get the longest possible use out of your batteries and to minimize the possibi- lity of data loss, keep the following tips in mind: 18 - HP Palmtop PC User Guide Select the length of idle time before your palmtop PC times out. -
Page 29: Customizing Your Hp Palmtop Pc
PC Card modem. Note The HP Palmtop PC will not power on if the main batteries are very low. CUSTOMIZING YOUR HP PALMTOP PC You can personalize and customize your Palmtop PC by adjusting settings, adding ID and password, and loading new software. -
Page 30: Adjusting Volume
To remove a sound, select None from the Event Sound list. 20 - HP Palmtop PC User Guide Clear or check boxes to turn the sounds associated with different kinds of events on or off. - Page 31 Tap here to use the bitmap to tile the entire display. Tap Browse to locate the bitmap you want to use. Use the sliders to adjust sound, brightness and contrast. Working with the HP Palmtop PC HP Palmtop PC User Guide - 21...
- Page 32 Double-tap the Stylus icon in the Control Panel. Adjusting the Keyboard Double-tap the Keyboard icon on the Control Panel. 22 - HP Palmtop PC User Guide Tap the Double-Tap tab and follow the instructions in the window to set your tap rate.
- Page 33 Owner Properties window. Tap here to cause your ID screen to display when the palmtop PC is powered on. Tap the Notes tab to add a note. Working with the HP Palmtop PC HP Palmtop PC User Guide - 23...
- Page 34 Record your password and put it in a safe place. If you forget your password, you will have to perform a full reset on your HP Palmtop PC. To do this, first turn the palmtop PC off, then remove the main batteries, then the backup battery.
-
Page 35: Printing
Programs list. 2. Tap Remove. PRINTING There are two ways to print from your HP Palmtop PC: using Mobile Devices on the desktop PC or directly from the palmtop PC. Printing from the Desktop PC The Windows CE Services 2.0 Mobile Devices lets you print files from your HP Palmtop PC via a desktop computer. -
Page 36: Resetting
A hard reset causes ALL data to be lost. Soft Reset Remove the backup battery door and press the red reset button inside the compartment, hold for 5 seconds Or alternatively press+ + . The palmtop PC will restart automatically. 26 - HP Palmtop PC User Guide... -
Page 37: Transferring Files
Sharing data Between HP 620LX and the desktop PC After establishing a connection between the HP Palmtop PC and the desktop com- puter, the Mobile Devices window on the desktop displays the files and folders located on the palmtop PC. This means that you can simply drag and drop or copy files in the Mobile Devices to transfer date between the two machines. - Page 38 8. Connect the HP 620LX to the desktop PC. Establish partnership between the HP 620LX and the desktop PC. 9. Restore the data which you have backed up in step 2 into the HP 620LX. * Select Backup/Restore from the Tools menu in Mobile Devices.
-
Page 39: Using A Pc Card
10. Perform a soft reset on the HP 620LX to complete the restoration operation. * Remove the backup battery cover. * Use a pen or tip of a straightened paper clip to press the red reset button and hold for approximately 5 seconds. Alternatively, press... -
Page 40: Using A Pc Card Modem
PC and a remote computer, refer to ‘Communicating Remotely’ of the Microsoft Handheld PC Companion Guide. For a list of PC Card modems that are supported on the HP Palmtop PC, refer to the HP web site at: http://www.hp.com/handheld/index.html. Note •... -
Page 41: Using A Compactflash Card
HP Palmtop PC permanently. To change the CompactFlash card that you are using: 1. Save all data and close all files on the HP Palmtop PC. 2. Turn off the palmtop PC. - Page 42 Finally select the computer name to synchronize with, and click Connect. Syncronizing data using an infrared connection. If you have not set up your desktop PC and your HP Palmtop PC for an infrared connection yet, you will need to do that first.
- Page 43 To manually resolve conflicting items 1. For each item listed in the Resolve Conflict dialog box, tap the button under the Action column to indicate which data you want to keep. Working with the HP Palmtop PC HP Palmtop PC User Guide - 33...
-
Page 44: Backing Up And Restoring Data
You can backup and restore Calendar, Contacts, and Tasks data and your Inbox messages quickly with HP Data Backup Utility. You can also perform a full system backup from the Mobile Devices tool menu. The differences between the two are: HP Data Backup •... - Page 45 It is recommended that you use only PC cards which have been tested with your model of HP Palmtop PC. Use of other cards is not recommended. For a list of recommended PC memory cards, refer to our website at “http://www.hp.com/ handheld/thirdparty_soln/product_info/620lx_hw.html”.
- Page 46 Backup option on the HP Palmtop PC’s Control Panel. Warning It is recommended that you use only PC Cards that have been tested with the HP Palmtop PCs. Use of other cards is not recommended. For a list of recommended PC Memory Cards, refer to the Readme file in the HP Web Site (http:// www.hp.com/handheld/palmtops/hp600lx/manual/index.html).
- Page 47 Data Backup window appears. Backing Up Data to a PC Card 1. Be sure that a PC Card with sufficient storage is in the PC Card slot on the HP Palmtop PC. 2. Select the Backup tab on the Data Backup window.
- Page 48 Restoring Data from a PC Card You can restore database data stored on a PC memory card to the HP Palmtop PC using the same Data Backup utility. 1. Select the Restore tab on the Data Backup window. 2. Tap Restore Data.
- Page 49 Using a CompactFlash Card The procedures for backing up and restore using a CompactFlash Card are the same as described in “Using a PC Card” on page 29. Working with the HP Palmtop PC HP Palmtop PC User Guide - 39...
- Page 50 40 - HP Palmtop PC User Guide...
-
Page 51: Translating Hp Pim Data Files
To install the HP PIM Translation Utility onto the desktop PC: 1. Insert the HP CD-ROM into the CD drive. 2. Click on the “Trial Software” button on the main menu of the HP Palmtop PC CD-ROM. The Solutions and Resource Guide for Hewlett-Packard Palmtop PC’s will appear. -
Page 52: Starting The Translation
STARTING THE TRANSLATION When you launch the HP PIM Translation Utility application on your desktop PC, you first see the Welcome screen: Click Appointments to begin translating Appoint Book data. Note To translate multiple PIM data files, you need to repeat the Translation opera- tion for each file separately. -
Page 53: Translating Phone Book Data
An Appointment Translation Limitation Although the Appointment Book applications on the HP 100LX/ 200LX palmtop PCs and HP OmniGo 100/120 organizers and the Calendar application on the HP Palmtop PC support daily, weekly, monthly, and yearly repeated events, the Schedule+ application supports only daily and yearly repeated events. Since all translation goes through Schedule+, there is no direct mapping from earlier HP Palmtop products to Schedule+ for repeating weekly and monthly events. - Page 54 OK to return to Welcome screen. Mapping Field Names The HP PIM Translation Utility attempts to map the fields in your Phone Book data file to standard fields in a Schedule+ record. As long as your Phone Book fields have standard names (that is, you have not modified the Phone Book database field structure), the translation is straightforward.
- Page 55 You can add or modify the suggested mappings before translating the data. For example, if you have customized the name of a Phone Book field so that the HP PIM Translation Utility did not know how to map it, you can define a mapping for it yourself.
- Page 56 If a field in the left column is mapped to the wrong field in the right column, change the mapping by selecting a different Schedule+ field name from the drop down list box for the corresponding cell in the right column. 46 - HP Palmtop PC User Guide...
-
Page 57: Reviewing Translation Status
Status screen. Click the Status button on Welcome screen to see the history of any translations begun during the current execution of the HP PIM Translation Utility application. Click OK to return to the Welcome screen... - Page 58 48 - HP Palmtop PC User Guide...
-
Page 59: Working With Pre-Installed Applications
Chapter 5 – WORKING WITH PRE-INSTALLED APPLICATIONS OVERVIEW OF HP PALMTOP PC PRE-INSTALLED APPLICATIONS The software programs on your palmtop PC have been specifically developed for this computer. Many of them are similar, “pocket-sized” versions of those running on your desktop computer. Information can be exchanged between the software programs running on your palmtop PC and those running on your desk- top computer. - Page 60 Microsoft Pocket Internet Explorer Find information on the Internet. The Pocket Internet Explorer toolbar makes it easy to enter an address, return to your start page, and store favorite addresses in a folder. 50 - HP Palmtop PC User Guide...
- Page 61 PCs. • Using a PC card and modem and a communications program, you can connect to the Internet (or use a RAS connection to connect to your company network). Working with Pre-Installed Applications HP Palmtop PC User Guide - 51...
-
Page 62: Information Manager For Windows Ce
• If the information is stored in another palmtop PC, you can transfer individual contact cards using infrared communication. • If the information is stored in HP100LX/200LX palmtop PCs or HP OmniGo 100/120 organizers, you can transfer your Appointment Book and Phone... - Page 63 Viewing your calendar Calendar has three views: Day, Week, and Agenda. You can also have a month view of your appointments and a 6-month calendar using the HP-exclusive utility, Month-at-a-Glance-Plus. To switch views, tap on the appropriate button on the toolbar or double-tap on the Month-at-a-Glance-Plus icon on the taskbar.
-
Page 64: Month View
To get a Month view, double-tap on the Month-at-a-Glance Plus icon on the taskbar. You can also view your appointments for the day in the Month view by first tap- ping on the date, and then pressing the spacebar. Day View 6-Month Calendar Week View 54 - HP Palmtop PC User Guide... - Page 65 You can even set additional information, like reminders and notes. In both Day and Week views, symbols appearing in an appointment’s description indicate that additional information has been entered. Working with Pre-Installed Applications HP Palmtop PC User Guide - 55...
- Page 66 You can also add new annual all day events from the pull-down menu. 3. Complete the information in the appointment card. Make sure that the All day Event check box is selected. 4. When finished, tap OK. 56 - HP Palmtop PC User Guide...
- Page 67 2. Make the changes you want, and then tap OK. To delete an appointment • Tap the appointment, and then tap the Delete button on the toolbar or the DEL key. Working with Pre-Installed Applications HP Palmtop PC User Guide - 57...
- Page 68 3. Select the range of dates for which you want to print your appointments, events, and tasks. 4. In the list, tap the port to which you want to print, and then tap OK. 58 - HP Palmtop PC User Guide...
- Page 69 You can choose to sort the list by first name or by any of the columns in the contact list. A triangular icon in the column head- ing indicates the column by which the list is sorted. Working with Pre-Installed Applications HP Palmtop PC User Guide - 59...
- Page 70 Notes. Touch the icons to go to the appropriate tab. To create a new contact card 1. Tap File, then New on the toolbar. 2. Type the information you want in the appropriate fields. 3. When finished, tap OK. 60 - HP Palmtop PC User Guide...
- Page 71 Contact cards are deleted immediately and cannot be retrieved; they are not moved to the Recycle Bin. Cards you delete on your palmtop PC will be deleted from your information manager on your desktop computer the next time you synchronize. Working with Pre-Installed Applications HP Palmtop PC User Guide - 61...
- Page 72 You can print your contact information directly from your palmtop PC. The infor- mation is printed in plain text format. To print contact information 1. Connect your palmtop PC to a printer using a serial cable or an infrared connection. 62 - HP Palmtop PC User Guide...
- Page 73 1. Tap the Filter box on the toolbar to see the list of task categories. 2. Tap the task category that you want to view. Tasks included in that category are displayed in the window. Working with Pre-Installed Applications HP Palmtop PC User Guide - 63...
- Page 74 To quickly make changes to a number of tasks, work in the task list with the edit panel displayed. If you are making changes to reminders, setting recurrence options, or adding notes, edit the task card directly. 64 - HP Palmtop PC User Guide Go to the edit panel by tapping this icon.
- Page 75 Printing a list of tasks You can print a list of tasks directly from your Handheld PC. Tasks are printed in plain text format. Working with Pre-Installed Applications HP Palmtop PC User Guide - 65...
-
Page 76: Microsoft Pocket Word
Handheld PC. For information on how to print PocketWord and Pocket Excel files from H/PC Explorer, as well as convert them to Microsoft Word and Microsoft Excel, see Chapter 3, “Working with the HP Palmtop PC”. 66 - HP Palmtop PC User Guide... - Page 77 To easily open the most recently used file, tap the File menu and then tap the file’s name. To create a new document or workbook On the File menu, tap New, and then tap Document or Workbook. Working with Pre-Installed Applications HP Palmtop PC User Guide - 67...
- Page 78 .pwd file. Pocket Excel automatically assigns a .pxl extension to the workbook you save. To save a document or worksheet 1. On the File menu, tap Save. 68 - HP Palmtop PC User Guide File Name Estimate Letter...
- Page 79 Search for an exact and complete match of characters in a cell (Pocket Excel only) Search for a particular workbook attribute, either a value or formula (Pocket Excel only) Working with Pre-Installed Applications HP Palmtop PC User Guide - 69...
- Page 80 This section teaches you how to select and format text in Pocket Word. It also tells you how to use Outline view to organize your document. 70 - HP Palmtop PC User Guide If you want to Find the next match without replacing...
-
Page 81: Formatting Text
2. Open the transferred document in Pocket Word. Do this Drag the stylus over the text. Tap the picture. Double-tap the word. Trip-tap within the paragraph. On the Edit menu, tap Select All. Working with Pre-Installed Applications HP Palmtop PC User Guide - 71... - Page 82 1. Open a new document. 2. Before you begin typing, tap Select All on the Edit menu to select the first blank paragraph. 3. Select a font from the list on the toolbar. 72 - HP Palmtop PC User Guide...
- Page 83 Outline view provides nine heading levels and one body text level. The formats for these levels correspond to heading styles in Microsoft Word. You can display all of the text in the document or only headings, without any body text. Working with Pre-Installed Applications HP Palmtop PC User Guide - 73...
- Page 84 You can use these symbols to expand or collapse text. To expand a heading or subheading, double-tap text, double-tap next to the heading. 74 - HP Palmtop PC User Guide next to the heading. To collapse a heading and its body...
-
Page 85: Microsoft Pocket Excel
Tap Insert Function Tap Define Name Tap Modify Sheets On the Format menu Tap Cells Tap Row Height Tap Column Width Tap Insert Tap Delete Working with Pre-Installed Applications HP Palmtop PC User Guide - 75... - Page 86 If it does not, Pocket Excel will simply copy the data in the first cell. • Tap Date to select an option from the Date list. Then specify an increment in the Step value box. 6. Tap OK. 76 - HP Palmtop PC User Guide...
- Page 87 Numbers are entered as constant values and are right-aligned in the cell by default. Numbers can include numeric characters (0 through 9) and any of the following special characters: + / $ , % . E e - ( ) Working with Pre-Installed Applications HP Palmtop PC User Guide - 77...
- Page 88 • If you want to display time using the 12-hour clock, type am or pm (for example, type 3:00 pm). Otherwise, Pocket Excel automatically displays time using the 24-hour clock (for example, 15:00). 78 - HP Palmtop PC User Guide...
- Page 89 To quickly calculate averages, sums, or maximum/minimum values 1. Select a range of cells. 2. Tap the AutoCalc menu on the status bar at the bottom of the screen. Times 3:00 3:00:00 pm 8/31/96 3:00 pm Working with Pre-Installed Applications HP Palmtop PC User Guide - 79...
- Page 90 3. Enter the formula using the following guidelines: • Use parentheses to enclose ranges (which are part of formulas) and other function arguments. For example, (A1:B3) represents the cell references and (1,2,3) represents constant values in the formula, =AVERAGE(SUM(A1:B3),SUM(1,2,3)). 80 - HP Palmtop PC User Guide...
- Page 91 There are times that you may want to refer to a range of sheets in a workbook. This is called 3-D referencing. A 3-D reference needs to specify the starting and ending worksheet, as well as the Working with Pre-Installed Applications HP Palmtop PC User Guide - 81...
- Page 92 A workbook can contain several pages, or worksheets, making it easy to access all your important data. You can switch quickly from one worksheet to another, or arrange the worksheets to best meet your needs. 82 - HP Palmtop PC User Guide...
- Page 93 1. On the Tools menu, tap Sheet, then Modify Sheets 2. Select the sheet you want to move, and then tap either Move Up or Move Down. 3. Tap OK. Working with Pre-Installed Applications HP Palmtop PC User Guide - 83...
-
Page 94: Microsoft Pocket Powerpoint
To open an existing PowerPoint presentation in your palmtop PC 1. The Open Presentation dialog box opens with the application. 2. Browse to the location of the document, and then double-tap the document icon. 84 - HP Palmtop PC User Guide... - Page 95 • Tap the Screen Show icon on the toolbar You can also use the stylus to draw annotations while presenting by tapping on the stylus icon on the Screen Show. Working with Pre-Installed Applications HP Palmtop PC User Guide - 85...
-
Page 96: Quicken® Expensable
Windows CE Services folder. 3. If there is an icon corresponding to your H/PC device, select it and delete it. 4. Reconnect your H/PC to the desktop computer and set up the Partnership in Mobile Devices. 86 - HP Palmtop PC User Guide... - Page 97 Enter key. 1. In the iconbar, tap the Options icon. 2. Adjust the individual options, and then tap OK to save the settings. Working with Pre-Installed Applications HP Palmtop PC User Guide - 87...
- Page 98 • Information put in the “Envelope Name:” field is for reference only. If you don’t enter a name, ExpensAble calls the new envelope “Untitled1.” • Select the “Show Currency” checkbox if you want to enter currency and exchange rate information with each transaction. 88 - HP Palmtop PC User Guide...
- Page 99 You can’t type into the Expense Log, but use the stylus, arrow keys, or scroll arrows to move through the log, and then tap a transaction to select or edit it. Working with Pre-Installed Applications HP Palmtop PC User Guide - 89...
- Page 100 You may want to enter a personal memo for an expense. You can add a personal memo for any transaction by taping the Details button in the Expense Record. 1. In the Expense Record, tap the Details button. 90 - HP Palmtop PC User Guide...
- Page 101 2. Choose the country (and currency) to use for this expense. 3. Enter the exchange rate for the expense. After entering your expense amount, ExpensAble remembers the exchange Working with Pre-Installed Applications HP Palmtop PC User Guide - 91...
- Page 102 3. At the Expense Record window, make any additions or adjustments to the transaction, and tap Enter. • For partial reimbursements enter the amount of the transaction and the account to which it will be deposited. 92 - HP Palmtop PC User Guide...
- Page 103 Expense Types list. The Expense Types drop-down list shows the expense types you can choose from when you enter transactions. The list includes some fixed expense types that are Working with Pre-Installed Applications HP Palmtop PC User Guide - 93...
- Page 104 • To delete an expense type, tap Delete. Confirm that you want to delete the expense type. 3. Make any other changes you want at the Expense Types List window, and then tap Done. 94 - HP Palmtop PC User Guide...
- Page 105 • If you don’t plan to use folders, slide the spacer to the left to “hide” the folders and give you more room for your envelopes. Note Many of the tasks in the following table are on the shortcut menu in the Envelopes window. Working with Pre-Installed Applications HP Palmtop PC User Guide - 95...
- Page 106 Open a file From the File menu, choose Open. Choose the name of the file you want fromthe file list, and then tap OK. ExpensAble automatically saves and closes the current 96 - HP Palmtop PC User Guide...
- Page 107 • Submit a expense report for approval and reimbursement. • Receive any amount of payment for reported expenses. • Reimburse your company for excess cash advances or personal expense amounts that you owe. Working with Pre-Installed Applications HP Palmtop PC User Guide - 97...
- Page 108 However, you can have more than one file. For example, if you want to keep a separate file for each year’s expense reports, you can set up a new file at the beginning of each year. 98 - HP Palmtop PC User Guide...
- Page 109 6 to the Windows Explorer window you opened in step 7. You will then be prompted to choose where, on the desktop computer, you want the file transferred. 9. After the file is copied and converted, click OK. Working with Pre-Installed Applications HP Palmtop PC User Guide - 99...
-
Page 110: Fiscal Pro
To start Fiscal Pro Press on the Fiscal Pro icon on the Quick Application Launch Pad. 100 - HP Palmtop PC User Guide... -
Page 111: Microsoft Voice Recorder
Options under the Tools menu. - Press the REC key again to stop recording. Working with Pre-Installed Applications HP Palmtop PC User Guide - 101... -
Page 112: Bfax Pro Fax Send/Receive Application
Fax menu (Ctrl+N) or double tap New Fax in the Fax Workspace folder. Type a filename for your fax. Type a descriptive new name for your fax when you create it, or rename it later by selecting it then tapping it again. 102 - HP Palmtop PC User Guide... - Page 113 To send your fax, make sure the Fax/Modem is properly connected to both palmtop and telephone line, then tap Send Fax (Ctrl+S) in the Fax menu or tap the icon in Working with Pre-Installed Applications HP Palmtop PC User Guide - 103...
- Page 114 “Answer Now” button will be enabled. If you tap on the “An- swer Now” button, bFAX™ will cause the modem to go “off hook” and attempt to manually answer an incoming fax. 104 - HP Palmtop PC User Guide...
- Page 115 (*.2bp file) as you would send any other document. Why does my file not fax correctly? In order to fax correctly, a text document file must end with “.txt” and it must also Working with Pre-Installed Applications HP Palmtop PC User Guide - 105...
- Page 116 Can I modify a recipient after I add that person to an outgoing fax? Yes, double tap the recipient in the recipient list that you wish to edit, and make the changes in the Add Recipient dialog. 106 - HP Palmtop PC User Guide...
- Page 117 (011 in the US) to the recipient’s phone number. This is automatically dialed by bFAX™ to access an international phone line if your dialing locations are set correctly. Working with Pre-Installed Applications HP Palmtop PC User Guide - 107...
- Page 118 Some voice mail systems will cause modems to report this error. Watch the Fax Progress box while dialing to see exactly what number is being dialed. If it is not a correctly, or the Dialing Location is not properly configured. 108 - HP Palmtop PC User Guide...
-
Page 119: More Information
Microsoft and Windows are either registered trademarks or trademarks of Microsoft Corporation in the United States and/or other countries. bFAX, bsquare Fax, and bsquare View are trademarks of bsquare development. Working with Pre-Installed Applications HP Palmtop PC User Guide - 109... -
Page 120: Inbox
Inbox and that messaging program over a serial connection. Backing up your email mes- sages is made easy with the HP Data Backup. This chapter describes how to set up the Inbox dial-up connections, how to create, read, send and receive messages, and how to transfer messages between Inbox and your desktop messaging program. - Page 121 The name appears on the Service menu. 5. In the Service Definition dialog box, fill in the information, as provided by your Internet service provider or system administrator, then tap Next. Working with Pre-Installed Applications HP Palmtop PC User Guide - 111...
- Page 122 If you download message headers only, you can then select the messages you need to see in their entirety and download them when you next connect, as described in “Reading messages” later in this chapter. 112 - HP Palmtop PC User Guide...
- Page 123 When you connect to Internet mail or to your corporate mail server, the following actions are carried out automatically: next to the time on the taskbar indicates you are connected. Working with Pre-Installed Applications HP Palmtop PC User Guide - 113...
- Page 124 PC, since you are only downloading the message headers. While connected, Inbox may check for new mail periodically, depending on the service options you select. You can also update the message list by tapping Refresh on the Service menu. 114 - HP Palmtop PC User Guide...
- Page 125 Optionally stores a copy of each message sent. You can select this option in the Compose tab, go to Compose, Options. Displays delete messages and deletes them according to the options you sent. Working with Pre-Installed Applications HP Palmtop PC User Guide - 115...
- Page 126 2. Tap the Compose, Read, or Deleted Items tabs as appropriate, and tap the options you want for messages you send, receive, and delete. For more information about specific options, tap the help button in the Options dialog box. 3. When finished, tap OK. 116 - HP Palmtop PC User Guide...
- Page 127 PC. Also, remember that you’ll retrieve and the message is copied to the Inbox the next time you Working with Pre-Installed Applications HP Palmtop PC User Guide - 117 and moved to the...
- Page 128 Reply to sender Reply to the sender and all recipients Forward 3. In the pre-addressed message form that appears, type your message text and send the message, as described in the following section. 118 - HP Palmtop PC User Guide...
- Page 129 Working in the message list While connected to your mail server, you can update the list of messages by tap- ping the Refresh command on the Service menu. Working with Pre-Installed Applications HP Palmtop PC User Guide - 119...
- Page 130 Inbox lists folders you create after the standard Inbox folders, in the order in which you created them. To rename a folder 1. Tap the folder name to select it, and then tap it again. 2. Type a new name. 120 - HP Palmtop PC User Guide...
- Page 131 1. Connect your palmtop PC to your desktop computer, and open Mobile Devices on your desktop computer. 2. In your Microsoft messaging program on your desktop computer, select the Working with Pre-Installed Applications HP Palmtop PC User Guide - 121...
-
Page 132: Microsoft Pocket Internet Explorer
Internet if you have not actively used it for a specified time. To set up AutoDial (Automatic Internet Connection) 1. On the View menu of Pocket Internet Explorer, tap Options, and then tap the Auto Dial tab. 2. Select the Use AutoDial check box. 122 - HP Palmtop PC User Guide... - Page 133 The Address List includes the ten most recent addresses that you’ve visited. 4. The Dial-Up Connection dialog box opens.Tap Connect to connect to your Internet server. Working with Pre-Installed Applications HP Palmtop PC User Guide - 123...
- Page 134 3. In the Address list, type the address for the Web page you want to open in another window. 4. To switch to a page in another window, tap its name on the taskbar. 124 - HP Palmtop PC User Guide...
- Page 135 To copy information from an Internet site to a document 1. Select the information you want to copy. 2. On the edit menu, tap Copy. Working with Pre-Installed Applications HP Palmtop PC User Guide - 125...
- Page 136 2. Drag the Size of Cache slider to the right to increase the storage size or to the left to decrease it. 3. When finished, tap OK. The amount of storage you set is shown at the right of the slider. 126 - HP Palmtop PC User Guide...
- Page 137 5. Tap Use Current Page, and then tap OK. Note You can reset the Home Page and Search Page to their original addresses by tap- ping Use Default Page. Working with Pre-Installed Applications HP Palmtop PC User Guide - 127...
-
Page 138: Setting Security Options
1. On the View menu, tap Options, and then tap the Advanced tab. 2. Select the Enable Cookies check box, and then tap OK. Setting security options Pocket Internet Explorer allows you to encrypt the information that you send and 128 - HP Palmtop PC User Guide... - Page 139 CERN proxy server standard. It does not work with ANS proxies or with servers using SOCKS security. To specify a proxy server 1. On the View menu, tap Options. Working with Pre-Installed Applications HP Palmtop PC User Guide - 129...
-
Page 140: Bfind Tm Global Find Utility
‘Look For’ field. 4. In the Search Location group box, check the location(s) in which you want to search. 130 - HP Palmtop PC User Guide... - Page 141 Pocket Word Documents: This is a customized “File Contents” search. It searches only the contents of pocket word files (i.e., “*.pwd”). Pocket Excel Documents: This is a customized “File Contents” search. It searches Working with Pre-Installed Applications HP Palmtop PC User Guide - 131...
- Page 142 2. Tap ‘Use Scripts’ to disable and/or enable this feature. To Create Shortcuts for Searches and Results 1. Choose the Shortcuts menu item by tapping on it or use Alt+S. 2. Tap on ‘Add Last Search’ or use Shift+L. 132 - HP Palmtop PC User Guide...
-
Page 143: World Clock
Whether at home or on the road, you can use World Clock to keep track of the date and time. You can find World Clock in your Control Panel folder by tapping Working with Pre-Installed Applications HP Palmtop PC User Guide - 133... - Page 144 If information for a city changes (for example, a new area code is added), you can add a new city with the same name, and then edit the information for the new city. 134 - HP Palmtop PC User Guide...
-
Page 145: Setting Alarms
These alarms are separate from those you set for task and appointment reminders in Tasks and Calendar. To set an alarm 1. Select the Alarms tab. 2. Tap, and then type a phrase. Working with Pre-Installed Applications HP Palmtop PC User Guide - 135... -
Page 146: Calculator
3.141529, you can double-tap the “/ 3.141529” line in the paper tape each time you want to apply it to a new calculation. 136 - HP Palmtop PC User Guide... -
Page 147: Synchronization With The Desktop Pc (Mobile Devices)
To connect your palmtop PC to your desktop computer 1. Start Mobile Devices on your desktop computer and power on your palmtop PC. Working with Pre-Installed Applications HP Palmtop PC User Guide - 137... - Page 148 PC by using the following procedure. For more information, refer to your software vendor’s instructions. You can remove software that you installed with a wizard or setup program by using the Remove Programs control panel. 138 - HP Palmtop PC User Guide...
- Page 149 Or select a file on your desktop computer and drag it to the Mobile Devices. Alternatively, select the file and use the Copy and Paste commands on Working with Pre-Installed Applications HP Palmtop PC User Guide - 139...
- Page 150 3. If you want to change the default file extension, click the H/PC -> Desktop or the Desktop -> H/PC tab, and then select a file type in the list box. The default extension used for converting this file type is displayed in the lower portion of 140 - HP Palmtop PC User Guide...
- Page 151 Cells are displayed as text separated by tabs. Text is displayed but some formatting may be lost. These items are removed. Working with Pre-Installed Applications HP Palmtop PC User Guide - 141...
-
Page 152: Connection To An Isp (Internet Service Provider)
Service Provider (ISP) first, using a PC Card modem. A Connection Internet Service Provider 142 - HP Palmtop PC User Guide If you want to Matched to the closest font available on your palmtop PC. Horizontal, vertical, and wrap text attributes remain the same; how- ever, vertical text appears horizontal. - Page 153 The two things you need are: 1. A PC Card modem, preferably one that is recommended by HP. Note Since most PC Card modems require significant power to operate, it is recom- mended that a AC adapter is used whenever a modem is used with the palmtop PC.
- Page 154 13. Tap the TCP/IP Settings box. 14. IP addresses identify computers on the Internet. They consist of four numbers in the range 0-255 separated by full stops (e.g. 15.123.112.31). If your ISP 144 - HP Palmtop PC User Guide...
- Page 155 Most modems will not work with digital telephone lines connected to a private exchange in your workplace. Generally, a telephone line that works with a fax machine will work with your HP 600 Series Palmtop PC. Note that digital phone lines may cause damage to your modem.
- Page 156 “0FG” or “9,0FG” as per the local example. (Area codes should be entered without zeros). 9. For international calls the dialing pattern should include the international access code (e.g. 001 in Singapore) followed by a comma and then EFG. 146 - HP Palmtop PC User Guide...
- Page 157 3. Tap File, then tap the Properties button on the toolbar. Long Distance International 001, EFG 001, EFG 011, EFG 00, EFG 00, EFG 00, EFG Working with Pre-Installed Applications HP Palmtop PC User Guide - 147...
- Page 158 1. Double tap Pocket Internet Explorer on your palmtop’s desktop. 2. Tap View, then Options and then tap the Proxy Server tab. 3. Enter the proxy server’s name and port. 4. Tap OK. 148 - HP Palmtop PC User Guide...
-
Page 159: Reference
With good care, your HP Palmtop PC will be a reliable desktop PC companion. Cleaning the Screen When you touch the screen of the HP Palmtop PC with your hand, it leaves a trace of natural oil that may make it harder to read the screen from certain angles. If you need to clean the screen, use a commercial glass cleaner sprayed on a soft cloth. - Page 160 …use point sizes greater than 36 in Pocket Word? Although font sizes between 1 and 1638 are allowed in Pocket Word for compatibility with Microsoft Word, the largest supported font size on the palmtop PC is 36. 150 - HP Palmtop PC User Guide...
- Page 161 ...determine which card my HP 620LX is addressing if both a PC Card and a CompactFlash Card are installed? The HP 620LX can address two flash memory cards at a time. If the palmtop PC is powered on with a card in each slot, the PC Card is shown as Storage Card in My Handheld PC and the Compact Flash Card as Storage Card2.
- Page 162 Contact one of the technical support numbers listed on the back of the card, “Contacting Hewlett-Packard Worldwide,” which is included in the product box. Do not ship your computer for service without first contacting a Hewlett-Packard office. 152 - HP Palmtop PC User Guide...
-
Page 163: Electrostatic Discharge Warning
This may cause the HP 620LX to behave abnormally, and data corruption or loss of unsaved data can be the result. To recover you need to reset the HP 620LX as described in ‘Resetting’. Similarly, the CompactFlash Card data can be recovered using the disk recovery utility program in your PC. - Page 164 Packard Customer Care Centre on 1800-131347. For Consumers in New Zealand The above warranty terms or any other warranty statement enclosed with this product, except to the extent lawfully permitted, do not exclude, restrict or modify 154 - HP Palmtop PC User Guide...
- Page 165 Packard office. If your unit qualifies for in-warranty service, be ready to supply a dated proof of purchase. In countries not listed on the card, contact your Hewlett-Packard authorized dealer or sales office. Reference HP Palmtop PC User Guide - 155...
- Page 166 156 - HP Palmtop PC User Guide...
-
Page 167: Index
CompactFlash Card Comparison operators Connection between palmtop and desktop PC Contacts change contact information copy, delete and modify contact card HP Palmtop PC User Guide - 157 104, 107, 108 104, 105 126, 127, 132 56, 57 56, 57 53-57, 63... - Page 168 Help HP 620LX HP 660LX HP Data Backup HP PIM Data Files HP PIM Translation Utility 29, 41, 42, 44, 45, 47, 52 75, 80 77, 78 1, 102, 103, 104, 105, 106, 108, 109 96, 112, 120 71, 72, 75, 77, 78, 79, 83...
- Page 169 Microsoft Windows Mobile Devices 86, 99, 100, 121, 122, 137-141, 150 Modem 125, 128 Network Connection Number Lock Key HP Palmtop PC User Guide - 159 3, 7 111, 148 17, 150 114, 117, 118, 120, 131 ® 49, 66, 75...
- Page 170 Printing from the Desktop PC Printing from the HP Palmtop PC Printing Pocket Word Files Proxy server Quick Application Launch Pad Quick Settings Hard Icon Panel 160 - HP Palmtop PC User Guide ® Quicken ExpensAble cash advance transactions 13, 32...
- Page 171 138, 149 switch to Outline view World Clock HP Palmtop PC User Guide - 161 29, 36, 109, 122- 129, 144, 151 7, 9, 12 1, 13, 15 10, 11, 28, 51, 133, 134, 150...
- Page 172 162 - HP Palmtop PC User Guide...