Pioneer CDJ-2000NXS Operating Instructions Manual
Multi player
Hide thumbs
Also See for CDJ-2000NXS:
- Service manual (158 pages) ,
- Quick start manual (44 pages) ,
- Quick start manual (116 pages)
Table of Contents
Quick Links
MULTI PLAYER
CDJ-2000NXS
CDJ-2000nexus
http://pioneerdj.com/support/
The Pioneer website shown above offers FAQs, information on software and various other types of information
and services to allow you to use your product in greater comfort.
http://rekordbox.com/
For inquiries on rekordbox™, please see the support site indicated above.
Operating Instructions
Table of Contents

Related Manuals for Pioneer CDJ-2000NXS


Summary of Contents for Pioneer CDJ-2000NXS
-
Page 1: Operating Instructions
CDJ-2000NXS CDJ-2000nexus http://pioneerdj.com/support/ The Pioneer website shown above offers FAQs, information on software and various other types of information and services to allow you to use your product in greater comfort. http://rekordbox.com/ For inquiries on rekordbox™, please see the support site indicated above. -
Page 2: Table Of Contents
Using the slip mode .................. 29 Playing from the point touched on the [NEEDLE SEARCH] pad ..30 Using the beat sync function ..............31 Operating the CDJ-2000NXS in combination with other devices ..31 Browsing tracks ..................31 Other browsing operations ..............32 Using hot cue banks ................. -
Page 3: Before Start
At the disco or club rekordbox (Mac/Windows) rekordbox is a software program allowing users who have purchased a Pioneer DJ player supporting rekordbox to manage music files to be used for DJ performances. The included rekordbox music management software can be used for the management (analysis, settings, creation, history storage) of music files on computers. - Page 4 QUANTIZE Connect the computer and DJ player. The CDJ-2000NXS is equipped with a quantize function for putting a track on beat even when the button is pressed roughly, as long as the track has been analyzed with rekordbox. When setting real time cues...
-
Page 5: Before You Start
2 Titles, album names and artist names recorded in the CD-Text data are dis- played. When multiple text data are recorded on the disc, the information for the Before you start first text data is displayed. Discs that cannot be played ! DTS-CD Supported sources ! Photo CDs... - Page 6 ! Optical disc type devices such as external DVD/CD drives, etc., are be used. Re-format the card on a computer, etc., before using it. not supported. ! Pioneer does not guarantee that all SD memory cards will operate on ! USB hubs cannot be used. this unit.
-
Page 7: Playable Music File Formats
Playable music file formats This unit supports music files in the formats shown below. Type File extension Compatible formats Bit depth Bit rate Sampling frequency Encoding method 32 kbps to MPEG-1 AUDIO LAYER-3 16 bit 32 kHz, 44.1 kHz, 48 kHz CBR, VBR 320 kbps .mp3... -
Page 8: Functions Usable In Combination With A Computer
The included CD-ROM contains the following two software programs. Program, except to the extent expressly permitted by applicable law, and then only after You have notified Pioneer in writing of rekordbox (Mac/Windows) music management Your intended activities. -
Page 9: Cautions On Copyrights
Cautions on copyrights USB port disc, etc.) is required to transfer music files to the USB device. To transfer music files to a Pioneer DJ player, an Ethernet LAN rekordbox restricts playback and duplication of copyright-protected LAN port adapter (RJ45 port) is required for communicating with the DJ music contents. -
Page 10: Using The Online Support Site
! You can select the one you desire from multiple languages as long — Pioneer’s privacy policy can be viewed on the rekordbox online as the language is supported by the system environment of your support site. - Page 11 — To inquire about configuring your computer with non-Pioneer peripheral devices and to obtain the corresponding technical support, contact the specific manufacturer or retailer.
-
Page 12: Connections
Connections ! Be sure to turn off the power and unplug the power cord from the power outlet whenever making or changing connections. ! Refer to the operating instructions for the component to be connected. ! Connect the power cord after all the connections between devices have been completed. ! When using a LAN cable for connection, be sure to use either the LAN cable included with this product or an STP (shielded twisted pair) cable. - Page 13 Connecting to a mixer with only one LAN port When connecting to a mixer with only one LAN port using a switching hub, in order to use rekordbox’s music file management functions to their maxi- mum, set the channel number of the mixer to which the audio or coaxial digital cable is connected and the player number displayed at the bottom left of the main unit display to the same number.
- Page 14 ! This product supports iPod touch (3rd and 4th generation), iPhone 4S, iPhone 4, iPhone 3GS, iPad (3rd generation), iPad 2 and iPad. ! Visit the Pioneer webpage (http://pioneerdj.com/support/) for the latest compatibility information. Using a switching hub...
-
Page 15: Using Other Brands Of Dj Software
USB cable to a computer on which MIDI-compatible DJ software is installed, the DJ software can be operated from the CDJ-2000NXS. The sound of music files being played on the computer can also be output from the CDJ-2000NXS. For details, see About the driver software (Windows) on page 39 and Using other brands of DJ software on page 41. -
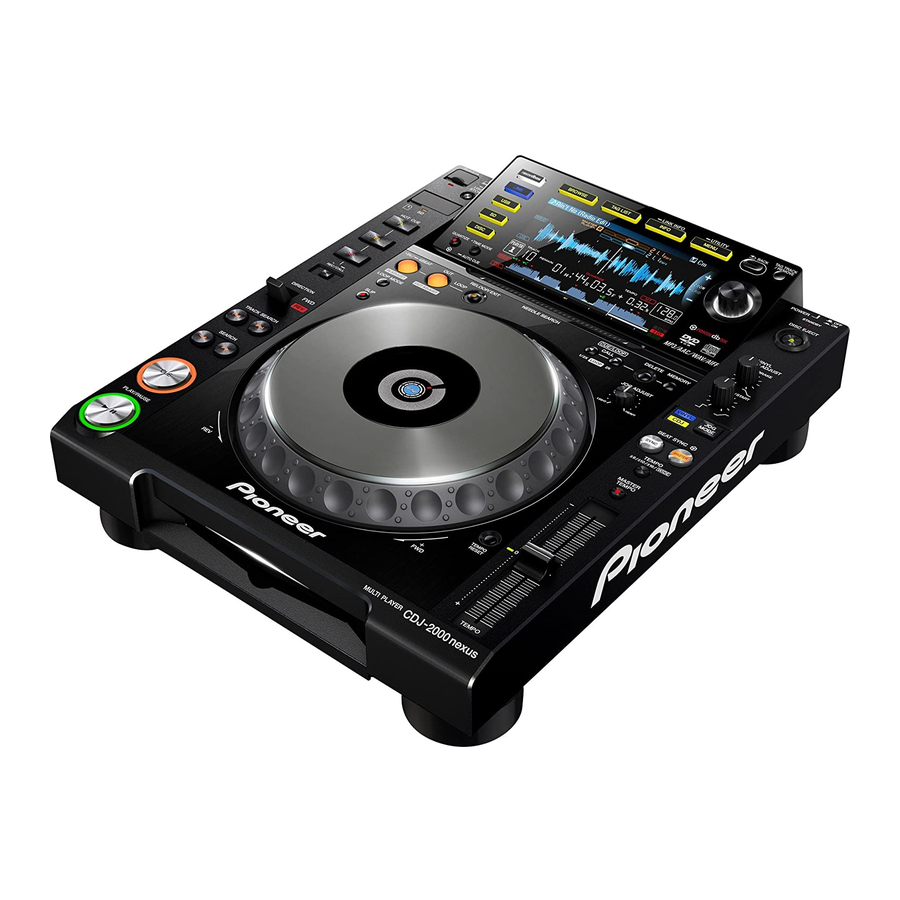
Page 16: Part Names And Functions
Part names and functions Control panel rekordbox TAG TRACK LINK INFO UTILITY BACK / REMOVE BROWSE TAG LIST INFO MENU LINK rekordbox POWER STANDBY LINK STOP DISC EJECT DISC QUANTIZE TIME MODE DISC VINYL AUTO CUE QUANTIZE TIME MODE SPEED ADJUST TOUCH / BRAKE HOT CUE AUTO CUE... - Page 17 d SD memory card indicator s TAG LIST button This flashes when communicating with the SD memory card. Press this to display the [TAG LIST] screen. = Inserting and ejecting SD memory cards (p.22) = Editing tag lists (p.34) e SD memory card door t INFO/LINK INFO button Open and close this door to insert or remove SD memory cards.
- Page 18 I BEAT SYNC MASTER button Use this to set the track loaded in this unit as the master for the beat sync function. = Using the beat sync function (p.31) J BEAT SYNC button Use this to turn on the beat sync function. = Using the beat sync function (p.31) K TEMPO ±6/±10/±16/WIDE button Use this to switch the playing speed adjustment range.
-
Page 19: Rear Panel
Rear panel POWER CONTROL For the terminals used for connections, see Descriptions of terminals 1 POWER ON/OFF button on page 12. Press to turn the power on and off. 2 Kensington security slot Front panel 1 Disc insertion slot 2 Disc force eject pin insertion hole 3 Disc insertion slot indicator About ejecting discs by force ! If the disc cannot be ejected by pressing the [DISC EJECTh] button, the disc can be forcibly ejected by inserting the disc force eject pin into the disc... -
Page 20: Main Unit Display
! The BPM measured by this unit may differ from the BPM indi- This indicates the track number (01 – 99). cated on the disc or that of a Pioneer DJ mixer, etc. This is due to 6 REMAIN the different methods used for measuring the BPM, and is not a This lights when the time display is set to the remaining time. -
Page 21: Jog Dial Display Section
Jog dial display section 1 Operation display This indicates the playing position, with one revolution equal to 135 frames. It turns during playback and stops in the pause mode. 2 Cue point display/slip play display 3 Audio memory status display This flashes when the audio memory is being written. -
Page 22: Basic Operation
Pioneer DJ player is connected, the number of discs stored in the disc information memory is displayed for several seconds on the Basic Operation main unit display. = For details on storing disc information, see Procedure for calling out hot cues (for discs) on page 28. -
Page 23: Connecting And Disconnecting Usb Devices
= Connecting USB devices (p.23) Inserting SD memory cards 2 Press the corresponding medium button ([DISC], [SD] or [USB]). 1 Press the [POWER ON/OFF] button to turn on this The tracks or folders are displayed on a list. unit’s power. The medium whose contents are displayed on the main unit display can be switched. - Page 24 ! When multiple media are connected, a screen for selecting the 3 Turn the rotary selector to select the track, then press medium appears. the rotary selector to set playback. ! If the storage device (SD, USB) contains rekordbox library informa- ! The display of the track names is canceled by pressing the [MENU] tion, the rekordbox library is displayed.
-
Page 25: Operating The Jog Dial
3 Spin the jog dial in the desired direction and at the Playing in reverse desired speed. The sound is played according to the direction and speed at which the ! When the quantize function is on, there may be a slight delay in jog dial is spun by spinning the top of the jog dial while pressing it. -
Page 26: Advanced Operation
! The auto cue level setting remains in the memory, even when the power is turned off. Advanced Operation Setting Loop Setting Cue This function can be used to play specific sections repeatedly. ! Loops that include sections in different tracks can only be set for tracks recorded on music CDs (CD-DA). -
Page 27: Setting Hot Cue
Returning to Loop playback (Reloop) Using active loops After canceling loop playback, press the [RELOOP/EXIT] 1 Connect a storage device (SD, USB) to this unit. button during playback. 2 Load a track for which an active loop has been set Playback returns to the previously set Loop In Point, and Loop playback with rekordbox. -
Page 28: Storing Cue Or Loop Points
! After calling out a loop stored at a [HOT CUE] button, loop playback Storing cue or loop points can be canceled using the [RELOOP/EXIT] button and the loop in and out points can be fine-adjusted using the [LOOP IN(IN ADJUST)] and [LOOP OUT(OUT ADJUST)] buttons. -
Page 29: Setting The Cue Point For Auto Cueing
4 Press the [DELETE] button. 3 Turn the rotary selector then press it. Select the acoustic pressure level or [MEMORY]. DELETE] or [ DELETE] is displayed on the main unit display, and the selected point information is deleted. Using the [TIME MODE (AUTO CUE)] button ! When a stored loop set as an active loop is deleted, the active loop is also deleted. -
Page 30: Playing From The Point Touched On The [Needle Search] Pad
2 Press the [SLIP] button. The [SLIP] button flashes in beat with the sound playing in the background. The mode switches to the slip mode. ! At the position 8 beats past the position at which the [DIRECTION 3 During playback, press the top of the jog dial. FWD REV] lever was moved to the REV side, the slip reverse mode is The scratch play mode is set. -
Page 31: Using The Beat Sync Function
For instructions on connecting, see Basic style on page 12. normal playback screen. ! If the Pioneer DJ mixer does not have a LAN port, connect a mini When the [BROWSE] button is pressed again, the previous browse phone plug cable (Ø 3.5 mm) to the CONTROL terminal. -
Page 32: Other Browsing Operations
Description of the screen Moving back up to a higher layer Press the [BACK] button while the browser screen is displayed. The screen moves back to the layer above. ! When the [BACK] button is pressed for over 1 second or the medium button for the medium being browsed is pressed, the display moves to the topmost level. -
Page 33: Using Hot Cue Banks
In the page jump mode 3 Use the [NEEDLE SEARCH] pad to input a character. Only the tracks including the character you have input are displayed. = Inputting characters using the [NEEDLE SEARCH] pad (p.33) 1 Display a list not sorted in alphabetical order. ! When more characters are input, only the tracks including the char- Display a list that is not sorted in alphabetical order, such as the tracks acter string you have input are displayed. -
Page 34: Checking The Playing History (History)
Checking the playing history Editing tag lists (HISTORY) Tracks to be played next or tracks selected according to DJ situations can be marked and collected on lists. The list of collected tracks is called The track playing history is stored and displayed at the [HISTORY] cat- the “tag list”. - Page 35 Removing one track at a time 1 Switch to the browse screen and select a category or folder that has tracks directly under it. A list of the tracks is displayed on the right half of the information display 1 Press the [TAG LIST] button.
-
Page 36: Displaying The Details Of The Currently Loaded Track
! When tag lists include both tracks being managed with rekordbox 2 Press the [INFO] button for over 1 second. and tracks not being managed with rekordbox, only the tracks being The [LINK INFO] screen appears. managed with rekordbox are converted into playlists. 3 Use the rotary selector to select and enter the DJ player whose track details you want to see. -
Page 37: Changing The Settings
Displaying the [UTILITY] screen Changing the Press the [MENU/UTILITY] button for over 1 second. settings The [UTILITY] screen is displayed. Description of the screen Storing the settings on a storage device (SD, USB) The [UTILITY] settings and other settings can be stored on a storage device (SD, USB). - Page 38 Selects whether or not to display LIBRARY*/FOLDER ! This unit is shipped with the auto standby function turned on. If you CREATOR Pioneer MEP-7000 libraries. do not want to use the auto standby function, set [AUTO STANDBY] HISTORY For details, see Setting the playing —...
-
Page 39: Duplicating The Settings Onto Dj Players Connected By Pro Dj Link
! If the CD-ROM menu does not appear when the CD-ROM is inserted, Duplicating the settings onto DJ open the optical drive from [Computer (or My Computer)] in the [Start] menu, then double-click the [CD_menu.exe] icon. players connected by PRO DJ LINK 5 When the CD-ROM’s menu is displayed, select [Install The [UTILITY] settings and other settings can be duplicated onto DJ play- Driver Software], then click [Start]. - Page 40 Programs]>[Pioneer]>[Pioneer CDJ]>[Pioneer CDJ Version Display Utility]. Click the Windows [Start] menu>[All Programs]>[Pioneer]>[Pioneer CDJ]>[Pioneer CDJ ASIO Settings Utility]. ! The firmware version is not displayed when this unit is not connected to the computer or when this unit and computer are not properly communicating.
-
Page 41: Using Other Brands Of Dj Software
The previous screen reappears. unit. The sound of music files being played on the computer can also be output from the CDJ-2000NXS. To use this unit as an audio device, install the driver software on the computer beforehand (page 39). This unit must also be selected in the DJ software’s audio output device settings. -
Page 42: List Of Midi Messages
MIDI Messages List of MIDI Messages SW Name Notes Type MIDI Messages BACK OFF=0, ON=127 SW Name Notes Type ENCODER OFF=0, ON=127 PUSH A linear value corresponding Touch OFF = 0 1 to 127 position data to the speed, from stop to 4X: NEEDLE Sensor from left to right side... -
Page 43: Additional Information
Sometimes the trouble may lie in another component. Inspect the other components and electrical appliances being used. If the trouble cannot be rectified after checking the items below, ask your nearest Pioneer authorized service center or your dealer to carry out repair work. -
Page 44: About The Liquid Crystal Display
! This product has been developed and tested based on the iPod/iPhone/iPad software versions indicated on the Pioneer website (http://pioneerdj. com/support/). ! Compatibility with this product may be lost if a version other than one indicated on the Pioneer website is installed on your iPod/iPhone/iPad. ! Note that Pioneer does not offer any guarantee regarding operation of iPods/iPhones/iPads. -
Page 45: Error Messages
When this unit cannot operate normally, an error code appears on the display. Check the table below and take the measures indicated. If an error code not shown on the table below is displayed, or if the same error code is displayed again after taking the indicated action, contact your store of purchase or a nearby Pioneer service station. Error code... -
Page 46: Cautions On Use
The player’s lens should not become dirty in normal use, but if for some reason it should malfunction due to dust or dirt, consult your nearest Pioneer authorized service center. Although lens cleaners for players are commercially available, we advise against using them since some may damage the lens. -
Page 47: About Trademarks And Registered Trademarks
Power consumption ................37 W Power consumption (standby) ............. 0.4 W ! Pioneer and rekordbox are trademarks or registered trademarks of Main unit weight ................... 4.7 kg the PIONEER CORPORATION. External dimensions ... 320 mm (W) × 106.5 mm (H) × 405.7 mm (D) ®...