Miele Built-in coffee machine Operating And Installation Instructions
Built-in coffee machine
Hide thumbs
Also See for Built-in coffee machine:
- Operating and installation instructions (84 pages) ,
- Operating and installation instructions (76 pages)

Related Manuals for Miele Built-in coffee machine


Summary of Contents for Miele Built-in coffee machine
- Page 1 Operating and installation instructions Built-in coffee machine To avoid the risk of accidents or damage to the machine, it is essential to read these instructions before it is installed and used for the first time. en - GB M.-Nr. 09 856 650...
-
Page 2: Caring For The Environment
Caring for the environment Disposal of the packing Disposal of your old machine material Electrical and electronic machines often contain valuable materials. They The packaging is designed to protect also contain materials which, if handled the appliance from damage during or disposed of incorrectly, could be transportation. -
Page 3: Table Of Contents
Contents Caring for the environment ......... . 2 Guide to the machine . - Page 4 Factory default ........... . 52 Miele|home, Remote control and SuperVision......52...
- Page 5 Miele|home ........
-
Page 6: Guide To The Machine
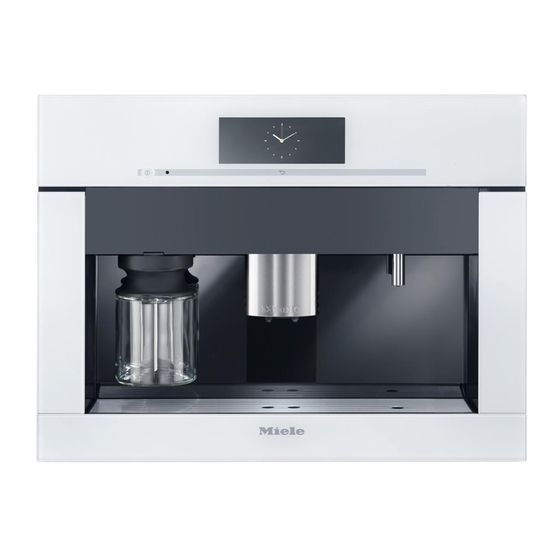
Guide to the machine Exterior view a On/Off sensor b Touch display c "Back" sensor d Handle e Hot water spout f Drip tray cover g Central spout with lighting and automatic height adjustment h Milk flask and lid... - Page 7 Guide to the machine Interior view i Ground coffee chute cover j Brew unit k Ground coffee chute l Slide control to select fineness of ground coffee m Coffee bean container n Water container with inlet device o Drip tray with grid p Waste container q Drip catcher r Central spout connector...
-
Page 8: Accessories
– Central spout connector cap – Angled connector for milk pipework Replacement part These products and other useful accessories can be ordered via the internet, from Miele (see back cover for contact details) or from your Miele dealer. -
Page 9: Warning And Safety Instructions
They contain important notes on installation, safety, use and maintenance. Miele cannot be held liable for damage caused by non-compliance with these instructions. Keep these instructions in a safe place and pass them on to any... - Page 10 Warning and Safety instructions Correct application This coffee machine is intended for use in domestic households and similar working and residential environments. The guarantee is limited a maximum of 2000 drinks per year where the coffee machine is being used in a working or residential environment.
- Page 11 Warning and Safety instructions Safety with children The central and hot water spouts present a danger of burning or scalding. Children's skin is very sensitive and reacts to hot temperatures. Do not allow then to touch hot components of the coffee machine or place any part of their body under the spouts.
- Page 12 Warning and Safety instructions Technical safety Installation and repairs may only be carried out by a Miele authorised service technician. Installation, repairs and other work by unqualified persons can cause considerable danger to users. A damaged coffee machine could be dangerous. Before building in the machine, check it for any externally visible damage.
- Page 13 (e.g. on a ship). The second electrical connection socket on the back of the machine may only be used for connecting a Miele EGW 4000-14, -29, EGW 5000-14 plate warming drawer or an ESW 6x14, ESW 6x29 food warming drawer.
- Page 14 Only use genuine original Miele accessories with this machine. Using spare parts or accessories from other manufacturers will invalidate the guarantee, and Miele cannot accept liability.
- Page 15 Warning and Safety instructions Correct use The central spout and hot water spout present a danger of burning or scalding. The liquids and steam dispensed are very hot. Water in the drip tray can also be very hot. Take great care when emptying it.
- Page 16 Do not put liquids containing sugar in the coffee machine. Only add ground coffee or the Miele cleaning tablets for degreasing the brew unit to the ground coffee chute. Do not use milk with additives. Most additives contain sugar which will stick to the milk pipework and damage the machine.
- Page 17 Descale the coffee machine regularly depending on the water hardness level in your area. Descale the machine more frequently in areas with very hard water. Miele cannot be held liable for damage arising from insufficient descaling, the use of incorrect descaling agent or the use of descaling agent which is not of the appropriate concentration.
-
Page 18: Operation
Operation Touch display The coffee machine is operated by finger tip contact. Touching the Touch display with your finger creates a tiny charge which releases an electrical impulse. This impulse is recognised by the Touch display. It is possible for the Touch display to not react to finger contact if your fingers are cold. - Page 19 Operation Operation Each touch of an available option changed the relevant field to orange. Selecting or opening a menu ^ Touch the field you want once with your finger. Scrolling ^ Swipe the screen, i.e. place your finger on the Touch display and swipe it in the direction you want.
- Page 20 Operation The numerical keypad will appear. ^ Touch the numbers you want. When you enter a valid number, the "OK" field will light up green. ^ Touch "OK". Entering letters Profile names or the names for your own drinks are entered using a keyboard. It is best to select short names.
- Page 21 (The symbol is also found on the water container: fill up to this marker.) SuperVision display – only appears if the coffee machine has been signed on to the Miele|home system and "SuperVision display – On" has been selected (see separate Operating instructions).
-
Page 22: Using For The First Time
– Language The setting is now saved. – Date – Time (of day) – Display (Time (of day) display) ^ Touch the On/Off sensor The welcome message "Miele - Willkommen" will appear in the display briefly. -
Page 23: Water Hardness
Using for the first time Water hardness Display You can choose from the following The water hardness level indicates how options: much calcium is dissolved in the water. The higher the calcium content, the – On: the display will always show the harder the water, and the harder the date and time (even when the water, the more often the coffee... - Page 24 Using for the first time Checking the water hardness level You can use the test strip supplied to check the water hardness level, or your local water supplier will be able to advise you on the hardness of the water in your area.
-
Page 25: Filling The Water Container
Filling the water container Change the water every day to prevent a build-up of bacteria. If the coffee machine is plumbed into the mains drinking water supply, the water container will fill automatically as soon as the machine is switched on. The inlet device in the lid ensures that the water is taken in slowly. -
Page 26: Filling The Coffee Bean Container
Filling the coffee bean container If you want to use freshly ground coffee beans for each cup of espresso or coffee, fill the coffee bean container with roasted coffee beans. Alternatively, you can make coffee or espresso with ready ground coffee (see "Making coffee or espresso using ready ground coffee"). -
Page 27: Switching The Coffee Machine On And Off
Switching the coffee machine on and off Switching on Switching off ^ Touch the On/Off sensor When the machine is switched on it heats up and rinses out the pipework. If coffee has been dispensed, the This cleans and heats the pipework in coffee machine will rinse the coffee preparation for making coffee. -
Page 28: Spout Adjustment (Cupsensor)
Spout adjustment (CupSensor) Switching spout adjustment on or off The central spout cannot be ^ Touch "Main menu" or the sensor. adjusted manually. ^ Touch "Settings" The coffee machine senses the height ^ Swipe the display until "Spout of the cup or glass being used. When a adjustment"... -
Page 29: Making Drinks
Making drinks Espresso, Coffee or Long Making two portions coffee You can request two portions of espresso, coffee or long coffee to be These drinks are in the drinks menu. dispensed at once either into one cup or two separate cups. These drinks are in the drinks menu. -
Page 30: Cancelling Preparation
Making drinks Cancelling preparation Making espresso and coffee using ready ground coffee To cancel preparation: To make espresso or coffee using ^ Touch "Stop" ready ground coffee, add a portion of ground coffee to the ground coffee chute. ^ Touch "Cancel". This gives you the option of making a Dispensing several cups of cup of decaffinated coffee, for... - Page 31 Making drinks Adding ready ground coffee Making espresso and coffee using ready ground coffee Use the coffee spoon supplied. If you want to use ready ground coffee Do not add more than one level to make the drink: spoon of ground coffee to the coffee ^ Touch "Yes".
-
Page 32: Drinks With Milk
Making drinks Drinks with milk Only use pasteurised milk to avoid a build-up of bacteria. You can use milk to make different coffee specialities, hot milk or milk froth. The following can be made: Cappuccino H consisting of two thirds milk froth and a third espresso. -
Page 33: Dispensing Hot Water
Making drinks Making drinks using a profile Making drinks with milk These drinks are in the drinks menu. If you have set the machine up for a specific user profile (see "Profiles") you ^ Place a suitable container can select this before you make a drink. underneath the central spout. -
Page 34: Coffee The Way You Like It
Coffee the way you like it To customise the coffee machine to suit your exact requirements, you can To avoid damaging the grinder: – adjust the grinder setting, Only ever adjust the grinder by one – change the amount of coffee, setting at a time. -
Page 35: Altering The Drinks Parameters
Coffee the way you like it Altering the drinks parameters – espresso or coffee only trickles into the cup. You can set the amount of coffee, pre-brewing and the brewing – the crema is dark brown. temperature for each drink individually. –... -
Page 36: Pre-Brewing The Coffee
Coffee the way you like it ^ Swipe the screen in the "Brew temperature" field until the setting you want appears. ^ Touch "OK". The setting is now saved. Pre-brewing the coffee When the Pre-brewing function is switched on, the freshly ground coffee is first moistened with a little hot water. -
Page 37: Setting The Portion Size
Setting the portion size Setting the portion size The flavour of the coffee produced depends on the type of coffee, how Start in the drinks menu. finely the beans are ground and the ^ Place the desired cup under the quantity of water used. - Page 38 Setting the portion size The coffee machine starts making the drink. You can now programme the portion size for each selected ingredient as soon as Save appears in the display. ^ Touch "Save" when the amount you want of the particular ingredient has been dispensed.
-
Page 39: Resetting Drinks
Resetting drinks You can reset the portion sizes and the parameters for all drinks back to their factory default setting. Start in the drinks menu. ^ Touch "Process". ^ Touch "Reset drinks". "Reset all drinks to default?" will appear in the display. ^ Touch "Yes". -
Page 40: Setting Up Profiles
For each individual profile back to the Miele standard profile you can select the portion sizes for automatically after each drink is each drink (see "Setting the portion dispensed or so that it retains the size"). -
Page 41: Deleting A Profile
Miele standard profile automatically after a drink is dispensed. When switched on Each time the machine is switched on it will automatically select the Miele stan- dard profile regardless of which profile was selected before the machine was last switched off. -
Page 42: Processing Drinks For A Profile
Processing drinks for a profile ^ Enter a name for the newly created You can create your own drinks for each profile and set the portion size drink (maximum of 8 characters) and and drinks parameters, e.g. amount of touch "Save". coffee, brewing temperature for each The newly created drink will appear in drink individually. -
Page 43: Mymiele
MyMiele To delete entries You can display drinks you make frequently, drinks from profiles and ^ Touch "Process". maintenance programmes in the ^ Touch "Delete entry". MyMiele screen. ^ Select the entry you want and then The MyMiele screen can be set to appear as the start screen (see touch "OK". -
Page 44: Settings
Settings Changing and saving settings You can use the "Settings" menu to customise the coffee machine to suit ^ Touch "Main menu" or the sensor. your requirements. ^ Touch "Settings" Opening the "Settings" menu ^ Swipe the screen until the setting you want appears and then touch this. -
Page 45: Possible Setting Options
Settings Possible setting options The factory setting for each option is shown in bold. Option Available settings Language Deutsch, English and other languages Country Time Display Off / On / Night dimming Clock type Analogue /Digital Clock format 12 h / 24 h Date Timer Timer 1... - Page 46 Settings Option Available settings Water hardness Soft 1 Medium 2 Hard 3 Very hard 4 Display brightness Volume Buzzer tones Keypad tone Plate warmer On / Off / Automatic Mains water On / Off Spout adjustment On / Off Showroom programme Demo mode ( On/ Off) Factory default Settings...
-
Page 47: Language
Information This option will only appear if the coffee about this will appear in the display. machine is signed on to the Miele|home system (see separate Operating instructions). Date You set the day, month and year. -
Page 48: Timer
Settings Timer If the coffee machine has switched itself on three times using the "Switch There are two timers with the following on at" timer function and no drinks have functions: been dispensed, the machine will not The coffee machine switch itself on again automatically. -
Page 49: Eco Mode
Settings Eco mode Allocating days of the week Select the day of the week you want. The Eco mode is an energy saving The selected day of the week will be mode. The steam system only heats up marked with a tick when a coffee or steam for hot milk or milk froth is selected. -
Page 50: Lighting
Settings Lighting Info (display information) You have the following options: In the "Info" option, the number of portions prepared for each individual – You can set the brightness when the drink can be displayed. machine is switched on. You can also see whether more than 50 –... -
Page 51: Water Hardness
The special connection cable required is available to order from Miele or your Water hardness Miele dealer. Once the warming drawer is See "Using for the first time" for connected, you will need to activate it information about water hardness. -
Page 52: Spout Adjustment
- Language - Time - Number of drinks (dispensed) - Profiles Miele|home, Remote control and SuperVision These options will only appear if the coffee machine has been signed on to the Miele|home system (see separate Operating instructions). -
Page 53: Cleaning And Care
Cleaning and care Quick guide Clean the coffee machine regularly to avoid a build-up of bacteria. Recommended frequency What do I have to clean / maintain? Every day the milk flask and lid (at the end of the day) the water container the waste container the drip tray and the drip tray cover Once a week... - Page 54 Cleaning and care All surfaces are susceptible to Danger of burning and scalding! Allow the coffee machine to cool scratching. Scratches on glass down before cleaning. Please be surfaces could even cause a aware that the water in the drip tray breakage.
-
Page 55: Rinsing The Coffee Machine
Cleaning and care Rinsing the coffee machine Milk pipework When a coffee drink has been All parts of the milk system need to dispensed, the coffee machine rinses be cleaned thoroughly and itself before switching off to remove any regularly. remaining coffee residue. -
Page 56: Cleaning The Milk Pipework
^ Touch "OK" to confirm this message. The milk pipework cleaning agent is available to order from Miele or via the When the number of days remaining internet at www.miele-shop.com. reaches 0, "Clean the milk pipework"... -
Page 57: Milk Flask And Lid
Cleaning and care Milk flask and lid It is important to keep the neck and flange of the flask clean (whilst filling it and carrying it). If the flask is dirty it could cause a fault in the machine. ^ Clean the milk flask holder on the coffee machine with a damp cloth. -
Page 58: Central Spout
Cleaning and care Central spout Clean the cover of the central spout by hand only using hot water and a little washing-up liquid. All other parts are dishwasher safe The central spout must be in the maintenance position for cleaning. Otherwise you will not be able to remove the parts. - Page 59 Cleaning and care ^ Turn upper connecting piece a and ^ Reassemble the dispensing unit in pull it upwards to remove it. Remove the reverse order. Make sure that lower connecting piece b in the upper connecting piece a clicks into position.
-
Page 60: Maintenance Of The Milk Valve
Cleaning and care Maintenance of the milk valve Sensor cover The milk valve should be cleaned once The sensor cover for the cup protection a week to ensure good quality milk cut-out is located under the central froth. spout. If the automatic spout adjustment sensors do not clearly rec- ^ Touch "Main menu"... -
Page 61: Water Container
Cleaning and care Water container Waste container Change the water every day to prevent After a certain period of time a reminder a build-up of bacteria. to empty the waste container will appear in the display. The waste Make sure that the valve, the container must be cleaned when this underside of the water container message appears. -
Page 62: Drip Tray
Cleaning and care Drip tray Make sure that the metal contact discs on the drip tray are cleaned Clean the drip tray every day to and dried properly. The discs will not prevent unpleasant odours and be able to detect that the drip tray is mildew. -
Page 63: Drip Tray Cover
Cleaning and care Drip tray cover Central spout connector ^ Remove the drip tray cover. The part which connects the brew unit and the central spout is located on the ^ The drip tray cover can be cleaned in inside of the machine front. the dishwasher, or by hand using ^ Clean this connection regularly with a warm water and a little washing-up... -
Page 64: Interior And Machine Front
Cleaning and care Interior and machine front Brew unit ^ First take out all removable parts and Clean the brew unit by hand only then clean the interior and the using hot water. Do not use machine front with a mild solution of washing-up liquid or any other hot water and washing-up liquid. - Page 65 Cleaning and care ^ Carefully pull the brew unit out of the To replace the brew unit, repeat the coffee machine. previous steps in the reverse order: ^ Push the brew unit back into the If you cannot remove the brew unit or can only do so with difficulty, the brew coffee machine, making sure it goes unit is not in the correct position (See...
-
Page 66: Degreasing The Brew Unit
These have been specially developed for use with Miele coffee machines and prevent subsequent damage. Miele cleaning tablets are available to order from Miele or via the internet at ^ Remove the coffee chute cover and www.miele-shop.com. open the lid of the coffee chute. -
Page 67: Appliance Front
^ Clean the front of the machine with a clean sponge and a solution of hot water and a little washing-up liquid. Dry using a soft cloth. Tip: You can also use a Miele microfibre cloth to clean the front. -
Page 68: Descaling
Preparing the descaling solution containing descaling agent is dispensed. We recommend using Miele descaling tablets. These have been specially The coffee machine will remind you developed for use with Miele when descaling needs to be carried appliances to optimise the descaling out. - Page 69 Descaling Miele descaling tablets are available to Carrying out descaling order from Miele or via the internet at ^ Replace the water container in the www.miele-shop.com. coffee machine and close the front. You will need two descaling tablets. ^ Follow the instructions in the display.
- Page 70 Descaling Descaling when not prompted by a message The descaling process cannot be cancelled once you have touched "OK". The process has to be completed through to the end. ^ Touch "Main menu" or the sensor. ^ Touch "Maintenance" ^ Touch "Descale the appliance". The descaling process will now start.
-
Page 71: Messages In Display
(see back cover for contact details). Messages in the display ^ Follow the instructions to remedy the problem. ^ If after this, the fault message appears in the display again, contact Miele. Message Possible cause and remedy Fault 1 - 4 There is a fault inside the machine. - Page 72 Problem solving guide Message Possible cause and remedy Fault 73 The brew unit cannot move into the correct position or it is dirty and the ground coffee cannot be processed. ^ Try to remove the brew unit (see "Cleaning and care – "Check brew unit"...
- Page 73 Problem solving guide Message Possible cause and remedy Fault 234 The cup protection cut-out has been triggered during the making of three drinks since the coffee machine was switched on. The cups or glasses being used have not been clearly recognised by the automatic spout adjustment function.
- Page 74 Problem solving guide Message Possible cause and remedy "Push the water The water container is not positioned correctly inside the container in until it machine. engages" ^ Remove the water container and replace it. This fault message also appears if the water container was not correctly filled and positioned for descaling.
- Page 75 The main fuse has tripped due to a problem with the coffee machine, the electricity supply or another appliance. ^ Switch off at the wall socket and unplug it. ^ Contact a qualified electrician or Miele. The coffee The switching off time programmed using the timer has been machine switches reached.
- Page 76 Problem solving guide Problem Possible cause and remedy The coffee The system lock is activated. machine does not ^ Deactivate the system lock (see "Settings - System lock"). switch itself on, although the The day of the week has not been selected. "Switch on at"...
- Page 77 Problem solving guide Problem Possible cause and remedy There is no milk or The milk pipework or the air intake tube is blocked. milk froth being ^ Follow the instructions in "Cleaning blockages from the dispensed from milk pipework". the central spout. "Fill and insert milk The lid of the milk flask could be dirty preventing the sensors flask"...
- Page 78 ^ Use another cup or glass and make a drink. moves to the rim ^ If the cup protection cut-out is triggered again or the of the container central spout moves to the rim of the cup or glass again, and triggers the contact Miele. cup protection cut-out.
- Page 79 Problem solving guide Problem Possible cause and remedy The cup If the cleaning container is very close to or touching the rear protection cut-out panel, the automatic spout adjustment will not detect it is not working. properly. The central spout ^ Move the cleaning container slightly further forward.
- Page 80 ^ Fill the container with fresh beans. There could be stones in amongst the coffee beans. ^ Switch the coffee machine off immediately. Contact Miele. Espresso or coffee The coffee is too coarsely ground. flows into the cup ^ Set the grinder on a finer setting (see "Grinder setting").
- Page 81 Problem solving guide Problem Possible cause and remedy The crema on the The grinder setting is not correct. coffee or espresso ^ Set the grinder on a finer or coarser setting (see "Grinder is not as it should setting"). The brewing temperature is too high for this type of coffee. ^ Set a lower brewing temperature (see "Brewing temperature").
-
Page 82: Cleaning Blockages From The Milk Pipework
Cleaning blockages from the milk pipework Step 1: Cleaning the milk If you notice that the quality of the milk froth is not satisfactory, this could be pipework in the lid of the milk caused by a blockage in the air intake flask tube. - Page 83 Cleaning blockages from the milk pipework To reassemble the lid: ^ First insert the seal in the lid. If you cannot insert it properly, try moistening the seal with a little water. ^ Then insert the milk tube into the seal.
- Page 84 Cleaning blockages from the milk pipework ^ Insert the brush in the milk valve and ^ Push the tubes back into the angled connector and replace this in the move it back and forth. machine. ^ Remove and dismantle the ^ Re-insert the air intake tube into dispensing unit as described in opening c.
-
Page 85: After Sales / Guarantee
In the event of a fault which you cannot correct yourself, or if the appliance is under guarantee, please contact: – your Miele Dealer – Miele (see the end of this booklet for contact details). Please note that telephone calls may be monitored and recorded for training purposes (UK only). -
Page 86: Saving Energy
Saving energy Changing the following settings from their factory default will increase the energy consumption of the coffee machine: – Eco mode – Lighting – Time of day display – Timer When altering these settings, the message "This setting increases energy consumption"... -
Page 87: Plumbed In Water Connection
Plumbed in water connection Notes on connecting to the The machine is only suitable for connection to a cold water supply, mains water supply which Connection to the mains water – is connected directly to the fresh supply should only be carried out by water supply, to guarantee a qualified and competent person. -
Page 88: Connection To The Water Inlet
Plumbed in water connection Connection to the water inlet A faulty stainless steel hose must only be replaced by a genuine Miele Before making plumbing replacement hose (available from connections, ensure that the Miele). Make sure that the water machine is disconnected from the hose is suitable for food use. -
Page 89: Electrical Connection U.k., Za, Irl
Electrical connection U.K., ZA, IRL All electrical work should be carried out Non-rewireable plugs BS 1363 by a suitably qualified and competent The fuse cover must be refitted when person only, in strict accordance with changing the fuse, and if the fuse cover current national and local safety is lost, the plug must not be used until a regulations (BS 7671 in the UK). -
Page 90: Installation
(except when it is combined with a suitable Miele built-in plate or food warming drawer). Some Miele warming drawers can be connected directly to a socket at the rear of the coffee machine using a special connection cable (available as an optional accessory) so that it can be switched on and off at the same time as the coffee machine. -
Page 91: Ventilation
Before installation make sure that with a sealing strip you should fit a there is no power supply to the Miele sealing strip to the machine machine. This also applies should it before installing it. This is fitted from ever need to be taken out of its the back of the machine. - Page 92 Installation Tip: It is useful to have somewhere at Four M5 hexagon socket screws are the height of the niche to place the supplied for aligning and securing the machine on. This makes electrical machine in its niche. connection and connection to the ^ Open the front of the machine and plumbed in water supply easier.
-
Page 93: Adjusting The Hinges
Installation Adjusting the hinges If the machine front becomes difficult to open or close after installation you can adjust the hinges to realign it (TX 20): ^ Turn screw a to align the front of the machine so that it is flush with the front of the housing unit. -
Page 94: Miele|Home
Miele|home a Miele|home communication enabled appliance b Miele|home communication module XKM3000Z c Miele|home communication enabled Master appliance with SuperVision functionality d Miele|home Gateway XGW3000 e WiFi router f Connection to a Home automation system g Smartphone, Tablet PC, Laptop h Internet connection... - Page 95 Further information signed on appliances and carry out Further information regarding certain functions. Miele|home is available on the internet – Household network f and in the instruction manuals of the various components, e.g. the The Miele|home system enables Miele|home Gateway.
-
Page 96: Copyright And Licences
You will need to enter the specific product name. Miele will provide the source code for all components of software licensed under the GNU General Public Licence and comparable Open Source licences. For source code requests please email info|miele.com. - Page 100 CVA 6805 en - GB M.-Nr. 09 856 650 / 01...