Toshiba 2000 series User Manual
2000-series digital telephones for strata dk systems
Hide thumbs
Also See for 2000 series:
- User manual ,
- Quick reference manual (8 pages) ,
- Operation manual (122 pages)

Related Manuals for Toshiba 2000 series


Summary of Contents for Toshiba 2000 series
- Page 1 Telecommunication Systems Division Digital Business Telephone Systems Digital Telephone User Guide (includes LCD, Add-on Module, and Direct Station Selection Console) April 1998...
- Page 2 Further, Toshiba America Information Systems, Inc., of the publisher of this material. Telecommunication Systems Division, also reserves the right, without Strata is a registered trademark of Toshiba America Information prior notice, to make such changes in equipment design or Systems, Inc.
-
Page 3: Table Of Contents
Contents Organization ............................viii How to Use This Guide ........................viii Conventions ............................ix Related Documents ..........................x Chapter 1 – The Grand Tour Buttons ..............................3 Fixed Buttons ...........................3 Flexible Buttons ..........................5 LCD ................................8 LCD Buttons ............................8 LED Indicators ............................9 On-hook/Off-hook ..........................10 Volume Controls ...........................10 Chapter 2 –... - Page 4 Account Code Calls ..........................17 Forced Account Codes (Verified/Non-Verified) ................17 Voluntary Account Codes (Verified/Non-Verified) ..............17 Alarm Reset ............................18 Alert Signaling ............................19 Attendant Console Calling ........................19 Automatic Busy Redial (ABR) ......................20 Automatic Callback (ACB) ........................21 Automatic Hold ............................22 BGM Over Telephone Speakers ......................23 Call Forward ............................23 Call Forward Modes ........................24 Using Call Forward Buttons ......................25...
- Page 5 Door Phone(s) ............................42 DTMF Tone Dialing with * and # ......................43 Emergency Ringdown/Hotline Service ....................44 Group Listening ............................44 Handsfree Answerback .........................44 Handsfree Monitoring ...........................45 ISDN Outgoing Calling ........................46 Subaddress ............................46 Message Waiting ..........................47 Message Waiting Light on [PDN] ....................47 Message Waiting Light on [PhDN/MW] ..................48 Message Waiting Light on Another Telephone ................49 Microphone Cut-Off ..........................49 Off-hook Call Announce (OCA) ......................50...
- Page 6 [DN] Button ...........................68 CO Buttons .............................69 Supervision .............................71 Voice Mail Integration ..........................71 Message Mailbox ...........................71 Message Retrieval ..........................72 Call Forward to Voice Systems ......................74 Chapter 3 – LCD Operation Control Buttons .............................75 Soft Keys ..............................77 Soft Key Display ..........................78 How to Use Soft Keys ......................
- Page 7 Transfer to an Idle Station ......................102 Call Transfer with Camp-on ......................103 Call Answering (CO Line) ......................104 Speed Dial ............................104 Paging ............................104 Call Forward Override ([DSS] Override) ..................104 Night Transfer ..........................105 CO Line Access Codes ........................107 Feature Access Codes .........................108 Paging Access Codes ..........................108 Speed Dial Access Codes ........................109 Flexible Directory Numbering ......................111...
- Page 8 Figures 20-button Digital Speakerphone with LCD ................2 Multiple Directory Numbers Example ..................7 LCD Buttons (with sample Soft Keys) ..................8 Example Button Assignments for the Strata DK DADMs ............100 Example Button Assignments (DDSS2060 shown) ..............101 Tables Fixed Button Definitions ......................3 Directory Button Definitions ....................6 LED Indicators ........................9 Using only Vol /Vol...
- Page 9 Introduction This guide describes how to use the 2000-series digital telephones for Strata DK systems. Models covered in this user guide include digital telephones equipped with a Liquid Crystal Display (LCD) and/or speakerphone. Also discussed are Digital Add-on Modules (DADMs) and the Direct Station Selection (DSS) Console.
-
Page 10: Organization
Organization –––––––––––––––––––––––––––––––––––––––––––––––––––––––––––––––––––––––––––––––––– Organization Chapter 1—The Grand Tour provides an overview of the equipment, buttons, Light Emitting Diodes (LEDs), and LCDs. Chapter 2—Features describes the available digital telephone features in alphabetical order. Detailed instructions on using each feature are covered. Chapter 3—LCD Operation includes an explanation of the Control button and Soft Key operations. -
Page 11: Conventions
––––––––––––––––––––––––––––––––––––––––––––––––––––––––––––––––––––––––––––––––––– Conventions Conventions The left column gives The right column gives the immediate response to you single or numbered your action. This column also includes additional steps that you need to notes and comments. perform a procedure. Note Elaborates specific items or references other information. Within some tables, General Notes apply to the entire table and numbered Notes apply to specific items. -
Page 12: Related Documents
Related Documents –––––––––––––––––––––––––––––––––––––––––––––––––––––––––––––––––––––––––––– Related Documents Refer to the following documents for more information: Digital Telephone Quick Reference Guide PC/Data Interface User Guide System Administrator Guide Strata DK Digital Telephone... -
Page 13: Chapter 1 - The Grand Tour
Toshiba digital telephones incorporate state-of-the-art telecommunications technology and provide a vast array of calling features. They are easy to operate, and all features are accessed with a feature button or a brief access code. -
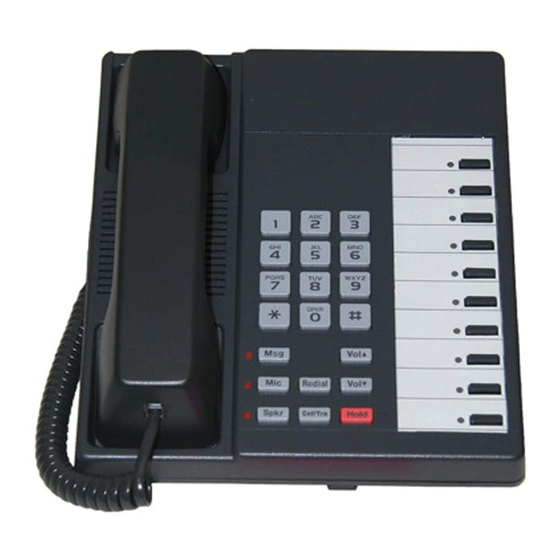
Page 14: Button Digital Speakerphone With Lcd
Buttons –––––––––––––––––––––––––––––––––––––––––––––––––––––––––––––––––––––––––––––––––––––– DKT2020-SD (20-button speakerphone model equipped with an LCD, and a speakerphone which enables users to make and receive outside and internal calls without lifting the handset). Buttons LCD Display Handset LCD Control/Soft Key Buttons Red/Green LED Indicators Dial Pad Flexible Buttons 0539 Fixed Buttons... -
Page 15: Buttons
–––––––––––––––––––––––––––––––––––––––––––––––––––––––––––––––––––––––––––––––––––––– Buttons Buttons There are two sets of buttons, fixed and flexible. The fixed buttons (e.g., , and ) are standard to every Strata DK 2000-series telephone (see Figure 1). The flexible buttons consist of Directory Number (Primary, Secondary, Phantom) and feature buttons. - Page 16 Buttons –––––––––––––––––––––––––––––––––––––––––––––––––––––––––––––––––––––––––––––––––––––– Table 1 Fixed Button Definitions (continued) Button Definitions (continued) If the held party hangs up, the call is released and the CO provides a hold- release signal. Note If your telephone is programmed for Automatic Hold, existing calls are automatically placed on hold when you answer a call or make another call.
-
Page 17: Flexible Buttons
–––––––––––––––––––––––––––––––––––––––––––––––––––––––––––––––––––––––––––––––––––––– Buttons Table 1 Fixed Button Definitions (continued) Button Definitions Press to toggle the speaker ON/OFF. The LED indicates the status of the (Speaker) speaker. Notes must be pressed and held down when switching from Handset to Speakerphone mode. Also selects a line or the internal [PDN] if programmed for auto preference in system programming. -
Page 18: Directory Button Definitions
Buttons –––––––––––––––––––––––––––––––––––––––––––––––––––––––––––––––––––––––––––––––––––––– If you have an LCD telephone, you can find out the actual Directory Number of a [DN] button by pressing the [DN] you want to display DN = 210 and dialing . The number ( ) displays. Table 2 Directory Button Definitions Button... -
Page 19: Multiple Directory Numbers Example
–––––––––––––––––––––––––––––––––––––––––––––––––––––––––––––––––––––––––––––––––––––– Buttons Phantom Directory Numbers [PhDNs] MW/50 11-1 10-1 Secondary Directory Numbers [SDNs] of Station 11 11-2 10-2 Calls to Station 11 can be originated 10-1 10-3 or answered by Station 10 by pressing the 11-1 or 11-2 button. 10-2 11-1 10-3 11-2... -
Page 20: Lcd
––––––––––––––––––––––––––––––––––––––––––––––––––––––––––––––––––––––––––––––––––––––––– In its idle state, the 32-character LCD feature on your digital telephone gives you an accurate desk clock and calendar combination. When you have an outside call in progress, an elapsed time display gives a constant reminder of the call duration. Alphanumeric messaging capability is also provided (see “Messages, Memos, and Name Display”... -
Page 21: Led Indicators
––––––––––––––––––––––––––––––––––––––––––––––––––––––––––––––––––––––––––––––––– LED Indicators LED Indicators Each line and feature button has a LED next to it which indicates the status of the line or feature associated with the button. Line LEDs light red or green and flash at varying rates to indicate call status (see Table Table 3 LED Indicators... -
Page 22: On-Hook/Off-Hook
On-hook/Off-hook –––––––––––––––––––––––––––––––––––––––––––––––––––––––––––––––––––––––––––––– On-hook/Off-hook Some procedures in this user guide instruct you to perform a step while “on-hook” or “off- hook.” These terms refer to the position of the handset. “Off-hook” indicates that the handset should be lifted off of the telephone cradle. “On-hook” indicates that the handset should remain in the cradle and should not be lifted. - Page 23 ––––––––––––––––––––––––––––––––––––––––––––––––––––––––––––––––––––––––––––––– Volume Controls Table 5 Using Vol /Vol with Other Buttons Phone Feature Press Comments Status Microphone Sensitivity On-hook/ While pressing, The Mic LED flashes about six Off-hook hold times while setting the sensitivity. for three When the microphone is set for seconds.
- Page 24 Volume Controls ––––––––––––––––––––––––––––––––––––––––––––––––––––––––––––––––––––––––––––––– Strata DK Digital Telephone...
-
Page 25: Chapter 2 - Features
Features This chapter lists all the digital telephone features in alphabetical order beginning on Page These features can be performed on 2000-series digital telephones equipped with or without LCDs. Features which require a telephone equipped with a speakerphone are noted. Before You Begin If you are a new user of the Strata DK digital telephone, you need to find out if your telephone has been set up for Automatic Line Selection and Ringing Line Preference. -
Page 26: Ringing Line Preference
Quick Reference ––––––––––––––––––––––––––––––––––––––––––––––––––––––––––––––––––––––––––––––– Ringing Line Preference You have Ringing Line Preference, if you can answer a line ringing your station by lifting the "$ handset or pressing . You do not have Ringing Line Preference, if you have to press the button associated with the ringing call (flashing LED) to answer the call. -
Page 27: Making An Outside Call
––––––––––––––––––––––––––––––––––––––––––––––––––––––––––––––––––––––––––––––– Quick Reference Making an Outside Call 1. Lift the handset or NO. 203 "$ press USING LINE 6 ...or if you do not have Automatic Line Selection, you must also: press ...or ...or [DN], then enter a CO line or line group access code (see... -
Page 28: On-Hook Dialing
Quick Reference ––––––––––––––––––––––––––––––––––––––––––––––––––––––––––––––––––––––––––––––– On-Hook Dialing "$ 1. Press (if you have Automatic line selection). 2. Access an outside line and dial a telephone number. 3. Lift the handset when Note If you have a full speakerphone, you do not have to lift the called party the handset. -
Page 29: Incoming Call Notification
––––––––––––––––––––––––––––––––––––––––––––––––––––––––––––––––––––––––––––– Account Code Calls Incoming Call Notification Muted ringing while you are on a call indicates an incoming call. If another call comes in during the first call, release, transfer, or place the call on hold, then answer the second call. % Press ...or hold down the hookswitch for about one second. -
Page 30: Alarm Reset
Alarm Reset –––––––––––––––––––––––––––––––––––––––––––––––––––––––––––––––––––––––––––––––––– To dial using a Voluntary Account Code 1. After accessing a CO Your conversation is not interrupted. NO. 204 % ' line, press ENTER ACCT CODE If the Voluntary Account Note Code is not required to dial " # ...or out, the account code can be... -
Page 31: Alert Signaling
––––––––––––––––––––––––––––––––––––––––––––––––––––––––––––––––––––––––––––––––– Alert Signaling Alert Signaling Alert Signaling enables you to send an alert sound to a predesignated (partner) station by pressing a single button. This feature is based on the “buzz” key, where, for example, a manager might alert his/her administrative assistant to enter the office. % " You can have as many as four (s) to send or receive an Alert Signal to/from... -
Page 32: Automatic Busy Redial (Abr)
Automatic Busy Redial (ABR) ––––––––––––––––––––––––––––––––––––––––––––––––––––––––––––––––––––– Automatic Busy Redial (ABR) After reaching a busy outside number, you can activate ABR so that the Strata DK system automatically redials the number at regular intervals. If the system redials an outside number that is still busy, ABR resets and tries again. This feature may not be allowed on some (or all) lines in your system—depending on the telephone line type connected. -
Page 33: Automatic Callback (Acb)
–––––––––––––––––––––––––––––––––––––––––––––––––––––––––––––––––––––––– Automatic Callback (ACB) To cancel ABR %' ,'- Press ...or [DN] + Automatic Callback (ACB) After reaching a busy/DND station, you can set ACB to have the system call you back when the called station becomes available. You can also set ACB to place you in a queue for an available CO line, if you reach a line group in which all lines are busy. -
Page 34: Automatic Hold
Automatic Hold –––––––––––––––––––––––––––––––––––––––––––––––––––––––––––––––––––––––––––––––– 4. Answer within three After you answer, you hear a single tone, and the LED flashes rings to prevent the green (in-use). callback from being If you hear a busy tone after answering a callback, the called cancelled. -
Page 35: Bgm Over Telephone Speakers
––––––––––––––––––––––––––––––––––––––––––––––––––––––––––––––––––– BGM Over Telephone Speakers BGM Over Telephone Speakers BGM over external speakers is controlled by the System Administrator. If BGM is enabled, you can turn it ON/OFF for your individual station speaker. To enable/cancel BGM on your telephone speaker Press to toggle BGM ON/OFF. -
Page 36: Call Forward Modes
Call Forward –––––––––––––––––––––––––––––––––––––––––––––––––––––––––––––––––––––––––––––––––– Call Forward Modes You can set your telephone [PDNs] or [PhDNs] for a variety of Call Forward modes: Call Forward—All Calls forwards all calls immediately; your telephone does not ring when called. Call Forward—Busy forwards calls immediately when your station, [PDN], or [PhDN] is busy or in the DND mode. -
Page 37: Using Call Forward Buttons
–––––––––––––––––––––––––––––––––––––––––––––––––––––––––––––––––––––––––––––––––– Call Forward Call Forward—External forwards new incoming calls directed to your [PDN] to a destination outside of the system. [PhDNs] assigned to your telephone do not call forward to external destinations. Internal calls and transferred calls to your [PDN] also do not forward to external destinations. -
Page 38: Call Forward-All Calls
Call Forward –––––––––––––––––––––––––––––––––––––––––––––––––––––––––––––––––––––––––––––––––– Call Forward–All Calls 1. Press The LED flashes red. NO. 201 CALL FORWARD TO ...or [PDN]/[PhDN] + You hear confirmation tone after is dialed. 2. Enter the destination NO. 201 [DN]. CALL FORWARD TO 203 3. Press The LED lights steady red and calls CF-A 201-203 forward to the stored directory... -
Page 39: Call Forward-No Answer
–––––––––––––––––––––––––––––––––––––––––––––––––––––––––––––––––––––––––––––––––– Call Forward To cancel a Call Forward—Busy Press ...or [PDN] + Call Forward–No Answer 1. Press The LED flashes red. NO. 201 CALL FORWARD TO You hear confirmation tone after ...or [PDN]/[PhDN] + is dialed. 2. Enter the destination NO. -
Page 40: Call Forward-Busy/No Answer
Call Forward –––––––––––––––––––––––––––––––––––––––––––––––––––––––––––––––––––––––––––––––––– Call Forward–Busy/No Answer 1. Press The LED flashes red. NO. 201 CALL FORWARD TO You hear confirmation tone after ...or [PDN]/[PhDN] + is dialed. 2. Enter the destination NO. 201 [DN]. ALL FORWARD TO 203 3. Press The pre-set time delay for calls to ring NO. -
Page 41: Call Forward-Fixed
–––––––––––––––––––––––––––––––––––––––––––––––––––––––––––––––––––––––––––––––––– Call Forward Call Forward–Fixed Press . The LED lights steady red and all calls forward to a station [PDN] or voice mail device set in system programming..or press a second time to cancel the feature. Call Forward—External 1. Store the destination This feature enables you to forward new incoming calls number at Station directed to your [PDN] to a destination outside of the system. - Page 42 Call Forward –––––––––––––––––––––––––––––––––––––––––––––––––––––––––––––––––––––––––––––––––– Remote Destination Change If Call Forward-External mode is set at your station, you can change the forwarding destination from a telephone outside of the system. To change the destination number 1. Call into the DK You hear ringback tone signal, then internal dial tone for 10 system over a CO line seconds.
-
Page 43: Call Park Orbits
–––––––––––––––––––––––––––––––––––––––––––––––––––––––––––––––––––––––––––––––– Call Park Orbits Call Park Orbits The Call Park feature enables you to hold a call temporarily in an orbit (the area where the call is held). Anyone can retrieve the call from the orbit using the same or a different station. There are 20 General Park Orbits for the system and 1 Personal Park Orbit for each station. -
Page 44: Call Park And Page
Call Park and Page ––––––––––––––––––––––––––––––––––––––––––––––––––––––––––––––––––––––––––––– When a parked call recalls your L 2 PK ORBIT 900 phone, the LCD shows the line or [DN] that is recalling and the orbit number. To retrieve a parked call $ 6 1. Press ...or [DN] + [DN] can be [PDN], [SDN] or [PhDN]. -
Page 45: Call Pickup
–––––––––––––––––––––––––––––––––––––––––––––––––––––––––––––––––––––––––––––––––––– Call Pickup 3. Enter a [DN] or a After you enter an Orbit Number, a short burst of dial tone Page Group or Zone prompts you to enter the Page access code. access code (see The LCD shows the Auto Park Tables 13 HOLD LINE 2... -
Page 46: Directed Call Pickup
Call Pickup ––––––––––––––––––––––––––––––––––––––––––––––––––––––––––––––––––––––––––––––––––– Directed Call Pickup This feature enables you to pick up calls ringing in, or calls held at other stations. To use directed call pickup # 1. Press The directed [PDN] is the Primary Directory Number of the $' station that has the ringing or held call that is to be picked up. -
Page 47: Page/Internal Call Pickup
––––––––––––––––––––––––––––––––––––––––––––––––––––––––––––––––––––––– Call Transfer with Camp-on 2. Enter , then the You are connected to the call. If the called station belongs to access code more than one group, any of the Group Pickup codes . ..7 ) of the associated with those groups pickup the call. -
Page 48: Call Waiting
Call Waiting ––––––––––––––––––––––––––––––––––––––––––––––––––––––––––––––––––––––––––––––––––– ...or if the station is The Line LED flashes green (on-hold). If you transferred the call from a [DN], the [DN]’s LED turns off. The CO line or busy or does not [DN] camps on to the called station and the called station answer, hang up receives a warning tone. -
Page 49: Conference Calls
––––––––––––––––––––––––––––––––––––––––––––––––––––––––––––––––––––––––––––––– Conference Calls ...or if your telephone You are connected to the transferred call. The [DN] or Line LED flashes green (in-use). has the Auto Hold feature, just press the Note See your System Administrator to find out if you have flashing [DN] or Auto Hold. -
Page 50: Date/Time/Day Adjustment
Date/Time/Day Adjustment ––––––––––––––––––––––––––––––––––––––––––––––––––––––––––––––––––––––– 4. Repeat the procedure to add other CO lines or [DNs], remembering not to try and exceed the allowed number. Notes If you receive a busy tone or no answer, press to return to the original connection. -
Page 51: Disa Calls - External
––––––––––––––––––––––––––––––––––––––––––––––––––––––––––––––– Direct Inward System Access (DISA) 2. When you hear dial You hear ring tone. When the station answers, you are tone, dial a [DN]. connected. If the call is not answered after 6 rings or 24 seconds, (whichever comes first) you hear busy tone. 3. -
Page 52: Direct Station Selection (Dss) Buttons (Hotline)
Direct Station Selection (DSS) Buttons (Hotline) –––––––––––––––––––––––––––––––––––––––––––––––––––––– Direct Station Selection (DSS) Buttons (Hotline) #"" This optional feature enables you to use a button to connect directly to another station’s [PDN]. The DSS LED shows the status (idle/busy) of the station and/or the station’s [PDN]. For example, a station’s DSS button LED shows busy (light steady red) when the station is: busy on a call on any button or is in the DND mode. -
Page 53: Door Lock(S)
–––––––––––––––––––––––––––––––––––––––––––––––––––––––––––––––––––––––––––––––––– Door Lock(s) # + #' If you press while a call is ringing, the ringing stops. The LED continues to flash. Door Lock(s) 8 $ # Your telephone may have up to five button(s), which enables you to unlock a door. -
Page 54: Door Phone(S)
Door Phone(s) –––––––––––––––––––––––––––––––––––––––––––––––––––––––––––––––––––––––––––––––– Door Phone(s) Door phones can be used to call digital/electronic telephones selected in system programming. When a door phone calls, you hear a distinctive ringing tone, one or five times (set in system programming). You can also call a door phone and monitor the surrounding area. The number of possible door phones vary by Strata DK system, with up to 12 as the maximum for larger systems. -
Page 55: Dtmf Tone Dialing With * And
––––––––––––––––––––––––––––––––––––––––––––––––––––––––––––––––––– DTMF Tone Dialing with * and # To call/monitor a door phone 1. With the handset off- You hear dial tone and the LED flashes green (in-use). hook, press a [DN]. 2. Dial the [DN] for the If you have an LCD telephone, see Table 6 for the [DN]. -
Page 56: Emergency Ringdown/Hotline Service
Emergency Ringdown/Hotline Service –––––––––––––––––––––––––––––––––––––––––––––––––––––––––––––– Emergency Ringdown/Hotline Service The Emergency Ringdown or Hotline Service feature enables standard telephones to automatically ring a designated extension by going off-hook. Digital telephones cannot perform this feature, but they can receive Emergency Ringdown or Hotline Service from standard telephones. -
Page 57: Handsfree Monitoring
––––––––––––––––––––––––––––––––––––––––––––––––––––––––––––––––––––––––––– Handsfree Monitoring 2. Do not lift the If you have a speakerphone, you will have better performance handset; speak toward if you press the called [DN] button first. the telephone in a normal voice level. Notes A [DN] must be pressed (or the handset must be taken off-hook) to actually answer the call. -
Page 58: Isdn Outgoing Calling
ISDN Outgoing Calling –––––––––––––––––––––––––––––––––––––––––––––––––––––––––––––––––––––––––– ISDN Outgoing Calling This feature enables you to make outgoing call using an Integrated Services Digital Network (ISDN) trunk, provided that you are connected to a Strata DK424 system with Release 4.0, or higher, and that you subscribe to ISDN lines. ISDN trunks offer faster call connection setup, and they also provide more connection circuits. -
Page 59: Message Waiting
––––––––––––––––––––––––––––––––––––––––––––––––––––––––––––––––––––––––––––––– Message Waiting Message Waiting If you call a busy station [DN] or its user does not answer, you can leave a message waiting indication at the station. The Msg LED at the called station flashes and the user can call you back by pressing the button with the flashing LED. -
Page 60: Message Waiting Light On [Phdn/Mw]
Message Waiting –––––––––––––––––––––––––––––––––––––––––––––––––––––––––––––––––––––––––––––– 3. After receiving the If the Msg LED continues to flash, you have more messages— message(s), place the repeat the Steps to retrieve them. Voice mail devices may handset on hook. cancel the indication after a short delay. To cancel the Msg light Press and lift the... -
Page 61: Message Waiting Light On Another Telephone
––––––––––––––––––––––––––––––––––––––––––––––––––––––––––––––––––––––––––––– Microphone Cut-Off Message Waiting Light on Another Telephone To set a message waiting light on another telephone 1. Press [DN] and dial You hear ringback or busy tone. an internal number. 2. Press or . The Msg or PhDN/MW] LED flashes NO. -
Page 62: Off-Hook Call Announce (Oca)
Off-hook Call Announce (OCA) –––––––––––––––––––––––––––––––––––––––––––––––––––––––––––––––––––– Off-hook Call Announce (OCA) This feature enables you to call and speak through either the handset or the speaker of an off- hook, busy digital telephone. The called station must be set in system programming for this feature to work. -
Page 63: Hs-Oca
–––––––––––––––––––––––––––––––––––––––––––––––––––––––––––––––––––– Off-hook Call Announce (OCA) 2. If you hear busy tone, If you hear busy or ring tone after dialing the first digit (2 or 1), press and speak to disregard the tone and dial the second digit to OCA the called the called station telephone. -
Page 64: Override Calls
Override Calls ––––––––––––––––––––––––––––––––––––––––––––––––––––––––––––––––––––––––––––––––– Override Calls The available override features are: Busy Override (BOV) – enables you to send a muted ring tone to a busy station to indicate that a call is waiting. The BOV muted ring can be programmed for each station to be two muted rings only or continued muted rings until the call is answered. -
Page 65: Busy Override
––––––––––––––––––––––––––––––––––––––––––––––––––––––––––––––––––––––––––––––––– Override Calls Busy Override After reaching a busy A muted tone is heard at the busy NO. 203 station, indicating that a call is station, press . 210 BUSY OVR waiting. The station number [ displays. Do Not Disturb Override After reaching a A tone signal is heard at the DND NO. -
Page 66: Privacy Override
Override Calls ––––––––––––––––––––––––––––––––––––––––––––––––––––––––––––––––––––––––––––––––– Privacy Override After reaching a busy Connected parties may hear an NO. 204 optional tone signal before you are station, press LINE 03 PRV OVRD connected. Your station’s LCD displays the CO line identification, Line 03 The overridden station’s LCD displays NO. -
Page 67: Page Announcements
––––––––––––––––––––––––––––––––––––––––––––––––––––––––––––––––––––––––––– Page Announcements Page Announcements Station users can make page announcements to telephones and external speakers. To make a page announcement 1. Press [DN], lift the Note Each of the page access codes (including the [PDN] "# handset, and enter a button) can be stored on an button. -
Page 68: Privacy On-Line
Privacy On-Line ––––––––––––––––––––––––––––––––––––––––––––––––––––––––––––––––––––––––––––––– Privacy On-Line With this feature, you can block those with Privacy Override from entering your CO line. The button does not block Busy or Executive Override. To set/cancel privacy : - Press to set privacy. The LED lights steady red. Others are blocked from entering your CO line calls when they press a common CO line button. -
Page 69: Release And Answer
–––––––––––––––––––––––––––––––––––––––––––––––––––––––––––––––––––––––––––– Release and Answer Release and Answer This feature enables you to automatically disconnect or transfer an active call and answer a new call using a button, instead of a hookswitch. When you receive the new call, the LED flashes red and you hear a muted, Busy Override or Camp-on busy tone. To release an active call and answer an incoming call While on a call, you Releases the original call and answers the new incoming call. -
Page 70: Speakerphone
Speakerphone –––––––––––––––––––––––––––––––––––––––––––––––––––––––––––––––––––––––––––––––– Speakerphone All digital telephone users can answer internal calls handsfree (on-hook), but only users with a speakerphone can make and receive calls without lifting the handset. Any digital telephone model with an “S” in the model name is equipped with a speakerphone. To change from speakerphone to handset Lift the handset. -
Page 71: Speed Dial
–––––––––––––––––––––––––––––––––––––––––––––––––––––––––––––––––––––––––––––––––––– Speed Dial 2. Speak at a normal voice level toward the telephone. "$ 3. Press disconnect the call. Speed Dial Speed Dial enables you to call a telephone number with a brief access code. There are two types of Speed Dial numbers: Station –... -
Page 72: Speed Dial Number Linking
Speed Dial ––––––––––––––––––––––––––––––––––––––––––––––––––––––––––––––––––––––––––––––––––– To store longer dialing strings, see “Speed Dial Number Linking” on Page To insert a pause or flash signal in the number, see “Speed Dial Pause and Flash Storage” on Page 4. Press The number is stored. To clear a telephone number on a Station Speed Dial button Repeat the previous procedure on Page... -
Page 73: Speed Dial-Advanced Features
–––––––––––––––––––––––––––––––––––––––––––––––––––––––––––––––––– Speed Dial—Advanced Features Speed Dial—Advanced Features Feature Access Codes "# You can program (Speed Dial) buttons with feature access codes for a single feature or a sequence of features as long as the keyed dial pad characters do not exceed 20 digits. To / determine how many digits you have, count 2 digits for... -
Page 74: Feature Access Codes
Speed Dial—Advanced Features –––––––––––––––––––––––––––––––––––––––––––––––––––––––––––––––––– Table 7 Feature Access Codes Features Feature Access Code Sequence Account Code (Frequently used codes) + Account code digits Automatic Callback #$ Background Music (Telephone Speaker ON) [PDN] + Background Music (Telephone Speakers OFF) [PDN] + Call Forward—All Calls (To Station or VM) [PDN] +... -
Page 75: Speed Dial Pause And Flash Storage
–––––––––––––––––––––––––––––––––––––––––––––––––––––––––––––––––– Speed Dial—Advanced Features Table 7 Feature Access Codes (continued) Features Feature Access Code Sequence Pickup any ringing CO line (new call only) + [PDN] + " Pickup Station Page or Ringing Door Phone + [PDN] + " Pickup External Page... -
Page 76: Speed Dial Number Linking
Speed Dial—Advanced Features –––––––––––––––––––––––––––––––––––––––––––––––––––––––––––––––––– Speed Dial Number Linking You can link any of the Station Speed Dial numbers to System Speed Dial codes or to any of the optional buttons associated with these codes. This enables up to 36 digits to be stored under one Station Speed Dial button or code. - Page 77 –––––––––––––––––––––––––––––––––––––––––––––––––––––––––––––––––– Speed Dial—Advanced Features Linked Speed Dial Example The System Administrator can store a CO line access code plus international long distance dialing codes in System Speed Dial locations (See Table 16 on Page 110). You link the System Speed Dial code to a telephone number stored in any Station Speed Dial location on your station.
-
Page 78: Chain Dialing Speed Dial Numbers
Timed Reminders –––––––––––––––––––––––––––––––––––––––––––––––––––––––––––––––––––––––––––––– Chain Dialing Speed Dial Numbers You can call two or more Speed Dial numbers during one call. This enables you to add additional parties (conference calls) to your conversation with Speed Dialing. It also allows dialing of a stored code, such as a credit card number, to send to a far-end computer. To chain dial Speed Dial numbers 1. - Page 79 –––––––––––––––––––––––––––––––––––––––––––––––––––––––––––––––––––––––––––––– Timed Reminders 4. Enter desired LCD message station #605 TIMER SET 0800110 number ( ) or system number ...or enter if your telephone does not have an LCD or if you do not want a message to display when the time reminder tone sounds.
-
Page 80: Tone/Pulse Dialing
Tone/Pulse Dialing ––––––––––––––––––––––––––––––––––––––––––––––––––––––––––––––––––––––––––––– Tone/Pulse Dialing With some older Central Offices, you may have to make calls on CO lines that are programmed for rotary dial pulses. This feature enables you, while on these lines, to switch to tone dial in order to access remote equipment (such as an answering machine) requiring DTMF tones. -
Page 81: Co Buttons
––––––––––––––––––––––––––––––––––––––––––––––––––––––––––––––––– Two (Tandem) CO Line Connection Table 12 on Page 107—CO Line Access Codes or ask your System Administrator. 3. After the party The [DN] LED flashes (in-use rate) and all parties are answers, press conferenced. If you receive a busy tone/no answer, press [DN] to return to the original connection. - Page 82 Two (Tandem) CO Line Connection –––––––––––––––––––––––––––––––––––––––––––––––––––––––––––––––– 3. Press another CO ...or and dial a telephone number. ...or on some systems, It is not necessary to have both CO buttons on your telephone. you can press and dial a CO line access code followed by a...
-
Page 83: Supervision
Voice Mail Integration This section explains how to program your telephone for Call Forward and retrieve messages when using a Toshiba Voice Mail System with your Strata DK system. Refer to the appropriate Toshiba Voice Mail User Guide for more information:... -
Page 84: Message Retrieval
Voice Mail Integration ––––––––––––––––––––––––––––––––––––––––––––––––––––––––––––––––––––––––––– To assign a voice mail message mailbox number This procedure is required for the initial storage of VM ID code to the Toshiba Note Voice Mail system. Once programmed, these digits remain in memory until changed. To change the code, repeat this procedure. - Page 85 ––––––––––––––––––––––––––––––––––––––––––––––––––––––––––––––––––––––––––– Voice Mail Integration 2. Enter the voice mail Example: for Toshiba voice mail system code and the systems, enter + the mailbox 92203 voice mailbox [DN], number. plus any required mailbox number. [203] = pauses (up to 16 characters).
-
Page 86: Call Forward To Voice Systems
Voice Mail Integration ––––––––––––––––––––––––––––––––––––––––––––––––––––––––––––––––––––––––––– Call Forward to Voice Systems By setting Call Forward to the Toshiba Voice Mail System on your telephone, callers are automatically connected to your voice mailbox. Note buttons can only be used to Call Forward [PDNs]; access codes can be used to Call Forward [PDNs] or [PhDNs]. -
Page 87: Chapter 3 - Lcd Operation
LCD Operation This chapter covers the LCD, its buttons and displays. Special features available only with the LCD are described in detail and step-by-step instructions on using them are given. (For digital telephone standard features, see Chapter 2 – Features.) Control Buttons ... - Page 88 Control Buttons –––––––––––––––––––––––––––––––––––––––––––––––––––––––––––––––––––––––––––––––– Table 8 Control Button Definitions (continued) Button Definitions Displays LCD message number NN, where NN can be personal (continued) messages or system messages. only displays the selected message. It cannot be used to edit or create a new message. Speed dial number check and memo dialing (see “Retrieve and Auto Dial Lost Calls”...
-
Page 89: Soft Keys
––––––––––––––––––––––––––––––––––––––––––––––––––––––––––––––––––––––––––––––––––––– Soft Keys Exit from any Mode 1. Press MODE NO. ? 2. Press The LCD displays date/day/time. JUNE 03 TUE 03:54 Soft Keys The Soft Key feature provides a quick-and-easy way to access frequently-used features during a call. When Soft Keys are on, they replace the Mode, Page, and Scroll functions. When your " ... -
Page 90: Soft Key Display
Soft Keys ––––––––––––––––––––––––––––––––––––––––––––––––––––––––––––––––––––––––––––––––––––– Soft Key Display Abbreviated Soft Key feature prompts display on the LCD above the TALK ON LINE 2 " Control buttons ( , and ). In the following TRNS CONF example, you would press for the function, TRNS... - Page 91 ––––––––––––––––––––––––––––––––––––––––––––––––––––––––––––––––––––––––––––––––––––– Soft Keys If you press RTRN you will have to repeat the previous step if you wish to return to transfer, conference, or page. 2. To transfer to a DIAL STATION NO. station, press RTRN 3. Dial a station number. The name and/or number [203] CALLING displays for about three seconds.
-
Page 92: Soft Key Prompts
Soft Keys ––––––––––––––––––––––––––––––––––––––––––––––––––––––––––––––––––––––––––––––––––––– Soft Key Prompts Table 9 provides definitions of all of the Soft Key prompts that could appear on your LCD. Table 9 Soft Key Prompts Soft Key Definition Activates Automatic Busy Redial after dialing a busy outside telephone number. Activates Automatic Callback after reaching a busy station, CO line, or CO Line group. -
Page 93: Busy Lamp Field (Blf) Display
–––––––––––––––––––––––––––––––––––––––––––––––––––––––––––––––––––– Busy Lamp Field (BLF) Display Busy Lamp Field (BLF) Display This feature displays when a station is busy or ringing on any type of [DN] or CO line. If all or a telephone’s [PDNs] are in use on another telephone(s), the telephone shows busy on the BLF, even though it may be idle. -
Page 94: Caller Id/Ani/Dnis Information Mode
Caller ID/ANI/DNIS Information Mode –––––––––––––––––––––––––––––––––––––––––––––––––––––––––––––– Caller ID/ANI/DNIS Information Mode Automatic Number Identification (ANI) information cannot co-exist on the same telephone LCD with Dialed Number Identification Service (DNIS) information. If your system is programmed to receive both ANI and DNIS information on incoming calls, press while the call is ringing to alternate between DNIS and ANI/Caller ID LCD displays. -
Page 95: Call Park Orbit List Display
Call Park Orbit List Display Table 10 DNIS/ANI Samples Function ANI/Caller ID Number* DNIS/Caller ID Name Incoming Call CN: 7145556782 TOSHIBA TSD LINE 3 RINGING LINE 3 CALLING Incoming ACD Call TOSHIBA TSD LINE 3 RINGING Answered incoming or transferred call. CN: 7145556782 TOSHIBA TSD Display changes to call duration. -
Page 96: Retrieve And Auto Dial Lost Calls
Retrieve and Auto Dial Lost Calls –––––––––––––––––––––––––––––––––––––––––––––––––––––––––––––––––– Retrieve and Auto Dial Lost Calls The system automatically saves the numbers for all calls that ring at your telephone, but are unanswered (lost calls). This feature enables you to view the stored information, view the time and date, delete the information without returning the call, and/or Auto Dial the saved numbers. -
Page 97: Messages, Memos, And Name Display
–––––––––––––––––––––––––––––––––––––––––––––––––––––––––––––– Messages, Memos, and Name Display ...or press The previous lost call displays. MS. DOE 7143723546 ...or press The lost call information is deleted without auto dialing the call. To Auto Dial the lost call 1. Press The phone number and caller name MR. - Page 98 Messages, Memos, and Name Display –––––––––––––––––––––––––––––––––––––––––––––––––––––––––––––– To enter LCD characters 1. Access message/ A cursor (—) appears at the first character in the display. memo/name display. 2. Enter the message/ Table 11 for dial pad key equivalents. name/memo (up to 32 alphanumeric characters), using the 2358...
-
Page 99: Messages
–––––––––––––––––––––––––––––––––––––––––––––––––––––––––––––––––––––––––––––––––––– Messages Table 11 Dial Pad Key Equivalents Letter Letter Letter Symbol Key Equiv. Equiv. Equiv. Equiv. – " " Note Symbols shown above must be " made in alpha character mode on the dial pad. Messages There are three basic LCD message functions: Advisory messaging enables you to store an informative message for LCD telephones that call your phone. -
Page 100: System Messages 60~64
Messages –––––––––––––––––––––––––––––––––––––––––––––––––––––––––––––––––––––––––––––––––––– System Messages 60~64 System messages 60~64 are standard messages. You can “fill in the blanks” of messages 62~64 (see below). Example: Message 64 can be edited to read . Callers RETURN ON JAN. 4 with LCD phones will see that message when they call your number. System Message Preprogrammed message Number... - Page 101 –––––––––––––––––––––––––––––––––––––––––––––––––––––––––––––––––––––––––––––––––––– Messages 4. Repeat Steps 1~3 for any additional messages you want to store. 5. Press The message displays on your LCD an Advisory Message (see below). To cancel the message display, press [PDN] and dial or press ...or To set an advisory message for incoming calls 1.
- Page 102 Messages –––––––––––––––––––––––––––––––––––––––––––––––––––––––––––––––––––––––––––––––––––– To cancel an advisory message that has been set at your station Press ...or [PDN] + The LED goes out. If a station message was sent, this procedure does not erase it. To set a advisory station message for a remote station 1.
-
Page 103: Message Notifications
–––––––––––––––––––––––––––––––––––––––––––––––––––––––––––––––––––––––––––––––––––– Messages Message Notifications With an LCD telephone, you can set short messages (up to 32 characters) that display to callers with LCD telephones. Any station can record a message; however, only stations with an LCD are able to see the stored messages. - Page 104 Messages –––––––––––––––––––––––––––––––––––––––––––––––––––––––––––––––––––––––––––––––––––– To receive a notification station message Press when your telephone Msg LED is flashing. To cancel the message from the telephone that set the message Press [PDN] and dial XXX is the [PDN] of the telephone that has the message set. Group Notification Station Messaging This feature enables a station to set a Called Station Message for a group of stations.
-
Page 105: Silent Messaging (Busy Station)
–––––––––––––––––––––––––––––––––––––––––––––––––––––––––––––––––––––––––––––––––––– Messages 7. Press MSG NO.? 8. Press MODE NO.? 9. Press At the destination station, the LCD displays the originating station SENT 207M number and the LED flashes. To receive a notification message Press To cancel the message from the telephone that set the message 4<<<... -
Page 106: Memos
Memos –––––––––––––––––––––––––––––––––––––––––––––––––––––––––––––––––––––––––––––––––––––– Your LCD confirms the message was sent. MSG SEND To return to a busy station message after receiving a busy station message 1. Press OVR TO ST210 MSG NO? 2. Enter the message Station message (10~19) and system message (60~99). The number. - Page 107 ––––––––––––––––––––––––––––––––––––––––––––––––––––––––––––––––––––––––––––––––––––––– Memos 4. Enter the name or The name appears on the bottom line as you enter it. (See “To memo (12 characters enter LCD characters” on Page 86.) maximum). 5. Press 6. Enter a phone number The number displays on the top line as you enter it. (16 characters maximum).
-
Page 108: Timed Reminders
Name/Number Display –––––––––––––––––––––––––––––––––––––––––––––––––––––––––––––––––––––––––– 2. Dial a speed dial is the memo (up to 12 TOSHIBA *11 TOSHIBA number. characters). 7145553700 is the number (up to 16 714 583 3700 digits). 3. Press to scan If the number is longer than 16 digits, a “+” appears in the far the directory for the right corner of the display. - Page 109 LCD characters” on Page "$ 3. Press The information is stored and appears TOSHIBA EXT. 200 on the top line of your station’s LCD. DATE DAY TIME When you call a station, the name/title NO. 213 displays on the bottom of the called TOSHIBA EXT.
- Page 110 Name/Number Display –––––––––––––––––––––––––––––––––––––––––––––––––––––––––––––––––––––––––– To erase name/number display 1. Press [DN] + Current information displays on the USER NAME ? 4 ! lower line of the LCD. 2. Press in the alpha Blank characters replace the information. mode to enter blanks. "$ 3.
-
Page 111: Chapter 4 - Add-On Module/Dss Console
Add-on Module/DSS Console This chapter provides an equipment overview of the following two optional units and describes the features buttons and their associated LEDs. Digital Add-on Module (DADM) – add 20 feature buttons to 2000-series digital telephones. Up to two DADMs can be connected to a telephone. Direct Station Selection (DSS) Consoles –... -
Page 112: Example Button Assignments For The Strata Dk Dadms
DADM ––––––––––––––––––––––––––––––––––––––––––––––––––––––––––––––––––––––––––––––––––––––– Notes The button numbers shown in this figure are examples only and may not reflect the numbers on your particular station equipment. Not available on DK14 systems. First DADM Second DADM Figure 4 Example Button Assignments for the Strata DK DADMs Strata DK Digital Telephone... -
Page 113: Dss Console
–––––––––––––––––––––––––––––––––––––––––––––––––––––––––––––––––––––––––––––––––– DSS Console DSS Console The DSS console operates alongside of a digital telephone to provide the telephone with 60 additional feature buttons. The buttons can be programmed for [DSS], CO line access, All Call Page, Night Transfer, and Station or System Speed Dial. This guide applies to the DSS Console models DDSS2060 (see Figure 5), DDSS1060, and HDSS6560. -
Page 114: [Dss] Button
[DSS] Button –––––––––––––––––––––––––––––––––––––––––––––––––––––––––––––––––––––––––––––––––– [DSS] Button The Direct Station Select [DSS] button can appear on both the DADM and DSS Console. Each DSS button is associated with a particular station in your telephone system. It can be used to transfer an outside call to the associated station or to make a direct call to the associated station. -
Page 115: Call Transfer With Camp-On
––––––––––––––––––––––––––––––––––––––––––––––––––––––––––––––––––––––––––––––––––––– Features 2. Announce the call. With Tone signaling, you would have to wait for the called station to answer before announcing the call. 3. Hang up. The call rings the called station when you hang up. While the called station is ringing, the [DSS] LED is steady red, and the Line LED flashes green at the on-hold rate or if on a [DN] button, it goes idle. -
Page 116: Call Answering (Co Line)
Features ––––––––––––––––––––––––––––––––––––––––––––––––––––––––––––––––––––––––––––––––––––– Call Answering (CO Line) If your DADM or DSS console is equipped with a button, you can answer CO line calls from the DADM or DSS console as you would from a digital telephone. See Chapter 2 – Features for detailed information. -
Page 117: Night Transfer
––––––––––––––––––––––––––––––––––––––––––––––––––––––––––––––––––––––––––––––––––––– Features To override call forward with your DSS Console Press the station [DSS] set for call forward. Night Transfer You can use the DSS console to make the system ring different telephones for incoming calls during different times of the day. For further details, refer to the Strata DK System Administrator’s User Guide. - Page 118 Features ––––––––––––––––––––––––––––––––––––––––––––––––––––––––––––––––––––––––––––––––––––– Strata DK Digital Telephone...
-
Page 119: Co Line Access Codes
Access Codes This appendix contains access codes for outside Speed Dial numbers, CO lines, Paging Group and Paging Zone Codes. CO Line Access Codes CO lines are used when you dial an outside number. If your telephone does not have a button, you can enter the appropriate code listed in Table 12 to access an outside line. -
Page 120: Feature Access Codes
Feature Access Codes –––––––––––––––––––––––––––––––––––––––––––––––––––––––––––––––––––––––––– Table 12 CO Line Access Codes (continued) System CO Line Access Codes $ &$ $ & DK424 (RCTUA) $ &$ $ & #$ DK424 (RCTUBA/BB) $ &$ &## DK424 (RCTUC/D) $ &$ &! DK424 (RCTUE/F) Notes... -
Page 121: Speed Dial Access Codes
–––––––––––––––––––––––––––––––––––––––––––––––––––––––––––––––––––––––– Speed Dial Access Codes Table 14 External Paging Zones External Paging Zone Access Code External Paging Zone Access Code DK14/DK40/DK424 (all processors) Paging Paging " "% All Call Page Zone All Call, External Page Zone DK40/DK424 ((RCTUA, RCTUBA/BB, RCTUC/D) " " Zone A... - Page 122 Speed Dial Access Codes ––––––––––––––––––––––––––––––––––––––––––––––––––––––––––––––––––––––– Table 16 Speed Dial Number Linking System Speed Dial Codes that can be Linked to System other Speed Dial Codes % &%% DK14, DK16e, DK40, RCTUA % &%% RCTUBA/BB, RCTUC/D %% &%%% RCTUE/F Strata DK Digital Telephone...
-
Page 123: Flexible Directory Numbering
Centrex Application Your system may be equipped with the Centrex Application, which enhances its feature capability when installed behind a Centrex or PBX system.Your telephone may have access to one or more of the enhanced Centrex features listed below: Flexible Directory Numbering A station’s [PDN] can be three or four digits. -
Page 124: Delayed Ringing
Delayed Ringing ––––––––––––––––––––––––––––––––––––––––––––––––––––––––––––––––––––––––––––––– Delayed Ringing CO or Centrex line(s) can be programmed for a 12-second and/or 24-second ring delay at stations to permit alternate answering conditions. Answer the line when your telephone is ringing. Strata DK Digital Telephone... -
Page 125: Feature Button Definitions
Button Labels All flexible buttons must be programmed for your telephone in system programming and vary for individual telephones. If a button does not appear on your display or telephone keystrip label, see your System Administrator for button assignments. The button labels in this guide are for the 2000-series telephone mode. Table 17 Feature Button Definitions 2000-series... - Page 126 Button Labels ––––––––––––––––––––––––––––––––––––––––––––––––––––––––––––––––––––––––––––––––– Table 17 Feature Button Definitions (continued) 2000-series Definitions Telephone Automatic Callback Button Press to recall a busy station or station in the Do Not Disturb (DND) mode as soon as that station becomes idle or deactivates DND. Also used for CO line queuing when all lines are busy.
- Page 127 ––––––––––––––––––––––––––––––––––––––––––––––––––––––––––––––––––––––––––––––––– Button Labels Table 17 Feature Button Definitions (continued) 2000-series Definitions Telephone Direct Station Selection Button(s) Press to ring a preselected station. The LED associated with each DSS button provides the status (idle/busy) of the station assigned to the button. Flash Button Press to perform the following functions: Disconnect and recall dial tone on a CO line;...
- Page 128 Button Labels ––––––––––––––––––––––––––––––––––––––––––––––––––––––––––––––––––––––––––––––––– Table 17 Feature Button Definitions (continued) 2000-series Definitions Telephone Additional Message Waiting Buttons Phantom Directory Numbers allow multiple Message Waiting buttons with LEDs for up to four different Directory Numbers [DNs] other than your Primary Directory Number [PDN].
- Page 129 ––––––––––––––––––––––––––––––––––––––––––––––––––––––––––––––––––––––––––––––––– Button Labels Table 17 Feature Button Definitions (continued) 2000-series Definitions Telephone Release and Answer Button Press to disconnect or complete the transfer the current CO or [DN] call and automatically answer the new incoming CO or [DN] call. Release Button Press to disconnect or complete the transfer of the current CO or [DN] call and to place your station in the idle condition.
- Page 130 Button Labels ––––––––––––––––––––––––––––––––––––––––––––––––––––––––––––––––––––––––––––––––– Table 17 Feature Button Definitions (continued) 2000-series Definitions Telephone = 7 Door Lock Buttons Press to unlock a door lock mechanism. Strata DK Digital Telephone...
- Page 131 Index automatic busy redial automatic callback about this book automatic hold conventions how to use this guide viii organization viii related documents before you begin BGM over telephone speakers BLF display access code busy override using button labels access codes buttons CO Line [DSS]...
- Page 132 Scroll directed call pickup Spkr directory number volume control DISA incoming calls outgoing calls DNIS call forward do not disturb (DND) all calls do not disturb override busy no answer door lock external door phone fixed [DSS] button modes no answer console to voice systems using the buttons...
- Page 133 group called station messaging memo group listening speed dial – group pickup timed reminders calls to other groups message calls within your group advisory called station group called station notifications handsfree answerback remote calling station handsfree monitoring silent (busy station) Hold station hotline service...
- Page 134 toll restriction advanced features override calls chain dialing linked speed dial example number linking pause and flash storage page announcements long pause page button memos paging group codes pause phantom directory number Spkr primary directory number SP-OCA privacy start (ISDN button) on-line sub (subaddress ISDN button) override...