Table of Contents
Quick Links
Table of Contents

Related Manuals for GE Kalatel 0150-0255C


Summary of Contents for GE Kalatel 0150-0255C
- Page 1 User Manual 0150-0255C Kalatel VDR...
- Page 2 © 2003 Kalatel, a GE Interlogix company All Rights Reserved. Any GE Interlogix, Kalatel division, software supplied with GE Interlogix, Kalatel division, products is proprietary and furnished under license and can be used or copied only in accordance with the terms of such license.
-
Page 3: Table Of Contents
Advanced Menu ...4-13 4.8 Main Menu About ...4-14 NSTALLER ROGRAMMING 5.1 Advanced Menu 5.2 Advanced Menu 5.3 Advanced Menu 5.4 Advanced Menu 0150-0255C ... 1-1 ETUP ... 4-1 ... 5-1 Disk Overwrite Mode...5-1 Disk Maintenance...5-2 Auto Delete Mode...5-3 Adjust Picture...5-4... - Page 4 RS-232 R EMOTE ROTOCOL ACTORY EFAULTS ECHNICAL PECIFICATIONS ARRANTY AND ERVICE 9.1 Factory Service ...9-1 9.2 Warranty and Return Information...9-2 Kalatel VDR Front Panel Lock...5-5 Factory Settings...5-5 Change Password ...5-5 Firmware Upgrade...5-6 ... 6-1 ... 7-1 ... 8-1 ... 9-1 0150-0255C...
-
Page 5: Features , Connections , And Setup
The Kalatel VDR is a Digital Video Recorder designed to be a direct replacement for a Time Lapse VCR. Digital Video Recording allows the user to have continuous recording on a removable hard disk, without the need for replacing or rewinding of videotapes. The VDR provides menu based search capabilities for recorded events. -
Page 6: Passwords
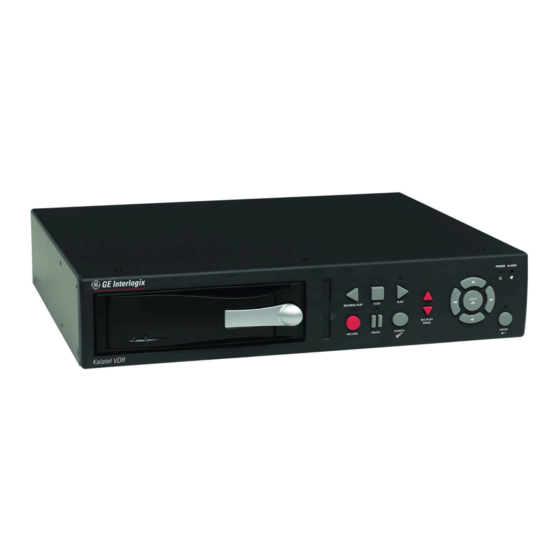
Advanced Menu on page 4-13. Figure 1-2 Front Panel REVERSE PLAY RECORD Password 0 0 0 0 8 1 1 1 Factory Settings on page 5-5. 13 14 POWER PLAY STOP MENU REC/PLAY SPEED PAUSE SEARCH 0150-0255C ALARM ENTER... -
Page 7: Back Panel Connections
Power Connector Power Supply Input Voltage: 120 to 240 Volt AC Tolerance: ±10% Frequency: 50 to 60 Hz 0150-0255C Figure 1-3 Back Panel 12V DC Composite Input: 75 Ohm BNC connector. Composite Output: 75 Ohm BNC connector. Composite Looping: Yes, while unit is On or Off. -
Page 8: Accessories I/O Port
Back Panel Ground DB-9 Connector on Back Panel Input: Active Low TTL w/ pull-ups or Normally Open Relay. High: 5V (12V tolerant) Low: Ground Minimum Duration: 0.5 Seconds N o r m a l l y O p e n 0150-0255C... - Page 9 The Videoloss Out signal is activated when the unit experiences videoloss on the video input (Composite). In the event of videoloss, VIDEOLOSS will be indicated near the upper left hand corner of the primary monitor. 0150-0255C Output: Active Low High: 12V Low: Ground Current Out: 50mA Max Short Circuit Protected.
-
Page 10: Setting The Time And Date
Set Time Format --OR— Set Date Format --OR— Output: Open Collector High: Transistor Off Low: Transistor On Active When On. Current Out: 10mA Max Minimum Duration: 0.5 Seconds Time Format Setup Select Format 12 Hour Date Format Setup Select Format MM/DD/YY 0150-0255C... -
Page 11: Setting The Alarms
Use this menu to specify: Whether an alarm condition will be activated when the unit detects a signal on the Alarm In connection. Whether the internal buzzer is activated during an alarm condition. 0150-0255C Set Time --OR-- Set Date --OR--... -
Page 12: The Removable Hard Drive
3. Active Handle (Shown Open). 4. Handle. 5. Key Lock. Key Lock 1. Power On. Drive Locked 2. Power Off. Drive Locked. 3. Power Off. Drive Unlocked. (Shown) Kalatel VDR --OR-- Alarms Menu Hardwire Alarm : Enable Alarm Buzzer Enable [CANCEL] [OK] 0150-0255C... -
Page 13: Removing The Hard Drive
The video files can be played back using GE Interlogix QuickWave software that is automatically copied to the CF card. GE Interlogix recommends that upon initial use a minimum of two CF cards be purchased. One CF card is used to create a Master CF card and the other(s) for the copying and transfer of video files. - Page 14 After formatting, QuickWave is automatically copied to the CF card. 3. Remove the Master CF card and label it “Master CF card”. GE Interlogix recommends that this Master CF card be stored in a safe place for use whenever a new and blank HDD is inserted into the VDR.
- Page 15 Storage and Retrieval of data, please see Section 4.6 Main Menu 6. Once operations are complete remove the CF card by grasping it with your thumb and forefinger and pulling it out of the CF card slot. 0150-0255C Compact Flash Compact Flash detected. Initializing...
-
Page 17: User Operations
Main Menu of the Operator Programming section of this manual. The unit returns to the normal record speed when the alarm condition ends. 0150-0255C Disk Overwrite Mode on Normal Record Speed, on page 4-5 of the... -
Page 18: Playback
Stop button, then press the Play button to resume playback at the speed the data was recorded. Kalatel VDR Disk Full. Recording Has Stopped. Disk Maintenance menu. Message [OK] PLAY Play Forward button REVERSE PLAY Reverse play button REC/PLAY SPEED Record Speed buttons 0150-0255C... -
Page 19: The Search Interface
Record mode is activated, it is considered a separate recording session. To enter the Search Filters menu, press the Search button. The Search Filters menu is displayed on the primary monitor. 0150-0255C Fast Forward Button Rewind Button PAUSE... -
Page 20: Specifying Search Parameters
2. Use the Arrow buttons to activate the alarms search, by placing an [X] in the check box. 3. Press the Enter button at any time to exit Edit mode. Kalatel VDR Search Filters Start DATE: 12/25/00 (MM/DD/YY) Start TIME: 11:11:21 ALARM: [ ] [CANCEL] [START SEARCH] Stop 01/01/01 (MM/DD/YY) Stop 12:34:34 0150-0255C... - Page 21 Selecting from the Search Results Use the Arrow buttons to select a recorded event. Press the Enter button to select the event, or press the Menu button to exit the Search Results menu. 0150-0255C Search Results Start Date Start Time...
- Page 22 Kalatel VDR 0150-0255C...
-
Page 23: The Menu System
In some boxes, items are highlighted on the screen. They are represented in this manual as follows: Not highlighted: TIME/DATE Entering the Main menu Enter the Main menu by pressing the Menu button. The Main menu will appear on the primary monitor. 0150-0255C Normal Record Speed Highlighted: ALARMS MENU Menu button... - Page 24 Down Arrow Button Time/Date Alarms Timer Settings Record Settings Display Settings CompactFlash Advanced Menu About Password Box Please Enter The Password! 0--- Disk Overwrite Mode Disk Maintenance Auto Delete Mode Adjust Picture Front Panel Lock Factory Settings Change Password Firmware Upgrade 0150-0255C...
-
Page 25: Operator Programming
Format the Date as either: DD/MM/YY MM/DD/YY YY/MM/DD Press the Enter button to confirm the selection and exit the menu. Press the Menu button to exit the menu without making changes. 0150-0255C Set Time Format --OR— Set Date Format --OR— Set Time Format... - Page 26 [CANCEL], then press the Enter button. Kalatel VDR Set Time --OR-- Set Date --OR-- Time Setup HH MM SS 03 05 53 [CANCEL] [OK] Date Setup MM DD YY DAY 12 17 00 SUN [CANCEL] [OK] 0150-0255C...
-
Page 27: Main Menu Alarms
The date, or days on which the recording will occur. The start and stop time. The record speed. The record quality. Whether the event is enabled. 0150-0255C Set Region Daylight Saving : Time Zone SUN, SUN, 26 OCT 2003 02:00 (-1) DATE START STOP... - Page 28 3. Use the Arrow buttons to change the values. Use the Arrow buttons to navigate among parameters in the same row. 4. When finished, press the Enter button to exit the Edit mode. Use the Arrow buttons to navigate to [OK], then press the Enter button to complete the selection. Kalatel VDR 0150-0255C...
-
Page 29: Main Menu Record Settings
When the Normal Record Speed is set to 0.0, the unit will only record while an alarm is active. Press the Enter button to confirm the selection and exit the menu. Press the Menu button to exit the menu without making changes. 0150-0255C Color/Mono --OR— Normal Record Speed --OR—... -
Page 30: Main Menu Display Settings
Kalatel VDR Alarm Record Speed --OR— Video Quality --OR— Current Time / Date --OR— Alarm Record Speed Pictures Per Second Record Quality Select Quality High Current Time / Date Record Capacity Last Alarm Record Playback Speed Playback Time / Date 0150-0255C... - Page 31 Use the Arrow buttons to select On or Off. Press the Enter button to confirm the selection and exit the menu. Press the Menu button to exit the menu without making changes. 0150-0255C Record Capacity --OR— Last Alarm --OR—...
- Page 32 1. Using the Right or Left Arrow buttons to navigate, highlight the DATE parameter, then press the Enter button. The unit will enter Edit mode. Kalatel VDR Store Compact Flash Store Search Filters Start DATE: 10/21/03 (MM/DD/YY) Start TIME: 15:09:47 ALARM: [ ] Store Retrieve Format Stop 10/21/03 (MM/DD/YY) Stop 15:09:47 0150-0255C...
- Page 33 The following display will also appear to indicate the system is in Preview Mode. Hit the Menu button to return to the Search Screen, 0150-0255C Preview Mode ‘MENU’ to Return Kalatel VDR...
- Page 34 When finished the system will display a Storing Complete Message Box. At this point it will be safe to remove the CF card from the VDR. The video files can be played back using GE Interlogix QuickWave software that is automatically copied to the CF card. The files may also be copied and viewed on any PC equipped with a CF card reader.
-
Page 35: Main Menu Compactflash
Enter button. The unit will enter Edit mode. 2. Use the Up or Down Arrow buttons to change the start and stop time values. Use the Right or Left Arrow buttons to navigate among the different parameters. 0150-0255C Retrieve Compact Flash Retrieve Search Filters... - Page 36 08:01:42 Selected Available on Target Medium [ ‘SEARCH’ to Store 4-12 28 [ ] 2 [ ] 2 [ ] 18 [ ] 2 [ ] 2 [ ] 2 [ ] 2 [ ] 0](MB) 39104](MB) Retrieving [CANCEL] 0150-0255C...
-
Page 37: Main Menu About
3. Pressing the Enter button on the last character will complete the password selection and the unit will display the Advanced menu. 0150-0255C Message Retrieving Complete. [OK] Format Format... -
Page 38: About
Use this menu to display information about the VDR. Select Main Menu screen. Serial Number: Software Version: Software Date: Software Checksum: Boot Code Ver.: Disk Size: Kalatel VDR About to display the About V301-9-3300005 1.05 Oct 15 2003 15:06:18 59767E0E 1.00 41.11 GB [OK] 4-14 0150-0255C... -
Page 39: Nstaller Rogramming
Enter button. Unit will not record over previously recorded data. To continue recording, the data must be erased (or deleted) in the Advanced Disk Maintenance menu. 0150-0255C Disk Overwrite Mode Disk Overwrite Mode No Overwrite Unit Stops Recording when this point is reached Advanced Menu, on page 4-8. -
Page 40: Advanced Menu Disk Overwrite Mode
Start of Disk Disk Overwrite Mode Continuous Overwrite Unit records over all recorded data Continuous Overwrite Mode Disk Maintenance New recorded data Unit Stops Recording when this point is reached Overwrite Once Mode Delete Disk Undelete Disk Erase Disk (Permanent) 0150-0255C... -
Page 41: Advanced Menu Disk Maintenance
Press the Enter button to implement the selection. If the selection is altered from what was previously selected, the confirmation menu will appear. Rotate the Arrow buttons to select Yes or NO. ADM Setting Days 0150-0255C Disk Maintenance Delete Disk Disk Maintenance Undelete Disk... -
Page 42: Advanced Menu Adjust Picture
[CANCEL], then press the Enter button. Kalatel VDR Adjust Picture Adjust Picture Adjust Brightness --OR— Adjust Picture Adjust Contrast --OR— Adjust Picture Adjust Saturation --OR— Brightness Contrast Saturation Adjust Brightness [CANCEL] [OK] Adjust Contrast [CANCEL] [OK] Adjust Saturation [CANCEL] [OK] 0150-0255C... -
Page 43: Advanced Menu Front Panel Lock
If the password in the Confirmation Box matches the password from the Password box, this message will appear. Press the Enter button to select [OK] and exit the menu. 0150-0255C Front Panel Lock --OR— Factory Settings Please Enter The Factory Password... - Page 44 Warning! Do not power off unit until the operation is done! Use the Arrow buttons to select Cancel to exit this command or OK to proceed. Kalatel VDR The Password Was Not Changed! Firmware Upgrade Firmware Upgrade CANCEL [OK] Message [OK] 0150-0255C...
- Page 45 Left Arrow Right Arrow Menu Enter Set Clock See instructions for setting clock in the following section. NOTE Note: All byte values shown in hexadecimal. 0150-0255C ROTOCOL ASCII String PLF E REC E STO E PAU E FWD E REW E...
-
Page 46: Setting The Clock
Minute Character #1 Minute Character #2 The final Set Clock Command String for 14:39 in December 25, 2000 would appear as follows: Command Value Command Value Kalatel VDR ASCII Character of Value Column desired Value Hex Value entered into command string. 0150-0255C... - Page 47 Stop Mode Status Request ASCII Status Response Messages Command Model Name Response Software Version Number Response Record Mode Status Response Stop Mode Status Response 0150-0255C ASCII String Bytes in Hexadecimal MLN E SVN E RMS E SMS E ASCII String MLN VDR E SVN 1.18 E...
-
Page 49: Factory Defaults
Display Record or Playback Speed Display Playback Time and Date Baud Rate Hardwire Alarm Alarm Buzzer 0150-0255C Setting 24 Hour MM / DD / YY 60 pictures per seconds (NTSC) or 50 pps (Pal) 60 pictures per seconds (NTSC) or 50 pps (Pal) -
Page 51: Echnical Pecifications
End of Data Fast Forward Last Alarm Record Speed Playback Speed 0150-0255C 120-240 Volt AC, Auto-Ranging adapter 12 Volt DC 20 Watts Max. Operating: 0 to 40 ºC. Storage: -20 to +60 ºC. Operating: 10% to 80%. Storage: 10% to 95% Inches: 13 x 10.5 x 2.5, MM: 330 x 267 x 63.5... - Page 52 ProMaster Memorex SanDisk SanDisk SanDisk Lexar 4x Simple Tech All specifications are subject to change without notice. GE Interlogix believes all specifications are correct, but no liability is assumed for omissions or errors. Kalatel VDR 0150-0255 Capacity 128Mb 32Mb 128Mb...
-
Page 53: Warranty And Service
Failure to comply with these instructions will delay service of the unit, and may result in the unit not being accepted by the Repair Center. Factory Address GE Interlogix Attention: Repair Center 3050 Redhill Ave. Costa Mesa, CA. 92626... -
Page 54: Warranty And Return Information
9.2 Warranty and Return Information GE Interlogix warrants all of its equipment for three years from the date of purchase. This warranty covers any defects in materials and workmanship. Equipment failures that are due to improper installation, modification, abuse, or acts of nature will not be covered by this warranty. The repair department will evaluate all equipment returned for repair to determine warranty coverage.