
Related Manuals for Panasonic AG-RCP30P


Summary of Contents for Panasonic AG-RCP30P
-
Page 1: Operating Instructions
Operating Instructions Remote Control Panel Model No. Car Use only Before operating this product, please read the instructions carefully and save this manual for future use. ENGLISH S0806K1116-M D VQT1A20-1... -
Page 2: Read This First
Read this first! WARNING: • TO REDUCE THE RISK OF FIRE OR SHOCK HAZARD, DO NOT EXPOSE THIS EQUIPMENT TO RAIN OR MOISTURE. • TO REDUCE THE RISK OF FIRE OR SHOCK HAZARD, KEEP THIS EQUIPMENT AWAY FROM ALL LIQUIDS. USE AND STORE ONLY IN LOCATIONS WHICH ARE NOT EXPOSED TO THE RISK OF DRIPPING OR SPLASHING LIQUIDS, AND DO NOT PLACE ANY LIQUID CONTAINERS ON TOP OF THE EQUIPMENT. - Page 3 Read this first! (continued) CAUTION: In order to maintain adequate ventilation, do not install or place this unit in a book case, built-in cabinet or any other confined space. To prevent risk of electric shock or fire hazard due to overheating, ensure that curtains and any other materials do not obstruct the ventilation.
-
Page 4: Important Safety Instructions
IMPORTANT SAFETY INSTRUCTIONS (1) Read these instructions. (2) Keep these instructions. (3) Heed all warnings. (4) Follow all instructions. (5) Do not use this equipment near water. (6) Clean only with a dry cloth. (7) Do not block any ventilation openings. Install in accordance with the manufacturer’s instructions. -
Page 5: Table Of Contents
Contents Before use Read this first! …………………… 2 Operating Precautions …………… 8 IMPORTANT SAFETY INSTRUCTIONS 4 Control Reference Guide ………… 9 Features/Included Accessories … 6 Front panel………………………… 9 About This Manual ………………… 7 Rear panel ………………………… 11 Before Use ………………………… 7 Connections ………………………... - Page 6 The speaker allows you to check live audio or playback audio. Included Accessories Control panel cable [7.5 m (24.6 feet)] ..............1 In no event will Panasonic be liable for any damages, including any incidental • or consequential damages, stemming from a failure to record data or from lost...
-
Page 7: About This Manual
About This Manual This manual is organized as described “Menu Screen” b e l o w a n d u s e s t h e f o l l o w i n g This section lists the functions conventions in presenting how to provided by the operation menu operate this unit. -
Page 8: Operating Precautions
Operating Precautions Maintenance Installation and connections To clean the recorder, turn the Consult your supplier. vehicle’s ignition switch to the LOCK Operating procedures (OFF) position, and keep the recorder • Disconnect the control panel cable power turned off (see page 13). when transporting the unit. -
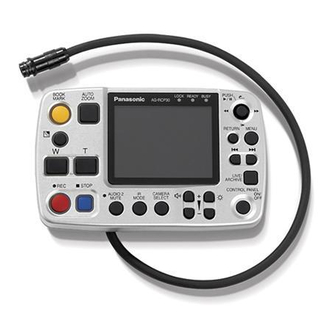
Page 9: Control Reference Guide
Control Reference Guide Front panel RETURN MENU CONTROL PANEL ∗ LCD panel REC button Shows images and operation menus. Press to start recording video and sound to P2 card. (see page 23.) ∗ AUTO ZOOM button 1, 2 ∗ STOP button ( Provides automatic control of zoom-in, Stops recording. - Page 10 Control Reference Guide (continued Front panel RETURN MENU CONTROL PANEL MENU button CONTROL PANEL ON/OFF button Turns on and off he LCD panel, lamp Opens menus on the LCD panel. indications and buttons when the Cursor buttons Memory Card Video Recorder is on. It cannot turn on or off the Memory Use these buttons to manipulate Card Video Recorder or this unit...
-
Page 11: Rear Panel
Control Reference Guide (continued) Front panel Rear panel RETURN MENU CONTROL PANEL Speaker BUSY lamp In playback screen mode: Lights or blinks when accessing a P2 card (for example during recording Outputs audio. However, during [ ] slow playback, and playback). (see page 52.) ] rewind, and [ ] fast forward, audio is not output. -
Page 12: Connections
Connections For details on installation and connections, be sure to consult your supplier. RETURN MENU CONTROL PANEL When connecting : Align the “ ” and “ ” White Yellow marks to connect. When removing : Slide in the reverse direction of the arrow to disconnect the connector. -
Page 13: Turning The Remote Control Panel On And Off
Turning the Remote Control Panel On and Off Turn the vehicle’s ignition switch to ON or ACC. This turns on the Memory Card Video Recorder and this unit. Turn the vehicle’s ignition switch to LOCK (OFF). This turns off the Memory Card Video Recorder and this unit. -
Page 14: Basic Menu Operations
Basic Menu Operations Use the LCD panel menus for operations and settings that cannot be performed with the front panel buttons. A list of all menus is provided on pages 44 to 51. (This list also describes menus available only to administrators.) Example: Test of Audio1 1. - Page 15 Basic Menu Operations (continued) Returning to previous screen Press the [RETURN] button to return to the previous screen. The menu is cleared when the “Archive” screen, Officer setup top screen or Setup/ Admin top screen is displayed. Long menus Menus with arrows at the top and bottom contain items that are currently not shown.
-
Page 16: Setting Up/Deleting Officer Data
Setting up/Deleting Officer Data Before using the Memory Card Video • Once the officer data has been Recorder, you must create and configure read, the USB memory device officer data, such as an officer ID and may be removed. officer name. For details on creating officer •... - Page 17 Setting up/Deleting Officer Data (continued) LIST mode Deleting entered data Open the menu on the LCD panel and 1. Press the [MENU] button. read in the officer data registered in The Menu appears. the Memory Card Video Recorder from 2. Use the [ , ] buttons to select the Officer setup top screen.
-
Page 18: Locking And Unlocking Buttons
Locking and Unlocking Buttons This function is provided to prevent Unlocking incorrect input through the inadvertent pressing of buttons. 1. Press the [MENU] button. The Menu appears. Locking 2. Use the [ , ] buttons to select [Setup/Info] and press [ ] to 1. -
Page 19: Viewing Live Video
Viewing Live Video Use the functions described below to Making a backlit image easier to view manipulate video output by the camera and sound from the microphone. A dark subject against a bright Press the [LIVE/ARCHIVE] button to background can be made easier to view. view live video. -
Page 20: Adjusting Image Brightness
Viewing Live Video (continued) Adjusting image brightness Adjusting image focus This menu is available only when This menu is available only when “CAMERA1” is selected. “CAMERA1” is selected. 1. Press the [MENU] button. 1. Press the [MENU] button. The Menu appears. The Menu appears. -
Page 21: Selecting Audio2 Input
Viewing Live Video (continued) Selecting AUDIO2 input Viewing Memory Card Video Recorder status The following function is provided to 1. Press the [MENU] button. enable viewing Memory Card Video The Menu appears. Recorder status and GPIO status. 2. Use the [ , ] buttons to select 1. -
Page 22
Viewing Live Video (continued)
REMAIN 4:12 min Restore C1 IRA BL TAL LOCK /TGT REMAIN 4:12 min ----- -- . ----- ---- --- . ----- Restore 2006-08-25 14:51:19 TRIGGER A B C1 IRA BL TAL LOCK Speed (MPH / KPH) Mode indication OWN : own vehicle speed... -
Page 23: Recording
Recording • When the P2 card slots cover on the Starting and stopping recording Memory Card Video Recorder is open. • When an administrator setup is started. Starting recording • When the GPIO trigger level criteria Press the [REC] button. is met (requires administrator setup). -
Page 24: A Trial Shoot
Recording (continued) A trial shoot Starting and stopping intermittent recording The following is a description of a test to When intermittent recording is set in check if recording can be correctly made. administrator setup, normal recording may take place in addition to intermittent 1. -
Page 25: Changing Playback Method
Playback (continued) Name of record file Changing playback method A record file name that appears in the Playback and pause On-Screen Display or playback file list Press the [ ] button. screen takes a name that is based on the local time when recording started. Playback starts. -
Page 26: Adding Bookmarks
Playback (continued) • Up to 999 bookmarks can be skipped. Moving back to a previous You cannot skip to the bookmark skip location to start playback position exceeding this limit. Press the [ ] button. • When the [ ] button or [ Playback starts from the previous skip button is pressed, playback stops location. -
Page 27: Selecting A File For Playback
Playback (continued) Selecting a file for playback Turning Audio1 and 2 ON and OFF 1. Press the [MENU] button. 1. Press the [MENU] button. The Menu appears. The Menu appears. 2. Use the [ , ] buttons to select 2. Use the [ , ] buttons to select [Archive] and press [ ] to [AUDIO]. -
Page 28
Playback (continued)
2006-08-25 14:45:05 x1/10 Restore /TGT 2006-08-25 14:45:05 ----- -- . ----- x1/10 ---- --- . ----- Restore 2006-08-25 14:51:19 TRIGGER A B Speed (MPH / KPH) Playback location (in file units) OWN: own vehicle speed Date/Time TGT: target vehicle speed Trigger input status... -
Page 29: Restoring Files
Restoring Files If the power of the Memory Card Video Notes: Recorder is turned off or a P2 card is • An interrupted restore process can removed during recording, the file will be be resumed at a later time. corrupted and cannot be played back. •... -
Page 30: Displaying Product Information
Displaying Product Information Viewing software version Viewing error log data Use the following procedure to open a 1. Press the [MENU] button. dialog showing up to five of the most The Menu appears. recent errors. 2. Use the [ , ] buttons to select 1. -
Page 31: Administrator Setup
Administrator Setup 5. Use the [ , ] buttons to select The Memory Card Video Recorder setup includes items that only an [Admin] and press [ ] to administrator is allowed to set up. confirm the entry. Log in at the Setup/Admin screen. The first of the files automatically sorted (in ascending order) from the 1. -
Page 32: Rec/Play
Administrator Setup (continued) Init Audio2 In Select Setup/Admin [1/2] Select the Audio2 input selected at Rec/Play power-on. Programed Rec INCAR : Input signal of the [IN CAR Date/Time MIC] connector Registration WMIC : Input signal of the [AUDIO Trigger IN 2] connector ∗... -
Page 33: Init Audio2 Rec
Administrator Setup (continued) ∗ Rec Continue Time ∗ PostRec Time (Audio) Use this function to set recording Use this function to set the time continue time for normal recording interval audio recording will continue when a trigger is entered or when after the [STOP] button is pressed. -
Page 34: Programed Rec
Administrator Setup (continued) Rec Tally Out Head of File Enables or disables output of the Use this function to move to the recording status as the GPIO9 beginning of a file during playback. signal. When enabled, a high level Setting : YES/NO (output voltage 5.0 V) indicates Notes: recording is in progress. -
Page 35: Date/Time
Administrator Setup (continued) Notes: Style • The start time must be set to a Use this function to set a date format. ISO : YYYY-MM-DD time that comes at or later than HH : MM : SS the stop time for the previous day. USA : MM/DD/YYYY •... -
Page 36: Trigger
Administrator Setup (continued) < Printable > Trigger Use this function to assign a letter to GPIO be shown on the On-Screen Displays. Use this function to turn GPIO on Setting : A - Z, – or off. Notes: Setting : ON/OFF •... -
Page 37: Camera
Administrator Setup (continued) AutoZoom Magnification Time Use this function to set the target Use this function to turn date zoom-in ratio. and time display on or off during Setting : ×1/×2/×3/×4/×5/×7/×10/ recording. ×15/×22 Setting : ON/OFF Note: AutoZoom Time The Detailed On-Screen Display Use this function to set the zoom-in (see pages 22 and 28) will hide this pause time. -
Page 38: Management Mode
Administrator Setup (continued) • The key lock is activated for the Management Mode first time when you move to the Management of Officer Setup live screen. • The [LOCK] lamp indicates Setting Method whether the keys are locked. Use one of the following methods to •... - Page 39 Administrator Setup (continued) Connection of Radar Use this function to specify the radar Connection of GPS gun connection port. Use this function to specify the GPS VPU : when connected to the Memory connection port. Card Video Recorder VPU : when connected to the Memory OFF : when not connected Card Video Recorder Notes:...
-
Page 40: File Management
Administrator Setup (continued) Rec Start Information Delete All Files Use this function to delete all video Own Speed and audio data files on the Memory Use this function to set the speed Card Video Recorder. Select of your own vehicle at the start of “Delete”... -
Page 41: Auto Maintenance
Administrator Setup (continued) Notes: Auto Maintenance • To start recording immediately after During continuous operation, the the end of auto maintenance, set Memory Card Video Recorder restarts, power ON recording to “ON”. checks files and frees memory at regular • When auto maintenance is completed, intervals to maintain system health. - Page 42 Administrator Setup (continued) Auto Maintenance Next Maintenance Day This function shows the date for the Operation next auto maintenance operation. Use this function to turn auto The set Operation, Interval, Day maintenance on or off. and Time appear at the bottom of Setting : ON/OFF the screen.
-
Page 43: Service
Administrator Setup (continued) Version Up Service For details on obtaining version AG-CPD15 Operating Time upgrade files, consult your supplier. Use this function to view the Make sure to use a computer operating time of the Memory Card beforehand to save the version Video Recorder. -
Page 44: Menu List
Menu List Use menus provided by this unit to set up and adjust the Memory Card Video Recorder. When the [MENU] button is pressed while recording is being stopped in the live screen • Menu top screen Camera (see page 20) Menu Auto Focus (ENTER) Camera... -
Page 45: Menu Screen
Menu List (continued) When the [MENU] button is pressed while the live screen is being recorded • Menu top screen Camera (see page 20) Menu Auto Focus (ENTER) Camera Audio Manual Focus Setup/Info AE[-2 -- +2] Setup/Info Audio (see page 21) (see pages 16, 17, 18, 20, 21, 30, 31) Audio Setup/Info... - Page 46 Menu List (continued) When the [MENU] button is pressed in the playback screen • Menu top screen Archive (see page 27) Menu File List [1/4] Archive 2006-08-21 14:18:56 Audio 2006-08-21 14:27:32 Setup/Info 2006-08-21 15:49:04 Restore 2006-08-21 16:00:04 2006-08-21 20:17:46 2006-08-22 20:17:58 2006-08-22 12:51:37 2006-08-22 17:42:08 ENTER...
- Page 47 Menu List (continued) When the [MENU] button is pressed in the “Archive” screen, Officer Setup top screen, Setup/Admin top screen or during a “Restore” operation Menu Archive (see page 27) Archive Setup/Info File List [1/4] Restore 2006-08-21 14:18:56 2006-08-21 14:27:32 Restore (see page 29) 2006-08-21 15:49:04 Restore...
- Page 48 Menu List (continued) When the [MENU] button is pressed in the Officer Setup top screen during recording Menu Setup/Info Setup/Info Officer (see page 48) (see pages 16, 17, 18, 31) The Officer setup top screen appears. Setup/Info Officer Admin (see pages 49 - 51) Admin The Setup/Admin top screen appears.
- Page 49 Menu List (continued) • Setup/Admin top screen (1)-1 Rec/Play (see pages 32 - 34) (see page 31) Rec/Play [1/3] Setup/Admin [1/2] PowerOff Time 120 min Init Camera Select Rec/Play Init Audio2 In Select INCAR Programed Rec PowerOn Rec Date/Time Loop Rec Registration Trigger Resolution / RecRate...
- Page 50 Menu List (continued) • Setup/Admin top screen (1)-2 Registration (see page 35) (see page 31) Registration Setup/Admin [1/2] Load Admin Rec/Play List Admin Programed Rec Load Officer Date/Time Registration List Officer Trigger Camera Management Mode Trigger (see page 36) Trigger Management Mode (see page 38) GPIO Management Mode...
-
Page 51: Auto Maintenance
Menu List (continued) • Setup/Admin top screen (2) Radar/GPS (see pages 38, 39) (see page 31) Radar/GPS [1/2] Setup/Admin [2/2] Radar Model : ProLaser3 Baud Rate 4800 Radar/GPS Bit Length 8 bit File Management Stop Bit 1 bit Auto Maintenance Parity Service Model Select... -
Page 52: Lamp Indications And Memory Card Video Recorder Status
Lamp Indications and Memory Card Video Recorder Status This table shows the relationship between lamp Lit/Unlit/blinking states and the Memory Card Video Recorder’s operating status. : Lit : Normal blinking : Unlit : Fast blinking (about three times/sec) : Blinking consisting of short off intervals combined with long on intervals Indicator Lamp Memory Card Video Recorder Status READY... -
Page 53: Troubleshooting
Troubleshooting Before requesting service, check the points listed below. If the problem persists, contact your supplier. Starting up Symptom Remedy Power does not come on. • Make sure the control panel cable is connected properly. Power gets turned off • If you have set the PowerOff Time (see page 32) and are running the recorder with the ignition automatically. - Page 54 Troubleshooting (continued) Recording Symptom Remedy Cannot start recording. • Check if the P2 card slots of the Memory Card Video Recorder contain a P2 card. • Make sure the P2 card slot cover on the Memory Card Video Recorder is closed. •...
-
Page 55: Error Messages
Error Messages Message Measure E02431 DSP error. Reproduction and Wait until the error message is cleared. record cannot be performed. Call your supplier if the message does E02432 not clear after about a minute. E02440 System error Couldn’t format P2 cards. Insert another P2 card. - Page 56 Error messages (continued) Message Measure E20801 The recorder reboots by unrecoverable card ejection error. Be sure to use the correct procedure to remove and load P2 cards. E20802 The recorder reboots by unrecoverable card insertion error. E20803 Card is not ready. Check the P2 card and re-insert it, or Please try to reinsert the card, reboot the Memory Card Video Recorder.
- Page 57 Error messages (continued) Message Measure E28403 Media error. Replace the P2 card or the USB Export incompleted. memory device. E28404 USB storage file system error. Couldn’t start export. Replace the USB memory device. E28405 USB storage write error. Export incompleted. E28406 Found update file in USB Delete the update file on the USB storages.
-
Page 58: Status Display
Status Display The Status Display shows messages about the operating status of the P2 card and Memory Card Video Recorder. Take action as appropriate for displayed error messages. Status Display Measure CARD FULL There is no more space on the P2 card. Either replace it with one having available space, or clear some space on the existing card. -
Page 59: Specifications
Specifications Power supply : 12 V DC Input current : 0.4 A indicates safety information. Ambient operating : 0 °C to 45 °C (32 °F to 113 °F) temperature Ambient operating : 10 % to 80 % (no condensation) humidity Weight : 500 g (1.10 lb) Dimensions... -
Page 60: Limited Warranty
It does not cover damage which occurs in shipment or failures which are caused by products not supplied by Panasonic, or failures which result from alteration, accident, misuse, introduction of liquid or other foreign matter into the unit, abuse, neglect,... - Page 61 MEMO...
- Page 62 MEMO...
- Page 63 MEMO...
- Page 64 Panasonic Computer Solutions Company 50 Meadowlands Parkway, Panazip 2F-5, Secaucus, NJ 07094 c 2006 Matsushita Electric Industrial Co., Ltd. All Rights Reserved.