Table of Contents

Related Manuals for Miele KWL 4712 SG ed


Summary of Contents for Miele KWL 4712 SG ed
- Page 1 Operating and installation instructions Wine storage unit KWL 4712 SG ed KWL 4912 SG ed en - GB, HK To avoid the risk of accidents or damage to the appliance, it is essential to read these instructions before it is installed and used for the first time.
-
Page 2: Table Of Contents
Miele{home ........ - Page 3 Contents Cleaning and care ..........23 Cleaning the outer casing, the door, the interior and accessories .
-
Page 4: Description Of The Appliance
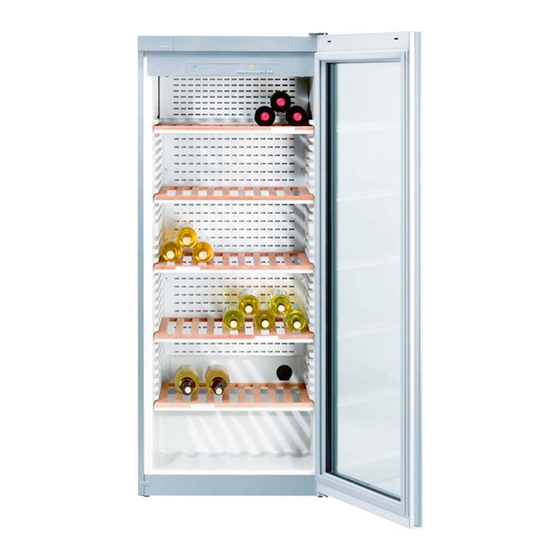
Description of the appliance a Safety lock indicator light e Temperature selector buttons (+ for warmer; – for colder) b Constant humidity (Dynamic cooling) indicator light f Interior lighting button and indicator light c On/Off button g Alarm off button d Temperature display... - Page 5 Description of the appliance a Door lock b Interior lighting c Wooden shelf with shelf edge trim for descriptive labels d Glass door with UV filter e Handle f Condensate channel and drain hole g Active charcoal filter Important! In tropical areas with temperatures over 38°C and a humidity level greater than 70%, the appliance may only be used in air conditioned rooms.
-
Page 6: Miele{Home
For example, if a temperature alarm, power cut or other fault message occurs, this information will be relayed directly to the Miele|home system. You will need a Miele|home master appliance (e.g. the Miele|home InfoControl) and your appliance must be fitted with Communication module (XKM 2000 KF) to benefit from this feature. -
Page 7: Caring For The Environment
Caring for the environment Disposal of the packing Disposal of your old appliance material Electrical and electronic appliances often contain materials which, if The transport and protective packing handled or disposed of incorrectly, has been selected from materials which could be potentially hazardous to are environmentally friendly for human health and to the environment. -
Page 8: Warning And Safety Instructions
Warning and Safety instructions Correct application This appliance complies with all This appliance is intended for relevant legal safety requirements. domestic use only for storing wine. Improper use can, however, present Any other usage is not supported by a risk of both personal injury and the manufacturer and could be material damage. -
Page 9: Technical Safety
Warning and Safety instructions Technical safety The more coolant there is in an appliance, the larger the room it should Before setting up the appliance, be installed in. In the event of a check it for any externally visible leakage, if the appliance is in a small damage. - Page 10 It is most important Faulty components must only be that this basic safety requirement is replaced by genuine Miele original present and tested regularly, and spare parts. The manufacturer can only guarantee the safety of the appliance...
- Page 11 Warning and Safety instructions Disposing of your old The appliance is designed for use within certain climate ranges (ambient appliance temperatures), and should not be used Before disposing of an old outside this range. The climate range appliance, first make the door latch or for your appliance is stated on the data lock unusable.
-
Page 12: Switching On And Off
The safety lock can be activated to suitable stainless steel conditioning prevent the appliance being switched agent (available from off inadvertently. www.miele-shop.com). Activating or de-activating the safety Important: Stainless steel conditioner lock gives long lasting protection, and helps to prevent resoiling. -
Page 13: Switching Off For Longer Periods Of Time
Switching on and off Switching off for longer ^ Press the interior lighting button to save the setting. periods of time The safety lock indicator light will If the appliance is not going to be used light up when the safety lock has been for a longer period of time, e.g. -
Page 14: The Optimum Temperature And Humidity
The optimum temperature and humidity Wine keeps on maturing depending on Safety features the surrounding conditions. The length A thermostat prevents the temperature of time for which wine can be kept in in the wine storage unit falling below good condition will therefore depend 2°C. -
Page 15: Temperature Range
The optimum temperature and humidity Temperature range Temperature display brightness The temperature can be adjusted from The appliance is supplied with the 5°C to 20°C. temperature display set on maximum brightness. Temperature display The level of brightness can be adjusted: During normal operation, the temperature display on the control panel shows the temperature inside the... -
Page 16: Humidity Level
The optimum temperature and humidity Constant humidity (Dynamic cooling) button m Dynamic cooling raises the relative humidity inside the wine storage unit ^ Press the On/Off button to come out and distributes the humidity and the of the setting mode. temperature evenly around the interior so that you can store all your wine If you do not do this the electronics... -
Page 17: Switching Off Dynamic Cooling
"Cleaning and care"). These are ^ To switch it off, press the alarm off available from your Miele Dealer or button and the interior lighting button the Miele Spare Parts Department. at the same time. -
Page 18: Interior Lighting
Interior lighting The interior lighting can be switched on Switching off the interior lighting to display your wine to its best effect ^ Press the interior lighting button. The when the door is shut, indicator light will go out The use of LED lighting avoids any The interior lighting will now only come damage to the wine due to heat or UV on when the door is opened. -
Page 19: Storing Wine Bottles
Additional labels can be purchased from your Miele Dealer or the Miele Additional bottle presenters are Spare Parts Department. available from the Miele Spare Parts Department. -
Page 20: Door Lock
Storing wine bottles Door lock You can lock the door of the wine storage unit to prevent it being opened without your knowledge. ^ Insert the key into the door lock. ^ Press it down and turn it 90° until the door lock engages. -
Page 21: Alarm
Alarm Activating the alarm system Your appliance is fitted with a warning system which ensures that the The alarm system is always active. It temperature cannot rise or fall does not have to be switched on unnoticed and impair the wine. manually. -
Page 22: Defrosting
Defrosting Condensate and frost can build up on the back wall of the appliance whilst it is in use. These are automatically defrosted and removed by the appliance. The condensate is drained away via a channel and drain hole into an evaporation system at the back of the appliance. -
Page 23: Cleaning And Care
Cleaning and care Before cleaning A range of Miele branded cleaning ^ Switch the appliance off at the wall and condtiioning products is socket and remove the plug. available from the Miele Spare Parts ^ Take out any removable parts, e.g. -
Page 24: Ventilation Gaps
Replace the active charcoal filter with a cleaned regularly with a brush or new one once a year. Active charcoal vacuum cleaner. A build-up of dust filters are available from your Miele will increase the energy consumption Dealer or the Miele Spare Parts of the appliance. -
Page 25: Problem Solving Guide
If it has, contact the Miele . . . "F1" appears in the temperature Service Department. display. There is a fault. Call the Miele Service . . . the appliance is switching in too Department. frequently and for too long. - Page 26 If the door has been open for less than 15 minutes, then there is a fault. Call the Miele Service Department. Do not remove the light cover. Should the cover be damaged or need to be removed due to damage, exercise caution.
-
Page 27: Noises
Noises Normal noises What causes them Humming noise made by the motor (compressor). This noise can Brrrrr... get louder for brief periods when the motor is switching on. Blubb, blubb..A gurgling noise can be heard when coolant is circulating through the pipes. -
Page 28: How To Save Energy
How to save energy Normal energy Increased energy consumption consumption Installation site In a ventilated room. In an enclosed, unventilated room. Protected from direct sunlight. In direct sunlight. Not situated near to a heat source Situated near to a heat source (radiator, oven). -
Page 29: After Sales / Guarantee
– your Miele Dealer – Miele (see back cover for contact details). When contacting your Dealer or Miele, please quote the model and serial number of your appliance. This information is given on the data plate inside your appliance. -
Page 30: Electrical Connection
Electrical connection Electrical connection U.K. Non-rewireable plugs (BS 1363) All electrical work should be carried out The fuse cover must be re-fitted when by a suitably qualified and competent changing the fuse, and if the fuse cover person in strict accordance with current is lost, the plug must not be used until a local and national safety (BS 7671 in suitable replacement is obtained. -
Page 31: Installation
Please ensure that doors are closing and sealing properly. Please ensure that the appliance is installed in accordance with these installation instructions and that the handle is fitted correctly. Should you require further assistance please contact your Miele customer service centre. -
Page 32: Installation
Installation Installation ^ Remove any cable clips from the back of the appliance. ^ Check that all parts at the back of the appliance are unhindered. Carefully remove any hindrance. ^ Carefully push the appliance into position. Aligning the appliance ^ To align the appliance adjust the feet using the spanner supplied. -
Page 33: Changing The Door Hinging
Changing the door hinging The appliance is supplied right hand Caution. hinged. If left hand door hinging is The door is very heavy. required, follow the instructions below. ^ Raise the door, open it outwards and We recommend that the remove it carefully. - Page 34 Changing the door hinging ^ Remove cover o from the top of the appliance door. ^ Place the door on upper hinge pin k. ^ Swing the door slowly inwards so that lower hinge pin g fits into the guide on hinge bracket b.
- Page 35 Changing the door hinging Changing over the door lock: ^ Open the appliance door. ^ Remove the key from the door lock. ^ Hold the lock mounting in your hand as shown. ^ Press the lock down and turn it 90° as far as it will go.
- Page 36 Alteration rights reserved / 4209 M.-Nr. 07 059 190 / 03 KWL 4712 SG ed, KWL 4912 SG ed...