Philips MX3950D Owner's Manual
Dvd video digital surround system
Hide thumbs
Also See for MX3950D:
- Manual (44 pages) ,
- Specifications (2 pages) ,
- Service manual (128 pages)
Table of Contents
Need help? Call us!
Phitips representatlves
are ready to help you with
any questions about your new product.We
can guide you
through Connections, First-tlme Setup, or any of the Features.
We want you to start enjoying your new product right away!
CALL US BEFORE YOU CONSIDER
RETURNING
THE PRODUCT!
1-800-531-0039
or
Visit us on the web at www.philips.com
MX3900D
MX3950D
PHILIPS
pg 001 044 MX39 37 Engl
1
2/25/03, 10:32 AM 3139
115 21993
Table of Contents

Related Manuals for Philips MX3950D


Summary of Contents for Philips MX3950D
- Page 1 Connections, First-tlme Setup, or any of the Features. We want you to start enjoying your new product right away! CALL US BEFORE YOU CONSIDER RETURNING THE PRODUCT! 1-800-531-0039 Visit us on the web at www.philips.com MX3900D MX3950D PHILIPS 115 21993 pg 001 044 MX39 37 Engl...
- Page 2 CAUTION Canada Use of controls or adjustments or English: performance of procedures other This digital apparatus does not exceed the Class B limits for" radio noise than herein may result in hazardous emissions from digital apparatus as set radiation exposure or other unsafe out in the Radio Interference...
-
Page 3: Using An Accessory Rf Modulator
_> <_ <,_ _> 7/8_@ @@ _¢ _ _4 @<16 _ .._(_(_d_ _OC C _0__i CD (]D _ ,T @ _--® PHILIPS 115 219£3 pg 001 044 Mx3g 37 Engl 2/25/03, 10:32 AM 3139... -
Page 4: Step 4: Connect Ng Fm/Am Antennas
• Once your Philips purchase is registered, • So complete and return the Warranty you're eligible to receive all the privileges Registration Card enclosed with your of owning a Philips product. purchase at once, and take advantage of these important benefits. -
Page 5: Connect Ng Avcr Or Cable/Satellite Box I 5 View Ng And Listen Ng To The Playback
As a member of the Philips "family" you're entitled to protection by one of the most comprehensive warranties and outstanding service networks in the industry. -
Page 6: Playing Np3/Picture Dsc (K_Dsk, Jpeg)
IMPORTANT SAFETY INSTRUCTIONS 1. Read these instructions. |2._ Use only with the cart, sland, tripod, bracket, or table specified Keep these instructions. by the manulacturer or sold with Heed all warnings. the apparatus,When a cart is used, use caution when moving 4. - Page 7 Index English Fran_ais Espafiol Environmental information This system complies with the FCC rules, Part 15 and with 21 CFR 1040.10. All unnecessa_"y packaginghas been omitted We Operation is subject to the following have tried to make the packagingeasy to conditions: separate intothree materials:cardboard (box), This device may not cause harmful...
-
Page 8: Table Of Contents
Contents General Information Disc Operations S pplied accessories............Playable discs ..............Care and safc_yinforrra_ on ........Playing discs ................ Turning on/off auto Eco standby mode Using the Disc Menu ............ Connections Basic playback coPtro s ..........Step 1: Pacng the speakurs and subwoofur. Resuming p}aybscl<... - Page 9 Contents Timer Operations Set_ ng the tmer .............. Activ_ing/Deactiv_ing the timer ....3 6 Se_ing the Sleep timer ..........Sound and Volume Controls Sound Control ..............Selectingsurround sound ........_ming on/off clear voice e_ct ...... Changing subwoofer volume level....38 Adjusting Bass/Treblelevel........
-
Page 10: General Information
General Information Supplied accessories Care and safety information Avoid high temperatures, moisture, Bpeakercables water dust Do -_ot expose the system, batteries or c!scs to hhJmidit_4rair, sand or excessive heat (cahJsed by -_eatir g equJprnerlt or direct sunlight) Aways Subwoofer cab e keep the disc tray dosed to avoid gett -_gdust or] the le-_s Add O cab _... -
Page 11: Connections
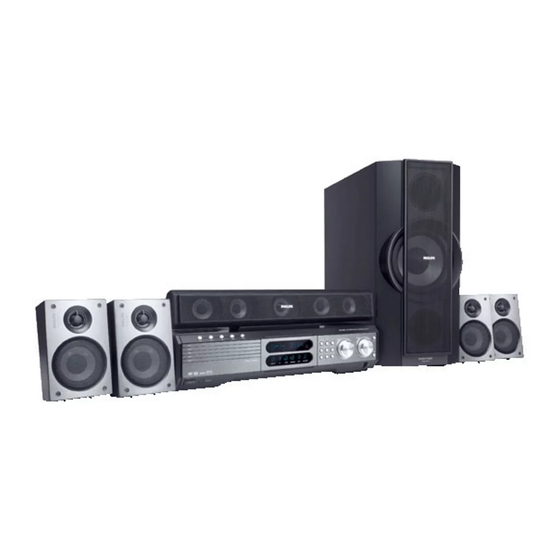
Connections Step 1: Placing the speakers Step 2: Connecting speakers and subwoofer and subwoofer Front SDeake_ tLe&l Center &rid Fron_ Si)e_Ker sysoem (Right:) Surround Subwoofer Surround Speaker (Left) Speake_(Right) For bes_ possible sub-round sound, all the Connect the supp led speaker" systems using the speakers (excep: subwoofer) should be placed... -
Page 12: Step 2: Connect Ng Speakers And Subwoofer 1I Step 3: Connect Ngtv
Connections Step 3: ConnectingTV ,®®®, IMPORTANT! IMPORTANT! If both S-Video and Component You only need to make one video (Pr PbY)Video connections are used to connection from the following options, connect to yourTV, the video signal will depending on the capabilities of yourTV automatically switch to S-Video when... -
Page 13: Using Component Video Jack (Pr Pb Y)12 Using Svdc_ Jack
29. view the DVD playback on theTV. your electronics retailer or contact Philips for details on RF modulator availability and operations. Use the S video cable (not supp} ed) to connect the DVD systerr,'s S-VIDEO jack to the S Video input jack (or labeled asY/C o¢... -
Page 14: Step 5: Connect Ng The Power Cord
Connections Step 5: Connecting the power Step 4: Connecting FM/AM cord antennas Power- Outlet Connect the supp led AM loop antenna to the After everything is connected properly, plug in theAC power cord to jack Pace the Aid loop antenna on a shel or attach t to a stand or wall the power outlet. -
Page 15: Connections (Optional)
Connections (optional) Connecting aVCR or Connecting digital audio Cable/Satellite equipment .®9®. VCR or Cable/Sateflite Box CDRecorder Connect the VCR or CaMe/Satellite Box to the Connect the DVD system's DIGITAL IN ack TV as shown to the DIGITAL jack o_ a digital audio devce Connect the DVD system's AUX... -
Page 16: Functional Overview
Functional Overview (illustrations on page 3) Main unit and remote control SEATING (only available in Muki channel mode) STANDBY Turns on/off the seating control diagram on the Use theVOLUME control on the man unt Switches to Eco Puwer standby mode or turns on tile sTstem (see page/39) or jogstick on the remote... -
Page 17: Control But*Ors Available On The Remote Ony
Functional Overview (s_ DISC MENU Enters or exits disc co_,ter,ts menu (see pa R 23) (DVD rhode only) (11 SYSTEM MENU ForVCD version 2.0 only; Enters or exits system setup men In stop mode, turns on/off playback control (see pages 272@ (PBC) mode. -
Page 18: Getting Started
Getting Started Step 1: Inserting batteries into Step 2: Setting the clock the remote control The dock can be set ir_either 12hour 24 hour mode C 12DO FI.." example) buttons on DVD system's front panel display panel FT Cl nc , n}_ Open the battery compartment Insert two batter es type R06 or AA, following the indications... -
Page 19: Step 3: Sett Ng The Tv
) Turn on theTV and set to the correct video4n channel should see the blue Philips DVD backsround screen on theTV @ Usually this channel s between the owest and I%hest channels and may be called FRONT... -
Page 20: Step 4: Selecting Speaker Layer1
Getting Started Step 4: Selecting speaker layout Normally the best sound spot and the ideal setting position is in the middle of the room With th s 'SEATING' feature, it allows you to select the current seating posit on in the room and the speaker setting will automatically adjusted for oplmum pel#ormance. -
Page 21: Setting The Speakers' Channels
Getting Started Step 5: Setting language preference You can adjust the dela 7 times (cepter surround only) and voume evel fur indvidual Tou cars select your proferred language settings speakers These adjustments et you optimize so that this DVD system wll automatically the sound accord ng to your surroundings switch to the language for you whenever setup... -
Page 22: Disc Operations
Video In channe (See page 19"Setting TV".) Your home cinema system will @ Yo should see the blue Philips DVD play: backgro nd screen on theTV DigitaIVideo Dscs/DVDs) Video CDs (VCDs) Press one of the OPEN*CLOSE iA but*on to SuperVideo... -
Page 23: Turning On/Off Auto Eco Standby Mode
Disc Operations Basic playback controls Ths s a power saving feature, the system will Pausing playback automatically switch to Eco standby mode if you Press • II do not press any but-arts within 30 min_les '_ To resume normal p ayback_ press • II after a dsc has stopped playing _ain... -
Page 24: Select Ng Vanous Rnpea: Functions
Disc Operations Program favorite tracks (audio Selecting various repeat functions CDs and VCDs) You can play the conter,ts of the ds, in the order you want by pro%amming the order of the tracks to be payed Up to 99 tracks can be While paying a disc, press REPEAT to select : sto_-ed... -
Page 25: (Audio Cds Andvcds)
Disc Operations @Press I_l_l, then u se t he numeric keypad Using the menu bar to program (0-9) to enter the disc numben 4 "_TSE x" appears IMPORTANT! You have to turn on yourTV and set to @ PressIDq_ then use the numeric keypad the correctVideo In channel. -
Page 26: Program Np3 Disc
Disc Operations In stop mode, you can; Playing MP3/Picture disc (Kodak, Use the joystick (< • • T) on the remo:e JPEG) move withn the men and press OK to select the desired file to pay IMPORTANT! You have to turn on yourTV and set to In picture menH, yoH can Hse the joystick... -
Page 27: Using The Menu Bat
Menu Options SUBTITLE Using the menu Select a subtide langu_e available on the DVD You can continue a number of operations AUDIO d rectly va the multiple menu bars on theTV DVD : Select an audio soundtraek language available on d_e DVD. screen wChout interruptin£... -
Page 28: Using The Setup ]4Er, U
Menu Options Using Setup Menu The format you select must be available on the This DVD setl_pis carried out via theTV, enablingyou to c stomize the DVD system to dsc. If it is not, the setting furTV Shape wll not suit your particular req _-ements. -
Page 29: Set_ Ng The Video Output
Menu Options Set Analog Output to match your DVD home Set theVideo Output according to your vdeo connection cinema system's playback capabilty This f_nction can also be accessed via the SURR Stop p ayback,then fulow the steps of"Using but-on on the remote control (or SURROUND the Setup Menu"... -
Page 30: Set; Ng The Digital Otp_
Menu Options Set D gital Output according to your optional Set your PCM (Pulse Code Modu}ation) outpc¢ audio equipment connections only after- you have set the system's Digital Follow the steps of"Using the Setup Menu" and Output to 'PCM only' (See "Setting the digital select : output") -
Page 31: Night Mode Turning Or,/Off
Menu Options Follow the steps of"Using the Setup Menu" and Follow the steps of"Using the Setup Menu" and select : select : Night Mode " Defaults Reset Select this when you want to enjoy the Pressir_g • on the remo_e will restore all the surround sound with... - Page 32 Menu Options ® Use the numeric keypad (0-9) to enter '1234' (default password) when you are asked to enter the fou digit password Yu will have to (only available in region I players) enter the same code, exactly twce Some DVDs may have a parental level assigned '_ To change the password, see page 33 to the complete disc or to certain scenes on the...
-
Page 33: Dvd Menu Options
Menu Options Use the numeric keypad (0-9) to enter >,or original fou_dist password at"Enter code" You can changethe fuur digit password used fur '@ If you are askud to enter the code for the Parental Control. The default password is'1234' first time, kuy in '1234' '@ If you fur'get your password, press •... -
Page 34: Tuner Operations Tunng To Radio Stations
Tuner Operations IMPORTANT! Presetting radio stations Make sure the FM and AM antennas You carqstore up to 40 preset radio stations b, connected. - TheTUNING button on the front the memor_ starting from FM and followed by AM bands panel is used to toggle between frequency tuning and preset tuning. -
Page 35: Automatic Presettuyg
Tuner Operations You can choose to store only 7our favodte radio You can s_arT the automat C pt esettlng f_-om a stations se coted pt esc_ numbel: In tuner mode, press PROGRAM (or PROG on the fiur,t pane) ,o o _'_e-s-c --@ Press •... -
Page 36: Timer Operations
Timer Operations Press CLOCK*TIMER agan To store the Setting timer settin£ The system can switch on to DISC orTUNER @ Once the timer is set, it will always swtch mode automatically at a preset time, serv% as unless y* deactivate an alarm to wake you up @ _) icon wll remain on the disp}ay panel ind cater the timer- s activated... -
Page 37: Se_Ing The Sleep Timer
Timer Operations Setting Sleep timer The sleep timer enables the system to switcl, to Eco Power s_andbymode alcott aticallyat a prese_time Press SLEEP on the remote repeatedly ur,til t reaches the desired preset turn offtime @ T_e select ons are as follows (time in mlr utes): rM'f _... -
Page 38: Sound And Volume Controls
Sound andVolume Controls Sound Control The BASS (low To_,e) andTREBLE (high tone) IMPORTANT! features enable you to define the sound For proper surround sound, make sure p -ocessor settings. the speakers and subwoofer are connected (see page t 1.) Press BASS or TREBLE '_ The level ind cater appears Within... -
Page 39: Other Functions
Other Functions Switching on/off Recording external device Connect t_e external rccor-d ng device to LINE or DIGITAL @ Adjust tk_eSOURCE control to selec_: (See page 15 "Connections-optional" DISC 1,,,,DISC S_ FMTUNER Select the sorce to record f'-om your DVD AM TUNER _ TV/AV _ AUX _ DIG IN system (DISC,TUNER, TV/AV orAUX/DI) -
Page 40: Troubleshooting
Troubleshooting WARNING Under no circumstances should you try to repair the system yourself, as this will invalidate the warranty. Do not open the system as there is a risk of electric shock. If a fault occurs, first check the points listed below before... - Page 41 Troubleshooting The DVD player does not start playback. _£_ _ _aaaD[n a_sc wLm _ne DlaVO_C_ _aQ I_C ng aown see b0Lte 221 Chnck foe disc EVDe CO[OFSYstem anG F_lOn CO_e See OC_e 22) Chnck for ar scratcncs or sm<_oees c _r:e also Press SYgl E _EFUP to mrn...
-
Page 42: Specifications
Specifications MAIN UNIT AMPLIFIER SECTION /20V/60 500W IbtJ power Power Supply Rating Output power I 85WRHS/ Consumption /S0W Stereo mode (DIN) Power" 2 x 60 W FlC 435 mm × 100 mm x 360 mm Dimensions (w x h x d) 85 W RMS/channel Sun'ound mode... -
Page 43: Glossary
Glossary Sound that has not been turned into Multichannel: is specified to have each sound I_ck constitute one sound field¸ Multichannel refers to numbers Analog sound vares while digi al sound specific numerical values¸ [hese jacks send audio a structure of sound tradPage 44: Limited Warranty
Philips, P.O. Box 520890, Miami, FL 33152, USA, (402) 536-4171 EL4965E007 / 8-02 3139 115 21993 pg 001 044 MX39 37 Engl 2/25/03, 9:59AM...- Page 45 PHILIPS 12no 339 /IL_ 22042 Pall ted il (hina Use this simple and quick way to watch your favorite DVD movie and enjoy your Home Cinema experience! MX3900D .A4X3950D FrontSpeaker FrontSpeaker (Right) (Le_) FM Antenna CenterSpeaker AM Antenna Helpful Hints...
- Page 46 In mode. You should see the blue Philips ©V© background screen on the_ (if no disc in the ©V© system) Usually this channel is between the lowest and highest channels and may be called FRONT, A/V IN, or...
- Page 47 Turn your Living Room into a Digital Home Theater - just add your TV Clear width & depth in sound • ,,,r-,7 r-,,I,F-,, _r,r-,l_,-rl ,i,_'3 ,,_,l _,,_,_ jlr-r ,,_' Improved voice quality • T_j,' Ljr- _,, ,_-,, i, _,7 ,','' Enjoy perfect sound anywhere Deep &...
- Page 48 S DVD/CD Home Entertainment System standard product information connections • 5 Disc Changer • Audio input: • PlaysCD, CD-RW, MP3-CD_,VCD, DVD, - analog :AUX,TV in (cinch) Seating Control DVD+R/RW, Picture CD (Kodak, jPEG) • digital : 1 x optical Seat#lg Control gwes you: •...