Table of Contents
Available languages
Available languages
Quick Links
Table of Contents

Related Manuals for Sharp AN-C41MZ


Summary of Contents for Sharp AN-C41MZ
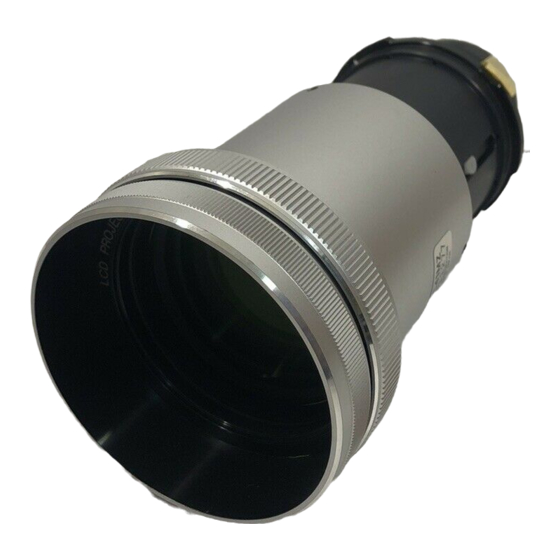
- Page 1 English Deutsch AN-C41MZ Français Español Tele-zoom lens for LCD projector Tele-zoomobjektiv für LCD-Projektor Téléobjectif-zoom pour projecteur LCD Objetivo telefoto-zoom para proyector LCD INSTALLATION MANUAL INSTALLATIONSHANDBUCH MANUEL D’INSTALLATION MANUAL DE INSTALACIÓN...
-
Page 2: Changing The Lens
Changing the Lens When changing the lens, use the supplied lens cover stick. Info • Before changing the lens turn off the power to the projector and remove the power cord from the wall outlet. • Do not attempt to change the lens while the projector is mounted on the ceiling. Upper half of the Pull out the carrying handle. - Page 3 Tab holes B First insert tabs a a of the lens cover into tab holes A A of the projector, then push tabs b into tab holes B B until it clicks into place. Push in the carrying handle. Tabs b Tab holes A Tabs a Remove the cap from the back of the lens.
- Page 4 Adjust the picture size and focus Zoom ring Turn the zoom ring to adjust picture size. Turn the focus ring to adjust the focus. Focus ring Picture size and projection distance chart Base line: Horizontal line passing through Screen the lens center Lens center L : Projection distance NORMAL Mode (4:3)
-
Page 5: Handling Precautions
Handling Precautions G Do not disassemble this lens. Please refer to your authorized dealer for any maintenance and inspections requiring an open cabinet. G Except for the lens fastener catch tab, touching any other internal part could cause personal injury or machine malfunction. G Do not touch any glass or protruding part of the lens. - Page 6 Objektiv austauschen Verwenden Sie für den Austausch des Objektivs den beiliegenden Objektivabdeckungsstab. Info • Schalten Sie die Stromversorgung zum Projektor aus und ziehen Sie das Netzkabel aus der Netzsteckdose heraus, bevor das Objektiv abgenommen wird. • Versuchen Sie nicht, das Objektiv abzunehmen, während der Projektor noch an der Decke installiert ist. Obere Hälfte der Ziehen Sie den Tragegriff heraus.
- Page 7 Sperrzungenöffnungen B Setzen Sie zuerst die Sperrzungen a a der Objektivabdeckung in die Zungenöffnungen A des Projektors ein, drücken Sie dann die b in die ZungenöffnungenB Sperrzungenb bis diese einrasten. Schieben Sie den Tragegriff ein. Sperrzungen b Sperrzungenöffnungen A Sperrzungen a Entfernen Sie die von der Objektiv- Rückseite.
- Page 8 Einstellen von Bildformat und Fokus Zoomring Drehen Sie den Zoomring, um das Bildformat einzustellen. Drehen Sie den Fokusring, um den Fokus einzustellen. Fokusring Tabelle für Bildformat und Projektionsentfernung Grundlinie: Horizontale Linie, die die Bildwand Objektivmitte passiert. Objektivmitte L: Projektionsabstand NORMAL Modus (4:3) Bildgröße (Bildwandgröße) Projektionsabstand [L] Abstand von der Objektivmitte...
-
Page 9: Vorsichtsmaßnahmen Bei Der Handhabung
Vorsichtsmaßnahmen bei der Handhabung G Bauen Sie das Objektiv nicht auseinander. Wenden Sie sich bitte für Wartungs- und Inspektionsarbeiten, bei denen das Gehäuse abgenommen werden muss, an Ihren autorisierten Händler. G Wenn ein inneres Teil außer des Objektivbefestigung-Sperrzunge berührt wird, können Verletzungen oder Gerätefehlfunktionen verursacht werden. - Page 10 Changement d’objectif Lors du changement d’objectif, utiliser la baguette de cache-objectif fournie. Info • Avant de changer l’objectif, éteindre le projecteur et retirer le cordon d’alimentation de la prise murale. • Ne pas essayer de changer l’objectif pednant que le projecteur est monté au plafond. Moitié...
- Page 11 Insérer d’abord les languettes a a du cache- objectif dans les trous de languette A A du projecteur, ensuite enfoncer les languettes b dans les trous de languette B B jusqu’à ce qu’elles s’emboîtent en place. Enfoncer la poignée de transport. Retirez le cache de l’arrière de l’objectif.
- Page 12 Ajuster la taille et la mise au point de l’image Bague de zoom Tourner la bague de zoom pour ajuster la taille de l’image. Tourner la bague de mise au point pour ajuster la mise au point. Bague de mise au point Format de l’écran et distance de projection Ligne de base : Ligne horizontale passant par...
-
Page 13: Précautions De Manipulation
Précautions de manipulation G Ne pas démonter cet objectif. Prendre contact avec votre revenfeur agréé pour les travaux de maintenance et de contrôle nécessitant l’ouverture du boîtier. G Excepté pour la languette d’arrêt de la bague de fixation d’objectif, le contact avec toute autre pièce interne pourrait provoquer des blessures corporelles ou un mauvais fonctionnement de l’appareil. - Page 14 Cambio del objetivo Al cambiar el objetivo, use la varita suministrada con la cubierta del objetivo. Información • Antes de cambiar el objetivo, desconecte la alimentación del proyector y desenchufe el cable de alimentación de la toma de corriente mural. •...
- Page 15 Agujeros B Primero, introduzca las lengüetas a a de la cubierta del objetivo en los agujeros A A del proyector; luego, introduzca las lengüetas b en los agujeros B B , presionándolas hasta que encajen en posición. Lengüetas b Devuelva el asa de transporte a su posición Agujeros A original.
- Page 16 Ajuste el tamaño de la imagen Aro de zoom y el enfoque Gire el aro de zoom para ajustar el tamaño de la imagen. Gire el aro de enfoque para ajustar el enfoque. Aro de enfoque Tamaño de la pantalla y distancia de proyección Línea de base: Línea horizontal que pasa a Pantalla...
-
Page 17: Accesorios Suministrados
Precauciones G No desarme el objetivo. Para cualquier trabajo de mantenimiento o inspección que requiera de la apertura de la cubierta, consulte a un distribuidor autorizado. G Tocar cualquier pieza interna (excepto la lengüeta de sujeción del objetivo) puede ocasionar lesiones personales y mal funcionamiento de la máquina. G No toque ninguna pieza de cristal o parte saliente del objetivo. - Page 18 更換鏡頭 更換鏡頭時﹐請使用附帶的鏡頭蓋拆卸杆。 ∑ 在更換鏡頭前﹐先關掉投影機的電源﹐並從牆上插座拔下電源線。 ∑ 當投影機安裝在天花板上時﹐請勿嘗試更換鏡頭。 拉出攜帶把手。 鏡頭蓋的上半 部分 將鏡頭蓋向前拉的同時﹐用附帶的鏡頭蓋 拆卸杆的端頭將鏡頭蓋上半部分頂部的企 口往下推﹐用手將鏡頭蓋取下。 攜帶把手 要拆下鏡頭蓋的下半部分﹐請向着自己往 下拉。 鏡頭蓋的下 半部分 要拆下鏡頭﹐用一只手沿圖中的箭頭方向 鏡頭接圈鎖 轉動鏡頭接圈鎖扣凸起的同時﹐請用另一 扣凸起 只手抓住鏡頭﹐以防止鏡頭跌落。 ∑ 如果鏡頭接圈很難拆﹐請將附帶的鎖扣 釋放帶連接到鏡頭接圈的鎖扣凸起上﹐ 並拉動該帶使鏡頭接圈轉動。 拆下鏡頭。 松開難拆鏡頭接圈的步驟 鏡頭接圈鎖 鎖扣釋放帶 扣凸起...
- Page 19 先將鏡頭蓋的凸起 a 插入投影機的凸起孔 凸起孔 A 中﹐然后將凸起 b 推入凸起孔 B 中﹐ 直到喀嗒一聲到位為止。 推入攜帶把手。 凸起 凸起孔 凸起 從鏡頭後端取下蓋子。 確認鏡頭接圈上的兩個槽面朝上。 槽 鏡頭接圈 將鏡頭推入投影機時﹐要保証鏡頭座上的 兩個槽面朝上﹐並將鏡頭插入部分的銷插 入鏡頭座的孔中。 ∑ 務必將鏡頭完全推入投影機內。 銷 鏡頭座 孔 沿圖中箭頭所示的方向轉動鏡頭接圈鎖扣 凸起﹐直到停止為止。 ∑ 要小心﹐不要將鏡頭接圈擰的太緊﹐否 則下次更換鏡頭時鏡頭接圈很難拆。 將鏡頭蓋凸起的上半部分插入投影機的凸 凸起 起孔中后﹐向着投影機的方向滑動鏡頭 蓋﹐直到喀嗒一聲到位為止。 ∑ 如果鏡頭蓋的上半部分沒有固定到投影 機上﹐就無法打開投影機的電源。 凸起孔...
- Page 20 調節圖像大小及焦距 變焦環 轉動變焦環調節圖像大小。 轉動對焦環調節焦距。 聚焦環 圖像大小和投影距離圖表 基本線︰ 穿過鏡頭中心的水平線 投影屏幕 鏡頭中心 L︰投影距離 注 ∑ 上述公式有 ± 3% 的誤差。 ∑ 帶負號 (–) 的值表示鏡頭中心的距離低于投影屏幕的底部。...
- Page 21 操作注意事項 ● 請勿拆卸該鏡頭。 任何需要打開機殼的保養和檢查﹐請向授權的經銷商咨詢。 ● 除鏡頭接圈鎖扣凸起外﹐接觸任何其他的內部部件會引起人身傷害或引起機器故障。 ● 請勿觸摸鏡頭玻璃或凸起部件。這會引起人身傷害並降低投影機的性能。 ● 保養投影機時﹐應注意下列幾點。 ∑ 清潔鏡頭時﹐必須使用市售的氣吹或鏡頭清潔紙(用于清潔眼鏡和照相機)。 ∑ 鏡頭表面非常精密。請勿用硬的物體撞擊或摩擦。 注意 ● 存放或搬運投影機時﹐請勿將鏡頭安裝到投影機上。否則可能對其造成損壞。 隨機附件 ∑ 鏡頭蓋拆卸杆 1 根 ∑ 鎖扣釋放帶 1 根 ∑ 2 個鏡頭蓋(用于鏡頭兩端) ∑ 安裝說明書(本說明書) 投影機及鏡頭尺寸 單位︰mm(英寸) 333 - 337 (13 " - 13 ") 規格...
- Page 22 ∫ ∫ ∫...
- Page 23 ∫ ∫...
- Page 24 34.9m 114' 6" 24.7m 45.4cm 17 7/8" 609.6cm 457.2cm 28.9m 94'10" 20.5m 67' 2" 37.8cm 14 7/8" 381.0cm 508.0cm 23.1m 75'11" 16.4m 53' 9" 30.3cm 11 59/64" 406.4cm 304.8cm 17.4m 12.3m 40' 5" 22.7cm 8 15/16" 304.8cm 228.6cm 11.6m 38' 1" 8.2m 15.1cm 5 15/16"...
- Page 25 ∫ ∫ ∫ ∫ ∫ ∫ ∫ : mm 333 - 337 (13 " - 13 ")
- Page 26 Memo...
- Page 27 SHARP CORPORATION Printed in Japan Gedrukt in Japan Imprimé au Japon Improso en Japón 03P02-JM...