Table of Contents
Available languages
Available languages
F
owner's
manual
MODEL
NO.
113.176110
Serial
Number
Model and serial
numbers
may be
found on the drum
latch and top of motor
cover.
You should record
both model and serial
numbers
in a safe
place for future use.
AWARNING"
FOR YOUR
SAFETY,
READ ALL
INSTRUCTIONS
CAREFULLY
SAVE THIS
MANUAL
FOR FUTURE
REFERENCE
J
CRRFrSMRX
2.5
GALLON
WET/DRY
VAC
• safety
• assembly
• operation
• maintenance
• troubleshooting
• Espahol- pagina 13
Sears, Roebuck and Co., Hoffman Estates, IL 60179 U.S.A.
Part No. SP6771
Printed in China
Chapters
Table of Contents

Related Manuals for Craftsman 113.176110


Summary of Contents for Craftsman 113.176110
- Page 1 owner's manual MODEL 113.176110 Serial Number Model and serial numbers may be found on the drum latch and top of motor CRRFrSMRX cover. You should record both model and serial numbers in a safe place for future use. GALLON WET/DRY AWARNING"...
-
Page 2: Warranty
Craftsman One Year Full Warranty If this Craftsman product fails due to a defect in material or workmanship within one year from the date of purchase, return it to any Sears store or other Craftsman outlet in the United States for free replacement. - Page 3 • Donotusewitha torn filter orwithout • Toreduce t herisk ofpersonal injury or thefilter installed except when damage toVac, u seonly Craftsman recommended accessories. vacuuming liquids a sdescribed inthis manual. Dry debris i ngested bythe • When using asablower: impeller may damage themotor orbe - Direct airdischarge only atwork area.
-
Page 4: Grounding Instructions
Grounding Instructions This appliance must be grounded. If it should malfunction or break down, Properly 3-Prong Plug grounding provides a path of least resistance for electric current to reduce Outlet the risk of electric shock. This appliance is equipped with a cord having an Grounded equipment-grounding conductor and... -
Page 5: Table Of Contents
Introduction This Wet/Dry Vac is intended for Familiarize yourself with the following household use only. It may be used for product features and read the entire light vacuuming of wet or dry media and owner's manual for specific usage of may also be used as a blower. -
Page 6: Vac Assembly
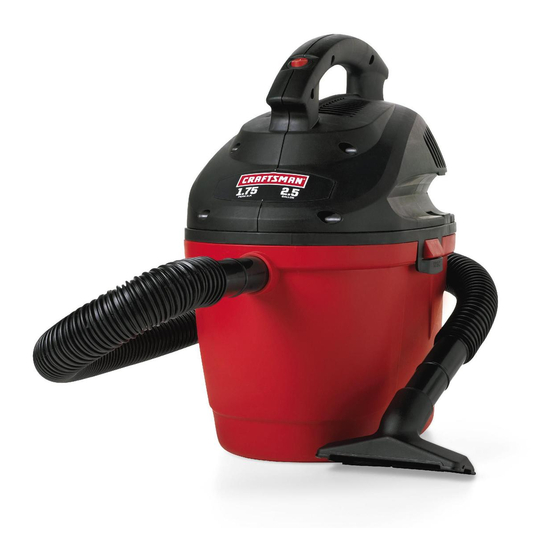
Assembly (continued) Vac Assembly Handle with On/Off Switch Conveniently Ten Foot Positioned Long Cord Storage Hose Stora¢ Two Easy-to- Open Latches- Port 2.5 Gallon Capacity Dust Filter and Retainer Band 4 Foot × 1-1/4 inches Flexible Hose Hose Storage The power head has recesses on each side for hose storage. -
Page 7: Operation
Operation WARNING: To reduce the risk of fire, explosion, or damage to Vac: • Do not leave Vac running while unattended - you may fail to notice important signs indicating abnormal operation such as loss of suction, debris/liquid exiting exhaust, or abnormal motor noises. Immediately stop using Vac if you notice these signs. -
Page 8: Vacuuming Dry Materials
Operation (continued) Vacuuming Dry Materials Vacuuming Liquids 1. The filter must always be in correct WARNING: Do not operate without position to reduce the risk of leaks and filter cage and float, as they prevent possible damage to Vac. Make sure liquid from entering the impeller and that the filter is completely covering the damaging the motor. -
Page 9: Emptying The Drum
Operation (continued) Emptying the Drum Blowing Feature Your Vac features a blowing port. It can blow sawdust and other debris. Follow injury from accidental starting, unplug the steps below to use your Vac as a power cord before emptying the drum. WARNING: To reduce the risk of blower. -
Page 10: Maintenance
Maintenance Handle to Filter Cleaning Remove Motor Your filter should be cleaned often to Cover maintain peak Vac performance. Take the dirty filter to a disposal container and gently brush away small dirt particles that may be adhering to the filter material. Drum NOTE: Clean the filter in an open area. -
Page 11: Cleaning And Disinfecting The Wet/Dry Vac
Maintenance (continued) 3. Empty drum after 20 minutes. Rinse Cleaning and Disinfecting with water until bleach smell is gone. Wet/Dry Allow drum to dry completely before To keep your Wet/Dry Vac looking its sealing the motor on the drum. best, clean the outside with a cloth dampened with warm water and mild Storage soap. - Page 12 Notes...
- Page 13 manual del usuari0 NO. DE MODELO 113.176110 N_mero de serie Los n_meros de modelo y de serie se pueden encontrar en el pestillo del tambor yen la partede CRRFrSMRN ° arriba de la cubierta del motor. Usted debe anotar los nQmerostanto de modelo como de serie en un lugar seguro para uso futuro.
-
Page 14: Garantfa
Garantia GarantiacompletaCraftsmande unafio Si este productoCraftsmanfalla debidoa un defecto de material o de fabricaci6ndentro del plazo de unafio a partir de la fecha de compra, devu_lvalo a cualquiertienda Sears, Centrode Servicio Sears u otro puntode venta Craftsmanpara que sea reparadogratuitamente (o reemplazadosi la reparaci6nresulta imposible). - Page 15 Para reducir el riesgo de caidas, tenga cuidado sacudidas el_ctricas, no exponga la aspiradora a la adicional al limpiar en escaleras. Iluvia y almac_nela en interiores. • Para reducir el riesgo de lesiones corporales o da_os a la aspiradora, utilice t_nicamente accesorios recomendados por Craftsman. GUARDE ESTEMANUAL...
-
Page 16: Instrucciones De Conexi6Na Tierra
Instrucciones de conexi6n a tierra Esteelectrodom6stico se debeconectaratierra. En Tomacorriente Enchufe d e3 casode realfuncionamientoo averia,la conexi6na conectado terminales tierraproporcionaunaruta de resistenciaminima a tierra parala corrienteel6ctricaconel fin de reducirel apropia- riesgode sacudidas el6ctricas.Esteelectro- damente dom6sticoest,.equipadocon un cord6nquetiene un conductordeconexi6natierra delequipoy un enchufede conexi6natierra. -
Page 17: Introducci6N
Introducci6n Esta aspiradora est,. dise_ada para uso dom6stico Familiarfcese con lassiguientescaracteristicas del productoy leatodo el manualdel usuariopara solamente. Se puede utilizar para la recogida ligera obtenerinstrucciones sobre la utilizaci6n especifica de medios mojados o secos y tambi6n puede de su nuevaaspiradoraparamojado/seco. utilizarse como soplador. -
Page 18: Ensamblaje
Ensamblaje (continuaci6n) Ensamblajede la aspiradora Asadetransporte c oninterruptor deencendido y apagado Cord6n de diez convenientemente ubicado pies de en el enrollador del cord6n Almacenamiento dela manguera Dospestillos Orificiode f_ciles deabrir_ ,iraci6n Tambor p ara polvo de2.5 galones de Filtro y banda retenedora Manguera de4 piesx 1-1/4pulg. -
Page 19: Funcionamiento
Funcionamiento ADVERTENCIA: P ara reducir el riesgo de incendio,explosiono dafiosa la aspiradora: • No deje la aspiradora en marcha mientras est_ desatendida. Usted podria no notar se_ales importantes que indiquen un funcionamiento anormal, tal como p_rdida de succiOn, residuos o liquido que salen por el escape o ruidos anormales del motor. -
Page 20: Recogida De Materialessecos Con Laaspiradora
Funcionamiento ( continuaci6n) Recogidade materiales secoscon Recogidade liquidoscon la aspiradora la aspiradora 1. El filtro debeestarsiempreen la posici6n lajaula del filtro y elfiotador, ya que estas correctapara reducirel riesgode fugasy piezasevitan queentre Ifquido en el impulsor y ADVERTENCIA: No utilice laaspiradorasin posiblesda_osa laaspiradora. -
Page 21: Dispositivode Soplado
Funcionamiento ( continuaci6n) Vaciadodel tambor Dispositivo de soplado La aspiradora cuentacon un orificio desoplado. Estedispositivopuedesoplaraserriny otros ,_ ADVERTENCIA: Parareducirel riesgode residuos.Sigalos pasosquese indicana conti- lesionesdebidasa un arranqueaccidental, nuaci6nparautilizarla aspiradora como soplador. desenchufe el cord6n deenergiaantesde vaciarel tambor. _, ADVERTENCIA: Usesiempreprotectores 1. -
Page 22: Mantenimiento
Mantenimiento Limpieza del filtro Asaparaquitarla El filtro se debelimpiar a menudopara mantener delmotor un rendimiento 6ptimo de la aspiradora. Lleveelfiltro sucio a un recipiente de desechoy quitesuavemente con un cepillolasparticulasde suciedadpeque_as quepuedanestaradhiriCndose Basedela al materialdelfiltro. flradora NOTA: L impieelfiltro en un _.rea abierta.La _landa limpiezase deberealizaren elexteriory no en retenedora... -
Page 23: Limpiezay Desinfecci6N De Laaspiradora Paramojado/Seco
Mantenimiento(continuaci6n) 3. Vacfeel tambor despu6sde 20 minutos. Limpiezay desinfecci6nde la Enju_.guelo con agua hasta queel olor a aspiradorapara mojado/seco blanqueadordesaparezca. D ejeque el tambor Para mantenerel mejor aspectoposible de la se sequecompletamenteantesde sellar el aspiradorapara mojado/seco,limpie su exterior motor sobre eltambor. con un paso humedecidocon aguatempladay Almacenamiento un jab6nsuave. - Page 24 Your Home For expert troubleshooting and home solutions advice: manage home www.managemyhome.com For repair - in your home - of all major brand appliances, lawn and garden equipment, or heating and cooling systems, no matter who made it, no matter who sold it! For the replacement parts, accessories and owner's manuals that you need to do-it-yourself.