Table of Contents
Available languages
Available languages
Owner's Manual
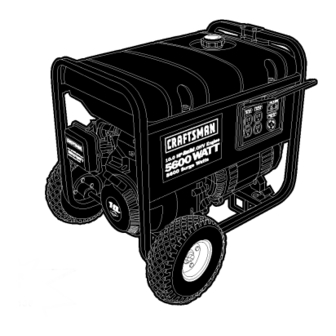
ICRAFTSMAN°I
AC Generator
Model No
580.325600
GENERATOR
J
CUSTOMER
HELPLINE
1"800__
"_
HOURS:
Mono-FrL8am
toSpm
(CT)
CAUTION
Before using this product, read this
manual and follow all Safety Rules
and Operating Instructions.
PRECAUCION
Antes de utilizar el producto, tea este
manual y siga todas las Reglas de
Seguridad e Instrucciones de Uso.
Sears,
Roebuck
and Co,
Hoffman
Estates,
IL 60179
USA.
visit our Craftsman website: www craftsman com
Part NO 191559GS
Draft 10 (03/01/2005)
•
Safety
•
Assembly
•
Operation
•
Maintenance
•
Parts
•
Espa_ol
Table of Contents

Related Manuals for Craftsman 580.325600


Summary of Contents for Craftsman 580.325600
- Page 1 Safety Rules manual y siga todas las Reglas de • Espa_ol and Operating Instructions. Seguridad e Instrucciones de Uso. Sears, Roebuck and Co, Hoffman Estates, IL 60179 USA. visit our Craftsman website: www craftsman com Part NO 191559GS Draft 10 (03/01/2005)
- Page 2 WARRANTY ........TROUBLESHOOTING ......SAFETY RULES ....... SCHEMATIC DIAGRAM ......FEATURES AND CONTROLS ...... WIRING DIAGRAM ......ASSEMBLY ........REPLACEMENT PARTS ....... 20-28 OPERATION ......... 8-11 NOTES ........SPECIFICATIONS ....... EMISSION CONTROL WARRANTY ....30-31 ESPAi_IOL ........32-51 MAINTENANCE ......13-15 STORAGE ........
- Page 3 This is the safety alert symbol. It is used to alert you to potential personal injury hazards. Obey all safety messages that follow this symbol to avoid possible injury or death. _Read this manual carefully and become WARNING familiar with your generator. Know its applications, its limitations,...
- Page 4 WARNING WARNING WHEN ADDING OR DRAINING FUEL WHEN ADJUSTING OR MAKING REPAIRS TO YOUR Turn generator OFF and let it cool at least 2 minutes ENERATOR before removing fuel cap. Loosen cap slowly to relieve Disconnect the spark plug wire from the spark plug and pressure in tank.
-
Page 5: Features And Controls
KNOW YOUR GENERATOR Read the owner's manual and safety rules before operating your generator. Compare the illustrations with your generator to familiarize yourself with the locations of various controls and adjustments. Save this manual for future reference. FuelTank Spark Arrester Muffler (not shown) Fuel Valve (not shown) - Page 6 YourCraftsman g enerator requires someassembly Refer to illustration shown below and install the wheel andis ready for useonlyafterit hasbeenproperly kit as follows: serviced withthe recommended oilandfuel, Place the bottom of the generator cradle on a flat, If you have any problems with the assembly of even surface.
-
Page 7: Adding Engine Oil
BEFORE STARTING Add Fuel GENERATOR WARNING To operate the generator you will need to first add engine oil and gasoline, as follows: Engine NOTE: When adding oil to the engine crankcase, use WHEN ADDING FUEL only high quality detergent oil rated with API service Turn generator OFF and let it cool at least 2 minutes classification SF, SG, SH, SJ or higher. - Page 8 HOW TO USE YOUR GENERATOR Generator Location If you have any problems operating your generator, Generator Clearance please call the generator helpline at 1-800-222-3136, ILWARNING System Ground The generator has a system ground that connects the generator frame components to the ground terminals on the AC output receptacles.
-
Page 9: Starting And Stoping Engine
TO START THE ENGINE Move choke lever to "Run" position a short distance at a time over several seconds in warm CAUTION weather or minutes in cold weather. Let engine run smoothly before each change. Operate with choke in "Run" position. NOTE: If engine starts after 3 pulls but fails to run, or if unit shuts down during operation, make sure unit is See "Don't Overload Generator". - Page 10 CORD SETS AND RECEPTACLES AC, 30 Amp Receptacle 120/240 Volt This is a full capacity receptacle; it can supply the Use only high quality, well-insulated, extension cords generator's full rated output from this sole outlet, The with the generator's 120 Volt electrical receptacles. outlet is protected by two 20 Amp push-to-reset CAUTION circuit breakers.
- Page 11 DON'T OVERLOAD GENERATOR Plug in and turn on the next load. Again, permit the generator to stabilize. Capacity Repeat steps 4 and 5 for each additional load. You must make sure your generator can supply NEVER add more loads than the generator capacity. enough rated (running) and surge (starting) watts for Take special care to consider surge loads in generator the items you will power at the same time.
-
Page 12: Specifications
ENGINE TECHNICAL INFORMATION PRODUCT SPECIFICATIONS This is a single cylinder, overhead valve(OHV), air Specifications Generator cooled engine. It is a low emissions engine. Rated Maximum Power ..5600 Watts (5.6 kW) In the State of California, Model Series 200000 Surge Power ....8600 Watts (8.6 kW) engines are certified by the California Air Resources Rated AC Voltage .... - Page 13 OWNER'S RESPONSIBILITIES Follow the hourly or calendar intervals, whichever occurs first, More frequent service is recuired when operating in adverse conditions noted below. MAINTENANCE SCHEDULE FILL IN DATES AS YOU SERVICE DATES COMPLETE REGULAR SERVICE SERVICE DATES Before Every 25 HOURS Every 50 HouRS Every...
- Page 14 ENGINE MAINTENANCE Clean/Replace Spark Plug Change the spark plug every 100 hours of operation WARNING or once each year, whichever comes first, This will help your engine to start easier and run better. Clean area around spark plug. Remove and inspect spark plug. Check electrode gap with wire feeler gauge and set spark plug gap to 0.030 inch (0.76mm) if WHEN ADJUSTING...
- Page 15 Carburetor Clean and inspect the spark arrester as follows: To remove muffler heat shield from muffler, remove If you think your carburetor needs adjusting, see your four screws that connect guard to muffler bracket, nearest Sears service center, Engine performance may be affected at altitudes above 3000 feet, For operation at higher elevations, contact your nearest Spark Arrester Screen...
- Page 16 GENERAL Change Oil While engine is still warm, drain oil from crankcase. The generator should be started at least once every Refill with recommended grade. seven days and allowed to run at least 30 minutes. If this cannot be done and you must store the unit for Oil Cylinder Bore more than 30 days, use the following information as a guide to prepare it for storage.
- Page 17 Problem Cause Correction One of the circuit breakers is Reset circuit breaker, open, Poor connection or defective Check and repair, Engine is running, but no AC cord set, output is available. Connected device is bad. Connect another device that is in good condition.
- Page 18 CRAFTSMAN 5600 Watt AC Generator 580.325600 BRIDGE RECTIFIER BLUE RED (6) EXCITATIDN FIELD BLUE BLACK GRAY BLACK BLUE GRAY (22) (33) (44) (ii) (22) GRAY 120V/20A (44A) BLUE (IIA) (22) BLUE (IIA) (22) BLUF (IIA) 120/240V/30A BLUE (IIA) (22)
- Page 19 CRAFTSMAN 5600 Watt AC Generator 580.325600 CIRCUIT CIRCUIT BREAKER BREAKER 120/240V 120V 120V _/ARNING! MUST BROKEN BLACK (33) CONNECTOR HOUSING NOTE= POSITIVE BRUSH 13 CLOSEST BEARING CUSTONER GROUND...
- Page 20 CRAFTSMAN 5600 Watt AC Generator 580.325600 Main Unit -- Exploded View >-40 ¢8...
- Page 21 CRAFTSMAN 5600 Watt AC Generator 580.325600 Main Unit- Parts List Item Part # Description M194766GS CRADLE 194150GS KIT, Vibration Mount, 45 ° Srv 190220GS HOUSING, Engine Adapter ASSY, Alternator (see page 24) 194151GS KIT, Hardware Mount, Aptr. 96796GS WASHER, M8 Flat 190274BGS SBHCS, 3/8-16 x 1.0 Lg.
- Page 22 CRAFTSMAN 5600 Watt AC Generator 580.325600 Control Panel -- Exploded View and Parts List Item Part # Description 195112GS KIT, Control Panel Lid 188889GS CONTROL PANEL, Compact 68759GS OUTLET, 120V, 20A, Duplex NUT, Palnut, Pushnut, 5/32 84198GS CAP, Circuit Breaker...
- Page 23 CRAFTSMAN 5600 Watt AC Generator 580.325600 Wheel Kit -- Exploded View and Parts List Item Part # Description 189715GS ASSY, Handle B1764GS LEG, Mounting 52858GS NUT, Locking Hex M8- 1.25 HHCS, M8 - 1.25 x 45 191267HGS AXLE, 5/8"x22.87" B4966GS...
- Page 24 CRAFTSMAN 5600 Watt AC Generator 580.325600 Alternator -- Exploded View and Parts List Item Part# Description 186059GS ADAPTER, Mounting, Alternator 190032GS ROTOR 190079AGS STATOR 186060GS RBC, with O-Ring (p/n 189197GS) 86308HGS HHCS, M6 - 1.0 x 140 SEMS 91825GS ASSY, Holder, RectifiedBrush 66849GS TAPTITE, M5 - 0.8 x 16...
- Page 25 ENGINE, 10 HP, Briggs and Stratton, 204412 - Exploded View 718A 22 _ 718 j 1052_ 774_ 799A_ 27 o 105_ 1095 VALVE GASKET SET 358 ENGINE GASKET SET _o _ _> 51A_...
- Page 26 ENGINE, 10 HP, Briggs and Stratton, 204412 - Exploded View 121 CARBURETOR OVERHAUL KIT 798_ 11oo 633 @ 633 @ 633 ® 127 O 51A_ 105_ 369 _...
- Page 27 ENGINE, 10 HP, Briggs and Stratton, 204412 - Exploded View 188_ 356A_ 356B 56__ 564A 564 % 977 CARBURETOR GASKET SET 633@ 1°7°_ 1005 456_ 597D 689_ 459_ 121( 1211 65 _...
- Page 28 ENGINE, 10 HP, Briggs and Stratton, 204412 - Parts List Item Part # Description Item Part # Description Gear-Governor 695464 Cylinder Assembly 693578 495657 Kit-Bushing/Seal (Magneto Side) 691724 Washer (Governor Gear) Bracket-Control 391086 Seal-Oil (Magneto Side) 694866 Lever-Governor Control 697233 Head-Cylinder 694864 694872...
- Page 30 Seam, Roebuck and Co., U.S.A. (Sears), the California Air Resources Board (CARB) the United States Environmental Protection Agency (U.S.EPA) Emission Control System Warranty Statement (Owner's Defect Warranty Rights and Obligations) EMISSION CONTROL WARRANTY COVERAGE IS a. Fuel Metering System APPLICABLE TO CERTIFIED ENGINES PURCHASED Cold start enrichment system...
- Page 31 Emissions Durability Emissions Compliance Period On Engine Period and Air Index Engine Emissions Compliance Label Information On Your Emissions Label Engines that are certified to meet the California Air After July 1, 2000 certain Sears engines will be certified to Resources Board (CARB) Tier 2 Emission Standards must meet the United States Environmental Protection Agency...
- Page 32 LIMITADA GENERADORES CRAFTSMAN SEARS le garantiza al comprador original que el alternador y el motor de su generador portatil estara libre de defectos en materiales y mano de obra en los componentes y por el perlodo de tiempo establecido a continuaci6n a partir de la fecha de compra original.
- Page 33 lesion para el personal. Siga las instrucciones ste es el simbolo de alerta de seguridad. Es usado para indicarle situaciones con peligros potenciales de de todos los mensajes de seguridad que aparecen despues de este simbolo para evitar posibles lesiones o muerte. _Lea este manual de manera cuidadosa y ADVERTENCIA...
- Page 34 , ADVERTENCIA ADVERTENCIA CUANDO ANADA COMBUSTIBLE O VACiE EL CUANDO AJUSTE O HAGA REPARACIONES A SU DEP6SITO ?ENE_DOR Apague el generador (posici6n OFF) y dejelo enfriar al menos por Siempre desconecte el alambre de Ia bujia y col6quelo donde 2 minutes antes de remover la tapa de la combustible. Afloje la no pueda entrar en contacto con la bujia.
- Page 35 CONOZCA SU GENERADOR LEA ESTE MANUAL DEL PROPIETARIO Y LAS REGLAS DE SEGURIDAD ANTES DE OPERAR SU GENERADOR. Compare las ilustraciones con su Generador para familiarizarse con las ubicaciones de los diferentes centreles y ajustes. Conserve este manual para referencias futuras. Tanque de Combustible Silenciador Apagachispas...
- Page 36 Su generador requiere de ciertos procedimientos de montaje Necesitara una Ilave de cubos con cubos de 112° o 13mm y y solo estara listo para ser utilizado despues de habede unas pinsas de punta para instalar el juego de ruedas. suministrado servicio con el combustible y aceite recomendados.
- Page 37 ANTES DE DARLE ARRANQUE Agregue Gasolina GENERADOR ADVERTENCIA Para operar el motor, debera hacer la siguiente: Agregar Aceite al Motor NOTA: Cuando agregue aceite al compart{miento del motor, utilice L_nicamenteace{re detergente de alta calidad, designado con la clasificaci6n AP] de servido SF, SG, SH, SJ o superior. CUANDO AI_ADA COMBUSTIBLE...
- Page 38 COMO USAR SU GENERADOR Ubicacibn del Generador Si tiene problemas operando su generador, por favor Ilame Espacio Libre Alrededor del Generador a la linea de ayuda para generadores al 1-800-222-3136. ADVERTENCIA Tierra del Sistema El generador dispone de una conexi6n a tierra del sistema que conecta los componentes del bastidor a los terminales de tierra de los enchufes hembra de salida de CA.
- Page 39 PARA ENCENDER EL MOTOR Mueva la pa{anca de choke a la posicion "Run" una distancia corta a [a vez por algunos segundos en un PRECAUCION clima calido, o algunos minutos en un clima frio. Deje que el motor corra suavemente antes de cada cambio.
- Page 40 JUEGOS DE CORDONES Tomacorriente de 120/240 Voltios 30 Amperios ENCHUFES CONECTORES Este es un tomacorriente de capacidad total, Io que significa que usted puede tomar el vatiaje nominal total de este solo PRECAUCION tomacorriente. Este es una tomacorriente tipo NEMA L14-30.
- Page 41 NO SOBRECARGUE GENERADOR Conecte y encienda la proxima carga. De nuevo, permita que el generador se estabilice. Capacidad Repita los pasos 4 y 5 para carla carga adicional que Usted debe asegurarse que su generador puede proveer el usted tenga. suficiente vataje calificado (cuando este funcionando) y de NUNCA afiada mas cargas sobre la capacidad del carga (al encender) para los aparatos a los cuales va a...
- Page 42 INFORMACION TI CNICA SOBRE EL ESPECIFICACIONES MOTOR PRODUCTO El motor es de uno cilindros, de valvulas en cabeza (OHV), Especificaciones del Generador refrigerado por aire y de baja emisidn. Potencia Maxima ....5,600 vatios (5.6 kW) En el Estado de California, los motores de la serie 200000 han obtenido la certificacidn del California Air Resources Potencia de Sobretension ..
- Page 43 RESPONSIBILADES DEL CLIENTE Siga los intervalos horarios o de calendario. Io aue ocurra orimero. Se requiere de servicle con mayor frecuencia cuando opere le unidad en les condleiones adversas descritas a continuaci6n. CALENOARIO DE MANTENIMIENTO ANOTE LAS FECHAS CONFORME INTERVALO DE OPERACION POR HORA CUMPLA CON EL SERVICtO...
- Page 44 MANTENIMIENTO DEL MOTOR Limpe/Reemplace la Bujia Cambie la bujia cada 100 horas de operaci6n o una vez al ADVERTENCIA afio, Io que suceda primero. Esto ayudar& a su motor a arrancar mas facilmente y a funcionar mejor. Limpie el area alrededor de la bujia. Retire y revise ]a bujia.
- Page 45 Arme la cubierta mas limpia aerea en la base y apriete Limpie e inspeccione el apagachispas de la siguiente los tornil]os. manera: Para retirar la protecci6n del silenciador, retire los NOTA: Si necesita oredenar un flltro de papel nuevo, per cuatro tomillos que conectan la proteccion a la mensula favor [lame al 1-800*366-PART.
- Page 46 GENERALIDADES Cambio de Aceite Con el motor todavia caliente, drene el aceite de la caja del El generador debera ser encendido al menos una vez cada cigQeSal. Vuelva a Ilenado con el grado de aceite siete dfas y debera dejarlo funcionar al menos durante recomendado.
- Page 47 Problemo Accion Causa Reposicione el interruptor. El interruptor automatico de circuito esta abierto. Conexidn real o defectuosa de] Revise y repare. juego de cables. El motor est_ funcionando pero no existe salida de AC disponsible. El dispositivo conectado esta Conecte otto dispositivo que este daSado.
- Page 48 Sears, Roebuck and Co., U.S.A. (Sears), California Air Resources Board (Consejo de Recursos sobre el Aire de California, GARB, por sus siglas en ingles) y United States Environmental Protection Agency (Agencia de Protecci6n Ambiental de EE.UU., EPA, por sus siglas en inglds). Declaracibn de garantia del sistema de control de emisiones (derechos y obligaciones del propietario para la garantia contra defectos)
- Page 49 Informacibn Sobre el Periodo Periodo de Cumplimiento de la Normativa DurabUidad de las Emisiones y el Indice de Emisiones en la Etiqueta de Aire en la Etiqueta de Emisiones Cumplimiento de Emisiones del Motor Motor Desde el 1 de julio de 2000, algunos motores Sears cuentan con la certificacion de cumplimiento de {a fase 2 de las...
- Page 52 Your Home For repair-in your home-of all major brand appliances, no matter who made it, no matter who sold it! iiiiiiiiiiiiiii!i!i!!iii!ii For the replacement parts, accessories and owner's manuals that you need to do-it-yourself. For Sears professional installation of home appliances iiiiiiiiiii! i!iiii ili ii and items like garage door openers and water heaters.