Quick Links
Operator's
Manual
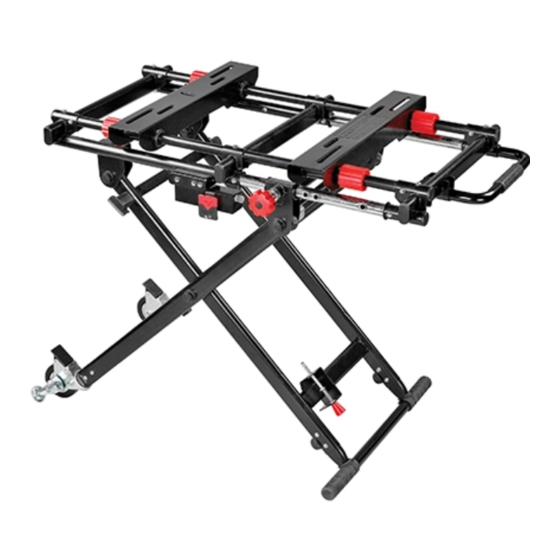
Universal Bench-Top-Tool
Adjustable Work Stand
Model No. 320. 22335
CAUTION!
Read, understand
and
follow all Safety Rules and Operating
Instructions
in this Manual
before
using this product.
• WARRANTY
• SAFETY
• UNPACKING
• ASSEMBLY
• DESCRIPTION
• MAINTENANCE
I Sears Brands Management
Corporation,
I
Hoffman Estates, IL 60179
www.craftsman.com

Related Manuals for Craftsman 320.22335


Summary of Contents for Craftsman 320.22335
- Page 1 Model No. 320. 22335 • WARRANTY • SAFETY • UNPACKING CAUTION! Read, understand • ASSEMBLY follow all Safety Rules and Operating • DESCRIPTION Instructions in this Manual before • MAINTENANCE using this product. I Sears Brands Management Corporation, Hoffman Estates, IL 60179 www.craftsman.com...
- Page 2 Parts list Pages 20-22 Sears Repair Parts Phone Numbers Back Cover ONE YEAR FULL WARRANTY ON CRAFTSMAN ® PROFESSIONAL PRODUCT If this Craftsman product fails due to a defect in material or workmanship within one year from the date of purchase,...
-
Page 3: Damage Prevention And Information Messages
We recommend a Wide Vision Safety Mask for use over eyeglasses or standard safety glasses with side shield, available at Sears Stores or other Craftsman outlets. 22335 Manual Revised 07-1203... -
Page 4: Work Area Safety
[.-"Y'-I iI zlll'4 I1_ (.._ij_ll_]ij[e]]_.._ WARNING:Be sure to read, understand and follow all Safety rules and operat- ing instructions in this Manual and the operator's manual of any bench top power tool you use with this Adjustable Work Stand. Failure to do so may result in electric shock, fire and/or serious personal injury. - Page 5 Remove adjusting keys or blade wrenches before turning the tool "ON." A wrench that is left attached to a rotating part of the tool may result in personal injury. De not overreach. Keep proper footing and balance at all times. Proper footing and balance enables better control of the tool in unexpected situations.
-
Page 6: Electrical Safety
Use only accessories that are recommended for the tool being used. Accessories that may be suitable for one tool may become hazardous when used on another tool. ELECTRICAL SAFETY Grounded tools In the event of a malfunction or breakdown, grounding provides a path of least resistance for electric current to reduce the risk electric shock. - Page 7 Use the proper extension cord. Make sure that your extension cord is good condition. When using an extension cord, be sure to use one heavy enough to carry the current your product will draw. An undersized cord will cause a drop in line voltage resulting in loss of power and overheating.
- Page 8 SAFETY FOR THE ADJUSTABLE WORK STAND Always set up the adjustable work stand on a hard, dry, flat, stable surface. Be sure that the adjustable work stand is fully opened and locked into the proper "set-up" position before mounting your bench-top power tool to the tabletop assembly.
- Page 9 Protect your lungs. Wear a face mask or dust mask if the operation is dusty. Protect your hearing. Wear appropriate personal hearing protection during use. Under some conditions, noise from power tools may contribute to hearing loss. All visters and bystanders must wear the same safety equipment that the operator...
- Page 10 If any part is missing or damaged, return the adjustable work stand to your nearest Sears store or Craftsman outlet to have the work stand replaced. ,_, WARNING:If any parts are bent or broken, do not attempt to set up the adjustable work stand.
- Page 11 ID]*'[_]];]_ij[e]_] This Adjustable Work Stand has the following features: 1. Setup adjustment handle with soft grip for easy setup and takedown Soft-grip dual handle for comfort during transport and sure grip during use Locking pin support automatically engages to secure the stand when it is folded for storage.
- Page 12 PRODUCT SPECIFICATIONS Stand Weight 50 Ibs. Maximum Weight Capacity 400 Ibs continuous load capacity Power Cord Length 10 ft. Tool Stand Height 28" - 36" (positive stops at 30", 32", 34", 36") Overall Dimensions, Fully extended 49 in.(L) x 26 in.(W)x36 in. (H) E[,.!.I =1 _ v_ I:] I_'d UNFOLDING AND SETTING UP THE WORK STAND (Figs.241) Remove the work stand...
- Page 13 3. With your foot still on Fig. 4 the support bar, lift up the setup adjustment handle (Fig. 4). 4. With your foot still on the support bar, continue lifting the setup adjustment handle to the height desired. Make sure that the red lock knob on each side is engaged.
- Page 14 NOTE: This work stand may be adjusted from: 28" - 36" in height with positive stops at 30", 32", 34", and 36". To ad- just the stand's height, turn the two red locking knobs counter clockwise to unlock them, then pull out the left knob and fol- low steps 3-4.
- Page 15 Be sure that, after adjusting Fig. 10 the width of the tabletop assembly, you lock the four clamping knobs by turning them clockwise until securely tightened (Fig. 9). Unlock the 4-inch locking Caster Wheels by lifting the locking lever on each wheel to the "UP"...
- Page 16 ATTACHING YOUR BENCH-TOP TOOL TO THE STAND (Fig.12) WARNING: Failure to unplug the tool before attach- Fig. 12 ing it to the stand could result in Mounting Holes accidental starting and possibly serious personal injury. WARNING: To avoid serious personal injury, always make sure that bench tools are fully supported...
- Page 17 SWITCH OPERATION Fig. 13 The switch has a safety key to help prevent accidentally switching the tool ON and the unauthorized, possibly hazardous use by others. The safety key must be completely inserted into the switch before the switch panel can be turned ON.
- Page 18 3. To turn the power OFF, Fig. 16 push the ON/OFF switch panel down (Fig. 16). 4. To lock switch in the OFF position, push the ON/ OFF switch panel down to OFF position, remove the safety from the switch panel.
- Page 19 This adjustable work stand has been designed to be low-maintenance. However, in order to maintain its performance, follow these steps. 1. Handle the adjustable work stand with care. Do not drop, throw, or otherwise mistreat the work stand. Use it only for its intended purpose. Do not allow the adjustable work stand to become and remain wet.
- Page 20 I",2.-_ -'#_ I_,.1JJ Universal Bench-Top-Tool Adjustable Work Stand MODEL NUMBER 320.22335 Always mention the Model Number when ordering parts for this tool. 3_8/ 22335 Manual Revised 07-1203 Page 20...
- Page 21 Universal Bench-Top-Tool Adjustable Work Stand MODEL NUMBER 320.22335 Always mention the Model Number when ordering parts for this tool. LA0200021 25mm Table Pull Rod LC0000021 Sliding Bush LE0100021 Moving Steel Board (printed) LC0000022 Fixing Bush LC0000023 Locking Nut LC0000024 Clamping Knob LIO200021 Bolt M6x75mm LIO200022...
- Page 22 LIO200025 Bolt M6X14mm LC0000032 Lower Support Cover LC0000033 Left Block LE0100026 Inner Bracket Assembly LL0500022 Handle Spring LIO200026 Flat Washer M8 LC0000034 Spring-loaded Locking Pin Assembly LB0200024 LC0000035 Rubber Support bar LE0100027 Support bar LIO200027 Nut M6 LIO200028 Bolt M6X35mm LC0000036 Rubber Foot LIO200029...
- Page 23 I_,]iii_,.-] 22335 Manual Revised 07-1203 Page 23...
- Page 24 Your Home For expert troubleshooting and home solutions advice: www.managemyhome.com For repair - in your home - of all major brand appliances, lawn and garden equipment, or heating and cooling systems, no matter who made it, no matter who sold it ! For the replacement parts, accessories and owner's manuals that you need to do-it-yourself.