Table of Contents
Quick Links
Table of Contents

Related Manuals for HP FA974AA - iPAQ 310 Travel Companion


Summary of Contents for HP FA974AA - iPAQ 310 Travel Companion
- Page 1 HP iPAQ Product Guide...
- Page 2 NOTICE: © 1984 – 2007 Tele Atlas. All rights Hewlett-Packard Company shall not be liable reserved. This material is proprietary and the for technical or editorial errors or omissions subject of copyright protection and other contained herein.
-
Page 3: Table Of Contents
Table of contents 1 Welcome 2 Register the Travel Companion 3 Box contents Box contents ............................3 4 Components Front components ..........................4 Left and right components ........................5 Top and bottom components ........................ 5 Back components ..........................6 5 Power on and set up the Travel Companion Set up the Travel Companion ....................... - Page 4 Switches ..........................18 Virtual keyboards ....................... 18 The QWERTY keyboard ........................18 The numeric keyboard ........................19 8 Discovering the Travel Companion through the Startup menu Entertainment ............................. 20 Videos ..........................20 Music ..........................21 Games ..........................22 Pictures ..........................22 Contacts .............................
- Page 5 POI groups ......................37 POI subgroups ....................37 Select a POI ...................... 37 Find co-ordinates ....................... 38 Coordinate display format ................. 39 11 Bluetooth Connect a Bluetooth-enabled phone to your Travel Companion ............40 Make a call ............................41 Use phone dialer ........................ 41 Use contacts ........................
- Page 6 Manage Track Logs ......................54 14 Settings Visual settings ............................ 56 3D settings ......................... 56 Landmarks ......................56 Elevated roads ....................56 Buildings ......................56 Terrain ....................... 56 Backlight settings ....................... 56 Brightness ......................56 Power management ..................56 Backlight always on ................... 56 Smart Powersave ....................
- Page 7 U-turns ......................62 Permit needed ....................62 Toll roads ......................62 Carpool lanes (for the USA map only) .............. 62 Keep position on road ......................62 Regional settings ..........................62 Language ........................... 63 Voice ..........................63 Units ........................... 63 Time settings ........................63 Set time format ....................
- Page 8 Cables ..........................72 Declaration of Conformity for Products Marked with the FCC Logo (United States Only) ..........................72 Canadian Notice ..........................73 Avis Canadien ............................ 73 European Union Notice ........................73 Products with 2.4–GHz Wireless LAN Devices ..............74 France ....................... 74 Italy ........................
- Page 9 Welcome Thank you for purchasing the HP iPAQ 300 Travel Companion. Your Travel Companion is pre loaded with many features that enhance your travel experience that you can learn about in this guide. In addition, there are free Web resources and additional content available to enhance your travels. Here you can find new Web-based trip planning services that allow you to personalize your travel by creating custom itineraries for export to your Travel Companion.
- Page 10 Register the Travel Companion You need to register the Travel Companion with Hewlett-Packard to be able to: ● Access support and services, and get the most out of your HP products. ● Manage your profile. ● Sign up for free support alerts, driver notices, and personalized newsletters.
-
Page 11: Box Contents
Box contents Box contents This illustration depicts the items that come in the box with the Travel Companion. Use this illustration to become more familiar with the device. NOTE: Box contents vary by model. Box Contents Travel Companion Stylus 1700 mAH li-ion removable/rechargeable battery Getting Started CD with additional software Travel Companion Documentation AC adapter with interchangeable plug... -
Page 12: Components
Components Front components Component Function Power Key and LED Press and hold to turn on the Travel Companion. ● Charge LED ◦ Solid Amber – Battery charging ◦ Solid Green – Battery fully charged Bluetooth LED Blue – Bluetooth ON Microphone For Bluetooth hands free audio. -
Page 13: Left And Right Components
Left and right components Component Function Multifunction Wheel Long press to open the Shortcut menu. Scroll to use. 3.5 mm Audio Jack Use with 3.5 mm audio headphones. Charging/Communications Port Use to connect the mini-USB cable. Reset Use to reset the Travel Companion. SD Card Slot Insert a Secure Digital (SD) storage card with the label side up for data storage. -
Page 14: Back Components
Back components Component Function Stylus Remove and use to select elements on the screen and to enter information. Back Speaker Use the speaker to listen to audio. Back Cover Slide the cover away from the Travel Companion to remove the battery. Chapter 4 Components... -
Page 15: Power On And Set Up The Travel Companion
Power on and set up the Travel Companion Set up the Travel Companion Step 1: Remove the battery cover Slide the back cover down and away from the Travel Companion. Step 2: Install the battery and replace the battery cover Align the battery connectors on the battery with the housing pins in the battery compartment and insert the battery. -
Page 16: Step 3: Charge The Battery
Step 3: Charge the battery CAUTION: To avoid damaging the Travel Companion or the AC adapter, make sure all connectors are properly aligned before connecting. The battery provides power for the Travel Companion to operate. Travel Companion comes with a mini-USB cable, which must be used to charge the device. - Page 17 Attach the power cable to the clips on the back of the Travel Companion holder. Be sure to leave enough cable to plug into the Travel Companion, and that the connector is turned the correct way to plug into the unit. Install the holder onto the windshield mounting bracket.
- Page 18 Insert the Travel Companion into the mounted car kit holder. Insert the securing clip into the slot on the top of the Travel Companion. Plug the power cable into the Travel Companion. Use the knobs to adjust the vertical and horizontal orientation of the Travel Companion. Chapter 5 Power on and set up the Travel Companion...
-
Page 19: Warnings And Safety Information
Warnings and safety information The Travel Companion is a navigation system that helps you find your way to your selected destination. It determines your exact location with the help of the built-in GPS device. The position information obtained from the GPS receiver is not transmitted elsewhere. Therefore, others cannot track you with the help of this application. -
Page 20: Learn The Basics
Learn the basics Your Travel Companion is a touch screen controlled device with limited hardware key functions. The device and the software are designed for easy operation. All controls are operable using your fingertips. Wherever possible, push buttons and lists are provided to make accessing functions or changing settings as easy as possible. -
Page 21: Open The Quick Launch Menu
Open the Quick Launch menu To open the Quick Launch menu: Press and hold the Multifunction wheel to open the Quick Launch menu, a list of frequently used applications is displayed. Turn the wheel up or down to scroll through the list, and press it to jump to the highlighted subsystem. - Page 22 Displays the current master volume level. The more number of arcs, the louder is the sound. The crossed out speaker icon indicates that the sound output is mute. Opens the Brightness setting slider below the icon to set the new backlight level. Tap the screen at the desired backlight level, or use the wheel to adjust it.
- Page 23 Deletes all list items. You are prompted for confirmation before items are deleted. Opens the Cursor menu. Displayed on the top centre of the screen, this icon opens Time 2007-08-04 18:04:31 settings. Displays the current date and time. Displayed on the bottom left corner, tap this icon to change its 2007-08-04 content.
-
Page 24: Buttons On The Map
On the Route Edit screen, this icon reorders the route points to optimize the route length. On the Route Information screen, this icon starts a simulation of the recommended route. On the Route Detail (Itinerary) screen, this icon saves the route for later use. -
Page 25: Selectors
On the 3D map screen (screen designed for navigation) you can access fixed tilt (and zoom) levels using these icons. These icons appear only when GPS position is available. These icons rotate the map left and right. Only one of these icons is displayed. Tap 3D to switch from the 2D map (designed for map browsing) to the 3D map (Cockpit, designed for navigation). -
Page 26: List Selectors
List selectors When the available values in the list need to be named, only the current value is displayed (sometimes with a short description) in a horizontal stripe with arrows at both ends. The arrows are buttons. Tap to move left in the list or tap to move right. You need not confirm your selection. -
Page 27: The Numeric Keyboard
Toggles between the alphabetic and numeric keyboards. Inserts a space character in the entered text. Clears the last entered character. Tap this icon to finish entering characters. The numeric keyboard The numeric keyboard only contains numbers, on buttons. The special keys you find on the other keyboards (except Space) are available on this keyboard as well. -
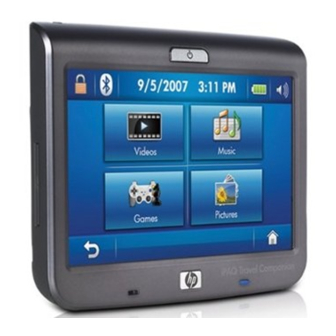
Page 28: Discovering The Travel Companion Through The Startup Menu
Discovering the Travel Companion through the Startup menu The best way to discover your Travel Companion is to explore each screen in detail, and find out how to navigate from one screen to another. When you turn on the Travel Companion, the Startup menu is displayed. -
Page 29: Music
Confirm any changes by tapping You can organize your playlist by tapping . Tap to return to the main Video screen after you finish organizing your playlist. You can play, stop, or jump to next and previous item by tapping the appropriate buttons. The volume level can be modified with the hardware jogwheel button. -
Page 30: Games
● if you would like to remove songs from the playlist. ● to return to the main Music screen after you finish organizing your playlist. ● You can play, stop, or jump to next and previous item by tapping the appropriate buttons. ●... -
Page 31: Contacts
Enlarge the picture to full screen view by tapping . Tap it again to get a thumbnail view. ● Tap the center of the picture to switch back to normal view. ● Tap the left side of the screen to display the previous picture and the right side to display the next one. -
Page 32: Add Contact
Add contact To add a contact: to add a new contact to your list. A data sheet is displayed. Tap the field and use the virtual keyboard to fill in the following information: ● name ● mobile phone ● e-mail (1–3) ●... -
Page 33: Edit Contact
Edit contact To edit a contact: Tap a contact name, and then to modify the details. To add or change the picture associated with the contact, tap the picture icon. This takes you to the pictures stored on your Travel Companion. Tap on a picture to select it, and then drag the picture around to choose which part of the picture becomes the contact icon. - Page 34 To configure the clock: to configure the clock. You can choose between analog and digital modes, and set up a world clock that shows three time zones at the same time. To set up the world clock, tap the Main clock title and timezone tab and choose your local time zone from the list selector.
-
Page 35: Phone
Phone To make a phone call using the phone feature: to enter the telephone function from the Extras menu. Enter a phone number directly, or select a phone number from your contact list by tapping After entering the phone number, tap to initiate the call. -
Page 36: System
● Set the time and date ● Read about the software and maps The Settings button takes you to the settings of the device. You can, for example, set the visual appearance, choose the language to apply, set the time and date, and read about the software and maps. -
Page 37: Media Directories
Media directories In the menu item, you can configure all your media directories. This saves time because the device searches for media files only in the directories listed here, rather than scanning all folders. To use media directories: to add, to remove a folder, and use to remove all directories. -
Page 38: Operating Navigation
Operating navigation You can access various navigation features using the navigation feature of your Travel Companion. CAUTION: Drive with due care and attention when using the Travel Companion for navigation. Navigate to an address To navigate to an address: If you are not on the Main menu screen, tap to return to the main menu. -
Page 39: Navigate To A Poi
Navigate to a POI To navigate to a POI: If you are not on the Main menu screen, tap to return to the main menu. Tap Go to. Tap Point of Interest. After you reach the next screen, do the following: tap Quick Search if you have saved a search criteria that can be used now, tap Along Route to search for a POI near your current route, or tap any of the other icons to define a point around which you wish to search for the POI. -
Page 40: Create A Route With A Different Start Point
When the map is displayed with the Cursor menu, you can extend your previous route: ● Tap Add Via insert this new point before the final destination; or ● Tap Continue to append it as a new final destination after the original destination. The route is automatically recalculated, and navigation continues. -
Page 41: Save User Data
Save user data To save user data, first select a map point, and then do the following: Either tap a location on the map to place the cursor, then open the Cursor menu with the icon. In the Main menu, tap Go to, and select a point. The map with the Cursor menu is displayed. From the Cursor menu: ●... -
Page 42: 10 Reference Book - Navigation Menu
10 Reference book – Navigation menu The Main menu is displayed when navigation is started. This is the root of the screen hierarchy. Most parts of the Travel Companion are directly accessible from here by using the icons described below: NOTE: To return to the Main menu from any screen, tap Button... -
Page 43: Find An Address, Street, Intersection, Or City
Buttons Function Displays Work on the map. Work is the second in the list of Favorite destinations. Opens the POI search screen. Opens the list of recent destinations. Opens the list of Contacts saved with valid address(es). Opens the map to let you pick one point. Opens the co-ordinates search screen. -
Page 44: Find In History
Find in History If you have already used Go to, or picked and used map points before, all of these appear in the History list. You can pick any of your recent locations to be your destination. On this screen, the list cannot be reordered or filtered by name, but the scroll bar on the right lets you browse through the complete list to find your preferred point. -
Page 45: Poi Groups
Buttons Function The search is carried out around a certain point on the map. The map opens to let you select the reference point by tapping the reference point. The search is carried out around the final destination of your current route. -
Page 46: Find Co-Ordinates
Buttons Functions Initiates a phone call to the displayed number. Opens the map with the selected POI in the centre. Opens the Cursor menu, and the map with the selected POI in the centre. Find co-ordinates In the Travel Companion, select your destination by entering map co-ordinates. The co-ordinates need to be entered in Latitude/Longitude format, based on the WGS84 earth model (the model used by most GPS devices). -
Page 47: Coordinate Display Format
Coordinate display format Positions are sometimes displayed with their addresses, and sometimes with their co-ordinates. This setting lets you choose whether to display co-ordinates in degrees (dd.dddddd); degrees and minutes (dd mm.mmm); or degrees, minutes and seconds (dd mm ss.s). Go to... -
Page 48: 11 Bluetooth
11 Bluetooth The Bluetooth application lets you connect your mobile phone, stereo headphone, or car stereo to your Travel Companion. When the connection to a mobile phone is established and you receive a call, it is automatically transferred to your Travel Companion and the speaker turns on. This enables safer driving and you need not use a headset or press any buttons to activate the speaker. -
Page 49: Make A Call
Buttons Function Tap to set your Bluetooth preferences Tap to enable automatic transfer of incoming calls Tap to view more information on Bluetooth Tap to dial a phone number Tap to view a list of previous connect attempts NOTE: My Shortcuts menu contains devices you have previously paired with your Travel Companion for easy access. -
Page 50: Use Contacts
Use contacts To make calls using contacts: Tap Extras > Select a phone number from your contact list by tapping to initiate a call. Use POI To make calls using POI: After a list of POI is displayed on your screen, tap to initiate a call. -
Page 51: 12 Map
12 Map There are two map screens: the Map (2D) screen and the Cockpit (3D) screen. The manner in which they display the map is similar, but the look and controls are optimized for different purposes. The Map (2D) screen is to be used for the following: ●... - Page 52 Zooms in map Initiates fixed zoom levels and re-enables Lock-to-Position (2D map only)**. This option is displayed only when GPS position is available. Initiates fixed tilt and zoom levels and re-enables Lock-to-Position (3D map only)**. This option is displayed only when GPS position is available.
-
Page 53: Map Visualization
GPS reception quality Opens GPS Data screen Time to destination and ETA at destination 1:31 h 3:16: 43 Time and ETA to next Via point Current speed 29 km/k Distance to next Via point and destination Opens the Main menu (Go to, Map, Route, Nav Extras, Settings) Map visualization The current version of the Travel Companion is primarily intended for land navigation. -
Page 54: Selected Map Point, Also Known As The Cursor
When the GPS position is lost, the arrow turns grey, but the journey continues on the recommended route for a short period of time with the speed last detected before the GPS position was lost. When the next route event is reached, or after 40 seconds, the arrow stops, and remains grey until GPS reception returns. -
Page 55: Start Point, Via Points, And Destination
Start point, Via points, and destination You have the following features on any active route while you are at a start point, at Via points, or at the destination. Active leg of the route The active leg is the section of the route you are currently driving. If you have not added any Via points, the whole route is the active leg. -
Page 56: Cursor Menu
Cursor menu The Cursor is the selected point on the map (marked by a red dot and radiating red circles around it), or the current GPS position when it is available and Lock-to-Position is enabled. Tapping the , or using the Go to menu, the map with the Cursor menu is displayed to give you the list of possible functions you can use the Cursor for. -
Page 57: Current Street
Edit Speedcam This button replaces Add Speedcam, if the Cursor is at or near to a position of a road safety camera. Tap it to edit the details of the camera. POI Info This button opens a list of POIs near the Cursor. Current street If you tap the Next street field on the map screens, the current street name is displayed for a few seconds. -
Page 58: 13 Route
13 Route This menu contains options to manage your routes and track logs. Edit Route To edit a route, you need to be aware of all waypoints used in the route. The first item in the list is the departure point of the route without a valid GPS position. The list contains the last reached Via point or the point where the Travel Companion recalculated the route. -
Page 59: Saved Routes
Buttons Function Deletes all route events. The whole route is deleted. Saves the route. Saved Routes This function opens the list of saved routes. All significant junctions are displayed in the list, even the ones that have still to be passed. Tap any of the list items to change its name. - Page 60 When you open the screen, you will see all fields contain information on reaching your final destination. Tap any of the fields to see data on the Via points starting from the first one through the final destination again. You can see the following options on the screen: ●...
-
Page 61: Warning Icons
Warning icons The following 5 squares are normally empty. Some of them show a graphical symbol in case warning (s) are attached to the planned route. These are warnings, so icons always show information for the whole route, even if the data fields display values from your current position to a Via point only. Tap on any of the icons to show its description. -
Page 62: Manage Track Logs
Buttons Function Settings – Opens the Route settings screen Simulation - this feature has no navigation function, it merely provides a quick view of the route. It presents a simulation of the route showing what you might see later when navigating. You can choose from two different kinds of simulations: ●... - Page 63 Tap any of the track log names in the list to open a new screen with the details of that track log. On this screen you have the following options: Button Function Changes the color of the track log. Opens a new screen where you can change the name of the track log.
-
Page 64: 3D Settings
14 Settings Your Travel Companion provides several settings to help you customize functions. The Settings screen can be accessed directly from the Main menu screen, while some of its sub-screens are accessible from other parts of the Travel Companion. Visual settings You can set a few parameters that determine the appearance of your Travel Companion. -
Page 65: Smart Powersave
Smart Powersave When running on battery, Smart Powersave lights up the screen only when you press a button or tap the screen. After a few seconds, the light level decreases, and after another few seconds, the backlight turns off. This helps you conserve the battery and achieve a longer battery life. Map settings These settings determine how maps are displayed on the Travel Companion. -
Page 66: Night Mode
Button Function This POI group has no subgroups. Tapping it does not perform any action. The POI group is not displayed on the map. However, some of its subgroups might be displayed according to their individual settings. The POI group is displayed on the map starting from this 500 m zoom level. -
Page 67: Restore Lock-To-Position And Smart Zoom
Restore Lock-to-Position and Smart Zoom You can move, rotate, tilt, and zoom the map during navigation. When you rotate, tilt, or zoom the map, the map follows your position but does not change the view parameter you have modified. Tap to return to the full Smart Zoom mode. -
Page 68: Voice Guidance
Voice guidance You can turn on the audible guidance (voice instructions and speed camera warning) by selecting the Voice check box. Move the voice slider to adjust the loudness of voice prompts. ● Moving the voice slider to the leftmost position suppresses the voice guidance. ●... -
Page 69: Route Calculation Method
Route calculation method You can choose from three different route types. Short Choosing Short results in a route that has the smallest total distance of all possible routes between the given points. This is usually preferred by cyclists or slow vehicles. Fast Choosing Fast results in the quickest possible route, given that you can travel at or near the speed limits on all included roads. -
Page 70: Ferries
Ferries The accessibility of temporary ferries is not necessarily included in the map data. Additionally, since you might need to pay a fare, you could consider disabling them. Cross-border planning By default your Travel Companion plans routes using the border crossing points. However, if you live near the border, you can disable border crossing with this switch to remain within one country. -
Page 71: Language
Language The display language currently selected is displayed. By tapping the left or right arrow, you can scroll through and select from the available languages. Your Travel Companion needs to be restarted if you change this setting. You are prompted for confirmation before it restarts. Voice The voice guidance profile currently selected is displayed. -
Page 72: Alternative Speeding Tolerance
Move the slider to its right-most position to turn off the alternative speed warning. This way the Speeding tolerance slider determines the warning for all roads. Alternative speeding tolerance If the speed limit of the current road reaches the value set at Alternative speed limit, this setting replaces Speeding tolerance. -
Page 73: 15 Navigation Extras
15 Navigation extras You can use the additional features of the Travel Companion to enhance your travel experience. Trip Planner Your Travel Companion includes access to HP iPAQ trip planning services. Visit http://www.ipaq.com to learn about the latest services and content available. Here you will find the free Web-based trip planning service that allows you to personalize your travel by creating custom trip itineraries that you can transfer to your Travel Companion for use during your travels. -
Page 74: Tmc Configuration
TMC configuration You can configure TMC using following features: ● Subscribe to TMC To receive a TMC data from a source, which needs subscription, you need to subscribe to it. Tap Subscribe TMC to subscribe. A new screen is displayed. Fill in the required details, tap the Web site and enter details when prompted. -
Page 75: 16 Gps Data Screen
16 GPS data screen The GPS data screen is a collection of information received from the GPS device. The GPS data screen displays the visible part of the sky above you, with your position as the centre. The satellites are displayed at their current positions. -
Page 76: 17 About Screen
17 About screen You can access this screen from the main page by tapping Settings > System > About. The screen provides information on the maps and licenses you have installed on your Travel Companion. Chapter 17 About screen... -
Page 77: 18 Outlook Synchronization
18 Outlook synchronization The HP iPAQ Outlook Synchronizer can synchronize contact entries between your computer's Outlook database and the Travel Companion, as well as back up, and restoring the entire contacts database. NOTE: You need to install the HP iPAQ Outlook Synchronizer that is available on the Getting Started CD or visit http://www.ipaq.com for downloading this application before you begin using it. -
Page 78: 19 Product Specifications
19 Product specifications System specifications System Feature Description Processor Titan 600 MHz ARM11 Dual-Core Processor Operating System Microsoft® Windows CE 5.0 Memory 2.0 GB flash memory, user available varies by model 128 MB SDRAM for running applications External Power AC Input: 100~240 Vac, 50/60 Hz, AC Input current: 0.2 A ac max Output Voltage: 5Vdc (typical) Display 4.3"... -
Page 79: Operating Environment
Operating environment Metric Temperature Operating 32° to 104° F 0° to 40° C Nonoperating -9.6° to 140° F -20° to 60° C Relative Humidity Operating up to 85 % up to 85 % Nonoperating up to 85 % up to 85 % Maximum Altitude Operating 0 to 15,000 ft... -
Page 80: 20 Regulatory Notices
This device must accept any interference received, including interference that may cause undesired operation. If you have questions about the product that are not related to this declaration, write to Hewlett-Packard Company P. O. Box 692000, Mail Stop 530113 Houston, TX 77269–2000 or call 1–800–HP–INVENT (1–800–474–6836) -
Page 81: Canadian Notice
*If applicable, a notified body number is used. Refer to the regulatory label provided on this product. Hewlett-Packard GmbH, HQ-TRE, Herrenberger Strasse 140, D-71034 Böblingen, Germany The telecommunications functionality of this product may be used in the following EU and EFTA... -
Page 82: Products With 2.4-Ghz Wireless Lan Devices
Austria, Belgium, Bulgaria, Cyprus, Czech Republic, Denmark, Estonia, Finland, France, Germany, Greece, Hungary, Iceland, Ireland, Italy, Latvia, Liechtenstein, Lithuania, Luxembourg, Malta, Netherlands, Norway, Poland, Portugal, Slovak Republic, Romania, Slovenia, Spain, Sweden, Switzerland, and United Kingdom. Products with 2.4–GHz Wireless LAN Devices France L'utilisation de cet equipement (2.4GHz Wireless LAN) est soumise a certaines restrictions: Cet equipement peut être utilisé... -
Page 83: Equipment Warning
Equipment Warning WARNING! To reduce the risk of personal injury, electrical shock, fire or damage to the equipment: Plug the AC adapter into an AC outlet that is easily accessible at all times. Disconnect power from the equipment by unplugging the AC adapter from the AC outlet or unplugging the synchronization cable from the host computer. -
Page 84: Airline Travel Notice
Airline Travel Notice Use of electronic equipment aboard commercial aircraft is at the discretion of the airline. Medical Electronic Equipment If you have a medical condition that requires you to use a pacemaker, hearing aid, or any type of medical electronic equipment, consult the manufacturer of the equipment to determine if the medical equipment is shielded from RF energy. -
Page 85: Bluetooth Devices
Bluetooth Devices Taiwan DGT Notice Korean Notice Taiwan DGT Notice... -
Page 86: 21 Guidelines For Care And Maintenance
21 Guidelines for care and maintenance It is recommended that you follow certain guidelines to prevent possible damage to the Travel Companion and to keep it in a good condition. Using the Travel Companion ● Avoid using the Travel Companion in dusty and extremely high or low temperature environments. ●... -
Page 87: Protect The Travel Companion Screen From Cracking Or Damage
If a nonwarranty event occurs such as a damaged or cracked screen and want your device repaired, contact HP Customer Support at http://www.hp.com/support for service. However, contacting HP customer service on a nonwarranty event results in a charge for the repair. Protect the Travel Companion screen from cracking or damage CAUTION:...