D-Link DSA-3100 Manual
Public/private gateway
Hide thumbs
Also See for DSA-3100:
- User manual (87 pages) ,
- Owner's manual (70 pages) ,
- Quick installation manual (12 pages)
Table of Contents
Quick Links
See also:
Owner's Manual, User Manual
Table of Contents

Related Manuals for D-Link DSA-3100


Summary of Contents for D-Link DSA-3100
- Page 1 D-Link Airspot DSA-3100 Public/Private Gateway Manual March 2006 Rev. B Building Networks for People...
-
Page 2: Table Of Contents
Rear Panel ................... 6 Features ....................7 Sample Scenarios ................8 Installation ..................10 Setting Up the DSA-3100 ..............11 Configure PCs on your LAN ............... 12 TCP/IP Network Setting ..............12 Internet Access Configuration ............13 Using the Configuration Utility ............15 Networking Basics ................ -
Page 3: Package Contents
Package Contents Contents of Package: D-Link DSA-3100 Airspot Gateway CD-ROM (containing Manual and Warranty) Quick Installation Guide Two (2) CAT5 UTP/Straight-through (Ethernet) cables One (1) CAT5 UTP/Cross-over cable One (1) Console cable 5V DC, 3A Power Adapter If any of the above items are missing, please contact your reseller. -
Page 4: Introduction
The DSA-3100 can be configured with a standard HTML browser (i.e., Internet Explorer, Netscape Navigator) operating on Windows 98SE/Me/2000/XP, Macintosh OS 9, Mac OS X (v10.1.5 or later), Linux, or Pocket PC 2000/2002. The DSA-3100 allows the operator to offer wired or wireless networking services and access to the Internet when used with a switch or wireless access point respectively. -
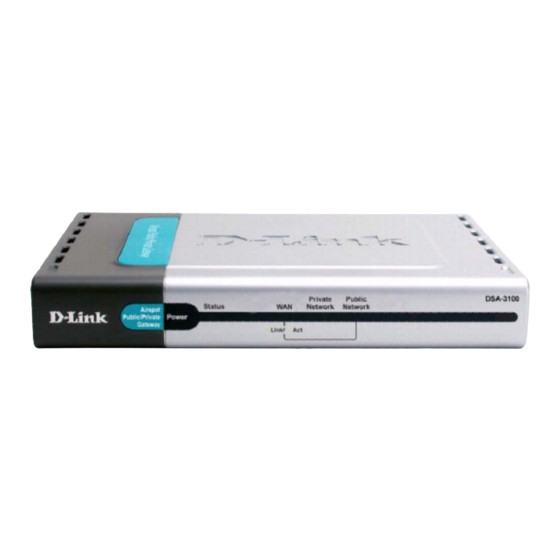
Page 5: Front Panel
Public Network - A solid light indicates a connection from the Status LED - A solid LED indicates Authentication port for a Public the DSA-3100 is working properly. Network. This LED blinks during This LED will flash during reboot. data transmission. -
Page 6: Rear Panel
Rear Panel Console Port - Authentication Port For resetting to factory (Public LAN or WLAN with Receptor for defaults, or reconfiguring Access Point) - Power the device. For Advanced Connects to a switch or AP. Adapter. users only! WAN Port - Local Area Network Port (Private LAN)- The port that connects to Connects to a switch for a private network. -
Page 7: Features
Features Creates two separate and discreet networks allowing the owner/ administrator to create a wired or wireless hotspot and provide Internet access to visitors, guests, or customers. Manages up to 250 user accounts with an internal database. Supports at least 50 users accessing the Internet at any given time. Allows ID/Password-based authentication and authorization (can also be combined with MAC address locking for even stricter access control). -
Page 8: Sample Scenarios
Sample Scenarios... - Page 9 Sample Scenarios (continued)
-
Page 10: Installation
Installation Requirements Standard 10/100Base-T network (UTP/Cat5 Ethernet) cable with RJ45 connectors. TCP/IP network protocol must be installed on all networked computers and related devices. -
Page 11: Setting Up The Dsa-3100
Setting up the DSA-3100 Make sure the DSA-3100 unit is not connected to the power adapter and is powered OFF. WAN port connection Use 10/100BaseT connections to connect the unmanaged network. The unmanaged network’s interface may be the ADSL router’s LAN port, cable modem’s LAN port or Intranet switch port. -
Page 12: Configure Pcs On Your Lan
Configure PCs on your LAN After installing the DSA-3100, each computer’s TCP/IP network settings and Internet access configuration may need to be re-configured: TCP/IP network settings f your PC uses the default Windows XP/2000/Me/98SE setting, no changes need to be made. Just restart your PC. -
Page 13: Internet Access Configuration
Internet Access Configuration To configure your PCs to use the DSA-3100 for Internet access, follow this procedure. For Windows 98SE/2000 Please select Start Menu - Control Panel - Internet Options. Select the Connection tab, and click the Setup button. - Page 14 Internet Access Configuration (continued) Select “I want to set up my Internet connection manually, or I want to connect through a local Area network (LAN)” and click Next. Select “I connect through a local area network (LAN)” and click Next. Ensure all of the boxes on the local area network Internet configuration screen are unchecked.
-
Page 15: Using The Configuration Utility
Using the Configuration Utility To configure the DSA-3100, use a computer which is connected to the local network port of the DSA-3100 with an Ethernet cable. First, disable the Access the Internet using a proxy server function. To disable this function, go to Control Panel > Internet Options > Connections >... - Page 16 Click Apply in each screen of the Configuration Utility in which you have made changes. Restart the DSA-3100 after completing any changes to its configuration. Home > Wizard The Home>Wizard screen will appear if you logged in as an admin. For more information...
- Page 17 Using the Configuration Utility (continued) Home > System System DSA-3100 is the default system name. You may wish to rename it to Name: indicate your company, department, or the service you would like to provide. Admin You can edit the System Administrator’s information here (e.g., name, Detail: phone number, and e-mail).
- Page 18 Using the Configuration Utility (continued) Home > WAN > Static IP Address Static IP Address: IP address: Enter the IP address provided to you by your ISP. Enter the subnet mask provided to you by your ISP. All Subnet mask: devices on the network must have the same netmask.
- Page 19 Using the Configuration Utility (continued) Home > WAN > Dynamic IP Address Select this option to obtain an IP address automatically from your ISP. Renew Click Renew to renew the IP configuration. Home > WAN > PPPoE Most DSL users will select this option.
- Page 20 Using the Configuration Utility (continued) Home > Public Network The DSA-3100 allows the gateway to be set to one of three Authentication modes. Mode: Select NAT; NAT_IP_PNP or Router This mode protects the identity of the devices within NAT: the LAN from those devices outside the network.
- Page 21 Using the Configuration Utility (continued) Home > Public Network (continued) Enable DHCP Selecting this option activates the device’s built-in DHCP server. Configure Server: the DHCP server with the following properties: DHCP Scope Enter the starting IP address, from which the DHCP Start IP server will assign to the DHCP-enabled devices (clients) on the network.
- Page 22 Using the Configuration Utility (continued) Home > Private Network Router are the two local network port modes. Nat mode: All outbound IP addresses on the local network port will be translated to the IP address of the WAN port to proceed. Router mode: All outbound IP addresses on the local network port will retain their IP addresses.
- Page 23 Using the Configuration Utility (continued) Home > User Manager > General Account User Control: Select Enable or Disable. When disabled, only the MAC Address Control function is available. General Account Session Length: Limit the duration of each session established by the general account from 5 minutes to an unlimited period.
- Page 24 Using the Configuration Utility (continued) Home > User Manager > General Account Define the login time and duration here.
- Page 25 Using the Configuration Utility (continued) Home > User Manager > Guest Account Guest Account: Select Enable or Disable. Guest Account List Up to 10 guest accounts can be defined. To activate a particular Guest Account, simply enter the corresponding password in the Password column and click Apply.
- Page 26 40 users will be allowed to login when this function is enabled. Please refer to the configuration screen as follows. Note: MAC address format is XX:XX:XX:XX:XX:XX or XX-XX-XX-XX-XX-XX. A newly created user account will be valid instantly. Restarting the DSA-3100 is not necessary.
- Page 27 Allow administrator to choose between activating https SSL: (encryption), or http (non-encryption) for the login page. Enter a URL, if you enable this function. The DSA-3100 detects WAN Fail the WAN port connection by linking the URL defined here. It will Function: pop up the alarm page when the WAN port fails to connect.
- Page 28 Using the Configuration Utility (continued) Home > User Manager > Authentication Server > Local Local Users List: list of all local user accounts stored in the embedded database for user account management.You can add, edit, and delete users. A sample list is shown here.
- Page 29 DSA-3100. Each line of the text file can be in one of the following two formats:...
- Page 30 On-demand User: When you connect the DSA-3100P (the plug and play receipt printer) to the DSA-3100’s console port, you can create a database of up to 2000 on-demand users. By default, the on-demand user database is empty. While you press the DSA-3100P’s button, the on-demand user will be created in the database, a receipt will then be printed which will contain the on-demand user’s information.
- Page 31 Field Description You can specify the prefix of the user name. The maximum Store Name is 8 characters (e.g., D-Link). You can specify the maximum user amount which cannot Account Range exceed 2000. You can configure the receipt’s header in this field.
- Page 32 You can delete users in this window. Local > Local User Group Configuration The DSA-3100 provides 5 local user groups; each group can designate a different outbound traffic bandwidth. The Logout Timer will logout a user that has not accessed the Internet for...
- Page 33 To use POP3 as the authentication method, input the POP3 server IP address or domain name and its POP3 server port. The settings will take effect immediately after you click the Apply button. It is recommended that you restart the DSA-3100 after these changes if there are any online users.
- Page 34 To utilize 802.1x, all the devices on the network must be 802.1x and EAP enabled. The APs and the RADIUS server must share the same secret word, and the DSA-3100 and the RADIUS server must share the same secret word.
- Page 35 Using the Configuration Utility (continued) Home > User Manager > Authentication Server > RADIUS > 802.1x (continued) Input the IP addresses and secret keys for the devices on the network. If you are using the 802.1x supplicant provided by Microsoft, the idle time out will be longer than the settings in RADIUS/AP and DSA- 3100.
- Page 36 Home > User Manager > Authentication Server > External Web Server The DSA-3100 can support an external web server which enables the user to put the login page on the external web server and change it at anytime to correspond with customer’s needs.
- Page 37 Home > User Manager > Authentication Server > Airpath Airpath: The DSA-3100 has the capability to allow Airpath and Pronto Wireless Users access to the Hot Spot by using their existing user credentials. Service from either Airpath and Pronto Wireless is required before the DSA-3100 can auth- enticate such users.
- Page 38 Pronto Roaming: Pronto Wireless will provide all required information. The DSA-3100 Administrator must have a roaming user agreement with Pronto Wireless in order to use this feature. Users who registered Pronto Wireless's service may login to the local public network via roaming. You can configure...
- Page 39 Using the Configuration Utility (continued) Advanced > Port and IP Redirect Up to 10 sets of traffic redirection criteria can be defined through this interface. Clients who try to access a specific destination that matches one of the defined destinations will be forced to a matching redirection target.
- Page 40 Using the Configuration Utility (continued) Advanced > Pass-Through To maintain an adequate level of security, each client on the network can be managed. To allow some devices to be unmanaged, input their IP addresses or MAC addresses in this interface. Up to 20 IP addresses and 10 MAC addresses can be assigned unmanaged access.
- Page 41 Using the Configuration Utility (continued) Advanced > DMZ If you have multiple IP addresses available to assign to the DSA-3100’s WAN interface, you could define up to 10 pairs of Ethernet side (Private IP) and WAN side (Public IP) addresses.
- Page 42 Note: For the static route to work, the next hop route must also have added a static route to forward all 192.168.100.0/24 IP packets to the DSA-3100. After clicking the Apply button, you will see the added route is shown in the current running routing table.
- Page 43 Using the Configuration Utility (continued) Advanced > Firewall Click the Filter Rule number to enter the firewall page for each filter. The chart on the following page explains each configurable item in detail. Edit the filter rule Filter rule is a set of fil- ters that determine whether traffic will be allowed to pass be-...
- Page 44 Using the Configuration Utility (continued) Advanced > Firewall (continued) Description Filter Gives a name to the IP Filter rule Name Check to en- Enables this rule if it is marked able this rule Specifies the action to be taken when packets match the rule Action Block: Packets matching the rule will be dropped Pass: Packets matching the rule will be passed...
- Page 45 Tools > Monitor IP List Admin E-mail Send From: Enter the E-mail address from which you wish to send the DSA-3100 history log. Send To: Enter the E-mail address here to which you wish to send the DSA-3100 history log.
- Page 46 To provide a private key page in order to support a specific certificate, please click Browse to search for the file name for the customer certificate. Click Apply to upload it onto the DSA-3100. If you want to get back to the default certificate page, simply click the Use Default Certificate button.
- Page 47 Tools > Upload Login Page To provide a custom user login page, please specify the file name to upload onto the DSA-3100. If you want to get back to the default user login page, simply click the Use Default Page button.
- Page 48 To provide a custom user logout page, please click Browse to specify the file name and upload it onto the DSA-3100 by clicking Apply. If you want to get back to the default user logout page, simply click the Use Default Page button.
- Page 49 Upload Logout Succeed Page: To provide a custom user logout page, please specify the file name to upload it onto the DSA-3100. If you want to get back to the default user logout page, simply click the Use Default Page button. If you want to display the...
- Page 50 Upload Radius Login Succeed Page: To provide a Radius user "login ok" page, please specify the file name to upload it onto the DSA-3100. If you want to get back to the default user login page, simply click the Use Default Page button.
- Page 51 When system power it off and on. Restarting the upgrading its firmware, the DSA-3100 in this way, after a firmware upgrade, Status LED blinks until might result in corruption of the DSA-3100 done. When finished, the firmware. (Online user sessions will be web interface will display a terminated when the system restarts.)
- Page 52 If you select Enable SNMP, enter the IP address, community string to the field. Proxy Server: Based on DSA-3100 security management, only port 80 is allowed (it will appear on logon webpage). If you have built a Proxy Server in your network environment, and the user’s browser is set to Proxy, you must set your External Proxy...
- Page 53 Using the Configuration Utility (continued) Tools > Restart Reboots the DSA-3100. It takes about 75 seconds for the DSA-3100 to reboot. If you have to turn off the power of the DSA-3100 for some time, please reboot it, and after you hear a beep, remove the power adapter.
- Page 54 Using the Configuration Utility (continued) Status > Device Info (continued) Current Firmware Version Displays the current firmware version System Name System name; DSA-3100 is the default Admin Detail Information about the admin Succeed Page The URL that appears after a successful user login–usually a corporation’s homepage...
- Page 55 Using the Configuration Utility (continued) With this feature, you can get Interface management information about the WAN port, Authentication port, and Local Network port. For more detail see the following page: Status > Interface...
- Page 56 Using the Configuration Utility (continued) Status > Interface (continued)
- Page 57 Account Name, Password and Domain. Access History IP Specify an IP address that allows the billing system to connect to the DSA-3100 via this IP address to get history information for billing. External Syslog Server Specify the IP address and the Port of the...
- Page 58 Using the Configuration Utility (continued) Help This feature provides online instructions for operating the DSA-3100, you can click the hyperlink for a more detailed description.
-
Page 59: Networking Basics
Networking Basics Using the Network Setup Wizard in Windows XP In this section you will learn how to establish a network at home or work, using Microsoft Windows XP. Note: Please refer to websites such as http://www.homenethelp.com http://www.microsoft.com/windows2000 for information about networking computers using Windows 2000, ME or 98. - Page 60 Networking Basics (continued) Please follow all the instructions in this window: Click Next In the following window, select the best description of your computer. If your computer connects to the internet through a gateway/router, select the second option as shown. Click Next...
- Page 61 Networking Basics (continued) Enter a Computer description and a Computer name (optional.) Click Next Enter a Workgroup name. All computers on your network should have the same Workgroup name. Click Next...
- Page 62 Networking Basics (continued) Please wait while the Network Setup Wizard applies the changes. When the changes are complete, Click Next. Please wait while the Network Setup Wizard configures the computer. This may take a few minutes.
- Page 63 Networking Basics (continued) In the window below, select the option that fits your needs. In this example, Create a Network Setup Disk has been selected. You will run this disk on each of the computers on your network. Click Next. Insert a disk into the Floppy Disk Drive, in this case drive A.
- Page 64 Networking Basics (continued) Please read the information under Here’s how in the screen below. After you com- plete the Network Setup Wizard you will use the Network Setup Disk to run the Network Setup Wizard once on each of the computers on your network. Click Next.
- Page 65 Networking Basics (continued) Please read the information on this screen, then click Finish to complete the Network Setup Wizard. The new settings will take effect when you restart the computer. Click Yes to restart the computer. You have completed configuring this computer. Next, you will need to run the Net- work Setup Disk on all the other computers on your network.
- Page 66 Networking Basics (continued) Naming your Computer To name your computer In Windows XP, please follow these directions: Click Start (in the lower left corner of the screen) Right-click on My Computer Select Properties Select the Computer Name Tab in the System Properties window.
- Page 67 Networking Basics (continued) Naming your Computer (continued) In this window, enter the Computer name. Select Workgroup and enter the name of the Workgroup. All computers on your network must have the same Workgroup name. Click OK Checking the IP Address in Windows XP The adapter-equipped computers in your network must be in the same IP Address range (see Getting Started in this manual for a definition of IP Address Range.) To check on the IP Address of the adapter, please do the following:...
- Page 68 Networking Basics (continued) Checking the IP Address in Windows XP (continued) This window will appear. Click the Support tab Click Close Assigning a Static IP Address in Windows XP/2000 Note: Residential Gateways/Broadband Routers will automatically assign IP Addresses to the computers on the network, using DHCP (Dynamic Host Configuration Protocol) technology.
- Page 69 Networking Basics (continued) Assigning a Static IP Address in Windows XP/2000 (continued) Double-click on Network Connections Right-click on Local Area Connections Click on Properties...
- Page 70 Networking Basics (continued) Assigning a Static IP Address in Windows XP/2000 Click on Internet Protocol (TCP/IP) Click Properties Input your IP Address and subnet mask. (The IP Addresses on your network must be within the same range. For example, if one computer has an IP Address of 192.168.0.2, the other computers should have IP...
- Page 71 Networking Basics (continued) Assigning a Static IP Address with Macintosh OSX Go to the Apple Menu and se- lect System Preferences cClick on Network Select Built-in Ethernet in the Show pull-down menu Select Manually in the Configure pull-down menu Input the Static IP Address, the Subnet Mask and the Router IP Address in the appropriate fields...
- Page 72 Networking Basics (continued) Selecting a Dynamic IP Address with Macintosh OSX Go to the Apple Menu and select System Preferences Click on Network Select Built-in Ethernet in the Show pull-down menu Select Using DHCP in the Configure pull-down menu Click Apply Now The IP Address, Subnet mask, and the Router’s IP Address will appear in a few...
-
Page 73: Technical Support
Networking Basics (continued) Checking the Wireless Connection by Pinging in Windows XP/2000 Note: The following illustrations are examples only. The IP Address that you are pinging may be different from those in the following examples. Go to Start > Run > type cmd. -
Page 74: Technical Specifications
Technical Specifications Functions Provided 3 10/100Mbps Fast Ethernet ports for WAN connection, trusted LAN connection and untrusted LAN connection Manages up to 250 user account data with internal user account database Supports up to 50 on-line users ID/Password based authentication and authorization- Can be combined with MAC Address locking to provide stricter access control POP3, RADIUS and LDAP external authentication mechanism support - Only one of these can be selected at a time... - Page 75 Technical Specifications (continued) Device Ports - All ports (except the console port) are auto-mdix, which means that you can use a straight-through or a crossover cable for connections. WAN port: 10/100Mbps Fast Ethernet Private LAN port: 10/100Mbps Fast Ethernet connects to workstations & serv- ers that do not need authentication Public LAN port: 10/100Mbps Fast Ethernet connects to workstations &...
- Page 76 Support echni cal Support You can find software updates and user documentation on the D-Link website. D-Link provides free technical support for customers within the United States and within Canada for the duration of the warranty period on this product.
- Page 77 D-Link’s sole obligation shall be to repair or replace the defective Hardware during the Warranty Period at no charge to the original owner or to refund at D-Link’s sole discretion. Such repair or replacement will be rendered by D-Link at an Authorized D-Link Service Office. The replacement Hardware need not be new or have an identical make, model or part.
- Page 78 The customer is responsible for all in-bound shipping charges to D-Link. No Cash on Delivery (“COD”) is allowed. Products sent COD will either be rejected by D-Link or become the property of D- Link. Products shall be fully insured by the customer and shipped to D-Link Systems, Inc., 17595 Mt.
- Page 79 Trademarks: D-Link is a registered trademark of D-Link Systems, Inc. Other trademarks or registered trademarks are the property of their respective manufacturers or owners.