Huawei FusionModule1000A40 Installation Manual
Prefabricated all-in-one data center
Hide thumbs
Also See for FusionModule1000A40:
- Maintenance manual (179 pages) ,
- Initial configuration parameter manual (109 pages) ,
- Product description (89 pages)

Related Manuals for Huawei FusionModule1000A40


Summary of Contents for Huawei FusionModule1000A40
- Page 1 FusionModule1000A40 Prefabricated All-in-One Data Center V200R003C10 Installation Guide Issue Date 2022-12-15 HUAWEI DIGITAL POWER TECHNOLOGIES CO., LTD.
- Page 2 Notice The purchased products, services and features are stipulated by the contract made between Huawei Digital Power Technologies Co., Ltd. and the customer. All or part of the products, services and features described in this document may not be within the purchase scope or the usage scope. Unless otherwise specified in the contract, all statements, information, and recommendations in this document are provided "AS IS"...
-
Page 3: About This Document
Indicates a hazard with a low level of risk which, if not avoided, could result in minor or moderate injury. Issue 07 (2022-12-15) Copyright © Huawei Digital Power Technologies Co., Ltd. - Page 4 This issue is the fourth official release. ● Optimized the content description. ● Optimized the figure display. Issue 03 (2020-06-09) This issue is the third official release. ● Updated the fire extinguishing devices. Issue 07 (2022-12-15) Copyright © Huawei Digital Power Technologies Co., Ltd.
- Page 5 This issue is the second official release. ● Updated the layout diagrams of the concrete platform scenario and base installation scenario. Issue 01 (2019-07-15) This issue is the first official release. Issue 07 (2022-12-15) Copyright © Huawei Digital Power Technologies Co., Ltd.
-
Page 6: Table Of Contents
5 Installing Pre-fab. Modules....................39 5.1 (Optional) Concrete Platform Scenario........................39 5.1.1 Determining the Pre-fab. Module Installation Position..................39 5.1.2 Removing the Pre-fab. Module Protective Cover....................40 5.1.3 Hoisting Pre-fab. Modules.............................. 41 Issue 07 (2022-12-15) Copyright © Huawei Digital Power Technologies Co., Ltd. - Page 7 10.2 (Optional) Connecting Generator Start/Stop Cables (ATS Input)..............100 11 Removing Transport Protection Materials from Fire Extinguishing and Monitoring Devices........................ 102 12 Installation Verification....................105 A Basic Installation Operations...................107 A.1 Cable Installation Techniques............................107 A.1.1 Cabling Rules..................................107 Issue 07 (2022-12-15) Copyright © Huawei Digital Power Technologies Co., Ltd.
- Page 8 A.2 Preparing Cable Terminals.............................. 119 B Repairing the Pre-fab. Module..................121 C Dimensions of External Cable Trays and Fixed Ladders..........123 D Cleaning Pre-fab. Modules....................125 E Acronyms and Abbreviations....................126 Issue 07 (2022-12-15) Copyright © Huawei Digital Power Technologies Co., Ltd.
-
Page 9: Safety Information
Equipment damage due to force majeure such as earthquakes, floods, volcanic eruptions, debris flows, lightning strikes, fires, wars, armed conflicts, typhoons, hurricanes, tornadoes, and extreme weather conditions ● Operation beyond the conditions specified in this document Issue 07 (2022-12-15) Copyright © Huawei Digital Power Technologies Co., Ltd. -
Page 10: Personal Safety
D ANGER During operations, use dedicated insulated tools to prevent electric shocks or short circuits. The insulation and voltage resistance must comply with local laws, regulations, standards, and specifications. Issue 07 (2022-12-15) Copyright © Huawei Digital Power Technologies Co., Ltd. - Page 11 – Trained personnel: personnel who are trained in technology and safety, have required experience, are aware of possible hazards on themselves in Issue 07 (2022-12-15) Copyright © Huawei Digital Power Technologies Co., Ltd.
-
Page 12: Electrical Safety
WARNING For the equipment that needs to be grounded, install the ground cable first when installing the equipment and remove the ground cable last when removing the equipment. Issue 07 (2022-12-15) Copyright © Huawei Digital Power Technologies Co., Ltd. - Page 13 Installation personnel mark tightened bolts in blue. Quality inspection personnel confirm that the bolts are tightened and then mark them in red. (The marks should cross the edges of the bolts.) Issue 07 (2022-12-15) Copyright © Huawei Digital Power Technologies Co., Ltd.
- Page 14 If high touch current may occur on the equipment, ground the protective ground terminal on the equipment enclosure before connecting the power supply; otherwise, electric shock as a result of touch current may occur. Issue 07 (2022-12-15) Copyright © Huawei Digital Power Technologies Co., Ltd.
- Page 15 (LSI) circuits. ● When touching the equipment and handling boards, modules with exposed circuit boards, or application-specific integrated circuits (ASICs), observe ESD Issue 07 (2022-12-15) Copyright © Huawei Digital Power Technologies Co., Ltd.
-
Page 16: Environmental Requirements
Do not place the equipment near heat sources or fire sources, such as smoke, candles, heaters, or other heating devices. Overheat may damage the equipment or cause a fire. Issue 07 (2022-12-15) Copyright © Huawei Digital Power Technologies Co., Ltd. - Page 17 Before opening doors during the installation, operation, and maintenance of the equipment, clean up any water, ice, snow, or other foreign objects on the top of the equipment to prevent foreign objects from falling into the equipment. Issue 07 (2022-12-15) Copyright © Huawei Digital Power Technologies Co., Ltd.
-
Page 18: Mechanical Safety
Before installing equipment in a cabinet, ensure that the cabinet is securely fastened with a balanced center of gravity. Otherwise, tipping or falling cabinets may cause bodily injury and equipment damage. Issue 07 (2022-12-15) Copyright © Huawei Digital Power Technologies Co., Ltd. - Page 19 ● Move or lift the equipment by holding its handles or lower edges. Do not hold the handles of modules that are installed in the equipment. Issue 07 (2022-12-15) Copyright © Huawei Digital Power Technologies Co., Ltd.
- Page 20 Set a restricted area and prominent signs for working at heights to warn away irrelevant personnel. ● Set guard rails and warning signs at the edges and openings of the area involving working at heights to prevent falls. Issue 07 (2022-12-15) Copyright © Huawei Digital Power Technologies Co., Ltd.
- Page 21 If a single ladder is used, the recommended angle for the ladder against the floor is 75 degrees, as shown in the following figure. A square can be used to measure the angle. Issue 07 (2022-12-15) Copyright © Huawei Digital Power Technologies Co., Ltd.
- Page 22 Do not drag steel ropes and hoisting tools or bump hoisted objects against hard objects during hoisting. ● Ensure that the angle between two hoisting ropes is no more than 90 degrees, as shown in the following figure. Issue 07 (2022-12-15) Copyright © Huawei Digital Power Technologies Co., Ltd.
-
Page 23: Equipment Safety
Otherwise, the gas may leak and cause a fire. ● High-temperature pipes after welding must be promptly cooled. 1.5 Equipment Safety Issue 07 (2022-12-15) Copyright © Huawei Digital Power Technologies Co., Ltd. -
Page 24: Cooling System Safety
Do not expose batteries at high temperatures or around heat sources, such as high-temperature sunlight, fire sources, transformers, and heaters. Battery overheating may cause leakage, smoke, flammable gas release, thermal runaway, fire, or explosion. Issue 07 (2022-12-15) Copyright © Huawei Digital Power Technologies Co., Ltd. - Page 25 Ensure that no liquid enters the equipment to prevent faults or short circuits. Issue 07 (2022-12-15) Copyright © Huawei Digital Power Technologies Co., Ltd.
- Page 26 WARNING If the electrolyte leaks, absorb and neutralize the electrolyte immediately. Exercise caution when moving or handling a battery with electrolyte leakage, because the leaking electrolyte is hazardous. Issue 07 (2022-12-15) Copyright © Huawei Digital Power Technologies Co., Ltd.
- Page 27 ● Batteries are damaged due to your or a third party's reasons, for example, relocating or reinstalling the batteries without complying with the Company's requirements. Issue 07 (2022-12-15) Copyright © Huawei Digital Power Technologies Co., Ltd.
- Page 28 When installing batteries, do not place installation tools, metal parts, or sundries on the batteries. After the installation is complete, clean up the objects on the batteries and the surrounding area. Issue 07 (2022-12-15) Copyright © Huawei Digital Power Technologies Co., Ltd.
- Page 29 Intake: Seek immediate medical attention. Special requirements for lead-acid batteries: NO TICE When the battery temperature exceeds 60°C, check whether the electrolyte leaks. If the electrolyte leaks, take proper measures promptly. Issue 07 (2022-12-15) Copyright © Huawei Digital Power Technologies Co., Ltd.
- Page 30 If batteries are out of service life, contact a battery recycling company for disposal. ● Do not expose waste batteries to high temperatures or direct sunlight. ● Do not place waste batteries in environments with high humidity or corrosive substances. Issue 07 (2022-12-15) Copyright © Huawei Digital Power Technologies Co., Ltd.
-
Page 31: Installation Guide Usage
Before using this document, make available the documents delivered with each component. ● Unless otherwise specified, dimensions of devices in this document are by default height x width x depth, and the default measurement is mm. Issue 07 (2022-12-15) Copyright © Huawei Digital Power Technologies Co., Ltd. -
Page 32: Site Requirements
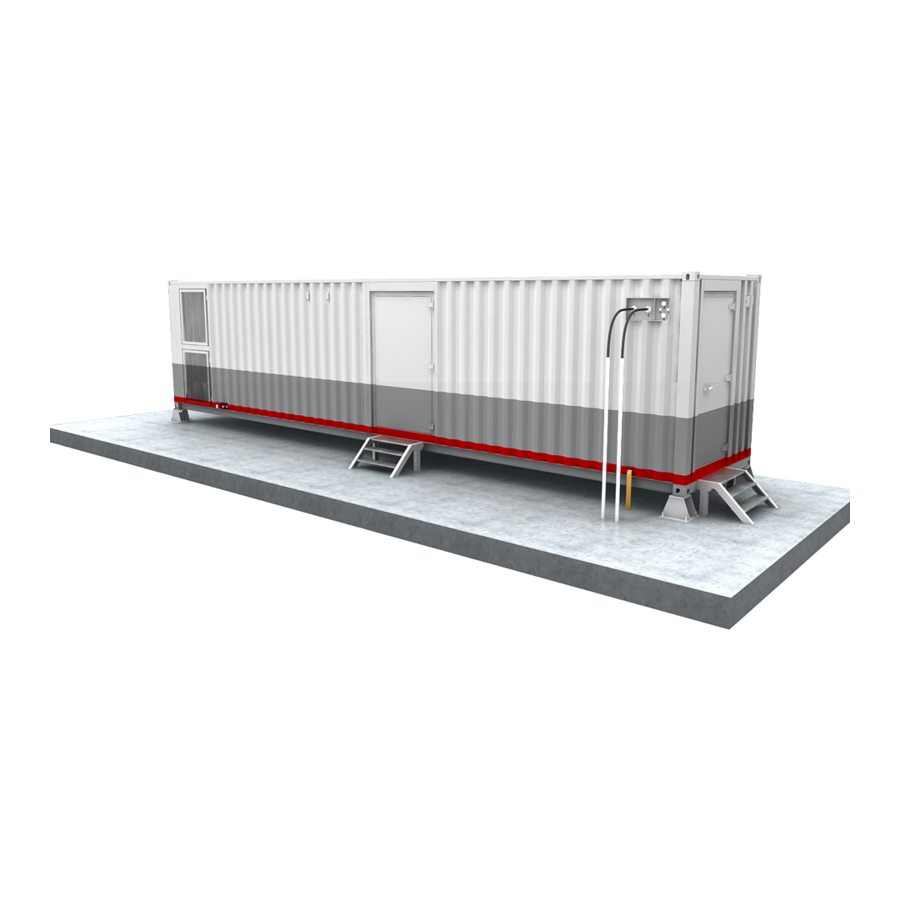
C outdoor unit. 3.2 Field Requirements The FusionModule1000 can be installed on bases or concrete platforms depending on the actual scenario. The site requirements vary with the selected installation mode. Issue 07 (2022-12-15) Copyright © Huawei Digital Power Technologies Co., Ltd. -
Page 33: Optional) Concrete Platform Scenario
3.2.2 (Optional) Base Installation Scenario ● Build concrete platforms on the selected installation site. Issue 07 (2022-12-15) Copyright © Huawei Digital Power Technologies Co., Ltd. - Page 34 The horizontal error between concrete platforms must be less than 5 mm. ● Concrete pads or passages with the load-bearing capacity meeting local civil work standards can be built on the site outside the concrete platforms for access and servicing. Issue 07 (2022-12-15) Copyright © Huawei Digital Power Technologies Co., Ltd.
-
Page 35: Power Supply And Distribution Requirements
5 m. ● The pre-buried ground grid must be at least 0.7 m underground. In cold areas, the ground electrodes must be buried under the frozen layer. Issue 07 (2022-12-15) Copyright © Huawei Digital Power Technologies Co., Ltd. -
Page 36: Water Refill And Drainage Requirements
Table 3-2 Water quality requirements Item Allowed Value Hydrogen ion pH: 7–8.5 300–1250 μS/cm Conductivity at 20°C (σ ≤ 100 mg/L Inlet water hardness specifications Issue 07 (2022-12-15) Copyright © Huawei Digital Power Technologies Co., Ltd. -
Page 37: Drainage Requirements
Wrap the pipes with an electric heating belt, starting from the water refill and drainage ports on a pre-fab. module to the frozen soil layer. Bury the remaining pipes underground (the temperature at a specific depth underground is always above 0°C). Issue 07 (2022-12-15) Copyright © Huawei Digital Power Technologies Co., Ltd. - Page 38 ● Wrap the electric heating belt before wrapping the thermal insulation foam. Ensure that the thermal insulation foam covers the electric heating belt. The thermal insulation foam must be able to withstand a temperature higher than 200°C. Issue 07 (2022-12-15) Copyright © Huawei Digital Power Technologies Co., Ltd.
-
Page 39: External Environment Requirements
–20°C to +45°C for standard configuration and 208 V scenarios – Low temperature working condition: –40°C to +45°C for advanced configuration ● Relative humidity: 5%–95% RH ● Solar radiation: ≤ 1120 W/m Issue 07 (2022-12-15) Copyright © Huawei Digital Power Technologies Co., Ltd. -
Page 40: Installation Preparations
Phillips screwdriver (M5, Flat-head screwdriver (2–5 Phillips screwdriver M4 M6, and M8) (length < 100 mm) Tightenin g tools Phillips screwdriver M8 Solid wrench Adjustable wrench (length = 200 mm) Issue 07 (2022-12-15) Copyright © Huawei Digital Power Technologies Co., Ltd. - Page 41 Pliers Diagonal pliers Wire clippers Crimping tool Wire stripper Hydraulic pliers Pliers Pipe wrench Hammer drill and drill bit Heat gun Vacuum cleaner (Φ22 mm, 7/8 inch) Power tools Issue 07 (2022-12-15) Copyright © Huawei Digital Power Technologies Co., Ltd.
- Page 42 Network cable tester Instrumen Height gauge Level gauge Right angle Measuring tape (5 m) Level Long leather measuring Claw hammer Utility knife tape Auxiliary tools Hacksaw Step ladder (2 m) Brush Issue 07 (2022-12-15) Copyright © Huawei Digital Power Technologies Co., Ltd.
- Page 43 Floating nut puller Ink fountain Cable reel Paint brush Jack Cable tie Insulation tape Marker ESD gloves Protective gloves Safety helmet Consuma bles Safety belt Safety goggles Anti-skid shoes Issue 07 (2022-12-15) Copyright © Huawei Digital Power Technologies Co., Ltd.
- Page 44 Pipe fastener Supports pipes. Depending on the actual pipe route Cable tie Binds and secures cables onsite. 1 package, 200 to 300 PCS Issue 07 (2022-12-15) Copyright © Huawei Digital Power Technologies Co., Ltd.
- Page 45 ● Preventive measures should be applied before installation to avoid water seepage into pre-fab. modules and equipment in the case of a sudden change in the weather. Issue 07 (2022-12-15) Copyright © Huawei Digital Power Technologies Co., Ltd.
-
Page 46: Installation Personnel Requirements
4.3 Checking the Installation Environment Check the site requirements one by one, and start installation only after all requirements are met. Huawei will not be liable for any consequences caused if the installation environment does not meet the requirements. NO TE Mark the security zone: Use red caution belts to delimit a security zone, clean up obstacles in that zone, and place construction signs and warning signs in eye-catching positions. -
Page 47: Installing Pre-Fab. Modules
Tools: marker, ink foundation, long leather measuring tape Materials: none Skill requirement: skilled technician Procedure Step 1 Determine the reference points for installing pre-fab. modules on the concrete platforms. Mark the reference points using a marker. Issue 07 (2022-12-15) Copyright © Huawei Digital Power Technologies Co., Ltd. -
Page 48: Removing The Pre-Fab. Module Protective Cover
A protective cover is installed to protect the pre-fab. module during transportation. Preparations Tools: safety helmet, safety belt, step ladder, protective gloves, utility knife Materials: none Skill requirement: common technician Issue 07 (2022-12-15) Copyright © Huawei Digital Power Technologies Co., Ltd. -
Page 49: Hoisting Pre-Fab. Modules
2896 mm x 2438 mm x 12192 14,000 kg Hoisting Precautions Stage Precautions Before hoisting Ensure that the crane and steel ropes provide the required bearing capacity. Ensure that the steel ropes are securely connected. Issue 07 (2022-12-15) Copyright © Huawei Digital Power Technologies Co., Ltd. - Page 50 When hoisting a pre-fab. module, ensure that the four corner fittings of the pre- fab. module are aligned with the marked mounting positions for corner fittings on the concrete platforms. Issue 07 (2022-12-15) Copyright © Huawei Digital Power Technologies Co., Ltd.
- Page 51 – Each angle steel bracket must be secured by two mounting holes. Preferentially drill the outer two mounting holes. If steel bars in a concrete platform block the drill bit, drill the inner mounting holes. Issue 07 (2022-12-15) Copyright © Huawei Digital Power Technologies Co., Ltd.
- Page 52 Secure the angle steel brackets to the pre-fab. module using bolt assemblies. Issue 07 (2022-12-15) Copyright © Huawei Digital Power Technologies Co., Ltd.
-
Page 53: Optional) Mounting Base Scenario
Pre-fab. module doors Open and close each All pre-fab. module pre-fab. module door doors can be once. smoothly opened and closed. 5.2 (Optional) Mounting Base Scenario Issue 07 (2022-12-15) Copyright © Huawei Digital Power Technologies Co., Ltd. -
Page 54: Determining The Pre-Fab. Module Installation Position
Step 2 Determine the installation position for the first base in the installation area based on the site space, and draw longitude and latitude reference lines between the first base and other bases. Issue 07 (2022-12-15) Copyright © Huawei Digital Power Technologies Co., Ltd. - Page 55 ● There are eight mounting holes for one single-capacity base. Mark all the hole positions. Step 5 Move away the pre-fab. module bases, and install expansion bolts in the base mounting holes. Issue 07 (2022-12-15) Copyright © Huawei Digital Power Technologies Co., Ltd.
- Page 56 Step 6 Reinstall the pre-fab. module bases to the concrete platforms with the expansion bolts securing the bases. Remount the flat washers, spring washers, and nuts on the expansion bolts and tighten the expansion bolts in sequence using a torque wrench. Issue 07 (2022-12-15) Copyright © Huawei Digital Power Technologies Co., Ltd.
- Page 57 Step 8 Insert a twistlock into the mounting hole in a single-capacity base and keep the lock head in the pre-fab. module length direction. Step 9 Pre-mount the nuts onto the twistlocks using an adjustable wrench. Issue 07 (2022-12-15) Copyright © Huawei Digital Power Technologies Co., Ltd.
-
Page 58: Removing The Pre-Fab. Module Protective Cover
Step 1 Cut open the protective cover using a utility knife and remove the protective cover. NO TE When removing the protective cover, take protective measures for working at heights. ----End Issue 07 (2022-12-15) Copyright © Huawei Digital Power Technologies Co., Ltd. -
Page 59: Hoisting And Securing Pre-Fab. Modules
Ensure that the steel ropes are securely connected. During hoisting Do not allow any unauthorized people to enter the hazardous areas and never stand under the crane arm during hoisting. Issue 07 (2022-12-15) Copyright © Huawei Digital Power Technologies Co., Ltd. - Page 60 Figure 5-12 Hoisting a pre-fab. module Step 2 Turn the twistlocks in the bases by 90 degrees to lock the pre-fab. module, and tighten the twistlocks using a torque wrench. Issue 07 (2022-12-15) Copyright © Huawei Digital Power Technologies Co., Ltd.
-
Page 61: Grounding Pre-Fab. Modules
5.3 Grounding Pre-fab. Modules Prerequisites ● The pre-fab. modules have been installed. ● The grounding positions have been specified. ● The grounding requirements have been specified. Issue 07 (2022-12-15) Copyright © Huawei Digital Power Technologies Co., Ltd. - Page 62 In addition to using ground lugs, you can also connect ground cables to pre-fab. module ground points using M12x30 stainless steel bolt assemblies, as shown in the following figure. Ground cables can be routed through plastic-coated metal hoses for protection based on site requirements. Issue 07 (2022-12-15) Copyright © Huawei Digital Power Technologies Co., Ltd.
- Page 63 FusionModule1000A40 Prefabricated All-in-One Data Center Installation Guide 5 Installing Pre-fab. Modules Figure 5-15 Installing a ground cable ----End Issue 07 (2022-12-15) Copyright © Huawei Digital Power Technologies Co., Ltd.
-
Page 64: Installing External Accessories For Pre-Fab. Modules
The external cable tray fittings consist of long cable trays, short cable trays, fasteners, M8 bolt assemblies, and M10 bolt assemblies. NO TE Only short cable trays and M10 bolt assemblies are required in this scenario. Issue 07 (2022-12-15) Copyright © Huawei Digital Power Technologies Co., Ltd. - Page 65 Step 1 Locate the external cable tray installation position, and remove the rubber plugs from the corresponding mounting holes in the pre-fab. module using a Phillips screwdriver. Step 2 Secure the short cable tray to the ports reserved on the pre-fab. module. Issue 07 (2022-12-15) Copyright © Huawei Digital Power Technologies Co., Ltd.
-
Page 66: Optional) Installing A Rain And Snow Cover
Issue 07 (2022-12-15) Copyright © Huawei Digital Power Technologies Co., Ltd. - Page 67 Step 3 Insert a rubber pad between the bottom of the rain and snow cover and the mounting plate. Install screws on both sides and three screws on the top of the rain and snow cover to partially secure the rain and snow cover. Issue 07 (2022-12-15) Copyright © Huawei Digital Power Technologies Co., Ltd.
- Page 68 ● When installing a holeless washer, tighten the screws to prevent the washer from falling off. Issue 07 (2022-12-15) Copyright © Huawei Digital Power Technologies Co., Ltd.
- Page 69 (A) Round-hole washer Step 5 Secure the rain and snow cover. Step 6 Apply white sealant on the joint between the rain and snow cover top and the pre-fab. module. Issue 07 (2022-12-15) Copyright © Huawei Digital Power Technologies Co., Ltd.
-
Page 70: Optional) Installing Step Ladders
Preparations Tools: adjustable wrench, torque wrench, marker, hammer drill, claw hammer, vacuum cleaner Materials: step ladder, expansion bolt Skill requirement: common technician Procedure Step 1 Assembling a step ladder. Issue 07 (2022-12-15) Copyright © Huawei Digital Power Technologies Co., Ltd. - Page 71 Step 6 Remove the nuts, spring washers, and flat washers. Figure 6-8 Installing an expansion bolt (unit: mm) (A) M12 bolt (B) Spring washer (C) Flat washer Issue 07 (2022-12-15) Copyright © Huawei Digital Power Technologies Co., Ltd.
- Page 72 Step 7 Install the step ladder on the concrete pad with the expansion bolts securing them. Remount the flat washers, spring washers, and nuts on the expansion bolts and tighten the expansion bolts. ----End Issue 07 (2022-12-15) Copyright © Huawei Digital Power Technologies Co., Ltd.
-
Page 73: Installing External Pipes For Smart Cooling Products
Materials: DN25 PP-R pipe (with an outer diameter of 25 mm, to be purchased onsite), bend, straight connector, 10 mm thick thermal insulation foam Skill requirement: skilled technician Procedure Step 1 Open the rear door of the pre-fab. module. Issue 07 (2022-12-15) Copyright © Huawei Digital Power Technologies Co., Ltd. - Page 74 Step 2 Open the compartment door of the smart cooling product on the right. Figure 7-1 Opening the compartment door of the smart cooling product on the right Step 3 Install the pipes. Issue 07 (2022-12-15) Copyright © Huawei Digital Power Technologies Co., Ltd.
- Page 75 Step 4 After the hot-melt connection, wrap the exposed part of the water pipe with 10 mm thick thermal insulation foam. ----End Follow-up Procedure Verify that the pipe connector is closely melted with the pipes at both ends. Issue 07 (2022-12-15) Copyright © Huawei Digital Power Technologies Co., Ltd.
-
Page 76: Removing Transport Protection Materials
This section describes how to remove the transport protection materials for the NetCol5000- A025 smart cooling product. Procedure Step 1 Remove the compressor fasteners of a smart cooling product. Issue 07 (2022-12-15) Copyright © Huawei Digital Power Technologies Co., Ltd. - Page 77 8 Removing Transport Protection Materials Figure 8-1 Removing the compressor fasteners Step 2 Remove the water pan cover. Figure 8-2 Removing the water pan cover Step 3 Remove the liquid level detector fasteners. Issue 07 (2022-12-15) Copyright © Huawei Digital Power Technologies Co., Ltd.
- Page 78 Figure 8-3 Removing the liquid level detector fasteners Step 4 Reinstall the water pan cover. Step 5 Verify the connection of the interconnection terminal of the low liquid level detector. Figure 8-4 Connect the interconnection terminal. Issue 07 (2022-12-15) Copyright © Huawei Digital Power Technologies Co., Ltd.
-
Page 79: Removing The Cabinet Sliding Base Fasteners
After the pre-fab. module is installed and secured, the fasteners need to be removed. Procedure Step 1 Remove the bolts securing the cabinet sliding base fasteners using an adjustable wrench, and remove the fasteners. Issue 07 (2022-12-15) Copyright © Huawei Digital Power Technologies Co., Ltd. -
Page 80: Removing Sliding Door Fasteners
After pre-fab. modules are installed and secured, the fasteners need to be removed so that the sliding doors can work properly. Issue 07 (2022-12-15) Copyright © Huawei Digital Power Technologies Co., Ltd. - Page 81 Step 2 Remove the piston rings, and install them in the screw holes in the floor under the sliding door and the beam above the sliding door. NO TE The plugs are packed and secured above the door handle before delivery. Issue 07 (2022-12-15) Copyright © Huawei Digital Power Technologies Co., Ltd.
- Page 82 Follow-up Procedure When a pre-fab. module needs to be relocated, refer to the preceding steps to adjust the sliding door fasteners in reverse order to secure the sliding doors. Issue 07 (2022-12-15) Copyright © Huawei Digital Power Technologies Co., Ltd.
-
Page 83: Installing Devices Inside Pre-Fab. Modules
Step 1 Determine the battery pack installation position based on the battery cabinet-1 configuration table. Step 2 Take out mounting ears from the battery pack fitting bag, and install the mounting ears on the battery pack using eight M4 screws. Issue 07 (2022-12-15) Copyright © Huawei Digital Power Technologies Co., Ltd. - Page 84 Follow-up Procedure Verify the battery pack cable connections. Ensure that the battery pack quantity and cable connections comply with the design and the cables or copper bars are reliably installed. Issue 07 (2022-12-15) Copyright © Huawei Digital Power Technologies Co., Ltd.
-
Page 85: Installing Batteries
Step 2 Unpack the batteries. Step 3 Open the front door of the battery cabinet. NO TICE Due to space limitation, connect power cables after placing batteries on one layer. Issue 07 (2022-12-15) Copyright © Huawei Digital Power Technologies Co., Ltd. -
Page 86: Optional) Installing The Electric Heating Belt
9.2 (Optional) Installing the Electric Heating Belt Prerequisites The pre-fab. modules have been installed. Preparations Tools: None Materials: low-temperature component suite Skill requirements: cooling engineer, common technician Issue 07 (2022-12-15) Copyright © Huawei Digital Power Technologies Co., Ltd. - Page 87 Figure 9-5 Secure the temperature probe Step 3 Connect the electric heating belt and temperature probe to the controller. Issue 07 (2022-12-15) Copyright © Huawei Digital Power Technologies Co., Ltd.
-
Page 88: Installing Monitoring Devices
A1 cabinet. The server, LAN switch, and IVS respectively occupy 2 U, 1 U, and 2 U space. 9.3.1 (Optional) Installing ECC800 Accessories Prerequisites Required ECC800 accessories have been obtained. Preparations Tool: Phillips screwdriver Materials: Micro SD card, SIM card, 4G antenna, RF_Z antenna Issue 07 (2022-12-15) Copyright © Huawei Digital Power Technologies Co., Ltd. - Page 89 Pull the indexing plunger handles at the front and rear of the sliding bases of cabinets in row A. Turn the indexing plunger handles at the front and rear of the sliding bases by 90° to unlock the handles. Issue 07 (2022-12-15) Copyright © Huawei Digital Power Technologies Co., Ltd.
- Page 90 Figure 9-10 Pushing the cabinet Put the RF_Z antenna through the gap between the front of the cabinet and the pre-fab. module ceiling, and attach the antenna to the top of cabinet A1. Issue 07 (2022-12-15) Copyright © Huawei Digital Power Technologies Co., Ltd.
- Page 91 – The cable outside the pre-fab. module must be fit with a corrugated metal hose. – The cable outside the pre-fab. module can be bent only in the U-shape. Issue 07 (2022-12-15) Copyright © Huawei Digital Power Technologies Co., Ltd.
- Page 92 Pay attention not to damage the light inside the ceiling plate. Figure 9-13 Removing the sealing plate from the suspended ceiling Issue 07 (2022-12-15) Copyright © Huawei Digital Power Technologies Co., Ltd.
-
Page 93: Optional) Installing A Pad
PAD mounting support and then connect the cable to the PAD. Step 2 Adjust the feet in the upper part of the PAD mounting support and clip the PAD into the mounting support. Issue 07 (2022-12-15) Copyright © Huawei Digital Power Technologies Co., Ltd. -
Page 94: Installing Fire Extinguishing Devices
● Do not power on the fire extinguishing system during installation. Preparations Tools: protective gloves, pallet truck, pipe wrench, adjustable wrench, step ladder Materials: fire extinguisher cylinder, high-pressure hose, sealing tape, threaded adapter, I-shaped connector Skill requirement: common technician Issue 07 (2022-12-15) Copyright © Huawei Digital Power Technologies Co., Ltd. - Page 95 Figure 9-16 Connecting the pneumatic switch hose to the container valve Step 4 Connect the fire extinguisher cylinder to the fire extinguishing pipeline. Issue 07 (2022-12-15) Copyright © Huawei Digital Power Technologies Co., Ltd.
- Page 96 – If the ejector is not pressed down, extinguishant may be released. – The electrical actuator ejector is 11 mm long before being pressed down, and 7 mm long after being pressed down. Issue 07 (2022-12-15) Copyright © Huawei Digital Power Technologies Co., Ltd.
-
Page 97: Connecting The Cable To The Battery Of The Fire Control Panel
Step 2 Remove the protective foam from the battery and check whether the battery is intact or leaks. NO TICE If the battery is damaged or leaks, contact Huawei technical support to replace the battery. Step 3 Connect the battery cables to the reserved power cable terminals. -
Page 98: Installing Standard Fire Extinguishing Devices
9.4.2 Installing Standard Fire Extinguishing Devices 9.4.2.1 (Optional) Installing the Fire Extinguisher Cylinder Prerequisites ● Pre-fab. modules have been installed. ● The extinguishant in the fire extinguisher cylinder meets the requirement. Issue 07 (2022-12-15) Copyright © Huawei Digital Power Technologies Co., Ltd. - Page 99 Step 3 Move the fire extinguisher cylinder to the installation position and secure it. NO TICE Keep the pressure gauge panel outwards so that people can view the reading, which also facilitates later maintenance. Issue 07 (2022-12-15) Copyright © Huawei Digital Power Technologies Co., Ltd.
- Page 100 Step 4 Install the threaded adapter and high-pressure hose. NO TICE Install the threaded adapter and then the high-pressure hose. Wrap the threads with sealing tape to ensure air tightness. Issue 07 (2022-12-15) Copyright © Huawei Digital Power Technologies Co., Ltd.
- Page 101 ● Before connecting the cable, verify that the cable is the electromagnetic valve cable by checking the cable label. ● Connect the red wire to the red wire, and connect the black wire to the black wire. Issue 07 (2022-12-15) Copyright © Huawei Digital Power Technologies Co., Ltd.
- Page 102 Remove the protective cover at the electromagnetic valve installation position on the container valve. Align the electromagnetic valve and the container valve, and tighten the electromagnetic valve clockwise. Figure 9-25 Removing the electromagnetic valve protective cover ----End Issue 07 (2022-12-15) Copyright © Huawei Digital Power Technologies Co., Ltd.
-
Page 103: Connecting The Cables To Fire Alarm Control Panel Batteries
Step 2 Remove the protective foam from the batteries and check whether the batteries are intact or leak. NO TICE If a battery is damaged or leaks, contact Huawei technical support to replace the battery. Step 3 Connect the battery cables to the reserved power cable terminals. -
Page 104: Optional) Connecting A Cable To The Asd Power Box Battery
Step 2 Remove the protective foam from the battery and check whether the battery is intact or leaks. NO TICE If the battery is damaged or leaks, contact Huawei technical support to replace the battery. Step 3 Connect the reserved battery cable. - Page 105 9 Installing Devices Inside Pre-fab. Modules NO TICE Distinguish the positive and negative battery terminals when connecting a battery cable. Figure 9-28 ASD battery wiring diagram Figure 9-29 Connecting the reserved battery cable ----End Issue 07 (2022-12-15) Copyright © Huawei Digital Power Technologies Co., Ltd.
-
Page 106: Installing Cables Outside Pre-Fab. Modules
Step 1 Open the door of the power PDB. Step 2 Remove the plugs from the two cable holes at the bottom of the power PDB. Figure 10-1 Removing the plugs from the cable holes Issue 07 (2022-12-15) Copyright © Huawei Digital Power Technologies Co., Ltd. - Page 107 After connecting the cables, seal the two cable holes at the bottom of the power PDB using waterproof sealing putty. Step 6 Reinstall the transparent cable protection panel, and close the door of the power PDB. ----End Issue 07 (2022-12-15) Copyright © Huawei Digital Power Technologies Co., Ltd.
-
Page 108: Optional) Connecting Generator Start/Stop Cables (Ats Input)
Here connecting one of the cables is used as an example. XT2-6 is a normally open contact, XT2-7 is a common contact, and XT2-8 is a normally closed contact. Issue 07 (2022-12-15) Copyright © Huawei Digital Power Technologies Co., Ltd. - Page 109 FusionModule1000A40 Prefabricated All-in-One Data Center Installation Guide 10 Installing Cables Outside Pre-fab. Modules Figure 10-3 Connecting the generator start/stop cables for the UPS (1) XT2 terminal block ----End Issue 07 (2022-12-15) Copyright © Huawei Digital Power Technologies Co., Ltd.
-
Page 110: Removing Transport Protection Materials From Fire Extinguishing And Monitoring Devices
Step 1 Understand the internal layout of the FusionModule1000 by referring to the fire extinguishing device layout diagram and monitoring device layout diagram. Step 2 Remove the transport protection materials from the top of the aisles inside the FusionModule1000. Issue 07 (2022-12-15) Copyright © Huawei Digital Power Technologies Co., Ltd. - Page 111 Securing tape Emergency light Securing tape Temperature and Securing tape humidity (T/H) sensor Camera Securing tape Emergency door release Plastic cover button Figure 11-1 Securing tape and red cover Issue 07 (2022-12-15) Copyright © Huawei Digital Power Technologies Co., Ltd.
- Page 112 Figure 11-3 Removing the sealing plate from the installation position of the external horn strobe NO TE Use sealant to seal the screw holes left after the sealing plate is removed. ----End Issue 07 (2022-12-15) Copyright © Huawei Digital Power Technologies Co., Ltd.
-
Page 113: Installation Verification
10 ohms or less. ● Each row of cable trays has at least two ground points and is grounded securely with a ground resistance of 10 ohms or less. Issue 07 (2022-12-15) Copyright © Huawei Digital Power Technologies Co., Ltd. - Page 114 Installation of Observe The number and positions of external external accessories installed conform to accessories design requirements. Labels Observe All labels are correct, clear, and complete. Issue 07 (2022-12-15) Copyright © Huawei Digital Power Technologies Co., Ltd.
-
Page 115: A Basic Installation Operations
Figure A-1 Figure A-2. ● Cables must be bound closely and neatly. Each bundle must not exceed 15 cables. Issue 07 (2022-12-15) Copyright © Huawei Digital Power Technologies Co., Ltd. -
Page 116: Measuring Cables
Figure A-3 Binding cables at a turning point A.1.2 Measuring Cables Prerequisites ● Pre-fab. modules have been installed. ● External cable trays have been installed. Preparations Tools: thin rope, protective gloves, and measuring tape Material: cable Issue 07 (2022-12-15) Copyright © Huawei Digital Power Technologies Co., Ltd. -
Page 117: Laying Out Cables
Tools: protective gloves and marker Material: cable Document: none Skill requirement: common technician Procedure Step 1 Select the designed cables. Step 2 Lay out cables to the required run length. Issue 07 (2022-12-15) Copyright © Huawei Digital Power Technologies Co., Ltd. -
Page 118: Routing Cables Through A Plastic-Coated Metal Hose
(at least three persons) to route cables especially armored cables through a plastic-coated metal hose if no assistant tool is available onsite. Preparations Tools: protective gloves Material: plastic-coated metal hose Documents: none Skill requirement: skilled technician Issue 07 (2022-12-15) Copyright © Huawei Digital Power Technologies Co., Ltd. -
Page 119: Mounting Cables On The Cable Tray
Some external cables for the FusionModule1000 are long and have a large diameter. Assign sufficient people to mount cables especially armored cables on cable trays if no assistant tool is available onsite. Preparations Tools: step ladder, protective gloves, and safety helmet Issue 07 (2022-12-15) Copyright © Huawei Digital Power Technologies Co., Ltd. - Page 120 ● Armored cables and power cables must be placed in the outside and bottom layer of cable trays. ● Cables must be level, without unevenness and deflection. Step 4 After adjusting cables as required, bind them with cable ties. Issue 07 (2022-12-15) Copyright © Huawei Digital Power Technologies Co., Ltd.
-
Page 121: Routing Cables Into Feeder Windows
Except armored power cables, other external cables of the FusionModule1000 must be routed through a feeder window using DPJ end connectors. Context A DPJ end connector consists of a body, ferrule, guarding, and cover lock nut, as shown in Figure A-5. Issue 07 (2022-12-15) Copyright © Huawei Digital Power Technologies Co., Ltd. - Page 122 Step 4 Place the cover lock nut and guarding along a cable into the plastic-coated metal hose, as shown in Figure A-7. Issue 07 (2022-12-15) Copyright © Huawei Digital Power Technologies Co., Ltd.
- Page 123 Step 8 Apply sealant on the joint between the DPJ end connector and the sheet metal on the pre-fab. module, as shown in Figure A-9. Figure A-9 Applying sealant Step 9 Spray water to test the waterproof performance of the DPJ end connector. ----End Issue 07 (2022-12-15) Copyright © Huawei Digital Power Technologies Co., Ltd.
-
Page 124: Installing Waterproof Metal Connectors
● To facilitate operation during internal routing, you can remove some top plate in the pre-fab. module aisle. Issue 07 (2022-12-15) Copyright © Huawei Digital Power Technologies Co., Ltd. - Page 125 Figure A-13 Securing the waterproof metal connector Step 5 Apply transparent sealant onto the joint between the waterproof metal connector and the sheet metal on the pre-fab. module, as shown in Figure A-14. Issue 07 (2022-12-15) Copyright © Huawei Digital Power Technologies Co., Ltd.
-
Page 126: Attaching Cable Labels
Step 2 Select correct cable labels. Step 3 Remove the simple labels attached to a cable during layout and attach the selected labels to both ends of the cable. Issue 07 (2022-12-15) Copyright © Huawei Digital Power Technologies Co., Ltd. -
Page 127: Preparing Cable Terminals
Figure A-15 Preparing a DT terminal (1) Cable (2) Heat shrink tubing (3) DT terminal (4) Hydraulic pliers (5) Heat gun Step 2 Figure A-16 shows how to prepare an OT terminal. Issue 07 (2022-12-15) Copyright © Huawei Digital Power Technologies Co., Ltd. - Page 128 Step 3 Figure A-17 shows how to prepare a cord end terminal. Figure A-17 Preparing a cord end terminal (1) Cable (2) Cord end terminal (3) Crimping tool ----End Issue 07 (2022-12-15) Copyright © Huawei Digital Power Technologies Co., Ltd.
-
Page 129: B Repairing The Pre-Fab. Module
Step 2 Use a polishing machine to polish the paint on the cut surface and the polishing width is 10–20 mm. Step 3 Cut the prepared materials into the same size as the holes to be welded. Step 4 Fully weld along the joints. Issue 07 (2022-12-15) Copyright © Huawei Digital Power Technologies Co., Ltd. - Page 130 +epoxy intermediate paint+polyurethane topcoat) according to the procedure: After the primer is dry, apply the epoxy intermediate paint. After the intermediate paint is dry, apply the polyurethane topcoat. ----End Issue 07 (2022-12-15) Copyright © Huawei Digital Power Technologies Co., Ltd.
-
Page 131: C Dimensions Of External Cable Trays And Fixed Ladders
The external cable trays and step ladders are optional. The unit of the dimensions in the figure is mm. Figure C-1 Installation dimensions of external cable trays (1) Power PDB (2) External cable tray Issue 07 (2022-12-15) Copyright © Huawei Digital Power Technologies Co., Ltd. - Page 132 C Dimensions of External Cable Trays and Fixed Installation Guide Ladders Figure C-2 Installation dimensions of fixed ladders (concrete platform scenario) Figure C-3 Fixed ladder port dimensions (base scenario) Issue 07 (2022-12-15) Copyright © Huawei Digital Power Technologies Co., Ltd.
-
Page 133: D Cleaning Pre-Fab. Modules
Wash the pre-fab. module with clean water. NO TE It is recommended that you clean the pre-fab. modules once every quarter. ----End Issue 07 (2022-12-15) Copyright © Huawei Digital Power Technologies Co., Ltd. -
Page 134: E Acronyms And Abbreviations
Installation Guide E Acronyms and Abbreviations Acronyms and Abbreviations automatic transfer switch Conformite Europende polyvinyl chloride rPDU rack power distribution unit surge protective device TCP/IP Transmission Control Protocol/Internet Protocol Issue 07 (2022-12-15) Copyright © Huawei Digital Power Technologies Co., Ltd. - Page 135 Conformite Europende digital distribution frame energy control center liquid crystal display monitor display module power over Ethernet power distribution frame power distribution unit Issue 07 (2022-12-15) Copyright © Huawei Digital Power Technologies Co., Ltd.
- Page 136 FusionModule1000A40 Prefabricated All-in-One Data Center Installation Guide E Acronyms and Abbreviations rPDU rack power distribution unit Issue 07 (2022-12-15) Copyright © Huawei Digital Power Technologies Co., Ltd.