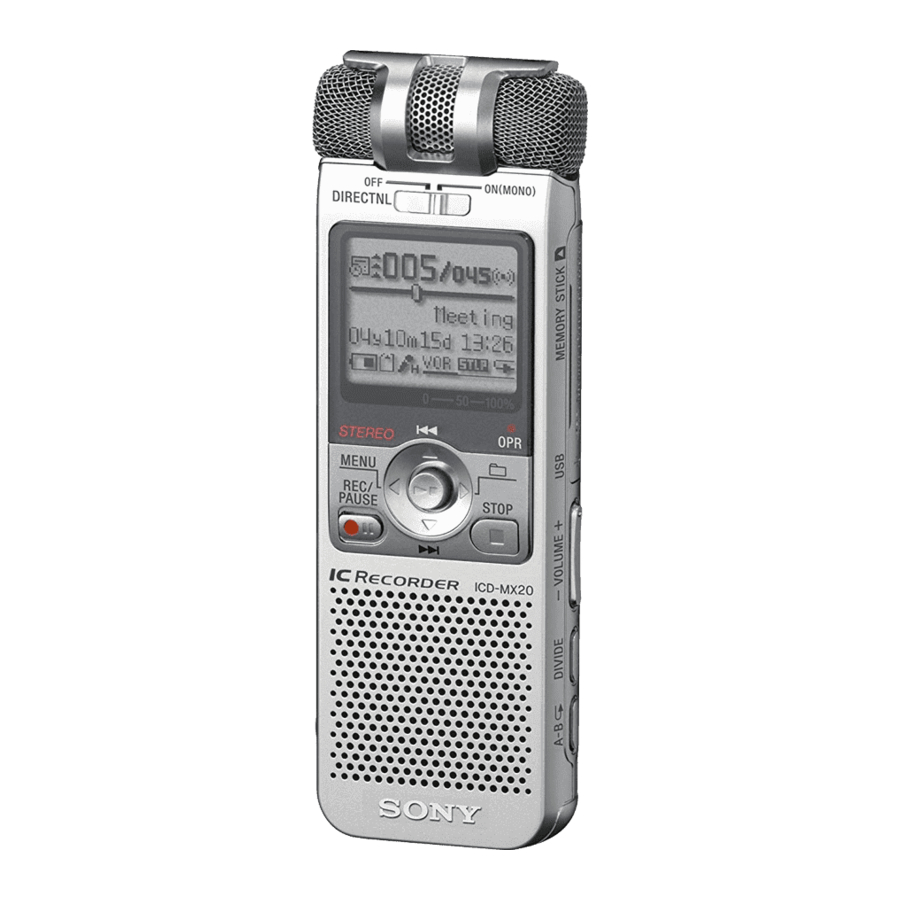
Sony ICD-MX20 - IC Recorder Operating Instructions
- Operating instructions (2 pages) ,
- Specifications (2 pages) ,
- Service manual (38 pages)
- 1 Getting started
-
2
Basic Operations
-
2.1
Recording Messages
- 2.1.1 Select the recording mode
- 2.1.2 Select the folder
- 2.1.3 Start recording
- 2.1.4 Maximum recording time* (built-in memory)
- 2.1.5 The maximum number of the folders when each folder contains one message
- 2.1.6 Expanding the memory
- 2.1.7 Switching the drives
- 2.1.8 Starting recording automatically in response to the sound - Advanced VOR function
- 2.2 Playing Back Messages
- 2.3 Operating the Menu
- 2.4 Index to Parts and Controls
-
2.1
Recording Messages
- 3 Various Ways of Recording
- 4 Various Ways of Playback
- 5 Editing Messages
- 6 Handling Folders
- 7 Expanding the Memory with the "Memory Stick"
- 8 Other Operations
- 9 Other Information
- 10 Troubleshooting
- 11 Documents / Resources
Getting started
Installing the Batteries
- Insert two LR03 (size AAA) alkaline batteries with correct polarity, and close the lid.
![]()
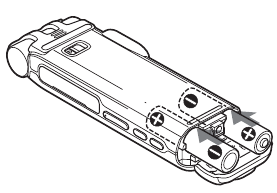
Make sure to insert batteries into the unit from the - end first.
When you insert batteries for the first time, or when you insert batteries after the unit has been without batteries for a certain period of time, "Set Date&Time" appears. Please refer "Step 2:
Setting the Clock" to set the date and time.
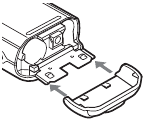
If the battery compartment lid is accidentally detached, attach it as illustrated.
Replacing the battaries
The battery indicator on the display window shows the battery condition:
 : Replace both of the two batteries with new ones.
 : "Replace Batteries" appears and the unit will stop operation.
Battery life* (Using Sony alkaline batteries LR03 (SG))
| Recording mode: | ST | STLP | SP | LP |
| In recording: | 8 hr. | 9 hr. 30 min. | 9 hr. 30 min. | 10 hr. 30 min. |
| In playback: | 8 hr. | 9 hr. | 9 hr. | 9 hr. |
(hr.: hours/min.: minutes)
* In continuous recording/playback
* In approximate hours and minutes
* When playing back through the internal speaker with the medium volume level
* The battery life may shorten depending on the operation of the unit.
Using on house current
Connect the AC power adaptor (not supplied) to the DC IN 3V jack of the unit and to the wall outlet. Do not use any other AC power adaptor.

Notes on batteries
When you insert the batteries for the first time after purchasing (initializing the memory)
"ACCESS" appears in the display window and the internal memory is initialized automatically to create 5 folders (FOLDER01 to FOLDER05).
Notes while "ACCESS" appears
Setting the Clock
You need to set the clock to use the alarm function or record the date and time. When you insert batteries for the first time, or when you insert batteries after the unit has been without batteries for a certain period of time, "Set Date&Time" appears. Set the date and time as follows:

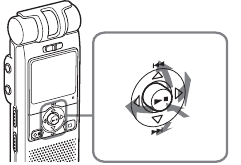
Press the control key upward, downward, leftward, or rightward (  /
/  /
/  /
/  ) to select an item, and then press down the center (
 ) to decide on the item. In this manual, these operations are described as follows:
- Press
![]() /
/ ![]() to select the digits for the year.
to select the digits for the year.
![]() : to decrease the number
: to decrease the number
![]() : to increase the number
: to increase the number - Press
![]()
![]() .
.
The month digits will flash. - Repeat steps 1 and 2 to set the month, day, hour, and then minutes in sequence.
To select a previous or next item
Press![]() for the previous item or
for the previous item or ![]() for the next item.
for the next item.
Note
If you do not press![]()
![]() for more than one minute, the clock setting mode is cancelled and the window will return to normal display.
for more than one minute, the clock setting mode is cancelled and the window will return to normal display. - Press
![]() STOP to return to the normal display.
STOP to return to the normal display.
 for the next item.
Note on setting the clock
Set the clock while the set is in the stop mode.
To display the clock setting windows and current time
You can display the clock setting window to set the date and time or check the current time:
- Press
![]() (MENU) to display the menu.
(MENU) to display the menu.
![]()
- Press
![]() /
/ ![]() to select (Preferences) and then press
to select (Preferences) and then press ![]()
![]() .
. - Press
![]() /
/ ![]() to select "Date&Time".
to select "Date&Time".
The current time is displayed in the right bottom of the display window.
![]()
- To set the clock, press
![]()
![]() to display the "Date&Time" window and follow the steps 1 through 4 of the "Step 2: Setting the Clock".
to display the "Date&Time" window and follow the steps 1 through 4 of the "Step 2: Setting the Clock".

Tip
This unit does not have a power on/ off switch. The display is shown at all times.
Basic Operations
Recording Messages
You can record the maximum of 999 messages in each folder of the initially 5 folders (FOLDER01 to FOLDER05). In all the folders of the built-in memory, you can record the maximum of 1,012 messages.
Since a newly recorded message is automatically added behind the last recorded message, you can start recording quickly without searching for the end of the last recording.
e.g.

Newly recorded message
Select the recording mode
For how to select the recording mode, see "Operating the Menu".
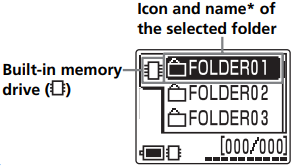
Select the folder
- Press
![]() (
( ![]() ).
).
The folders in the built-in memory are displayed.
![]()
![]()
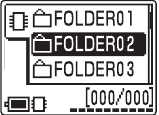
- Press
![]() or
or ![]() to select the folder in which you wish to record messages.
to select the folder in which you wish to record messages.
![]()
- Press
![]()
![]() .
.
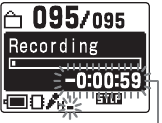
Start recording

- Built-in microphone
![]() Press
Press ![]()
![]() REC/PAUSE during the stop mode.
REC/PAUSE during the stop mode.
You do not need to keep pressing![]()
![]() REC/PAUSE while recording.
REC/PAUSE while recording.- OPR indicator**
(lights in red during recording.) - Folder icon
- Current message number/ Number of messages in the selected folder
- Remaining memory indication
- Counter display*
- Recording mode
- Remaining memory indication
- Microphone sensitivity
![]() Speak to the built-in microphone.
Speak to the built-in microphone.
 Press
Press * The display selected with the "Display" in the menu appears.
**When the "LED" in the menu is set to "OFF", the OPR indicator turns off.
| To | Do this |
| stop recording | Press STOP. The unit stops at the beginning of the current recording. If you do not change the folder after you stop recording, the next time you record you will record in the same folder. |
| pause recording* | Press   REC/PAUSE. REC/PAUSE.During recording pause, the OPR indicator flashes in red and "REC Pause" flashes in the display window. |
| release pause and resume recording | Press REC/PAUSE. Recording resumes from that point. |
| listen to the current recording | Press STOP to stop recording, then press . |
| review the current recording instantly | Press during recording. |
| review during recording | Keep pressing (  ) during recording or recording pause. ) during recording or recording pause.Recording stops and you can search backwards while listening to fast playback sound. After you release the key, playback starts from that point. You can add an overwrite recording from that point. |
* About one hour after you pause recording, recording pause is automatically released and the unit goes into the stop mode.
Maximum recording time* (built-in memory)
The maximum recording time of all the folders is as follows. You can record messages for the maximum recording time in a single folder.
| Recording modes** | |
| ST | Approx. 1 hr. 25 min. |
| STLP | Approx. 2 hr. 45 min. |
| SP | Approx. 4 hr. 20 min. |
| LP | Approx. 11 hr. 45 min. |
(hr.: hours/min.: minutes)
* In continuous recording
**Recording modes:
ST: Standard play stereo recording mode/STLP: Long play stereo recording mode /SP: Standard play monaural recording mode/LP:
Long play monaural recording mode
The maximum number of the folders when each folder contains one message
You can create the maximum of 340 folders each in the built-in memory and the "Memory Stick".
Notes before recording
- You cannot record through the built-in microphone if you connect an external microphone to the
![]() (microphone) connector.
(microphone) connector.
 (microphone) connector.
Expanding the memory
You can expand the memory by inserting a "Memory Stick Duo" or "Memory Stick PRO Duo" into the MEMORY STICK slot. (See the reverse side.)
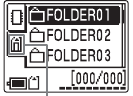
Switching the drives
You can use both the built-in memory and the "Memory Stick" by switching drives as follows:
- Press
![]() (
( ![]() ) to display the folders in the current drive.
) to display the folders in the current drive. - Press
![]() .
. - Press
![]() or
or ![]() to select the "Memory Stick" drive (
to select the "Memory Stick" drive ( ![]() ) or the built-in memory drive (
) or the built-in memory drive ( ![]() ).
).
![]()
"Memory Stick" drive (![]() )
) - Press
![]()
![]() .
.
The folders of the selected drive are displayed, where you can select one by pressing![]() or
or ![]() . (If you keep pressing
. (If you keep pressing ![]() or
or ![]() , the display switches to the folders of another drive.)
, the display switches to the folders of another drive.)
 ) or the built-in memory drive (
  ).
).
Starting recording automatically in response to the sound - Advanced VOR function
Set "VOR" in the menu to "ON".
Notes on recording
Playing Back Messages
When playing back a previously recorded message, start from Step 1. When playing back a message you have just finished recording, start from Step  - 2.
- 2.
Select the folder
Follow the step 2 in "Recording Messages".
Select the message and start playback

![]() (headphones) jack
(headphones) jack![]() Press
Press ![]() or
or ![]() to display the desired message number.
to display the desired message number.
![]() : for previous message number
: for previous message number
![]() : for next message number
: for next message number
![]() Press
Press ![]()
![]() .
.![]() Adjust the volume with VOLUME +/–.
Adjust the volume with VOLUME +/–.- OPR indicator**
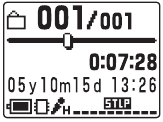
(lights in green during playback.) - Selected message number/Number of messages in the selected folder
- Playback slider Displays the current playback position.
- Counter display*
- Recorded date and time of the message
* The display selected with the "Display" in the menu appears.
**When the "LED" in the menu is set to "OFF", the OPR indicator turns off.
The unit plays all the messages in a folder continuously and stops at the beginning of the last message in the folder. (You change the "Play Mode" in the menu so that the unit plays a message and then stop at the beginning of the next message.)
| To | Do this |
| stop at the current position | Press or STOP. To resume playback from that point, press again. |
| go back to the beginning of the current message | Press once.* |
| skip to the next message | Press once.* |
| go back to previous messages/skip to succeeding messages | Press or repeatedly. (During stop mode, keep the key pressed to skip the messages continuously.) |
* These operations are for when "Easy Search" in the menu is set to "OFF".
Searching forward/backward during playback (Cue/Review)
- To search forward (cue):
Keep![]() pressed during playback and release the key at the point you wish to resume playback.
pressed during playback and release the key at the point you wish to resume playback. - To search backward (review):
Keep![]() pressed during playback and release the key at the point you wish to resume playback.
pressed during playback and release the key at the point you wish to resume playback.
If you keep or pressed, the unit starts to search at higher speed.
During cue/review, the counter will be displayed, regardless of the display mode setting.
When playback or fast playback is done to the end of the last message
- If you keep
![]() pressed while "Message End" is flashing, the messages are played back rapidly, and normal playback will start at the point you release the key.
pressed while "Message End" is flashing, the messages are played back rapidly, and normal playback will start at the point you release the key. - If the last message is long and you wish to start playback at a later part of the message, keep
![]() pressed to play back the message to the end and then press
pressed to play back the message to the end and then press ![]() while "Message End" is flashing to go back to the desired point.
while "Message End" is flashing to go back to the desired point.
Listening in better sound quality
You can enjoy better sound quality as follows:
- To listen from headphones: Connect the stereo headphones (supplied or not supplied) to the
![]() (headphones) jack. The built-in speaker will be automatically disconnected.
(headphones) jack. The built-in speaker will be automatically disconnected. - To listen from an external speaker: Connect an active or passive speaker (not supplied) to the
![]() (headphones) jack.
(headphones) jack.
Operating the Menu
During stop, playback or recording, you can use the menu to change the operation modes in playback and recording, display mode, or other settings. Display the menu and change the settings as follows:
| To | Do this |
| 1 enter the menu mode. | Press b (MENU). |
2 select the desired menu (  ). ). | Press / and press . |
| 3 select the desired menu item. | Press / and press . |
| go back to the previous step. | Press / to select "  "and press . ( If " " does not appear, press .) "and press . ( If " " does not appear, press .) |
| 4 select the setting item. | Press / and press . |
| 5 exit the menu mode. | Press STOP. |
If you do not press the key or button for one minute, the menu mode is automatically cancelled and the window will return to normal display.
How the display changes in the menu mode

Entering the menu mode (1)
Selecting the item in the desired menu (2, 3)
Selecting the setting item (4)
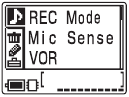
| Menu items | Settings (*: Initial setting) | Stop/Play/Rec** | |
 Record/play menu Record/play menu | |||
| REC Mode | You can set the recording mode (bit rate): | OK/–/– | |
| ST*: | You can record with high-quality stereo sound. (48 kbps) | ||
| STLP: | You can record with stereo sound for longer time. (24 kbps) | ||
| SP: | You can record with better sound (monaural sound). (16 kbps) | ||
| LP: | You can record for longer time (monaural sound). (8 kbps) | ||
| Note: When the DIRECTNL switch is set to "ON", a message will be recorded in monaural even in the "ST" or "STLP" recording mode. | |||
| Mic Sense | You can set the microphone sensitivity. | OK/–/OK | |
| High*: | To record at meetings or in a quiet and/or spacious place. | ||
| Low: | To record dictation or in a noisy place. | ||
| VOR | You can activate or disable the VOR (Voice Operated Recording) function for eliminating recording from soundless period.: | OK/–/OK | |
| ON: | Recording starts when the unit detects sound and "VOR" is displayed. Recording pauses when no sound is heard and "VOR Pause" is displayed. | ||
| OFF*: | The VOR function is disabled. Normal recording operation is selected. | ||
| Note: VOR function is affected by the sound around you. Set the "Mic Sense" according to the recording conditions. If recording is not satisfactory after you have changed the microphone sensitivity, or for important recording, set the "VOR" to "OFF". | |||
| Add/Over | You can enable or disable the adding or overwrite recording mode: | OK/–/– | |
| OFF*: | You cannot add a recording to avoid erasing a message by accidental operation. | ||
| Add REC: | You can adds a recording to a previously recorded message during playback. | ||
| Overwrite: | You can adds an overwrite recording to a previously recorded message during playback. | ||
| DPC | You can set the playback speed: | OK/OK/– | |
| OFF*: | Messages will be played back at normal speed. | ||
| ON: | You can adjust the speed of the playback between twice the normal speed (+100%) and half the normal speed (–50%) | ||
| Easy Search | You can activate or disable the easy search function: | OK/OK/– | |
| ON: | You can go back for approx. 3 seconds by pressing ( ), or advance for approx. 10 seconds by pressing (  ). ). | ||
| OFF*: | You can go back or forward the messages by pressing / ( / ). | ||
| Play Mode | You can set the playback mode when you press : | OK/OK/– | |
| Cont Play*: | The unit plays back all messages in a folder continuously. | ||
| One MSG: | The unit plays back one message and then stops at the beginning of the next message | ||
| Repeat: | The unit plays back a message repeatedly until you press or STOP. "Repeat MSG" and "  " will be displayed. " will be displayed. | ||
 Erase menu Erase menu | |||
| Erase a MSG | You can erase the currently selected message. (See the reverse side.) | OK/OK/– | |
| Erase AllMSG | You can erase all the messages in the selected folder. (See the reverse side.) | OK/–/– | |
| Erase Folder | You can erase the selected folder and the messages contained in the folder. (See the reverse side.) | OK/–/– | |
| Format | You can format a "Memory Stick". (See the reverse side.) | OK/–/– | |
 Edit menu Edit menu | |||
| Priority | You can add priority marks ( ) to the currently selected message. Usually the recorded messages are lined up in the order of recording. (None*/ /  / /  ) (See the reverse side.) ) (See the reverse side.) | OK/OK/– | |
| Move MSG | You can move the currently selected message to the desired folder. (See the reverse side.) | OK/OK/– | |
| Alarm | You can set the alarm to the currently selected message. (See the reverse side.) | OK/–/– | |
| Add Folder | You can add a new folder to the end of the current drive. (See the reverse side.) | OK/–/– | |
| Edit Folder | You can change the icon and name of the currently selected folder. (See the reverse side.) | OK/–/– | |
 Preferences menu Preferences menu | |||
| Display | You can change the display mode on the display window. | OK/OK/OK | |
| Elapse: | Displays the elapsed playback/recording time of one message (counter). | ||
| Remain: | Displays the remaining time indication. | ||
| Name: | Displays the message name (title) if it is specified with the supplied Digital Voice Editor software. | ||
| Date&Time | You can set the clock manually or automatically: | OK/–/– | |
| Automatic: | If the unit is connected to a PC while the supplied Digital Voice Editor is operating, the clock is automatically set according to the PC internal clock. | ||
| Manual*: | Displays the window to set the clock manually (05Y1M1D*). (See "Step 2: Setting the Clock".) | ||
| Beep | You can turn on or off the beep. | OK/OK/OK | |
| ON*: | A beep will sound to indicate that operation has been accepted. | ||
| OFF: | No beep sound will be heard except for the alarm. | ||
| LED | You can turn on or off the OPR (operation) indicator during operation. | OK/–/OK | |
| ON*: | The OPR indicator lights or flashes during operations such as recording or playback. | ||
| OFF: | The OPR indicator turns off even during operation. (Even if you set the LED to "OFF", the indicator lights when the unit is connected to the PC.) | ||
| Backlight | You can turn on or off the backlight on the display window during operation. | OK/OK/OK | |
| ON*: | The backlight on the display window lights during operation. | ||
| OFF: | The backlight on the display window turns off during operation. | ||
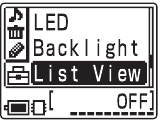
| List View | You can select the list view or one message view in the stop mode. | OK/OK/– | |
| ON: | List of the messages is displayed in the stop mode. | ||
| OFF*: | A message is displayed in the stop mode. | ||
**Displays whether you can change the setting in each operation mode (Stop: stop mode/Play: playback mode/Rec: recording mode): "OK" shows the setting can be changed and "–" shows the setting cannot be changed.
Index to Parts and Controls
Identifying the front and rear panels of the unit

- Built-in monaural/stereo microphone (directional/all-directional)
You can set the directivity with the DIRECTNL switch![]() , and sensitivity with the "Mic Sense" in the menu.
, and sensitivity with the "Mic Sense" in the menu. - DIRECTNL (directional) ON (MONO)/OFF switch
Slide the switch to set the directivity of the built-in microphone![]() as follows:
as follows:
ON (MONO): To record a sound centering on a specific direction in monaural. Use this position when you record a sound at a conference/ meeting or in a spacious place etc.
OFF: To record a sound not centering on a specific direction (all-directional recording).
Notes
 , and sensitivity with the "Mic Sense" in the menu.
 as follows:
- Display window
For the details, see "Using the display window" below. - OPR (operation) indicator
The indicator lights in red during recording or in green during playback. It flashes in red during recording pause. During accessing the data, it lights or flashes in red or orange. You can turn off the indicator with the "LED" in the menu. - Control key
![]() (MENU)/
(MENU)/ ![]() (
(![]() : folder)
: folder) ![]() (
( ![]() : review)/
: review)/ ![]() (
( ![]() : fast forward)/
: fast forward)/ ![]()
![]() (play/stop • enter)
(play/stop • enter) -
![]()
![]() REC (record) /PAUSE button
REC (record) /PAUSE button
Press here to start and pause recording. ![]() STOP button
STOP button
Press here to stop operation.- Speaker
Sound is heard when no headphones or active speaker are connected. - MEMORY STICK slot
Insert the "Memory Stick Duo" or "Memory Stick PRO Duo" here. - USB connector
Use the USB cable to connect a PC here. - VOLUME (volume) +/– button
Adjust the playback sound with the button. - DIVIDE button
Press to divide a message during playback. - A-B
![]() (repeat) button
(repeat) button
Press to specify the beginning and ending points of the portion to be played back repeatedly. - HOLD switch
To prevent accidental operation, slide this switch to "ON". "HOLD" will appear for 3 seconds, indicating that all the functions of the buttons are locked.
When the HOLD function is activated during stop, all the display will be turned off after "HOLD" is displayed.
To cancel the HOLD function Slide the HOLD switch to "OFF".
Tip
Even if the HOLD function is activated, you can stop the alarm playback. To stop the alarm or playback, press![]() STOP. (You cannot stop usual playback.)
STOP. (You cannot stop usual playback.) ![]() (headphones) jack
(headphones) jack
To monitor the recording from the built-in microphone, connect headphones supplied or not supplied here. You can adjust the volume with VOLUME +/–![]() , but the recording level is fixed.
, but the recording level is fixed.
Note
If you turn up the volume excessively or place the headphones near the microphone while monitoring recording, the microphone may pick up the sound from the headphones, causing acoustic feedback (howling sound).![]() (microphone) jack (PLUG IN POWER)
(microphone) jack (PLUG IN POWER)
You can connect an external microphone here. When an external microphone is connected, the built-in microphone is automatically cut off.- DPC ON/OFF switch
You can play back a message at a higher or lower speed as follows:
ON: "Fast Play" or "Slow Play" will be displayed and a message is played back at the speed specified with the "DPC" in the menu (between twice the normal speed (+100%) and half the normal speed (– 50%)).
![]()
OFF: A message is played back at the normal speed. - VOICE UP (Digital Voice Up) ON/OFF switch
You can make the playback sound well-balanced and more audible by enabling the Digital Voice Up function as follows:
ON: Digital Voice Up function is activated. Inaudible low-level part of a recorded message is amplified so that the overall recording is adjusted to its optimum level.
OFF: A message is played back without Digital Voice Up function.
Note
Depending on the area you purchased the unit, the Digital Voice Up switch name shown on the unit may differ. - Slit for a handstrap
You can attach a handstrap (not supplied) here. - Battery compartment /DC IN 3V jack
Open the compartment lid and insert two LR03 (size AAA) alkaline batteries.
 , but the recording level is fixed.
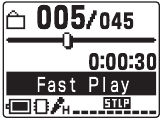
Using the display window

- Folder icon
Displays the icon of the current folder. You can change the icon with the "Edit Folder" in the menu. - Priority marks
Displays the priority marks specified with the "Priority" with the menu. You can renumber the messages in the order of their priority. - Alarm indicator
Appears when the alarm is set for a message. - Playback slider
Displays the current playback position. - Counter (Elapsed time)/Remaining time / Message name indication
The display mode selected with the "Display" in the menu appears:
Elapse: Displays the elapsed playback/recording time of one message (counter).
![]()
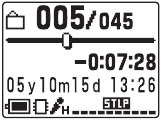
Remain: Displays the remaining time of the message in the playback mode, and the remaining recordable time in the stop and recording modes.
![]()
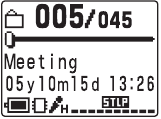
Name: Displays the message name (title) if it is specified with the supplied Digital Voice Editor. (Some characters that are not compatible with the unit may not be displayed.)
![]()
- Recorded date and time indication
Recorded year, month, day, hours, and minutes of the current message are displayed. - Repeat play indicator
Appears when "Repeat" (one message repeat playback mode) is selected with the "Play Mode" in the menu. - Remaining memory indicator
Displays the remaining memory:
- When the remaining time reaches 1 minute, the remaining time indication
![]() will flash regardless of the display mode.
will flash regardless of the display mode.
![]()
Remaining memory time - When the memory is full, recording automatically stops and "Memory Full" will be displayed with an alarm sound. To continue recording, first erase some of the messages.
Notes
- Recording mode indication
Displays the current recording mode specified with the "REC Mode" in the menu:
- VOR (Voice Operated Recording) indicator
Appears when the "VOR" in the menu is set to "ON" and the voice operated recording is activated. - Microphone sensitivity indication Displays the current microphone sensitivity specified with the "Mic Sense" in the menu:
- Drive indication
Displays the current drive:
![]() :Built-in memory drive
:Built-in memory drive
![]() :"Memory Stick" drive
:"Memory Stick" drive - Remaining battery indicator
Displays the remaining battery volume. When the AC power adaptor (not supplied) is connected, the indicator does not appear. - Folder name indication
Displays the name of the current folder. You can change the icon with the "Edit Folder" in the menu. - Messages list
Displays the list of the three messages in the current folder when "List View" in the menu is set to "ON". The number and recorded date/time of each message is displayed. You can scroll the messages with![]() /
/ ![]() .
. - Scroll bar
Displays the current location of the displayed messages among the whole messages in the current folder.
Note
The effect of the back light of the display window may be reduced in a bright location.
Switching the one message view and the list view
You can choose how the messages will be displayed on the stop mode between list view and one message view as follows:
- Press
![]() (MENU).
(MENU).
The menu window is displayed. - Press
![]() /
/ ![]() to select (Preferences) and then press
to select (Preferences) and then press ![]()
![]() .
.
The Preferences menu is displayed. - Press
![]() /
/ ![]() to select "List View".
to select "List View".
![]()
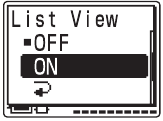
- Press
![]()
![]() .
.
The "List View" setting window is displayed. - Press
![]() /
/ ![]() to select "ON" (list view) or "OFF" (one message view) and then press
to select "ON" (list view) or "OFF" (one message view) and then press ![]()
![]() .
.
The setting will be changed.
![]()
- Press
![]() STOP to return to the normal display.
STOP to return to the normal display.
Various Ways of Recording
Adding a Recording to a Previously Recorded Message
You can add a recording to the message being played back.
Notes
When "Add REC" is selected in the menu
The added recording will be placed after the current message and counted as a part of the message.

When "Overwrite" is selected in the menu
You can add an overwrite recording after the selected point in a recorded message. The part of the message after the selected point is deleted.

- During playback, press
![]()
![]() REC/PAUSE briefly.
REC/PAUSE briefly.
The "Add REC?" or "Overwrite?" will appear and the unit stops in the recording stand-by mode.

- While the "Add REC?" or "Overwrite?" appears, press
![]()
![]() REC/PAUSE again.
REC/PAUSE again.
The OPR indicator will turn in red. An add or overwrite recording starts.

- Press xSTOP to stop the recording.


Recording with an External Microphone or Other Equipment
Recording with an external microphone
Connect an external microphone to the  (microphone) jack.
When you connect an external microphone, the built-in microphone is automatically cut off. When a plug in power type microphone is connected, power is automatically supplied to the microphone from the IC recorder.

Recommended types of microphones
You can use the ECM-CS10 Sony electret condenser microphone (not supplied).
Recording from other equipment
To record sound of other equipment with the IC recorder, connect the (microphone) jack of the IC recorder to the earphone jack of other equipment (tape recorder etc.) by using a resistance audio connecting cable.
Before you start recording, set the microphone sensitivity by setting the "Mic Sense" in the menu to "High".
Note
If you use an audio connecting cable without a resistor, sound may be recorded interrupted. Make sure to use a resistance audio connecting cable.
Recording with other equipment
To record the sound of the IC recorder with other equipment, connect the  (headphones) jack of the IC recorder to the audio or line input connector (stereo mini- plug) of other equipment.

Notes
Various Ways of Playback
Locating quickly the point you wish to start playback (Easy Search)
You can quickly locate the point you wish to start playback by pressing ( )/ ( ) repeatedly during playback. This function is useful when locating a desired point in a long recording.
Set "Easy Search" in the menu as follows:
ON: You can go back for approx. 3 seconds by pressing ( ), or advance for approx. 10 seconds by pressing ( ).
OFF*: You can go back or forward the messages by pressing / ( / ).
Playing back a message repeatedly — Repeat Play
Repeating a message
Set "Play Mode" in the menu to "Repeat" and press . The "![]() " and "Repeat MSG" will be displayed and the selected message will be played back repeatedly.
" and "Repeat MSG" will be displayed and the selected message will be played back repeatedly.

To resume normal playback
Set "Play Mode" in the menu to "One MSG" or "Cont Play".
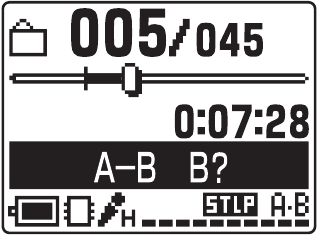
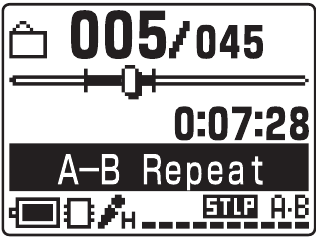
Playing back the specified section repeatedly - A-B Repeat
While playing back a message, you can set the start (A) and end (B) points for a section you wish to play repeatedly.
- During playback, press A-B
![]() (repeat) briefly.
(repeat) briefly.
The starting point (A) of the section you wish to play repeatedly is set. "A-B B?" appears.
![]()
- During playback, press A-B
![]() (repeat) briefly again.
(repeat) briefly again.
The finishing point (B) of the section is set.
"A-B Repeat" is displayed and the specified section is played back repeatedly.
![]()
To resume normal playback
Press .
To stop A-B Repeat playback
Press STOP.
Notes
Playing Back a Message at a Desired Time with an Alarm
You can sound an alarm and start playback of a selected message at a desired time. You can have the message played back at a specified date, once every week, or the same time everyday.
You can also sound the alarm without playing back a message.
Note
When the clock is not set or no messages are recorded, you cannot set the alarm.
- Display the message you want to set the alarm.

- Enter the alarm setting mode.
- Press
![]() (MENU), and select
(MENU), and select ![]() (Edit) by pressing
(Edit) by pressing ![]() /
/ ![]() , and then press
, and then press ![]()
![]() .
. - Press
![]() /
/ ![]() to select "Alarm" and press
to select "Alarm" and press ![]()
![]() . The alarm setting mode will be displayed.
. The alarm setting mode will be displayed.

- Press
![]() /
/ ![]() to select "ON".
to select "ON".
If "ON" has already been selected, follow the next step.

- Press
![]()
![]() .
.
The window to set the alarm date will be displayed.
- Press
- Set the alarm date.
To play back on a desired date- Press
![]()
![]() while "DATE" is selected.
while "DATE" is selected.
The year digits will be selected.

- Press
![]() or
or ![]() to select the year digits and press
to select the year digits and press ![]()
![]() .
.
The month digits will be selected.

- Set the month and day in sequences.

- Press


To play back once a week Press or to select the day of the week, and press .

To play back at the same time every day
Press or to select "DAILY", and press .

- Set the alarm time.
- Press
![]() or
or ![]() to select the hour digits and press
to select the hour digits and press ![]()
![]() .
.
The minute digits will flash.

- Press
![]() or
or ![]() to select the minute digits and press
to select the minute digits and press ![]()
![]() .
.

- Press


Note
You cannot set the alarm at a previously set date and time on another message in the built-in memory or "Memory Stick".
- Select the alarm playback.
Press![]() or
or ![]() to select the alarm sound either from "Beep&Play" (for starting playback after the alarm) or "Beep" (for only the alarm).
to select the alarm sound either from "Beep&Play" (for starting playback after the alarm) or "Beep" (for only the alarm). - Press
![]()
![]() .
.
The alarm setting is completed. - Press
![]() STOP to exit the menu mode.
STOP to exit the menu mode.
"![]() " is displayed when the message having an alarm setting is displayed in one message view.
" is displayed when the message having an alarm setting is displayed in one message view.
 " is displayed when the message having an alarm setting is displayed in one message view.
When the alarm time comes
The alarm will sound for about 10 seconds and the selected message will be played back. (If you have selected "Beep", only the alarm will sound.)
When the playback ends, the unit will stop automatically at the beginning of that message. To listen to the same message again, press .
To stop alarm
Press STOP while the alarm sound is heard. You can stop even when the HOLD function is activated.
To cancel the alarm setting or change the alarm time
Select "OFF" in the steps  - 2, and then press .
Notes
- If the alarm time comes during recording, alarm will sound for 10 seconds after the recording is finished and playback begins. "
![]() " will flash when the alarm time comes.
" will flash when the alarm time comes.
Editing Messages
Note
Once a recording has been erased, you cannot retrieve it.
Erasing messages one by one
You can erase unnecessary messages one by one.
When a message is erased, the remaining messages will advance and be renumbered so that there will be no space between messages.

- Display the message you want to erase.
- Press
![]() (MENU), and select
(MENU), and select ![]() (Erase) by pressing
(Erase) by pressing ![]() /
/ ![]() , and then press
, and then press ![]()
![]() .
.
The cursor moves to the Erase menu.

- Press
![]() /
/ ![]() to select "Erase a MSG" and press
to select "Erase a MSG" and press ![]()
![]() . The window for erasing a message is displayed.
. The window for erasing a message is displayed.

- Press
![]() /
/ ![]() to select "Execute" and press
to select "Execute" and press ![]()
![]() . The confirmation window is displayed.
. The confirmation window is displayed.

 (Erase) by pressing


- Press
![]() /
/ ![]() to select "Yes" and press
to select "Yes" and press ![]()
![]() .
.
The message is erased.

- Press
![]() STOP to return to the normal display.
STOP to return to the normal display.
The remaining messages will be renumbered. (For example, if you erase Message 3, Message 4 will be renumbered as Message 3. When erasing is completed, the unit will stop at the beginning of the following message.)


To cancel erasing
Press STOP before step 5.
To erase a message partially
First divide the message and then follow the steps on this section to erase the message.
Erasing all messages in a folder
You can erase all recorded messages in a folder.
- Display the folder or a message in the folder that you want to erase.
- Press
![]() (MENU), and select
(MENU), and select ![]() (Erase) by pressing
(Erase) by pressing ![]() /
/ ![]() , and then press
, and then press ![]()
![]() .
.
The cursor moves to the Erase menu.

- Press
![]() /
/ ![]() to select "Erase AllMSG" and press
to select "Erase AllMSG" and press ![]()
![]() . The window for erasing all the messages in a folder is displayed.
. The window for erasing all the messages in a folder is displayed.

- Press
![]() /
/ ![]() to select "Execute" and press
to select "Execute" and press ![]()
![]() . The confirmation window is displayed.
. The confirmation window is displayed.

- Press
![]() /
/ ![]() to select "Yes" and press
to select "Yes" and press ![]()
![]() .
.
All the recorded messages contained in the folder are erased. The folder itself will not be erased. - Press
![]() STOP to exit the menu mode.
STOP to exit the menu mode.


To cancel erasing
Press STOP before step 4.
Note
If a folder contains a lot of messages, it may take long to erase all the messages.
Dividing a Message
You can divide a message during recording or playback, so that the message is divided into two and the new message number is added to the divided message. By dividing a message, you can easily find the point you want to play back when you make a long recording such as a meeting.
You can divide messages until the total number of messages in the folder becomes 999.
Notes
While recording or playing back a message, press DIVIDE at the point you want to divide
- When you press DIVIDE during recording:
The new message number is added at the point you pressed the button, and "New MSG REC" appears for 3 seconds. The message will be divided into two; however, the messages will be recorded without a break.


Tip
You can divide a message during recording pause.
- When you press DIVIDE during playback:
The message is divided into two at the point you pressed the button, and "Dividing" appears for 3 seconds. The message numbers of the following messages will increase by one.


To play the divided message
Press or to display the message number as the divided messages each have message numbers.
Moving Messages to a Different Folder — Move Function
You can move the recorded messages to another folder. When you move a message to another folder, the one in the previous folder will be erased.
Example: Moving Message 3 in FOLDER01 to FOLDER03
- Display the message you want to move.

- Press
![]() (MENU), and select
(MENU), and select ![]() (Edit) by pressing
(Edit) by pressing ![]() /
/ ![]() , and then press
, and then press ![]()
![]() .
.
The cursor moves to the Edit menu.

- Press
![]() /
/ ![]() to select "Move MSG" and press
to select "Move MSG" and press ![]()
![]() .
.
The window for selecting the destination folder is displayed.

- Press
![]() /
/ ![]() to select the folder to which you want to move the message to and press
to select the folder to which you want to move the message to and press ![]()
![]() .
.
The window for moving the message is displayed. The message is played back from the beginning.

- Press
![]() /
/ ![]() to select "Yes" and press
to select "Yes" and press ![]()
![]() .
.
The message is moved to the destination folder. Messages are sorted in order of the recorded date and time.

- Press
![]() STOP to exit the menu mode.
STOP to exit the menu mode.


Note
You cannot move a message to the other drive.
Adding Priority Mark(s) — Priority Mark Function
Usually the recorded messages are lined up in the order of recording.
By adding priority mark(s) ( ) to important messages, you can renumber the messages in the order of their priority. There are four levels, " " (the most important), " ", " ", and "None" (no priority mark). You can add priority marks both in the stop mode and in the playback mode.
- Display the message you want to mark.
- Press
![]() (MENU), and select
(MENU), and select ![]() (Edit) by pressing, and then press
(Edit) by pressing, and then press ![]()
![]() .
.
The cursor moves to the Edit menu.
 - Step 1")
- Press
![]() /
/ ![]() to select "Priority" and press
to select "Priority" and press ![]()
![]() .
.
The window for setting priority marks is displayed.
 - Step 2")
 (Edit) by pressing, and then press
  - Step 1")
 - Step 2")
- Press
![]() /
/ ![]() to select the number of the priority marks with which you want to mark.
to select the number of the priority marks with which you want to mark.
 - Step 3")
- Press
![]()
![]() .
.
The setting is finished.
 - Step 4")
- Press
![]() STOP to exit the menu mode.
STOP to exit the menu mode.
The messages will be renumbered.
 - Step 3")
 - Step 4")
Messages with priority mark(s)
Messages are sorted in order of the number of priority mark(s) ( ) in a folder. Messages without a priority mark are moved behind the messages with priority mark(s).
e.g. When there are 3 messages in a folder
 - Example 3")
Message 1
Message 2
Message 3
Tip
If there are over 2 messages with the same number of priority marks in a folder, these messages are sorted by the recorded date and time. (The oldest one comes first.)
Note
You can also add priority mark(s) using the supplied "Digital Voice Editor" software. But messages are not sorted in order of the number of the priority marks unless you sorted by the number of priority marks using the software.
Handling Folders
Adding / Deleting Folders
By default setting, there are 5 folders: "FOLDER01" through "FOLDER05". You can add folders as you like. You can also delete unnecessary folders.
Note
The maximum number of folders you can add varies depending on the using conditions. "Folder Full" is displayed in the display window when you cannot add any folder because of the system limitations of the IC recorder.
Adding a folder
- Press
![]() (MENU), and select
(MENU), and select ![]() (Edit) by pressing
(Edit) by pressing ![]() /
/ ![]() , and then press
, and then press ![]()
![]() .
.
The cursor moves to the Edit menu.

- Press
![]() /
/ ![]() to select "Add Folder" and press
to select "Add Folder" and press ![]()
![]() .
.
The window for creating a new folder is displayed.

- Press
![]() /
/ ![]() to select "Execute" and press
to select "Execute" and press ![]()
![]() .
.
A new folder is added to the end of the current drive.

- Press
![]() STOP to exit the menu mode.
STOP to exit the menu mode.


About added folder names
The new folder is labeled automatically with the icon "  " and double figures or letter like "FOLDER04" or "FOLDERAB". If there is a missing number or letter among the folder names, the new one is labeled using the missing number or letters automatically.
You can change the folder icon and name as you like.
Erasing a folder
- Display the folder you want to delete.
Note
Once a folder has been erased, you cannot retrieve it. When erasing a folder that contains recorded messages, please check the contents. - Press
![]() (MENU), and select
(MENU), and select ![]() (Erase) by pressing
(Erase) by pressing ![]() /
/ ![]() , and then press
, and then press ![]()
![]() .
.
The cursor moves to the Erase menu. - Press
![]() /
/ ![]() to select "Erase Folder" and press
to select "Erase Folder" and press ![]()
![]() .
.
The window for erasing the folder is displayed.

- Press
![]() /
/ ![]() to select "Execute" and press
to select "Execute" and press ![]()
![]() .
.
The confirmation window is displayed.

- Press
![]() /
/ ![]() to select "Yes" and press
to select "Yes" and press ![]()
![]() .
.
The folder is erased.

- Press
![]() STOP to return to the normal display.
STOP to return to the normal display.


To cancel erasing
Press STOP before step 4.
Notes
Editing an Icon and Name of a Folder
You can label an icon or name of a folder yourself.
Registered templates of folder icons and names
Folder icons and names registered as templates are associated with each other. When you select a folder icon or name, the folder name associated with the folder icon, or the folder icon associated with the folder name is automatically selected. When you re-select or edit the identical folder icon and name, they will no longer be associated. Some icons have no associated names.
![]()
Changing a folder icon
Folders have been automatically attached with the folder icon " ". You can select the desired folder icon from the templates.
- Display the folder you want to change the folder icon.
- Press
![]() (MENU), and select
(MENU), and select ![]() (Edit) by pressing
(Edit) by pressing ![]() /
/ ![]() , and then press
, and then press ![]()
![]() .
.
The cursor moves to the Edit menu.

- Press
![]() /
/ ![]() to select "Edit Folder" and press
to select "Edit Folder" and press ![]()
![]() .
.
The window for editing a folder is displayed.

- Press
![]() /
/ ![]() to select "Icon" and press
to select "Icon" and press ![]()
![]() .
.
The window for selecting a folder icon is displayed.

- Press
![]() /
/ ![]() /
/ ![]() /
/ ![]() to select a folder icon.
to select a folder icon.
The cursor moves to the direction you press the key (![]() /
/ ![]() /
/ ![]() /
/ ![]() ).
).
When you keep pressing![]() /
/ ![]() , you can scroll the pages.
, you can scroll the pages.

- Press
![]()
![]() .
.
The setting is finished.

- Press
![]() STOP to exit the menu mode.
STOP to exit the menu mode.
The folder is labeled with the selected icon and its associated name.
Note
Depending on the folder icon you choose, there is no associated name. If you edit folder icons and names, folder icons and names will not be associated.
Changing a folder name
Folders have been labeled automatically with double figures or letter like "FOLDER04" or "FOLDERAB", but you can label folders as you like by using template names.
- Display the folder you want to change the name.
- Press
![]() (MENU), and select
(MENU), and select ![]() (Edit) by pressing
(Edit) by pressing ![]() /
/ ![]() , and then press
, and then press ![]()
![]() .
.
The cursor moves to the Edit menu.

- Press
![]() /
/ ![]() to select "Edit Folder" and press
to select "Edit Folder" and press ![]()
![]() .
.
The window for editing a folder is displayed.

- Press
![]() /
/ ![]() to select "Name" and press
to select "Name" and press ![]()
![]() .
.
The window for selecting a folder name is displayed.

- Press
![]() /
/ ![]() to select a folder name and press
to select a folder name and press ![]()
![]() .
. - Press
![]() STOP to exit the menu mode.
STOP to exit the menu mode.
The folder is labeled with the selected name and its associated icon.

In the list view


Note
You can also label a folder using the supplied "Digital Voice Editor" software. For the details, see the help of the Digital Voice Editor. Some characters that the unit does not support will not be displayed properly.
Expanding the Memory with the "Memory Stick"
Inserting the "Memory Stick"
You can expand the memory by inserting the "Memory Stick Duo" or "Memory Stick PRO Duo" into the MEMORY STICK slot.

Notes
When you insert the "Memory Stick" for the first time (initializing the memory)
"ACCESS" appears in the display window.
If you insert a "Memory Stick" for the first time after purchasing or one with no data, 5 folders (FOLDER01 to FOLDER05) will be made in the "Memory Stick" automatically.
Notes while "ACCESS" appears
Removing the "Memory Stick"
Make sure that "ACCESS" disappears, and the unit is in the stop mode. Then push the "Memory Stick" into the unit. When it pops out, remove it from the slot as shown below.

Maximum recording time and number of messages* (in a "Memory Stick")
| ST** | STLP** | SP** | LP** | |
| 32MB | 1 h. 25 m. | 2 h. 45 m. | 4 h. 20 m. | 11 h. 45 m. |
| 64MB | 2 h. 50 m. | 5 h. 35 m. | 8 h. 50 m. | 23 h. 35 m. |
| 128MB | 5 h. 50 m. | 11 h. 10 m. | 17 h. 45 m.. | 47 h. 25 m. |
| 256MB. | 11 h. 10 m. | 21 h. 35 m | 34 h. 10 m. | 91 h. 10 m. |
| 512MB. | 22 h. 5 m | 42 h. 35 m. | 67 h. 25 m. . | 179 h. 45 m |
| 1GB | 44 h. 55 m. | 86 h. 25 m. | 136 h. 50 m. | 364 h. 55 m. |
| 2GB | 92 h. 10 m. | 177 h. 25 m. . | 280 h. 50 m. | 749 h. 5 m |
(h.: hours/m.: minutes)
* In continuous recording/playback
* In approximate hours and minutes
*The maximum number of messages in a folder is 999. When there are 5 folders in the "Memory Stick", you can record up to 1,012 messages.
** Recording modes:
ST: Standard play stereo recording mode/STLP: Long play stereo recording mode/SP: Standard play monaural recording mode/LP: Long play monaural recording mode
Note
When you use the "Memory Stick", the battery life may be shortened.
The above table shows the recording time when you use the "Memory Stick" for use with ICD-MX20 only and by the initial setting with 5 folders. The maximum recording time and number of messages may differ depending on the using conditions. The maximum recording time of a "Memory Stick Duo" varies depending of the media type.
Using the "Memory Stick" (not supplied) with the unit
When you purchase "Memory Stick", make sure that you select "Memory Stick" with a logo  or a logo
  .
.
Even with either of the logos, however, some "Memory Stick" cannot be used with the unit. For details, see the Sony product information "Memory Stick" web site.
About the "Memory Stick"
What is "Memory Stick"?
"Memory Stick" is small, light-weighted, and next- generation IC storage media with a larger capacity than a floppy disc. You can use the "Memory Stick" to exchange data among "Memory Stick" compatible devices. In addition, you can use the "Memory Stick" as a removable external storage device to save your data.
In a "Memory Stick", you can save image data from other device in addition to the sound files of the IC recorder.
Sizes of "Memory Stick"
There are two sizes of "Memory Stick": regular size "Memory Stick" and compact size "Memory Stick Duo". With a Duo adaptor, you can use "Memory Stick Duo" on a device supporting regular size "Memory Stick". For ICD-MX20, use a "Memory Stick Duo" or "Memory Stick PRO Duo" (compact size "Memory Stick Duo").
Types of "Memory Stick"
Following types of "Memory Stick" are available for versatile purposes. "Memory Stick Duo" and "Memory Stick PRO Duo" are the only media supported by ICD-MX20.
- "Memory Stick PRO": "Memory Stick PRO" employs the "MagicGate" copyright protection technology and can be used only with "Memory Stick PRO" compliant devices.
- "Memory Stick-R": Data stored in "Memory Stick-R" cannot be overwritten. It can be used on "Memory Stick-R" compatible devices. You cannot store data with "MagicGate" copyright protection technology.
- "Memory Stick": "Memory Stick" can store all types of data except for the one that requires the "MagicGate" copyright protection technology.
- "Memory Stick" (MagicGate/High-Speed Transfer Compatible): "Memory Stick" (MagicGate/High- Speed Transfer Compatible) employs "MagicGate" copyright protection technology and supports high- speed data transfer. It can be used with all the "Memory Stick"-compatible devices. (Data transfer speed depends on the "Memory Stick"-compatible device.)
- "MagicGate Memory Stick" : "MagicGate Memory Stick " employs the "MagicGate" copyright protection technology.
- "Memory Stick-ROM": "Memory Stick-ROM" is the read-only "Memory Stick" storing the data. You cannot save or delete its data.
What is "MagicGate"?
"MagicGate" is a copyright protection technology for "MagicGate Memory Stick" and compliant products. The unit does not support the "MagicGate" standards and cannot read or write the data subject to the "MagicGate" copyright protection.
Notes on use
- When you slide the write-protect switch to the write protect position, you cannot record, edit, or delete the data. (Some types of "Memory Stick Duo" are not equipped with write-protect switch.)

- Data may be damaged in such occasions:

Notes on formatting (initializing)
"Memory Stick" is shipped with a FAT format as the standard format. To format "Memory Stick", use devices conformable with the "Memory Stick". When you format "Memory Stick", always perform the procedures in "Formatting the Memory".
Note
We cannot guarantee operations if the "Memory Stick" is formatted on your PC
About the minimum recording unit
When recording a message in the "Memory Stick", the relevant information of the message, the number of folders, or others is recorded in addition to the message itself. As the number of messages or folders increase, the remaining memory reduces accordingly.
To record a message or add a folder, you need the time of the minimum recording unit. Although the actual recording time of a message may be less than that of the minimum recording unit, the time of the message is counted as a minimum recording unit.
If the remaining recording time of the inserted "Memory Stick" is less than that of the minimum recording unit, you cannot add a message or a folder in the "Memory Stick".
The minimum recording unit in each recording mode
| ST | 8 seconds |
| STLP | 8 seconds |
| SP | 8 seconds |
| LP | 22 seconds |
Other Operations
Formatting the Memory
You can format the built-in memory and a "Memory Stick Duo" or "Memory Stick PRO Duo" inserted in the MEMORY STICK slot. Formatting will delete all the data recorded in the memory including images and other data. Before formatting, check the data in the memory.
Tip
Because a commercially available "Memory Stick" has already been formatted at the factory, you do not need to format a "Memory Stick" before the first use.
- Press
![]() (MENU), and select
(MENU), and select ![]() (Erase) by pressing
(Erase) by pressing ![]() /
/ ![]() , and then press
, and then press ![]()
![]() .
.
The cursor moves to the Erase menu. - Press
![]() /
/ ![]() to select "Format" and press
to select "Format" and press ![]()
![]() .
.
The window for selecting the memory to be formatted is displayed.

Note
When the "Memory Stick" is not inserted, this window does not appear. Skip to step 4. - Press
![]() /
/ ![]() to select the media ("Built-In" or "Memory Stick") that you want to format and press
to select the media ("Built-In" or "Memory Stick") that you want to format and press ![]()
![]() .
.
The window for executing format is displayed.

- Press
![]() /
/ ![]() to select "Execute" and press
to select "Execute" and press ![]()
![]() .
.
The confirmation window is displayed.

- Press
![]() /
/ ![]() to select "Yes" and press
to select "Yes" and press ![]()
![]() .
.
Formatting of the selected media starts.

- Press
![]() STOP to return to the normal display.
STOP to return to the normal display.
After formatting, 5 folders (FOLDER01 to FOLDER05) are automatically made in the memory in the same way when you insert batteries for the first time after purchasing.


To cancel formatting
Select "Cancel" in step 4 or "NO" in step 5.
Note
You cannot format when the write-protect switch on the "Memory Stick" is set to "LOCK".
Using the IC Recorder with Your Computer (Digital Voice Editor)
What You Can Do Using the Digital Voice Editor Software
The Digital Voice Editor software allows you to transfer the messages to your display monitor, to save them on your computer's hard disk, and to play back and edit them.
Use of the CD Recording Tool for DVE is limited to the personal purposes.
System Requirements
Your computer and system software must meet the following minimum requirements.
- IBM PC/AT or compatible
Notes
Note on transcribing a message
When you use Dragon NaturallySpeaking® speech- recognition software to transcribe a message, your computer must also meet the system requirements that the Dragon NaturallySpeaking requires.
Note on sending a voice e-mail
When you use Microsoft® Outlook Express 5.0/5.5/6.0 to send a voice e-mail of a message, your computer must also meet the system requirements that the Outlook Express requires.
Installing the Software
Install the Digital Voice Editor software in your computer's hard disk.
Notes
- When you install the Digital Voice Editor, you can create all the compatible file types except for the DVF (TRC) files. (You can play back the DVF (TRC) files.)
When installing both types of the Digital Voice Editor, make sure to select overwrite installation to handle all the compatible file formats.
- Make sure that the IC recorder is not connected and then turn on your computer and start up Windows.
- Insert the supplied CD-ROM into the CD-ROM drive.
The installer starts up automatically and the welcome window appears. If the installer does not start up, double click [DVE Setup.exe] in the [English] folder.
If you have already installed a previous version of the Digital Voice Editor or any version of the "Memory Stick Voice Editor"
The dialog box to uninstall the previous version may be displayed. (Messages are not removed.) Follow the instructions on the screen to uninstall the software and then the installation of the current version starts. - Follow the displayed instructions.
When the [Restart] dialog box appears, click [OK] to restart the computer. Now the installation is completed.
When the dialog box to select the help language is displayed
Click the desired language you want to use for the help.
When the dialog box used to input the owner name is displayed
Input the owner name for privilages and limitations in the Digital Voice Editor usage.
Notes
Uninstalling the software
When you wish to uninstall the software, follow the steps below.
- Click [Start] and select [Programs], [Sony Digital Voice Editor 3] and then [Uninstall].
The uninstaller starts up. - Follow the displayed instructions.
Note
If you wish to move the software to another drive or directory after it is installed, you need to uninstall the software and then reinstall it. The software does not work properly if you just move the files.
Tips
Connecting the IC Recorder to your Computer
You can transfer the IC recorder data onto your computer by connecting the IC recorder to the computer.
Use the USB connecting cable supplied with the IC recorder to connect the USB connectors of the IC recorder and your computer.
The IC recorder is recognized by the computer as soon as the cable is connected. "PC Connect" appears on the display window. You can connect or disconnect the cable when the IC recorder and the computer are turned on or off.

Notes
Referring to the Help Files
For details on each operation, refer to the help files.
![]()
Help menu and icon
Recording dictation (Using the voice recognition software)
- To obtain maximum recognition accuracy, avoid recording in a noisy place.
![]()
Microphone - You cannot transcribe a message recording the voices of more than one person.

- You can transcribe the following messages recorded using your IC recorder or files saved on your computer.
Other Information
Precautions
On power
On safety
On handling
On noise
On maintenance
If you place a magnetic card near the speaker of the unit, the card may be affected by the magnet of the speaker and may become unusable. Please keep a magnetic card away from the unit.
If you have any questions or problems concerning your unit, please consult your nearest Sony dealer.
Backup recommendations
To avoid potential risk of data loss caused by accidental operation or malfunction of the IC recorder, we recommend that you save a backup copy of your recorded messages on a tape recorder or to a computer, etc.
On system limitations of the IC recorder
There are some system limitations of the unit. Troubles as mentioned below are not malfunctions of the unit.
You cannot record messages up to the maximum recording time.
You cannot divide a message.
If an Error Message is displayed
If the following error messages are displayed, do the remedies described here.
Should any problem persist after you have made these checks, consult your nearest Sony dealer.
Alarm already set for the same time.
Battery Low
Data not supported
File not supported
Folder/File is protected.
Maximum Folders
Maximum Messages: Folder Full
Memory Full
Memory Stick Error
Memory Stick is locked.
No Folder/Message
Only one folder remains.
Past date and time.
Please format with the unit.
Power Supply Problem
Replace Batteries
Read-only Memory Stick
System Error
Specifications
Recording media
Built-in flash memory 32MB/"Memory Stick Duo", Stereo/Monaural recording
Recording time
Frequency range
Speaker approx. 2.8 cm (1 1/8 in.) dia.
Power output
350 mW
Input/Output
- Microphone jack (minijack, stereo)
- Headphones jack (minijack, stereo)
Playback speed control (DPC)
+100% to -50%
Power requirements
Two LR03 (size AAA) alkaline batteries: 3 V DC
Dimensions (w/h/d) (not including projecting parts and controls)
36.6 107.5 16.9 mm (1 1/2 4 1/4 11/16 in.)
Mass (including batteries)
96 g (3.4 oz)
Supplied accessories
Operating instructions
Stereo headphones (1)
USB connecting cable (1)
Application Software, Digital Voice Editor (CD-ROM) (1)
LR03 (size AAA) alkaline batteries (2)
Carrying pouch (1)
Application Software, Dragon NaturallySpeaking (CD-ROM) (1)
Optional accessories
Stereo headphones MDR-EX71SL, MDR- E931LP/Active speaker SRS-T88, SRS-T80/ Electret condenser microphone ECM-CS10, ECM-TL1/Audio connecting cable RK- G134HG, RK-G135HG, RK-G136HG, RK-G139HG /AC power adaptor AC-E30HG / "Memory Stick Duo" MSH-M128A (128 MB)/ "Memory Stick PRO Duo" MSX-M256 (256 MB), MSX-M1GST (1 GB)/High Speed "Memory Stick PRO Duo" MSX-M1GN (1 GB), MSX-M2GN (2 GB)
Your dealer may not handle some of the above listed optional accessories. Please ask the dealer for detailed information.
Design and specifications are subject to change without notice.
For the customers in the USA
INFORMATION
This equipment has been tested and found to comply with the limits for a Class B digital device, pursuant to Part 15 of the FCC Rules.
However, there is no guarantee that interference will not occur in a particular installation.
If you have any questions about this product, you may call: Sony Customer Information Services Center 1-800-222-7669 or http://www.sony.com/
Declaration of Conformity
Trade Name: SONY
Model: ICD-MX20
Responsible Party: Sony Electronics Inc.
Address: 16530 Via Esprillo, San Diego, CA 92127 U.S.A.
Telephone Number: 858-942-2230
This device complies with part 15 of the FCC Rules. Operation is subject to the following two conditions:
Notice for users
Program © 1999, 2000, 2001, 2002, 2003, 2004, 2005, 2006, 2007
Sony Corporation
Documentation ©2007 Sony Corporation
All rights reserved. This manual or the software described herein, in whole or in part, may not be reproduced, translated or reduced to any machine readable form without prior written approval from Sony Corporation.
Troubleshooting
Before taking the unit for repair, check the following sections. Should any problem persist after you have made these checks, consult your nearest Sony dealer.
IC Recorder
The unit does not operate.
The "Memory Stick" is not recognized. The number of folders automatically created in the "Memory Stick" is less than 5.
No sound comes from the speaker.
Sound comes from the speaker even when the headphones are plugged in.
The OPR indicator does not light.
You cannot start recording.
You cannot erase a message.
You cannot add a recording or an overwrite recording to the previously recorded message.
Recording is interrupted.
Recording is interrupted (when recording from an external device).
Noise is heard.
Recording level is low.
Playback speed is too fast or too slow.
"--Y--M--D" or "--" is displayed.
"--Y--M--D" or "-" is displayed as the recorded date.
There are fewer menu items in the menu mode.
A character in a folder or message name is displayed as "  ".
".
Messages are not sorted in order of the number of priority marks in a folder.
The remaining time displayed in the display window is shorter than that displayed in the supplied "Digital Voice Editor" software.
The battery life is short.
"ACCESS" display does not disappear.
The unit does not operate correctly.
You cannot connect the unit to the PC.
Digital Voice Editor
Refer to the Help files of the Digital Voice Editor software, too.
The Digital Voice Editor software cannot be installed.
- In Windows® XP Media Center Edition 2005/Windows® XP Media Center Edition 2004/Windows® XP Media Center Edition/Windows® XP Professional/Windows® XP Home Edition, you log on as a user name belonging to a user account with limitations. Make sure to log on as a user name with the "Computer administrator" user account.
In Windows® 2000 Professional, make sure to log on as the user name of "Administrator".
The IC recorder or "Memory Stick" cannot be properly connected.
- Check that the installation of the software has been successful. Also check the connection as follows:
The IC recorder does not operate.
Messages cannot be played back./Playback sound volume is too low.
Saved message files cannot be played back or edited.
Counter or slider moves incorrectly.
Operation is slow when there are many messages.
Display does not work during saving, adding, or deleting of messages.
It takes too long to convert a file format.
The software "hangs" when the Digital Voice Editor software starts up.
Please note that recorded messages may be erased during service or repair work.

Documents / Resources
References
Download manual
Here you can download full pdf version of manual, it may contain additional safety instructions, warranty information, FCC rules, etc.
Thank you! Your question has been received!


Need Assistance?
Do you have a question about the ICD-MX20 that isn't answered in the manual? Leave your question here.