Panasonic RP-HD610N - Digital Wireless Stereo Headphones Manual
- Owner's manual (28 pages)
Accessories
Please read these instructions carefully before using this product, and save this manual for future use.
Please check and identify the supplied accessories.
Only for U.S.A.:
To order accessories, refer to "Limited Warranty" on the rear page.
Only for Canada:
To order accessories, contact the dealer from whom you have made your purchase.
- 1 x USB charging cord
- 1 x Detachable cord
- 1 x Carrying case
- 1 x Airplane adaptor
Maintenance
Clean this unit with a dry and soft cloth.
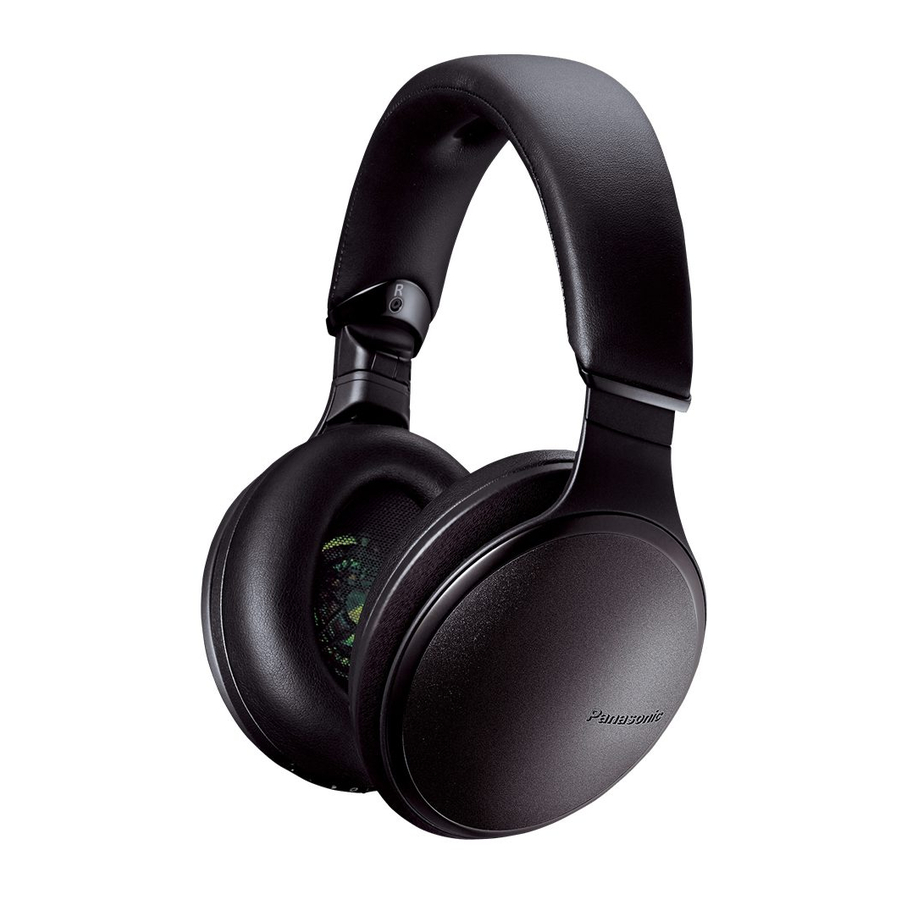
Part names

![]() button*
button*- Charging terminal (DC IN) Microphone Ear pads Raised dot indicating the left side
*![]() : Standby/ON
: Standby/ON
 : Standby/ON
Charging

The rechargeable battery (installed in the unit) is not charged initially. Charge the battery before using the unit.
Connect this unit to a computer ( ) using the USB charging cord (supplied) (
 ).
).
- The power/pairing LED (
![]() ) lights in red when charging is in progress. When charging is completed, the power/pairing LED will go out.
) lights in red when charging is in progress. When charging is completed, the power/pairing LED will go out. - When the battery starts running low during use of the unit, the blinking power/pairing LED will turn from blue to red. A beep will sound every 1 minute.* When the battery runs out, an English guidance message will be heard and the power will turn off.
* If you press![]() twice quickly, an English guidance message will be heard and you can check the battery level.
twice quickly, an English guidance message will be heard and you can check the battery level.
 ) lights in red when charging is in progress. When charging is completed, the power/pairing LED will go out.
Turning the power on/off

Press and hold  () of this unit for approx. 3 seconds until the power/pairing LED (blue) () blinks.
To turn the power off
Press and hold for approximately 3 seconds. An English guidance message will be heard, and the power will be turned off.
Connecting a Bluetooth

- Bluetooth®pairing
When using the Google Assistant, refer to "Using the Google Assistant" (![]() right) before performing the following settings.
right) before performing the following settings. - In the power-off state, press and hold
![]() of this unit until the power/pairing LED blinks.
of this unit until the power/pairing LED blinks. - The unit starts to search for the Bluetooth® device for connection, and the power/pairing LED will blink in blue and red alternately.
- Turn on the power of the Bluetooth® device, and enable the Bluetooth® function.
- Select "RP-HD610N" (
![]() ) from the Bluetooth® device's menu.
) from the Bluetooth® device's menu. - If connection to a device is not established within approximately 5 minutes, the unit will be turned off. Perform pairing again.
(Except for when noise cancelling is turned ON.)
- If connection to a device is not established within approximately 5 minutes, the unit will be turned off. Perform pairing again.
- In the power-off state, press and hold
- Connecting a paired Bluetooth® device
- Turn on this unit.
- Perform steps 2 and 3 of "Bluetooth® pairing". (
![]() above)
above)
 right) before performing the following settings.
  above)
 Using the headphones

When using the functions below that are indicated with the [ ] mark, connect the Bluetooth® device and the unit.
- Listening to music [
![]() ]
]
Select and play the music on the Bluetooth® device. -
Remote controlling (Available only if your Bluetooth® device supports "AVRCP" Bluetooth® profiles) [
![]() ]
]
(Operation example of the Multiple functions button (![]() ))
))Play / Pause: Press the Multiple functions button. Increase the volume: Slide the Multiple functions button towards "+". Decrease the volume: Slide the Multiple functions button towards "–". Skip forward: Press the Multiple functions button twice quickly. Skip backward: Press the Multiple functions button three times quickly. Fast forward: Press the Multiple functions button twice quickly; hold the second press. Fast rewind: Press the Multiple functions button three times quickly; hold the third press. - Making a phone call [
![]() ]
] - Press the Multiple functions button (a) on the unit and answer the incoming call.
- Start talking.
- Press the Multiple functions button to end the phone call.
- (HFP only) It may be difficult to hear phone conversations when the unit is used in locations with loud ambient noise or in outdoor or other locations exposed to powerful winds. In that case, change the calling location or switch the calling device to the Bluetooth® enabled phone to continue the call. (Press the Multiple functions button on the unit twice quickly to switch.)
- You can have the Bluetooth® enabled phone make phone calls by using the microphone of the unit and an app of the Bluetooth® enabled phone.
(![]() right, "Activating voice functions")
right, "Activating voice functions")
- Press the Multiple functions button (a) on the unit and answer the incoming call.
- Using noise cancelling
While using the noise cancelling function, changes the volume and sound quality. The sound quality is set so that it is optimized for each level.
Press the [NC] button to adjust the volume of the playback device. (![]()
![]() )
) - Using the Google Assistant
![]()
You can play back music or look for information by talking to this unit to operate a smartphone or tablet (AndroidTM 5.0+/iOS 9.3 or higher) equipped with the Google Assistant.
Action button • Connect the smartphone or tablet to the Internet. This unit cannot be connected to the Internet directly.
Speak while pressing and holding the Action button.
(Release your finger when you finish speaking.)- Setup is required on the smartphone or tablet before use. For information about other functions and setup procedures, refer to the supplied "About the Google Assistant" or "Owner's Manual (PDF format)".
For more details about the Google Assistant, refer to the site below.
https://support.google.com/headphones
![]()
- Setup is required on the smartphone or tablet before use. For information about other functions and setup procedures, refer to the supplied "About the Google Assistant" or "Owner's Manual (PDF format)".
- Using the app "Panasonic Audio Connect"
By creating a Bluetooth® connection with a smartphone or tablet installed with the "Panasonic Audio Connect" app (free of charge), you can enjoy a wide variety of features.
![]()
- For information, refer to the supplied "About Panasonic Audio Connect" or "Owner's Manual (PDF format)".
Android: Google Play
![play.google.com]()
iOS: App Store
![www.apple.com]()
- For information, refer to the supplied "About Panasonic Audio Connect" or "Owner's Manual (PDF format)".
- Using the ambient sound enhancer
Place your hand over the ambient sound enhancer sensor panel (R side) so that its entire surface is covered. (![]() )
) - Noise cancelling will turn OFF temporarily and the volume of the playback sound will be lowered.
To switch this function between enabled and disabled:
Slide and hold the Multiple functions button (![]() ) towards "+" and at the same time press and hold [NC] for at least 5 seconds.
) towards "+" and at the same time press and hold [NC] for at least 5 seconds.
To set this function to always-on mode: Press [NC] button twice quickly.
- Noise cancelling will turn OFF temporarily and the volume of the playback sound will be lowered.
- Activating voice functions [
![]() ]
]
You can use a button on this unit to activate Siri or other voice functions on your smartphone or similar device.
Press and hold the Multiple functions button (![]() ) on this unit until the voice function is activated.
) on this unit until the voice function is activated. - Making a multi-point connection [
![]() ]
]
 )
) 


 )
)  ) towards "+" and at the same time press and hold [NC] for at least 5 seconds.
- Register the unit to both the first Bluetooth® device and the second Bluetooth® device.
- Connect the first Bluetooth® device, which will be used for music playback, and the unit.
- Connect the second Bluetooth® device, which will be used for calls, and the unit.
- For more details, including more specific setup instructions, refer to the operating instructions for the Bluetooth® devices.
- Only one Bluetooth® device can be connected for music playback.
- Using the detachable cord (supplied)
While the unit is turned off, it can be used as normal headphones by connecting the detachable cord (supplied). (![]() )
) - If you connect the detachable cord (supplied) during Bluetooth® connection, the Bluetooth® connection will be lost.
 )
) To connect to an airplane audio system:
- Connect the unit and the detachable cord (supplied). (
![]() )
) - Connect the input plug (
![]() ) of the detachable cord (supplied) to the airplane adaptor (supplied) (
) of the detachable cord (supplied) to the airplane adaptor (supplied) (![]() ).
). - Connect the airplane adaptor to the in-airplane audio system. (
![]() )
)
 ) of the detachable cord (supplied) to the airplane adaptor (supplied) (
 ).
). )
)- Restoring to the factory settings
Charge the battery before restoring the unit.
- While the unit is turned off, press and hold
![]() for at least 5 seconds until the power/pairing LED starts blinking alternately in blue and red.
for at least 5 seconds until the power/pairing LED starts blinking alternately in blue and red. - While the power/pairing LED is blinking alternately in blue and red, slide and hold the Multiple functions button towards "+" and at the same time press and hold
![]() for at least 5 seconds.
for at least 5 seconds.
 for at least 5 seconds until the power/pairing LED starts blinking alternately in blue and red.
- When pairing a device again, delete the registering information (Device: "RP-HD610N") from the Bluetooth® device's menu, and register this unit with the Bluetooth® device again. (
![]()
![]() )
)
 )
)To remove the battery when disposing of this unit

The following instructions are not intended for repairing purposes but for the disposal of this unit. This unit is not restorable once disassembled.
- When disposing of this unit, take out the battery installed in this unit and recycle it.
Regarding the handling of used batteries
- Batteries
- Remove the left ear pad.
- Remove the 4 screws.
- Remove the part
![]() in step 2.
in step 2. - Remove the battery, and cut off the wires one by one with scissors.
Troubleshooting
Before requesting service, make the following checks. If you are in doubt about some of the check points, or if the remedies indicated in the chart do not solve the problem, refer to "Customer Services Directory" on the front page if you reside in the U.S.A., or refer to "CONTACT INFORMATION" on the front page if you reside in Canada.
No sound
- Check if music is playing on the Bluetooth (
![]()
![]() ) ® device.
) ® device. - Pair and connect the Bluetooth ® device and the unit again. (
![]()
![]() )
)
 ) ® device.
Cannot adjust the volume
- Is the ambient sound enhancer operating? Turn off the ambient sound enhancer. (
![]()
![]() )
)
 )
)Low volume
- Is the ambient sound enhancer operating? Turn off the ambient sound enhancer. (
![]()
![]() )
) - Increase the volume of the unit. (
![]()
![]() )
) - Increase the volume on the Bluetooth® device.
Sound from the device is cut off. / Too much noise. / Sound quality is bad.
The device cannot be connected
- Delete the pairing information for this unit from the Bluetooth®device, then pair them again. (
![]()
![]() )
)
You cannot hear the other person
- Check if the unit and the Bluetooth ® enabled phone are connected. (
![]()
![]() )
) - Check the audio settings of the Bluetooth ® enabled phone. Switch the calling device to the unit if it is set to the Bluetooth ® enabled phone. (
![]()
![]() )
)
Cannot make a phone call
- Check if the Bluetooth® compatible device supports "HSP" or "HFP" profile. For details on profiles, see "Listening to music" and "Making a phone call" in "Owner's Manual (PDF format)". Also refer to the operating manual for the Bluetooth®enabled phone.
The unit does not respond.
Cannot charge the unit.
The power/pairing LED does not light during charging. / Charging takes longer.
- Is the USB charging cord connected firmly to the USB terminal of the computer? (
![]()
![]() )
)
 )
)The power does not turn on.
- Is the unit being charged? The power cannot be turned ON during charging. (
![]()
![]() )
)
The audio guidance language has changed.
- The audio guidance language can be switched.
(Slide and hold the Multiple functions button towards "–" and at the same time press and hold![]() for at least 5 seconds.)
for at least 5 seconds.)
Specifications
- General
| Power supply | DC 5 V, 0.5 A (Internal battery: 3.7 V (Li-polymer)) |
| Operating time*1 | Approx. 24 hours (Noise cancelling: ON, SBC) |
| Charging time*2 (25 oC (77 oF)) | Approx. 4 hours |
| Charging temperature range | 10 oC to 35 oC (50 oF to 95 oF) |
| Operating temperature range | 0 oC to 40 oC (32 oF to 104 oF) |
| Operating humidity range | 35 %RH to 80 %RH (no condensation) |
| Mass (Weight) | Approx. 275 g (9.7 oz) (without cord) |
- Bluetooth®section
| Frequency band | 2402 MHz to 2480 MHz |
| Supported profiles | A2DP, AVRCP, HSP, HFP |
| Supported codec | SBC, AAC, Qualcomm® aptXTM, Qualcomm® aptXTM HD, LDAC |
- Headphone section
| Impedance | 38 Ω (Power off, with cord) |
- Speaker section
| Max input | 1000 mW (IEC) |
*1 It may be shorter depending on the operating conditions.
*2 The time required to charge the battery from empty to full.
Register online at http://shop.panasonic.com/support
(U.S. customers only)
If you have any questions, visit: In the U.S.A.:
http://shop.panasonic.com/support
In Canada: www.panasonic.ca/english/support
Panasonic Corporation of North America
Two Riverfront Plaza, Newark, NJ 07102-5490
http://shop.panasonic.com
Panasonic Canada Inc.
5770 Ambler Drive, Mississauga, Ontario L4W 2T3
www.panasonic.com
© Panasonic Corporation 2019

Documents / Resources
References
Google Assistant Help
![play.google.com]() Google Play
Google Play![www.apple.com]() App Store - Apple
App Store - AppleOfficial Consumer Product Support - Panasonic North America
Electronics, Beauty & Appliances | Panasonic UK & Ireland
Download manual
Here you can download full pdf version of manual, it may contain additional safety instructions, warranty information, FCC rules, etc.


