Motorola MBP944CONNECT - Baby Monitors Quick Start Guide
- User manual (57 pages) ,
- User manual (59 pages)
Contents Inside Box


Strangulation Hazard: Children have STRANGLED in cords. Keep this cord out of the reach of children (more than 1m (3ft) away).
Never use extension cords with AC Adapters. Only use the AC Adapters provided. Stop using the crib mount when baby begins to push up on hands and knees.
Setting up MBP944CONNECT
Step 1: Fasten the round adaptive plate on to the screw thread of the crib mount stand. (see note)

Step 2: Place the mount stand against the crib with the screw thread going through the crib bars.

Step 3: Secure the mounting knob on to the screw thread.

Step 4:Keep the stand parallel and tighten the mounting knob so that the crib mount stand is secured to the crib bars.


Note: Only use the adaptive plate if the top rail of your crib is too thick for the bracket.
Step 5: Extend the telescopic leg of the crib stand so the foot is secured to the floor.

Step 6: Tighten the securing knob to lock the telescopic leg in place.

Note: Ensure the telescopic leg is extended so the foot sits tight against the floor.
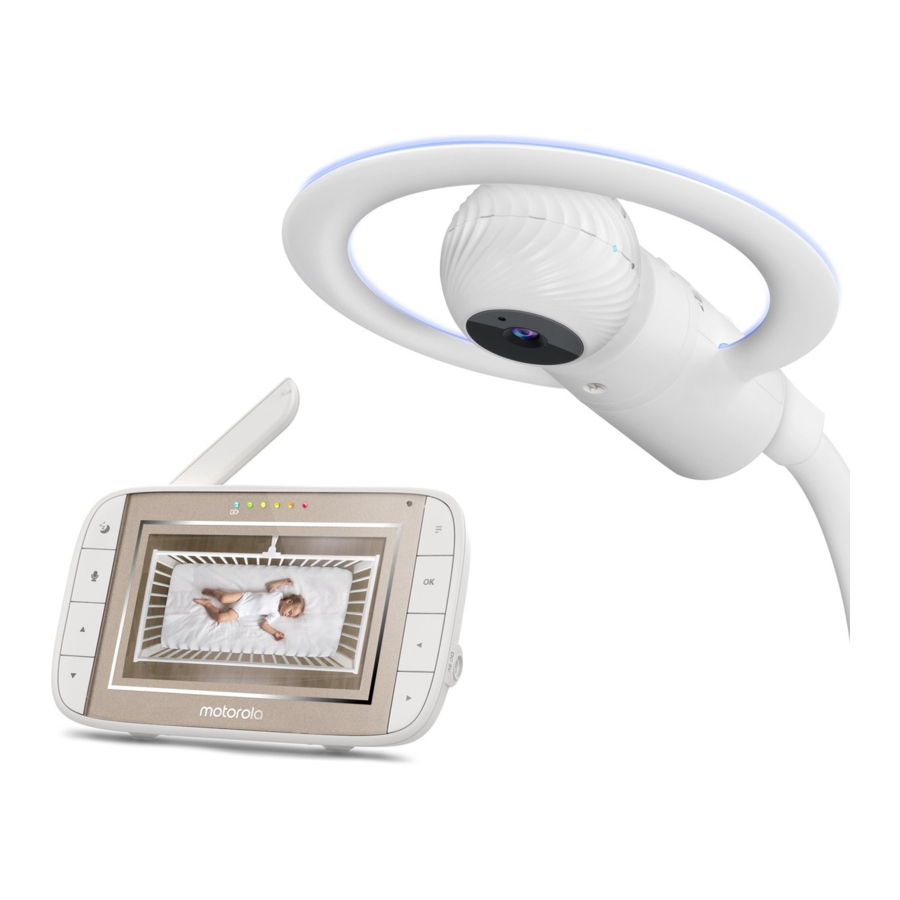
Step 7: Insert the Top Pole (with night light ring) into the crib mount stand. It will lock into place with a 'click'.

Step 8: Dock the baby unit into the top pole (with night light ring) as shown in the picture below.

Note: Before removing the camera from the top pole. Rotate the top pole outside the crib area to avoid the possibility of the camera falling into the crib.
Step 9: Plug the Power Adapter (DC5V/1.5A) into the socket on Crib Mount Stand and the other end to a suitable electrical outlet.

Note: When your child is older the baby unit (camera) can be removed and used without the crib mounting kit. This is 'Desk Mode'. Connect the power supply directly into the Baby Unit (camera) when using in desk mode.
Step 10: Connect the DC plug of the power adapter(DC5V/1.5A) to the Parent Unit and the other end to a suitable electrical outlet. Press and hold the POWER button  on the top of the Parent Unit to turn it ON.

Note: A rechargeable battery (Lithium ion battery 2000mAh) inside the Parent Unit allows you to move it without losing the link and picture from the Baby Unit. The battery gives up to 5 hours operation for the Parent Unit. We recommend you charge it for at least 16 hours before first use, or when the Parent Unit indicates the battery is low.
Parent Unit menu icons
 | Signal Level Indication (5 Levels). |
 | Night Vision Mode (Video also changes to Black/White). |
 | Talk Mode On. |
 | Indicates the screen off timer is set. |
 | Volume Level Control (8 Levels). |
 | No Baby Unit detected. |
 | Sleep activity monitoring. |
 | Battery Level Indication (4 Levels). |
 | Night light is ON. |
 | Night Light Brightness Control with 3 levels of selection. |
 | Night Light Colour Control with 7 colour options. |
 | Night Light Colour Loop with 7 colours. |
 | Zoom Level Control (1X, 2X). |
 | LCD Brightness Level Control (8 Levels). |
 | Audio content Playback selection - Lullabies/Soothing Sounds  and Audio Books and Audio Books  . . |
 | Alarm Setting (6h, 4h, 2h, OFF) On status bar, indicates alarm set, and when flashing, that alarm time has been reached or missed. |
 | Temperature scale select (°C/°F) Readings display in BLUE, but turn RED if > 29°C / 84°F or < 14°C / 57°F. Displays HH °C / °F if >36°C / 97°F. Displays LL °C / °F if < 1°C / 34°F. |
 | Camera Control (scan  , view , view  , add , add  , suppression , suppression ). ). |
 | Set Screen Off Timer (Off  , 5 min, 30 min, 60 min). , 5 min, 30 min, 60 min). |
 | View multiple cameras on screen. Available when you have more than 1 Baby Unit (Camera). |
 | Light Show Projector is on. |
Basic operation of the keys
Parent Unit
 | ON/OFF button | Press and hold to switch on/off the parent unit. Press to turn the LCD screen ON/OFF. |
 | Volume Down/Up buttons | Press -/+ to select volume level of the parent unit. |
 | SLEEP button | Press to review the sleep activity of your baby that recorded from Camera. |
 | TALK button | Press and hold to talk to your baby. |
 | UP/DOWN buttons | Press to adjust menu settings. |
 | MENU | Press to open menu options or exit the menu. |
 | OK button | Press to confirm a selection. |
 | LEFT/RIGHT buttons | Press to access different menu options. |
 | RESET button | Press and hold with a small pin to reset the unit. |
| Baby Unit | ||
 | PAIR button | When use the Baby Unit at desktop mode, press and hold to pair with the parent unit or Hubble Wi-Fi® Setup. |
 | ON/OFF button | Slide the power switch to switch on/off the Unit. |
| Top Pole | ||
 | Night Light button | Press once to switch Night Light on, press repeatedly to select Night Light with 7 colour options. |
 | Light Show Projector button | Press to switch Light Show on or off, press repeatedly to select projector scenes. When use the Baby Unit at dock mode, press and hold to pair with the |
 | UNLOCK/LOCK Switch | parent unit or Hubble Wi-Fi® Setup. Slide the switch to UNLOCK to release baby unit. |
Setting up the Baby Unit for Wi-Fi® internet viewing
- After the Baby Unit docked on the top pole (with Night Light ring) then connect the small plug of the power adapter to the socket at the end of the Crib Mount Stand and the other end to the electrical outlet. Ensure the Power ON/OFF switch is "ON" position.
- Install Hubble for Motorola Monitors App on your Android™ Devices / iPhone® / iPad®


- Scan the QR code with your smart device and download Hubble for Motorola Monitors App from the App Store for iOS devices or from the Google Play devices.
- Install Hubble for Motorola Monitors App on your device.
- Monitor on Compatible Smartphones and Tablets

- Open the Hubble for Motorola Monitors App on your compatible smartphone or tablet.

Please take note of the following minimum system requirements:
Smartphones/Tablets: iOS 8, Android™ 5.0
Wi-Fi® requirements:
At least 0.6 Mbps upload bandwidth per Smart Monitoring Companion unit, test your Internet speed at: http://www.speedtest.net/
General Information
If your product is not working properly, read this Quick Start Guide.
Contact Customer Service:
+491808 938 802 in Europe
E-mail: [email protected]

VideosMotorola Halo+ MBP944CONNECT Video
Documents / Resources
References
![itunes.apple.com]() Hubble for Smart Nursery on the App Store
Hubble for Smart Nursery on the App Store![play.google.com]() Google Play
Google Play![www.speedtest.net]() Speedtest by Ookla - The Global Broadband Speed Test
Speedtest by Ookla - The Global Broadband Speed Test
Download manual
Here you can download full pdf version of manual, it may contain additional safety instructions, warranty information, FCC rules, etc.
Thank you! Your question has been received!


Need Assistance?
Do you have a question about the MBP944CONNECT that isn't answered in the manual? Leave your question here.