Motorola hmez1000 Quick Start Manual
Home monitoring & control system usb gateway
Hide thumbs
Also See for hmez1000:
- Quick start manual (11 pages) ,
- Specifications (2 pages) ,
- User manual (1 page)
Quick Links
See also:
User Manual, Quick Start Manual
Motorola Home Monitoring & Control System
Overview
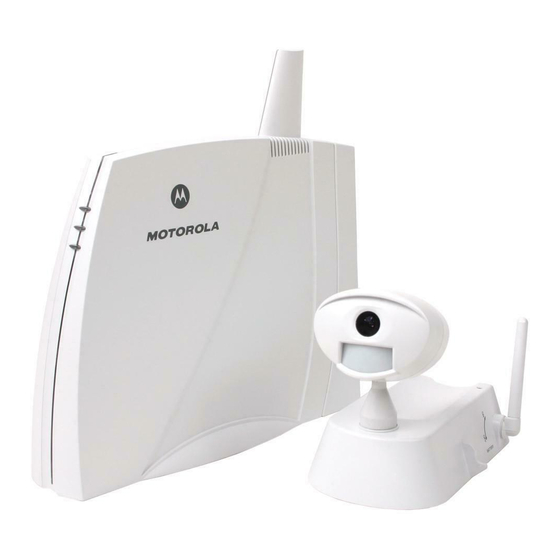
Congratulations on your purchase of the USB Gateway, the
primary component of the Motorola Home Monitoring & Control
System. This guide describes how to set up the USB Gateway.
The Motorola Home Monitoring & Control System helps keep
you informed day and night, rain or shine. The complete product
line offers many advanced monitoring devices, including:
•
Wired and wireless video cameras
•
Wireless temperature sensors
•
Wireless water sensors
•
Wireless door/window sensors
You can manage your system on your home PC. With a
broadband Internet connection, you can specify e-mail and cell
phone, as either a text message or as text + image (depending
on your provider), for delivery of notifications based on
monitored events.
For more information about Motorola Home Monitoring &
Control products, go to
http://www.motorola.com/homemonitoring/
To register your product, go to
http://broadbandregistration.motorola.com
Package Contents
This USB Gateway package includes:
•
Motorola Home Monitor software to manage cameras and
sensors using your computer
•
The USB Gateway to connect to your computer to locally
manage your Motorola Home Monitoring & Control System
through a wireless link
•
A 12V power adapter
Power
Video
Status
Data
12V Power
USB Gateway
CD-ROM
Adapter
Computer System Requirements
®
PC with Intel Pentium
II or later processor, 2X CD-ROM drive,
®
USB port, and 128 MB RAM running Windows Me
,
®
™
Windows
2000, or Windows XP
for Home or Professional
45 MB of hard drive space recommended for installation; 500
MB (maximum) for archives
Installing the Software and USB Gateway
Do not connect your USB Gateway to your computer until the
Installation Wizard instructs you to do so.
1
Insert the enclosed Motorola Home Monitoring & Control
System CD in the CD-ROM drive. The Motorola Home
Monitor Installation Wizard is displayed.
a
If the application does not appear or autorun, right-click the
Start button and select Explore.
b
Select your CD-ROM and double-click to open.
c
Double-click Launch.exe to start the application.
2
Click Next. The Choose Destination Location window is
displayed.
3
Click Next to accept the default destination folder or click
Browse to select a new one. After you click Next, the Select
Program Folder window is displayed.
4
Accept the default folder or choose a new one. Click Next.
The file installation begins. After a few moments, the Install
Motorola Home Monitor Hardware and Driver window is
displayed.
5
Remove the back cover from your
USB Gateway.
Powe r
Video
Statu s
Dat a
Pull back from the top and
then down. The cover will
separate from the unit.
6
Plug the AC adapter into the Power port on the USB
Gateway and into an AC wall outlet. This powers on your
USB Gateway.
7
Connect the USB cable on the Gateway to the USB port on your
computer. Windows automatically installs the required drivers.
USB port on
PC (step 7)
AC adapter
(step 6)
8
If desired, replace the USB Gateway back cover.
9
Once the driver installation is complete, click Next. The
Software installation was successful window is displayed. Be
sure the checkbox “Launch Motorola Home Monitor” is selected.
10
Click Finish. The Motorola Setup Wizard is displayed. Follow
the on-screen instructions for installing The Motorola Home
Monitor software.

Related Manuals for Motorola hmez1000


Summary of Contents for Motorola hmez1000
-
Page 1: Package Contents
Motorola Home Monitoring & Control System Overview Congratulations on your purchase of the USB Gateway, the primary component of the Motorola Home Monitoring & Control System. This guide describes how to set up the USB Gateway. The Motorola Home Monitoring & Control System helps keep you informed day and night, rain or shine. -
Page 2: Quick Start Guide
For your Motorola Home Monitoring & Control System devices that require batteries, use high-quality, non-corrosive batteries designed for use in electronic equipment. Battery life is one year with normal usage. Do not use rechargeable batteries in any Motorola Home Monitoring & Control System device.