Table of Contents
Quick Links
Table of Contents

Related Manuals for Motorola MX240a


Summary of Contents for Motorola MX240a
- Page 1 MX240a Wireless Instant Messenger User's Guide > 6881041B80-A...
-
Page 2: Welcome
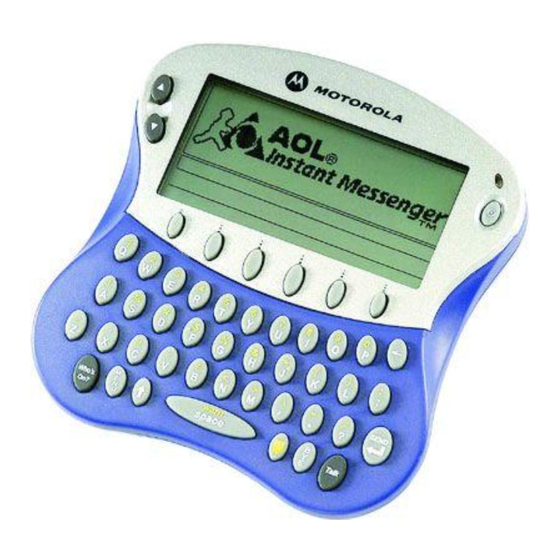
Welcome Handheld Unit Up/Down Scroll Keys 6 Option Keys Keyboard Who’s On? Menu Key Caps Key Base Unit LCD Screen " > < ’ & warn space 020688a Symbol Key Base USB Connector Status Light Power Key Backspace Send Key Talk Key Bye Key Cable... - Page 3 Furthermore, the purchase of the Motorola products shall not be deemed to grant either directly or by implication, estoppel, or otherwise, any license under the copyrights,...
-
Page 4: Table Of Contents
Contents Welcome ........1 Handheld Unit . - Page 5 Using Your MX240a Handheld....27 Navigating the Menus ......27 Handheld Key Functions .
-
Page 6: Fcc And Interference Information
FCC and Interference Information This device complies with Part 15 of the FCC Rules. Operation is subject to the following two conditions: • This device may not cause harmful interference; and • This device must accept any interference received, including interference that may cause undesired operation. - Page 7 Washington, D.C. 20402. Please specify stock number 004-000- 00345-4 when ordering copies. The FCC requires this product to be serviced only by Motorola or its authorized service agents. Changes or modifications not expressly approved by Motorola could void not only the user's...
-
Page 8: Important Safety Information
6. Do not disassemble this product. If service or repair work is required, contact the Motorola address found in the back of this user’s guide. 7. Do not overload wall outlets and extension cords. - Page 9 4. Operate this product using only the power source indicated on the marking label. If you are unsure of the power supply to your home, consult your dealer or local power company. 5. Do not place this product on an unstable cart, stand, or table. This product may fall, causing serious damage to the product.
- Page 10 5. To reduce the risk of electric shock, unplug the charger from the outlet before attempting any maintenance or cleaning. 6. Use of an attachment not recommended or sold by Motorola may result in a risk of fire, electric shock, or personal injury.
-
Page 11: Getting Started
Internet, both in and around your home, from a single PC. Service Requirements In order to use the MX240a, you must have: • A personal computer connected to the Internet (see “Computer Requirements” below). • An AOL Instant Messenger (AIM) account. You can obtain an AIM account by visiting: http://www.aim.com... -
Page 12: What's In The Box
• One base unit with USB connector • Rechargeable battery and battery charger • CD-ROM You can add handheld units that will work with your single base unit (refer to following typical MX240a configuration). Base Unit Internet Broadband or Modem... -
Page 13: Installing The Battery
Plus Polarity Charging the Battery Charge the battery for 16 hours before using the MX240a handheld for the first time. After first use, the battery will be fully charged within 10 hours. You may use the handheld while the battery is charging. -
Page 14: Status Light Indicator
10 minutes of operational use remaining in the handheld unit. Battery Performance • Always use Motorola Original batteries and battery chargers. The warranty does not cover damage caused from using non-Motorola batteries and/or battery chargers. - Page 15 • When you do not intend to use the battery for a while, store it uncharged in a cool, dark, dry place, such as a refrigerator. • Over extended periods of time, batteries gradually wear down and require longer charging times. This is normal.
-
Page 16: Installation And Setup
Installation and Setup To use your MX240a unit, the software and hardware must be properly installed on your computer. Before you begin installation, make sure your computer meets the minimum requirements (see page 10). Software Installation Action 1 Insert the MX240a software CD-ROM into your PC’s CD tray. - Page 17 MX240a icon on your desktop. Double click the icon to launch the application. If you do not see the MX240a icon on your desktop, click Start on the Windows taskbar and select MX240a in the Programs list to launch the application.
-
Page 18: Hardware Installation
2 Place the base unit in any convenient location away from your computer to prevent interference. When the base is connected and the PC MX240a software is running, a green icon ( area. If the base is disconnected from your computer, a red icon ) appears in the taskbar status area. - Page 19 Action 3 If you are prompted to enter the base ID, skip this step and proceed to step 4. If you are not prompted to enter the base ID, press Menu. When the Menu screen appears, press the option key below Regstr to register the base.
-
Page 20: Pc Setup
MX240a program if it is not already running. If you do not see the MX240a icon on your desktop, click Start on the Windows taskbar and select MX240a in the Programs list to launch the application if it is not already running. -
Page 21: Menu Configuration
5 When all information has been entered, click Apply. Note: You can customize the way the MX240a will dial up the Internet through your PC. To do this, click the Help button to open the online help screen. The article... -
Page 22: Alerts
• Service Connected • Out of Range • Return to In-Range • Enter Sleep Mode To customize the alerts for your MX240a unit: Action 1 Highlight the alert you want to change and click Browse. 2 Select a different sound file and click Open. -
Page 23: Options
The alert sound you have selected can be modified by clicking on Music Editor. This option allows you to modify the play rate, scale, note duration, and volume of an alert. If you do not want to hear any sound for a given alert, highlight the alert and click the box labeled “Disable Alert on Handheld”. -
Page 24: Security
Block Only the Users Below option. Then click the Add Name button and enter a screen name. It will then appear in the box. You can also select or deselect the following checkboxes: • Show Accept Message Dialogue for Buddies not on my Buddy List •... -
Page 25: Diagnostics
To deactivate all handhelds for a period of time, click the “Disable Handhelds Beginning At” box. Then select a time from the first pulldown list and a duration from the second pulldown list. During the time period specified, all handhelds are deactivated. Diagnostics To test your Internet connection: Action... - Page 26 When a connection fails: Failed Check Internet If you are using a modem, make Connection sure it is connected to the Internet. If you are using a LAN or broadband connection, make sure the connection is functioning. If you are using a firewall or proxy server, make sure the system is configured properly.
-
Page 27: Buddy List
Note: You can also manage your Buddy List through AOL Instant Messenger (AIM) on your PC. Changes you make to your Buddy List through the MX240a software will be reflected when you log on to the regular AIM client and... -
Page 28: Using Your Mx240A Handheld
Using Your MX240a Handheld Make sure your computer is logged on to your Internet service provider and the battery in the MX240a handheld unit is fully charged. Navigating the Menus Up/Down Scroll Keys 6 Option Keys Keyboard Who’s On? ’... -
Page 29: Handheld Key Functions
Handheld Key Functions • Power Key (ª)—press and hold longer than 1 second to turn power on or off. • Up/Down Keys ( ¢ ©)—use to scroll main text area only (see page 30). • 6 Option Keys—select various options. •... -
Page 30: Option Keys
displays on the screen. Caps remain locked on until you press ® again. Option Keys When you press ® or ™, addition, Smileys are displayed above each option key. To send a Smiley, press the corresponding option key. The Smiley’s text equivalent appears in the Send Text Area as shown in the following screen. -
Page 31: Available Aol Smileys
Entering Text Send Text Area Option Key Label Area The Entering Text screen shows the areas where you can enter text. Unlike typical keyboard text entry, with the MX240a unit, you enter text via thumb typing. Meaning Smiling Winking Frowning... -
Page 32: Status Icons
Status Icons There are 2 types of status icons that appear on your screen. • Buddy status icons: Status Icon • Device status icons: Status Icon Description Buddy is online using a mobile device Buddy is idle Buddy is away Description Capitals Capitals Locked... -
Page 33: Power Up And Logon A Handheld Unit
AIM screen name and password. • If your handheld cannot see an active base that you previously registered with, you will see a message stating that it could not contact the base. Move closer Welcome! MX240a V1.0 Copyright 2002 Motorola Patents Pending... - Page 34 to the base and press the Exit option to try to connect again. • If you have previously registered with this base and still cannot see the base, refer to “Troubleshooting” on page 39. If the base is operating and you have not previously used that base: Action 1 Press Menu to enter the Setup screen.
-
Page 35: Who's Online Now Screen
Who’s Online Now Screen Who s Online Now 1>buddy A 2>buddy B 3>Buddy C 4>buddy D Press a number key to talk group The Who’s Online Now screen shows all of your buddies from your Buddy List who are currently online. Notes: •... -
Page 36: Sending And Receiving A Message
Sending and Receiving a Message To send messages to a buddy: Action 1 Select the buddy you want to talk to from the Who’s Online Now list by pressing the number associated with the name. 2 The Talk screen displays. The line below the text entry area will show you who you are talking to and their warning level. -
Page 37: Sending A Warning
To receive messages from a buddy: Action 1 When your buddy responds with a message, the New Message alert sounds and the LED flashes green if you are not in the IM session. Note: While you are in a private chat and you receive another message, the name of the buddy sending the new message appears above an option key. -
Page 38: Main Menu Screen
given the option of Yes or No on two of the option keys. Press the option key below your desired choice. If you do not respond to the chat invitation, it will be declined after a short time. Main Menu Screen Logoff- Logoff from the service Add- Add Buddies to a Chat... -
Page 39: Set Your Away Message
To add buddies to a chat session: Action 1 Press Menu to display the Main Menu. 2 Press Invite. 3 Press Curren to add buddies to your current chat session, or New to add buddies to a new chat session. 4 Enter the number of each buddy you want to add to the chat session and press Send. -
Page 40: Register With A Base
Action 7 Press Talk to display the Talk screen and read the message. To delete your Away message: Action 1 Press Menu to display the Main Menu. 2 Press Away. 3 Press Delete. 4 Enter the number associated with the Away message you want to delete. -
Page 41: Beeps/Lcd/Alerts Screen
6 Press Exit to return to the Main Menu. 7 Press Exit again. Beeps/LCD/Alerts Screen Alert Volume Off ‘’’’’’’______Max LCD Contrast Light ______________Dark Adjust Your Beeps/LCD/Alerts Vol- Vol+ To Power Down Your MX240a Unit Press ª for 2 seconds. Key Beeps Beeps Light Dark Exit... -
Page 42: Troubleshooting
Troubleshooting Your MX240a unit comes with a diagnostic program installed. However, the following error messages may appear while you are installing or using your MX240a unit: Error Message Can’t find base Incorrect User Name or Password Entered Your network connection has... -
Page 43: Warranty
SOFTWARE PURCHASED IN THE UNITED STATES OR CANADA What Does this Warranty Cover? Subject to the exclusions contained below, Motorola, Inc. warrants its telephones, pagers, messaging devices, and consumer two-way radios that operate via Family Radio Service or General Mobile Radio Service (“Products”), Motorola-branded or certified... - Page 44 Products Covered Products and Accessories as defined above, unless otherwise provided for below. Decorative Accessories and Cases. Decorative covers, bezels, PhoneWrap™ covers and cases. Monaural Headsets. Ear buds and boom headsets that transmit mono sound through a wired connection. Consumer Two-Way Radio Accessories Products and Accessories that are Repaired or...
- Page 45 (d) other acts which are not the fault of Motorola, are excluded from coverage. Use of Non-Motorola Products and Accessories. Defects or damage that result from the use of Non-Motorola branded or certified Products, Accessories, Software or other peripheral equipment are excluded from coverage.
- Page 46 This warranty extends only to the first consumer purchaser, and is not transferable. What will Motorola Do? Motorola, at its option, will at no charge repair, replace or refund the purchase price of any Products, Accessories or Software that does not conform to this warranty. We may use functionally equivalent reconditioned/refurbished/pre-owned or new Products, Accessories or parts.
- Page 47 You will receive instructions on how to ship the Products, Accessories or Software, at your expense, to a Motorola Authorized Repair Center. To obtain service, you must include: (a) a copy of your receipt, bill of sale or other comparable proof of purchase;...
- Page 48 Laws in the United States and other countries preserve for Motorola certain exclusive rights for copyrighted Motorola software such as the exclusive rights to reproduce and distribute copies of the Motorola software.
-
Page 49: License Agreement For Aol® Instant Messenger
® License Agreement for AOL ™ Instant Messenger Software The AOL Instant Messenger software (the "Software") is provided to you free of charge, "AS IS," subject to the terms and conditions of this License Agreement (the "Agreement"). Please read this Agreement in full before using the Software. - Page 50 You further agree to abide by all laws and regulations in effect regarding your use of the Software and Service and agree to indemnify AOL, its officers, agents, employees and directors for any damages incurred as a result of a violation of this paragraph. Finally, you may not authorize or assist any third party to do any of the things described in this paragraph.
- Page 51 6. Termination. Should you breach this Agreement, your right to use the Software shall terminate immediately and without notice. You may also terminate this Agreement by simply discontinuing use of the Software. In the event of any termination of this Agreement, the restrictions on your use of the Software as set forth in Paragraph 2 ("Restrictions on Use") shall survive such termination, and you agree to be bound by those terms.
- Page 52 10. No Trademark License. No license is granted to you in this Agreement, either expressly or implicitly, to use any trademark, service mark, names, or logos of AOL, including America Online, AOL, AOL Instant Messenger, Instant Messenger, AIM and the Running Man logo. AOL owns all intellectual property in the Software and the proprietary AOL name space database, including but not limited to AOL components and algorithms and access to the Service server complex.