- 1 Owner's Record
- 2 Refer to the Help Guide
- 3 Check the supplied items
- 4 Parts and controls
- 5 Let's try out your new IC recorder
- 6 Using the HOME menu
- 7 Using the OPTION menu
- 8 Copying files from your IC recorder to a computer
- 9 Installing Sound Organizer 2
- 10 Precautions
- 11 INFORMATION
- 12 Specifications
- 13 Trademarks
- 14 License
- 15 Videos
- 16 Documents / Resources
Owner's Record
The model number is located at the rear panel and the serial number is located at the rear panel. Record these numbers. Refer to these numbers whenever you call upon your Sony dealer regarding this product.
You are cautioned that any changes or modifications not expressly approved in this manual could void your authority to operate this equipment.
Refer to the Help Guide
This is the Operating Instructions, which provides you with instructions on the basic operations of the IC recorder.
The Help Guide is an online manual.
Refer to the Help Guide when you would like to know further details, operations and possible solutions when a problem occurs.
http://rd1.sony.net/help/icd/u56/h_ce/

Check the supplied items
Optional accessories
Electret condenser microphone ECM-CS3, ECM-TL3
 Note
Note
Depending on the country or region, some of the models or optional accessories are not available.
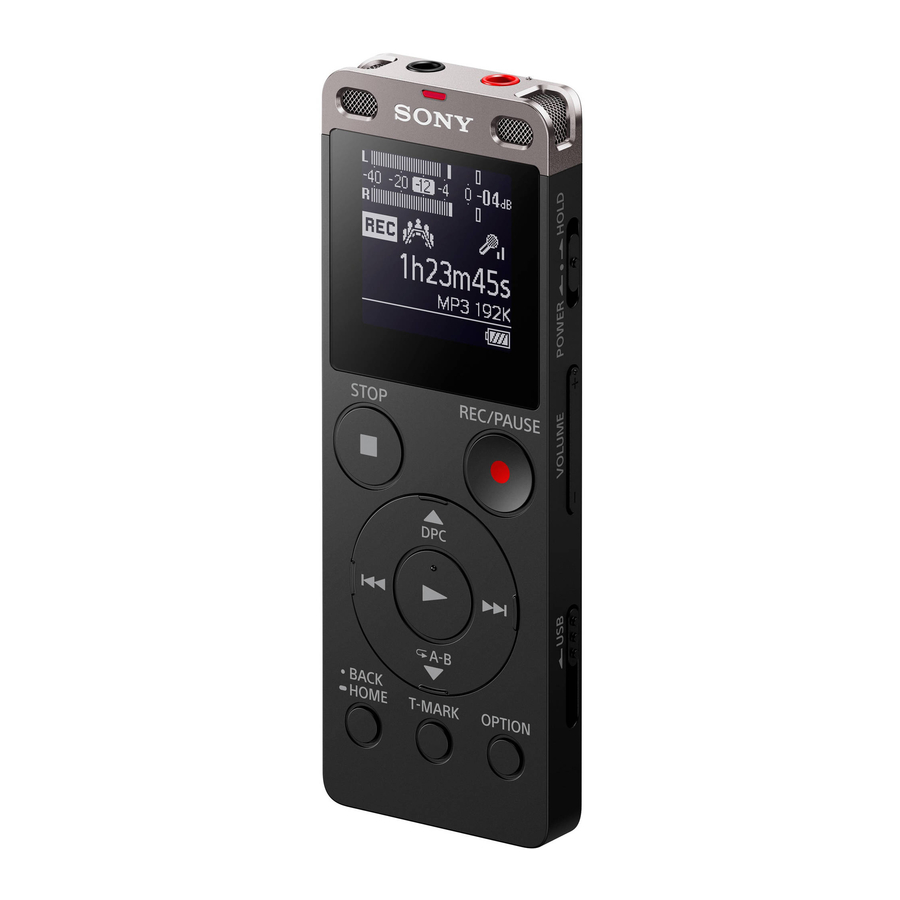
Parts and controls

![]() REC/PAUSE (record/pause) button
REC/PAUSE (record/pause) button![]() STOP button
STOP button- Control button (
![]() DPC (Digital Pitch Control),
DPC (Digital Pitch Control), ![]() A-B (repeat A-B),
A-B (repeat A-B), ![]() (review/fast backward),
(review/fast backward), ![]() (cue/fast forward))
(cue/fast forward)) ![]() (play/enter) button*1
(play/enter) button*1![]() (headphones) jack
(headphones) jack![]() (microphone) jack*1
(microphone) jack*1- POWER•HOLD switch*2
- VOLUME –/+ (volume –/+) button*1
 REC/PAUSE (record/pause) button
 DPC (Digital Pitch Control),
  A-B (repeat A-B),
  (review/fast backward),
  (cue/fast forward))
 (headphones) jack
*1 The  (play/enter) button, VOLUME –/+ (volume –/+) button, and
  (microphone) jack have a tactile dot. Use the tactile dot as a reference when operating the IC recorder.
*2 Sliding the POWER•HOLD switch to "POWER" and holding it for 8 seconds or longer restarts your IC recorder. For detailed instructions, refer to the Help Guide.
Let's try out your new IC recorder
Charge

- Charge the IC recorder.
Slide the USB slide lever in the direction of the arrow, and insert the USB connector into the USB port of a running computer.
When the battery is fully charged, the battery indicator will indicate "![]() ".
". - Disconnect the IC recorder.
Make sure that the operation indicator does not light. Then refer to the Help Guide to remove the IC recorder safely.
 ".
".Power on

Slide and hold the POWER•HOLD switch in the direction of "POWER" until the window display appears.
To turn the power off, slide the POWER•HOLD switch to "POWER" and hold it until "Power Off" appears on the display window.
To prevent unintentional operations (HOLD)
Slide the POWER•HOLD switch in the direction of "HOLD."

 To release the IC recorder from the HOLD status, slide the POWER•HOLD switch towards the center.
Initial settings

When you turn on your IC recorder for the first time, the "Configure Initial Settings" screen appears on the display window. You can then select the display language, set the clock, and turn on/off the beep sound.
- Select "Yes" to start the initial settings.
![]()
- Select the display language.
You can select from the following languages: English*, Español (Spanish), Français (French)
* Default setting - Set the current year, month, day, hour, and minute.
![]()
![]() To go back to the previous clock setting item, press BACK/HOME.
To go back to the previous clock setting item, press BACK/HOME. - Select "Next."
![]()
- Select "ON" or "OFF" to turn on or off the beep sound.
When the initial settings finish, the completion message and then the HOME menu screen appears.
![]()


 To go back to the previous clock setting item, press BACK/HOME.

Notes
Record

- Turn the IC recorder so that its built-in microphones point in the direction of the recording source.
- Press
![]() REC/PAUSE.
REC/PAUSE.
Recording starts and the operation indicator lights in red.
![]()
During the recording, the peak meters appear to help you adjust the recording level (A).
Please adjust the orientation of the built-in microphones, the distance from the sound source, or the sensitivity setting of the microphones so that the recording level stays around -12 dB, which fits within the optimum range, as illustrated above. - Press
![]() STOP to stop recording.
STOP to stop recording.
"Please Wait" appears first, and then the record standby screen appears.
After you stopped recording, you can press![]() to play the file you have just recorded.
to play the file you have just recorded.

Listen

- Select "
![]() Recorded Files" from the HOME menu.
Recorded Files" from the HOME menu. - Select "Latest Recording," "Search by REC Date," "Search by REC Scene," or "Folders."
- Select your desired file.
Playback starts and the operation indicator lights in green.
![]()
- Press VOLUME -/+ to adjust the volume.
- Press
![]() STOP to stop playback.
STOP to stop playback.
 Recorded Files" from the HOME menu.
To add a track mark
You can add a track mark at a point at which you want to divide a file later or locate during playback. You can add a maximum of 98 track marks to each file.
You can also add track marks during recording.
Delete

Note
Once a file is deleted, you cannot restore it.
- Select the file you want to delete from the list of recorded files or play back the file you want to delete.
- Select "Delete a File" from the OPTION menu.
![]()
"Delete?" appears and the selected file starts playing for your confirmation. - Select "Yes."
![]()
"Please Wait" appears and stays until the selected file is deleted.


The display window turns off automatically
The "Screen Off Timer" setting on your IC recorder is set to "30sec" by default to save battery power. If you leave the IC recorder untouched for 30 seconds, the display window will turn off, but you can still perform any button operations. To turn the display window back on, press BACK/HOME.

You can keep the display window from turning off or change the default setting to another timer interval. Press and hold BACK/ HOME and select " Settings" - "Common Settings" - "Screen Off Timer," and then select "No Auto Screen Off," "15sec," "30sec," "1min," "3min," or "5min."
Using the HOME menu
You can use the HOME menu for a variety of operations, including locating and playing a recorded file and changing the settings of your IC recorder.

- Press and hold BACK/HOME.
The HOME menu screen appears.
![]()
The HOME menu items are aligned in the following sequence.
![]()
* The function you are currently using is displayed in "XX." - Select your desired function from the following:
![]() Music
Music You can select and play one of the files you have imported from a computer.
To locate a music file, select "All Songs," "Albums," "Artists," or "Folders."![]() Recorded Files
Recorded Files You can select and play one of the files you have recorded with your IC recorder.
To locate a recorded file, select "Latest Recording," "Search by REC Date," "Search by REC Scene," or "Folders."![]() Record
Record You can display the record standby screen, and then start recording. ![]() Settings
Settings You can display the Settings menu screen and change various settings on the IC recorder. ![]() Return to XX*
Return to XX* You can go back to the screen that was displayed before the HOME menu screen.
* The function you are currently using is displayed in "XX."


 Music
Music  Recorded Files
  Record
  Return to XX*
 Press  STOP to return to the screen displayed before you entered the HOME menu.
Using the OPTION menu
You can use the OPTION menu to perform a variety of functions, including changing the settings of your IC recorder.
The available items differ depending on the situation.

- Select your desired function from the HOME menu, and then press OPTION.
![]()
- Select the menu item for which you want to change the setting.
- Select your desired setting option.

Copying files from your IC recorder to a computer
You can copy the files and folders from your IC recorder to a computer to store them.
- Follow the instructions in "Charge" to connect your IC recorder to a computer.
- Drag and drop the files or folders you want to copy from "IC RECORDER" or "MEMORY CARD" to the local disk on the computer.
- Disconnect your IC recorder from the computer.
Installing Sound Organizer 2
Install Sound Organizer on your computer.
Sound Organizer allows you to exchange files between your IC recorder and your computer.
Songs imported from music CDs and other media, MP3 and other audio files imported to a computer can also be played and transferred to the IC recorder.
Notes
When installing Sound Organizer, log in to an account with administrator privileges.
- Follow the instructions in "Charge" to connect your IC recorder to a computer.
- Make sure the IC recorder is successfully detected by the computer.
"Connecting" appears and stays on the IC recorder's display window while the IC recorder is connected to the computer. - Go to the [Start] menu, click [Computer], and then double-click [IC RECORDER] - [FOR WINDOWS].
- Double-click [SoundOrganizer_V2000] (or [SoundOrganizer_ V2000.exe]).
Follow the computer's on-screen instructions. - Make sure that you accept the terms of the license agreement, select [I accept the terms in the license agreement], and then click [Next].
- When the [Setup Type] window appears, select [Standard] or [Custom], and then click [Next].
Follow the instructions on the screen and set the installation settings when you select [Custom]. - When the [Ready to Install the Program] window appears, click [Install].
The installation starts. - When the [Sound Organizer has been installed successfully.] window appears, check [Launch Sound Organizer Now], and then click [Finish].
![warning]() Note
Note
You may need to restart your computer after installing Sound Organizer.
Precautions
On power
Operate the unit only on 3.7 V DC with the built-in rechargeable lithium-ion battery.
On safety
Do not operate the unit while driving, cycling or operating any motorized vehicle.
On handling
- When using your IC recorder, remember to follow the precautions below in order to avoid warping the cabinet or causing the IC recorder to malfunction.
- Be careful not to allow water to splash on the unit. The unit is not waterproof. In particular, be careful in the following situations.
- You may feel pain in your ears if you use the headphones when the ambient air is very dry.
This is not because of a malfunction of the headphones, but because of static electricity accumulated in your body. You can reduce static electricity by wearing non-synthetic clothes that prevent the emergence of static electricity.
On noise
On maintenance
To clean the exterior, use a soft cloth slightly moistened in water. Then use a soft dry cloth to wipe the exterior. Do not use alcohol, benzine or thinner.
If you have any questions or problems concerning your unit, please consult your nearest Sony dealer.

Do not expose the batteries (battery pack or batteries installed) to excessive heat such as sunshine, fire or the like for a long time.
INFORMATION
This equipment has been tested and found to comply with the limits for a Class B digital device, pursuant to Part 15 of the FCC Rules. These limits are designed to provide reasonable protection against harmful interference in a residential installation.
This equipment generates, uses and can radiate radio frequency energy and, if not installed and used in accordance with the instructions, may cause harmful interference to radio communications.
However, there is no guarantee that interference will not occur in a particular installation. If this equipment does cause harmful interference to radio or television reception, which can be determined by turning the equipment off and on, the user is encouraged to try to correct the interference by one or more of the following measures:
If you have any questions about this product, you may call: Sony Customer Information Service Center 1-800-222-7669 or http://www.sony.com/
Declaration of Conformity
Trade Name: SONY
Model: ICD-UX560
Responsible Party: Sony Electronics Inc.
Address: 16535 Via Esprillo, San Diego, CA 92127 USA
Telephone Number: 858-942-2230
This device complies with part 15 of the FCC Rules. Operation is subject to the following two conditions:
Specifications
Capacity (User available capacity*1*2)
4 GB (approx. 3.20 GB = 3,435,973,837 Byte)
Maximum recording time (Built-in memory)
The maximum recording time of all the folders is as follows.
| LPCM 44.1 kHz/16 bit | 5 hours 20 minutes |
| MP3 192 kbps*3 | 39 hours 45 minutes |
| MP3 128 kbps | 59 hours 35 minutes |
| MP3 48 kbps (MONO) | 159 hours |
Note
When you are going to record continuously for a long time, you may need a USB AC adaptor (not supplied). For details on the battery life, see Battery Life. The maximum recording time in this topic is for your reference only.
Battery Life (a built-in rechargeable lithium-ion battery) (JEITA)*4*5
| Recording | Playback with the built-in speaker*6 | Playback with the headphones | |
| LPCM 44.1 kHz/16 bit | Approx. 23 hours | Approx. 5 hours | Approx. 30 hours |
| MP3 192 kbps | Approx. 27 hours | Approx. 5 hours | Approx. 45 hours |
Dimensions (w/h/d) (not incl. projecting parts and controls) (JEITA)*4
Approx. 1 1/2 inches (36.6 mm) x 4 inches (101.5 mm) x 7/16 inches (10.5 mm)
Mass (JEITA)*4
Approx. 1.9 oz (52 g)
Temperature/Humidity
| Operating temperature | 41°F - 95°F (5°C - 35°C) |
| Operating humidity | 25% - 75% |
| Storage temperature | 14°F - 113°F (-10°C - +45°C) |
| Storage humidity | 25% - 75% |
Compatible memory cards
*1 A small amount of the internal memory is used for file management and therefore not available for user storage.
*2 When the built-in memory is formatted with the IC recorder.
*3 Default settings for the recording scenes.
*4 Measured value by the standard of JEITA (Japan Electronics and Information Technology Industries Association)
*5 The battery life may shorten depending on how you operate the IC recorder.
*6 When playing back music with the built-in speaker with the volume level set to 27.
Trademarks
- microSD, microSDHC and microSDXC logos are trademarks of SD-3C, LLC.
![]()

All other trademarks and registered trademarks are registered trademarks or registered trademarks of their respective holders. Furthermore, "™" and "®" are not mentioned in each in this manual.
This product is protected by certain intellectual property rights of Microsoft Corporation. Use or distribution of such technology outside of this product is prohibited without a license from Microsoft or an authorized Microsoft subsidiary.
The "Sound Organizer 2" uses software modules as shown below:
Windows Media Format Runtime
License
Notes on the License
This IC recorder comes with software that are used based on licensing agreements with the owners of that software.
Based on requests by the owners of copyright of these software applications, we have an obligation to inform you of the following. Please read the following sections.
Licenses (in English) are recorded in the internal memory of your IC recorder.
Establish a Mass Storage connection between the IC recorder and a computer to read licenses in the "LICENSE" folder.
On GNU GPL/LGPL applied software
The software that is eligible for the following GNU General Public License (hereinafter referred to as "GPL") or GNU Lesser General Public License (hereinafter referred to as "LGPL") are included in the IC recorder. This informs you that you have a right to have access to, modify, and redistribute source code for these software programs under the conditions of the supplied GPL/LGPL.
Source code is provided on the web. Use the following URL to download it. http://www.sony.net/Products/Linux/
We would prefer you do not contact us about the contents of source code.
Licenses (in English) are recorded in the internal memory of your IC recorder. Establish a Mass Storage connection between the IC recorder and a computer to read licenses in the "LICENSE" folder.

VideosSony ICD UX560 - Review Video
Documents / Resources
References
Download manual
Here you can download full pdf version of manual, it may contain additional safety instructions, warranty information, FCC rules, etc.
Thank you! Your question has been received!


Need Assistance?
Do you have a question about the ICD-UX560 that isn't answered in the manual? Leave your question here.