
Related Manuals for Electrolux SafeBox Hold


Summary of Contents for Electrolux SafeBox Hold
- Page 1 Safe box Installation and operating manual * 595405401- 2022.08 *Original instructions...
- Page 2 Foreword Read the following instructions, including the warranty terms before installing and using the appliance. Visit our website www.electroluxprofessional.com and open the Support section to: Register your product Get hints & tips of your product, service and repair information The installation, use and maintenance manual (hereinafter Manual) provides the user with information necessary for correct and safe use of the appliance.
-
Page 3: Table Of Contents
Contents A WARNING AND SAFETY INFORMATION....................4 General information ........................4 Personal protection equipment ......................4 General safety ..........................5 Protection devices installed on the appliance ..................5 Safety signs to be placed on the appliance or near its area ..............6 Reasonably foreseeable improper use .................... -
Page 4: Awarning And Safety Information
WARNING AND SAFETY INFORMATION General information To ensure safe use of the appliance and a proper understanding of the manual it is necessary to be familiar with the terms and typographical conventions used in the documentation. The following symbols are used in the manual to indicate and identify the various types of hazards: WARNING Danger for the health and safety of operators. -
Page 5: General Safety
Stage Protective Safety footwear Gloves Glasses Safety helmet garments ○ ● ● ○ — Extraordinary ˉ cleaning ○ ● ○ — — Maintenance ○ ● ○ ○ — Dismantling ○ ● ○ ○ — Scrapping Key: ● PPE REQUIRED ○ PPE AVAILABLE OR TO BE USED IF NECESSARY —... -
Page 6: Safety Signs To Be Placed On The Appliance Or Near Its Area
Safety signs to be placed on the appliance or near its area Prohibition Meaning do not remove the safety devices do not use water to extinguish fires (placed on electrical parts) Danger Meaning caution hot surface danger of electrocution (shown on electrical parts with indication of voltage) exposure to UV-C rays UV-C Reasonably foreseeable improper use... -
Page 7: Transport, Handling And Storage
Residual risk Description of hazardous situation Slipping or falling The operator can slip due to water, any liquid or dirt on the floor Burns/abrasions (e.g. heating elements, cold The operator deliberately or unintentionally touches some components pan, cooling circuit plates and pipes) inside the appliance without using protective gloves. -
Page 8: Appliance Space Limits
• Do not spray water or use water jets, steam cleaner or high pressure cleaner. A.15 Preventive Maintenance In order to ensure the safety and performance of your equipment, it is recommended that service is undertaken by Electrolux Professional authorised engineers every 12 months, in accordance with Electrolux Professional Service Manuals. Please contact your local Electrolux Professional Service Centre for further details. -
Page 9: Appliance Disposal
– inadequate or interrupted water supply, steam, air, gas Check on Electrolux Professional website the list of authorized (including impurities and/or other that does not comply with customer care. the technical requirements for each appliance);... -
Page 10: Testing And Inspection
Manufacturer Electrolux Professional SpA or any other service centre authorised by Electrolux Customer packaging checks Professional SpA. • The forwarder is responsible for the goods during transport... -
Page 11: Dinstallation Diagrams
INSTALLATION DIAGRAMS Drop down doors EI = Power supply B = Bolting holes EQ = Equipotential screw... -
Page 12: Einstallation And Assembly
Sliding doors EI = Power supply B = Bolting holes EQ = Equipotential screw INSTALLATION AND ASSEMBLY Introduction Polyethylene WARNING • Outer wrapping Refer to “Warning and safety • Instructions bag information“. Polypropylene To ensure correct operation of the appliance and maintain safe •... -
Page 13: Sliding Doors Installation
Adjust the appliance by turning the special adjustable feet and 1. Place the right door in the most internal rail. making sure it is perfectly levelled horizontally (side to side and front to rear). 2. Place the left door in the most external rail. CAUTION •... -
Page 14: Electrical Connection For Appliances With Plug
The appliance must also be included in an equipotential A. Lower appliance system, whose connection is made by means of equipotential B. Upper appliance screw indicated by the symbol To install multiple appliances on top of each other, follow these steps: The equipotential wire must have a section of at least 10 mm2. -
Page 15: Fnormal Appliance Use
3. Remove the two rear screws at the bottom of the 2. Insert the plug or open the terminal block and insert the appliance “B“. terminals and reassemble the protective cover with the screws. 4. Place appliance “B“ on top of appliance “A“ and secure the rear supports with the two screws you just removed. -
Page 16: Basic Requirements For Appliance Use
• receive specific training for correct appliance use. • Adequate general basic education and technical knowledge for reading and understanding the contents of the manual, IMPORTANT including correct interpretation of the drawings, signs and The Customer must make sure his personnel have pictograms. -
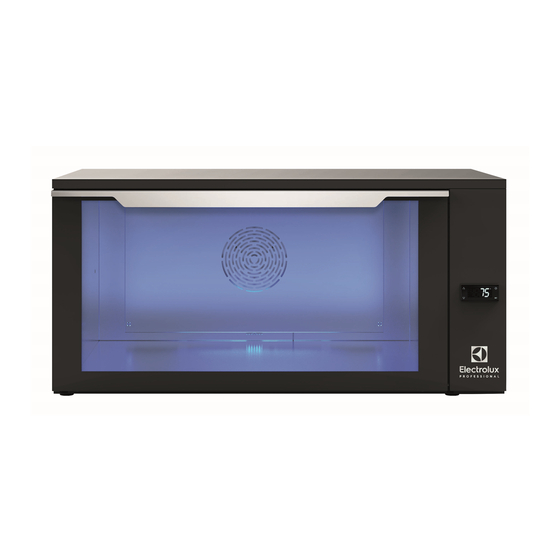
Page 17: Daily Use
Daily use To turn the UV-C led off NOTE! • If necessary, the UV-C led can be turned For sliding doors models off by pressing the UV-C led on-off Open and close the doors exclusively using the button. The appliance will continue to special handles: when the appliance is in operation operate at the set temperature. -
Page 18: Daily Cleaning
Daily cleaning Always dry all interior and exterior surfaces carefully after cleaning. Cleaning must be carried out after every day of use. Use a dry soft or microfiber cloth to clean the door/s and all IMPORTANT interior surfaces of dust. Drop down models Never spray water or detergents on the door hinges, IMPORTANT... -
Page 19: Troubleshooting
Troubleshooting Anomaly Description Possible causes Actions Contact the Customer Care Serv- • Connector unplugged ice to check the probe type, the Probe failure • Probe and/or probe wire probe wiring and replace if damaged necessary. • High temperature Wait for the temperature to drop alarm •... -
Page 20: Kappliance Disposal
Anomaly Description Possible causes Actions Refer to the chapter E.5 Sliding • Wrong door(s) assembly (slid- doors installation. If the problem Lighting low or missing ing doors model only) persists contact Customer Care • Appliance internal issue Service. Carry out a thorough cleaning. If Unpleasant odors Dirt inside the appliance the problem persists contact Cus-... - Page 22 Electrolux Professional SPA Viale Treviso 15 33170 Pordenone www.electroluxprofessional.com...