Table of Contents
CITY MULTI Control System
and Mitsubishi Mr. SLIM Air Conditioners
MA Remote Controller
PAR-41MAA
Instruction Book
Prior to use, thoroughly read the instructions in this manual to use the product correctly.
Retain for future reference.
Make sure that all the included manuals are passed on to any future users.
To ensure safety and proper operation of the remote controller, the remote controller should
only be installed by qualified personnel.
WT09533X02
en
Chapters
Table of Contents

Related Manuals for Mitsubishi Electric CITY MULTI MA PAR-41MAA


Summary of Contents for Mitsubishi Electric CITY MULTI MA PAR-41MAA
-
Page 1
WT09533X02 CITY MULTI Control System and Mitsubishi Mr. SLIM Air Conditioners MA Remote Controller PAR-41MAA Instruction Book Prior to use, thoroughly read the instructions in this manual to use the product correctly. Retain for future reference. Make sure that all the included manuals are passed on to any future users. To ensure safety and proper operation of the remote controller, the remote controller should only be installed by qualified personnel. -
Page 3: Table Of Contents
Contents Safety precautions ................4 Controller components ..............6 Controller interface ....................6 Display ........................8 Menu structure and icons ..............10 Menu structure ...................... 10 Icon explanations ....................13 Basic operations ................14 Power ON/OFF ..................... 14 Operation mode, temperature, and fan speed settings ........15 Navigating through the menu ............ -
Page 4: Safety Precautions
Safety precautions • Thoroughly read the following safety precautions before using the unit. • Observe these precautions carefully to ensure safety. WARNING Indicates a risk of death or serious injury. CAUTION Indicates a risk of serious injury or structural damage. •... - Page 5 This controller is designed for exclusive use with the a dry cloth. Do not use the detergent straight. Building Management System by Mitsubishi Electric. The use of this controller for with other systems or for other purposes may cause malfunctions.
-
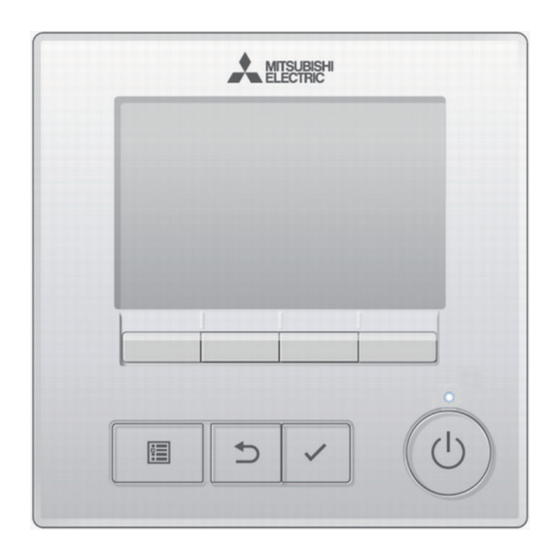
Page 6: Controller Components
Controller components Controller interface ⑤ ⑥ ④ ③ ② ① Function buttons ⑨ ⑦ ⑧ ⑩... - Page 7 The functions of the function buttons ① ON/OFF button change depending on the screen. Refer Press to turn ON/OFF the indoor unit. to the button function guide that appears at the bottom of the LCD for ② SELECT button the functions they serve on a given Press to save the setting.
-
Page 8: Display
Controller components Display The main display can be displayed in two different modes: “Full” and “Basic.” The factory setting is “Full.” To switch to the “Basic” mode, change the setting on the Main display setting. (Refer to page 66.) Full mode * All icons are displayed for cde f g h explanation. - Page 9 ① Operation mode Page 15 ⑮ Page 53 Appears while the units are operated in the ② Preset temperature Page 16 energy-save mode. (Will not appear on some models of indoor units) ③ Clock ⑯ See the Installation Manual. Page 41 Appears while the outdoor units are operated in ④...
-
Page 10: Menu Structure And Icons
Menu structure and icons Menu structure Main menu Operation ......Page 22 Vane•3D i-See•Vent.(Lossnay) ........Page 27 High power Comfort Manual vane angle ....Page 28 Vertical air direction ....Page 31 Horizontal air direction ........Refer to the indoor unit Instruction Book. 3D i-See sensor Timer menu Timer... - Page 11 Initial setting menu Basic setting ..........Main/Sub Refer to the Installation Manual. Clock ......... Page 62 Clock ....Page 64 Daylight saving time ......Administrator password Refer to the Installation Manual. Display setting ......... Page 66 Main display ... Page 67 Black and white inversion setting ........
- Page 12 Menu structure and icons ........Refer to the indoor unit Installation Maintenance information Manual. Refer to the indoor unit Installation Collect model names and serial No. (Mr. SLIM only) Manual........Refer to the indoor unit Installation Model name input Manual.
-
Page 13: Icon Explanations
Icon explanations Controller operation The table below Timer summarizes the square icons used in this manual. The administrator or maintenance user password must be entered Main on the password input screen to change settings. There is no settings that can skip this process. Indicates settings that : Press to move the cursor left. -
Page 14: Basic Operations
Basic operations Power ON/OFF Button operation Press the button. ON/OFF The ON/OFF lamp will light up in green, and the operation will start. When “LED lighting” is set to “No,” the ON/OFF lamp will not light up. Press the button again. ON/OFF The ON/OFF lamp will come off, and the operation will stop. -
Page 15: Operation Mode, Temperature, And Fan Speed Settings
Operation mode, temperature, and fan speed settings Button operation Operation mode Each pressing of the F1 button cycles through the following operation modes. Select the desired operation mode. Cool Auto Heat • Operation modes that are not available to the connected indoor unit models will not appear on the display. -
Page 16
Basic operations Preset temperature
- Page 17 Press the F1 or F2 button to move the cursor to the desired temperature setting (cooling or heating). Press the F3 button to decrease the selected Preset temperature temperature, and press the F4 button to increase. for cooling • Refer to the table below for the settable temperature Preset range for different operation modes.
-
Page 18: Navigating Through The Menu
Navigating through the menu Main menu list Main menu Setting items Setting details Page Operation Vane•3D i-See•Vent. Vane: Use to set the vertical air direction. Louver: Use to set the horizontal air direction. (Lossnay) 3D i-See sensor: This setting is available only for the air (Vane•Vent.(Lossnay)) conditioners that support easy setting function of motion sensing air direction. - Page 19 Main menu Setting items Setting details Page Energy Energy Schedule Set the start/stop times to operate the units in the energy-save saving saving mode for each day of the week, and set the energy-saving rate. • Up to four energy-save operation patterns can be set for each day. •...
-
Page 20: Restrictions For The Sub Remote Controller
Navigating through the menu Restrictions for the sub remote controller The following settings cannot be made from the sub remote controller. Make these settings from the main remote controller. “Main” is displayed in the title of the Main menu on the main remote controller. •... -
Page 21: Navigating Through The Main Menu
Navigating through the Main menu Button operation Accessing the Main menu Press the button on the Main display. Menu The Main menu will appear. Item selection Press to move the cursor left. Press to move the cursor right. Cursor... -
Page 22: Function Settings
Function settings Vane•3D i-See•Vent.(Lossnay) Button operation Accessing the menu Select “Operation” from the Main menu (refer to page 21), and press the button. SELECT Select “Vane•3D i-See•Vent.(Lossnay)” from the Operation menu, and press the button. SELECT... - Page 23 Vane (vertical air direction) setting <3D i-See sensor supported> <3D i-See sensor supported> Press the button. <3D i-See sensor not supported> Press the button. Press the button as indicated above to go through the following setting options. Auto Auto Step 1 Step 2 <3D i-See sensor not supported>...
- Page 24 Function settings Louver (horizontal air direction) setting <3D i-See sensor supported> <3D i-See sensor supported> Press the button. <3D i-See sensor not supported> Press the button. When the horizontal air direction function is supported, the following setting options are available. Front Auto Swing...
- Page 25 3D i-See sensor setting This setting cannot be made when the 3D i-See sensor function is not supported. * Refer to the indoor unit Instruction Book to see if the unit supports the function or not. <3D i-See sensor supported> <3D i-See sensor supported>...
- Page 26 Function settings Ventilation setting <3D i-See sensor supported> <3D i-See sensor supported/not supported> Press the button to go through the following setting options. High High • The fan on some models of indoor units may be interlocked with certain models of ventilation units. <3D i-See sensor not supported>...
-
Page 27: High Power
High power Function description High-power operation function allows the units to operate at higher-than-normal capacity so that the room air can be conditioned to an optimum temperature quickly. This operation will last for up to 30 minutes, and the unit will return to the normal operation mode at the end of the 30 minutes or when the room temperature reaches the preset temperature, whichever is earlier. -
Page 28: Manual Vane Angle
Function settings Manual vane angle Main Vertical air direction Button operation Select “Comfort” from the Operation menu, and press button. SELECT Select “Manual vane angle” with the button, and press the button. SELECT Select “Vertical” with the button, and press button. - Page 29 Move the cursor to “Ref. address” or “Unit No.” with button to select. Select the refrigerant address and the unit number for the units to whose vanes are to be fixed, with the button, and press the button. SELECT • Ref.
- Page 30 Function settings The current vane setting will appear. Select the desired outlets from “1,” “2,” “3,” “4,” or “1, 2, 3, 4 (all outlets)” with the button. Press the button to go through the following options and select the desired setting. No setting Step 1 Step 2...
-
Page 31: Horizontal Air Direction
Horizontal air direction Button operation Select “Comfort” from the Operation menu, and press button. SELECT Select “Manual vane angle” with the button, and press the button. SELECT Select “Horizontal” with the button, and press the button. SELECT... - Page 32 Function settings Move the cursor to “Ref. address” or “Unit No.” with button to select. Select the refrigerant address and the unit number for the units to whose vanes are to be fixed, with the button, and press the button. SELECT •...
-
Page 33: Timer (On/Off Timer)
Timer (On/Off timer) Main Button operation Select “Timer” from the Main menu (refer to page 21), and press the button. SELECT The On/Off timer will not work in the following cases: when On/Off timer is disabled, during an error, during check (in the service menu), during test run, during remote controller diagnosis, when the clock is not set, during function setting, when the system is centrally... - Page 34 Function settings The screen to set the timer will appear. Select the desired item with the button out of “On/Off timer,” “On,” “Off,” or “Repeat.” Change the setting with the button. • On/Off timer: No (disable)/Yes (enable) • On: Operation start time (settable in 5-minute increments) * Press and hold the button to rapidly advance the numbers.
- Page 35 Press the button to save the settings. SELECT A confirmation screen will appear. Navigating through the screens • To go back to the Main menu ... button MENU • To return to the previous screen ..button RETURN will appear on the Main display in the Full mode when the On/Off timer is enabled.
-
Page 36: Timer (Auto-Off Timer)
Function settings Timer (Auto-Off timer) Main Button operation Bring up the Timer setting screen. (Refer to page 33.) Select “Auto-Off”, and press the button. SELECT The Auto-Off timer will not work in the following cases: when Auto-Off timer is disabled, during an error, during check (in the service menu), during test run, during remote controller diagnosis, during function setting, when the system is centrally controlled (when On/Off... - Page 37 Press the button to save the settings. SELECT A confirmation screen will appear. Navigating through the screens • To go back to the Main menu ... button MENU • To return to the previous screen ..button RETURN will appear on the Main display in the Full mode when the Auto-Off timer is enabled.
-
Page 38: Weekly Timer
Function settings Weekly timer Main Button operation Select “Weekly timer” from the Timer menu, and press the button. SELECT The Weekly timer will not work in the following cases: when the On/Off timer is enabled, when the weekly timer is disabled, during an error, during check (in the service menu), during test run, during remote controller diagnosis, when the clock is not set, during function setting, when the system is centrally controlled (On/Off... - Page 39 The weekly timer settings screen will appear. In the “Action” setting, select “1” to enable the timer setting 1, or select “2” to enable the timer setting 2 with the button. Then, press the SELECT button. To check the setting contents of the timer setting 1 or 2, move the cursor to “Setting”...
- Page 40 Function settings Operation pattern setting screen will appear. Press the button to move the cursor to the desired pattern number. Move the cursor to the time, On/Off, or temperature with the button. Change the settings with the button. • Time: settable in 5-minute increments * Press and hold the button to rapidly advance the numbers.
-
Page 41: Ou Silent Mode
OU silent mode Main Function description This function allows the user to set the time periods in which priority is given to quiet operation of outdoor units over temperature control. Set the start and stop times each day of the week for the quiet operation. - Page 42 Function settings The screen to enable (Yes) and disable (No) the silent mode will appear. To enable this setting, move the cursor to “Yes” with button, and press the button . SELECT The OU silent mode setting screen will appear. To make or change the setting, move the cursor to the desired day of the week with the button,...
- Page 43 The setting screen will appear. Move the cursor to the desired item with the button out of Start time, Stop time, or Silent level. Change the settings with the button. • Start/Stop time: settable in 5-minute increments * Press and hold the button to rapidly advance the numbers.
-
Page 44: Night Setback
Function settings Night setback Main Function description This control starts heating operation when the control object group is stopped and the room temperature drops below the preset lower limit temperature. Also, this control starts cooling operation when the control object group is stopped and the room temperature rises above the preset upper limit temperature. - Page 45 Move the cursor to the desired item with the button out of Night setback No (disable)/Yes (enable), Temp. range, Start time, or Stop time. Change the settings with the button. • Temp. range: The lower limit temperature (for heating operation) and the upper limit temperature (for cooling operation) can be set.
- Page 46 Function settings will appear on the Main display in the Full mode when the Night setback function is enabled. appears when the timer is disabled by the centralized control system. The Night setback will not work in the following cases: when the unit is in operation, when the Night setback function is disabled, during an error, during check (in the service menu), during test run, during remote...
-
Page 47: Restriction
Restriction Setting the temperature range restriction Button operation Select “Energy saving” from the Main menu (refer to page 21), and press the button. SELECT Move the cursor to “Restriction” with the button, and press the button. SELECT... - Page 48 Function settings The current settings will appear. Move the cursor to “Temp. range” with the button, and press the button. SELECT The screen to set the temperature range will appear. Move the cursor to the desired item with the button out of “Temp. range,” “Cool•Dry,” “Heat,” or “Auto.”...
- Page 49 Change the settings with the button. • Temp. range: No (unrestricted) or Yes (restricted) • Cool•Dry: Upper and lower limit temperature (1ºC increments) • Heat: Upper and lower limit temperature (1ºC increments) • Auto: Upper and lower limit temperature (1ºC increments) Temperature setting ranges Mode Lower limit...
- Page 50 Function settings Restriction Operation lock function To enable the operation lock function, set the item “Operation locked” to “ Yes”. Button operation Bring up the Restriction setting screen. (Refer to page 47.) Move the cursor to “Operation locked” and press the button.
- Page 51 The screen to make the settings for the operation lock function will appear. Move the cursor to the desired item with the button out of “Operation locked,” “Location,” “On/Off,” “Mode,” “Set temp.,” “Menu,” “Fan,” “Louver,” or “Vane.” Change the settings with the button.
- Page 52 Function settings will appear on the Main display in the Full mode when the operation lock function setting is enabled. Operation guide that corresponds to the locked function will be suppressed. To display the main menu while the menu setting is being locked, press and hold the button for ten Menu...
-
Page 53: Energy Saving
Energy saving Main Automatic return to the preset temperature After the Auto return function is enabled, when the operation mode change or ON/OFF operation is performed from this remote controller, the set temperature automatically returns to the required temperature regardless of the set time. Button operation Select “Energy saving”... - Page 54 Function settings The screen to make the settings for the automatic return to the preset temperature will appear. Move the cursor to the desired item with the button out of “Auto return,” “Cool,” or “Heat.” Change the settings with the button.
- Page 55 Energy saving Main Setting the energy-saving operation schedule Button operation Bring up the “Energy saving” screen. (Refer to page 53.) Move the cursor to “Schedule,” and press the button. SELECT The screen to see the schedule will appear. Press the button to see the settings for each day of the week.
- Page 56 Function settings The setting change/day of the week selection screen will appear. Up to four operation patterns can be set for each day. Move the cursor to the desired day of the week with button, and press the button to select it.
- Page 57 will appear on the Main display in the Full mode when the unit is operated in the energy saving mode. Navigating through the screens • To go back to the setting change/day of the week selection screen ..........button SELECT •...
-
Page 58: Energy Data (Mr. Slim Only)
Function settings Energy data (Mr. SLIM only) Main Energy data display (for unit time, month, and day) Energy consumption per unit time (for one month) or per month/day (for 14 months) is displayed. Button operation Bring up the “Energy saving” screen. (Refer to page 53.) Move the cursor to “Energy data,”... - Page 59 [Unit time data] Displays the energy consumption for the last 31-day period including today. (Displayed on six screen pages.) • To select a date: button • To toggle through pages: button * "-" will appear when energy consumption data are not collected properly. * If the power has been turned off when data are collected, data will not be collected, but the uncollected data will be included in the data...
- Page 60 Function settings [Monthly data/Daily data] Displays the energy consumption for the last 14-month period including the current month. Select the month with the button on the monthly data display screen (shown on three screen pages), and press the button to move to the SELECT daily data display screen (shown on four screen pages) of the corresponding month.
- Page 61 Energy data reset Energy consumption data (per unit time, month, and day) are initialized. Button operation Select “Data reset” from the Energy data menu, and press the button. SELECT Enter the administrator’s password on the password input screen, and press the button.
-
Page 62: Clock
Function settings Clock Button operation Select “Initial setting” from the Main menu (refer to page 21), and press the button. SELECT Clock setting is required before making the following settings. • On/Off timer • Weekly timer • OU silent mode •... - Page 63 Move the cursor to “Clock” with the button, and press the button. SELECT Move the cursor to the desired item with the button out of year, month, date, hour, or minute. Increase or decrease the value for the selected item with the button, and press the SELECT...
-
Page 64: Daylight Saving Time
Function settings Daylight saving time Function description The start/end time for daylight saving time can be set. The daylight saving time function will be activated based on the setting contents. • If a given system has a system controller, disable this setting to keep the correct time. •... - Page 65 Move the cursor to the following items with the button to make the settings. • Select “No” (disable) or “Yes” (enable) with the button. The default setting is “No.” • Date(Start) Set the day of the week, week number, and month with the button.
-
Page 66: Main Display
Function settings Main display Button operation Select “Display setting” from the Initial setting menu, and press the button. SELECT Move the cursor to “Main display” with the button, and press the button. SELECT Select “Full” or “Basic” (refer to page 8) with the button, and press the button. -
Page 67: Black And White Inversion Setting
Black and white inversion setting Button operation Select “Display setting” from the Initial setting menu, and press the button. SELECT Move the cursor to “Main display” with the button, and press the button. SELECT Select “B&W inversion” with the button, and select the display mode “Yes”... - Page 68 Function settings Selecting “Yes” will invert the colors of the display, turning white background to black and black characters to white as shown at left.
-
Page 69: Contrast•Brightness
Contrast•Brightness Button operation Select “Display setting” from the Initial setting menu, and press the button. SELECT Move the cursor to “Contrast•Brightness” with the button, and press the button. SELECT Adjust the brightness with the button. Adjust the contrast with the button, and press the button. -
Page 70: Language Selection
Function settings Language selection Function description The desired language can be set. The language options are English, French, German, Spanish, Italian, Portuguese, Swedish, Russian, Greek, Turkish, Dutch, Czech, Hungarian, and Polish. Button operation Select “Display setting” from the Initial setting menu, button. - Page 71 Move the cursor to the language you desire with the through buttons, and press the button SELECT to save the setting. When the power is on for the first time, the Language selection screen will be displayed. Select a desired language.
-
Page 72: Initialize Remote Controller
Function settings Initialize remote controller Function description The remote controller can be initialized to the factory shipment state. Note that the following data will be initialized. The remote controller will automatically be started up after being initialized. Timer setting, Weekly timer setting, OU silent mode setting, Energy saving setting, Energy saving option setting, Main/Sub setting, Clock setting, Daylight saving time setting, Main display setting, Contrast•Brightness setting, Display details setting, Auto mode setting, Model name setting, Serial No. - Page 73 Select “OK” with the button. The remote controller will automatically be started up after being initialized.
-
Page 74: Remote Controller Information
Function settings Remote controller information Function description The information of the remote controller in use can be checked. Button operation Select “Others” from the Service menu, and press the button. SELECT Move the cursor to “Remote controller information” with the button, and press the SELECT button. -
Page 75: Troubleshooting
Troubleshooting Troubleshooting Error information When an error occurs, the following screen will appear and the operation LED will blink. Check the error status, stop the operation, and consult your dealer. Button operation Error code, error unit, refrigerant address, unit model name, date and time on which an error occurred, and serial number will appear. - Page 76 Troubleshooting Press the button or the button to reset ON/OFF the error that is occurring. Errors cannot be reset while the ON/OFF operation is prohibited. Select “OK” with the button. A confirmation screen will appear. Navigating through the screens • To go back to the Main menu ..button MENU...
- Page 77 Checking the error information While no errors are occurring, page 2/2 of the error information (refer to page 75) can be viewed from the menu operation. Select “Maintenance” menu from the Main menu, and press the button. SELECT To display the error information screen, select “Error information”...
-
Page 78: No Occupancy Auto-Off
Troubleshooting No occupancy Auto-OFF The following screen will appear for the 3D i-See sensor panel model when the unit is stopped due to the No occupancy Auto-OFF function of the energy saving option. Refer to the indoor unit Instruction Book for the 3D i-See sensor setting. -
Page 79: Maintenance
Maintenance Filter information will appear on the Main display in the Full mode when it is time to clean the filters. Wash, clean, or replace the filters when this sign appears. Refer to the indoor unit Instructions Manual for details. Button operation Select “Filter information”... - Page 80 Maintenance Select “OK” with the button. A confirmation screen will appear. Navigating through the screens • To go back to the Main menu ..button MENU • To return to the previous screen ..button RETURN When the is displayed on the Main display in the Full mode, the system is centrally controlled and the filter sign cannot be reset.
-
Page 81: Specifications
Specifications Controller specifications Specification Product size 120(W) × 120(H) × 14.5(D) mm (4 23/32 × 4 23/32 × 37/64 [in]) Net weight 0.19 kg (27/64 lbs) Rated power supply voltage 12 VDC (supplied from indoor units) Power consumption 0.3 W Usage environment Temperature 0 ~ 40ºC (32 ~ 104ºF) Humidity 25 ~ 90%RH (with no dew condensation) -
Page 82: Function List (As Of August 1, 2021)
Specifications Function list (as of August 1, 2021) : Supported : Unsupported ○ × Function CITY MULTI Mr. SLIM Required password Power Power ON/OFF ○ ○ Settings Operation mode ○ ○ Auto (dual set point) mode ○ ○ Preset temperature ○... -
Page 83: List Of Functions That Can/Cannot Be Used In Combination
List of functions that can/cannot be used in combination High On/Off Auto-off Weekly Temperature Operation Auto Energy Night power timer timer timer silent range lock return saving setback mode schedule High power On/Off timer Auto-off timer Weekly timer OU silent mode Temperature range... - Page 84 The product at hand is based on the following EU regulations: • Restriction of Hazardous Substances 2011/65/EU • Electromagnetic Compatibility Directive 2014/30/EU HEAD OFFICE: TOKYO BLDG. , 2-7-3, MARUNOUCHI, CHIYODA-KU, TOKYO 100-8310, JAPAN MANUFACTURER: MITSUBISHI ELECTRIC CORPORATION Air-conditioning & Refrigeration Systems Works 5-66, Tebira 6 Chome, Wakayama-city, 640-8686, Japan WT09533X02_en...