
Summary of Contents for RCA WDK30AE7N
- Page 1 Model: WDK30AE7N WDK50AE7N Before operating this product, please read the instructions carefully and save this manual for future use.
-
Page 2: Table Of Contents
CONTENTS SAFETY PRECAUTIONS Warning ............................2 Caution ............................2 Electrical information ........................3 CONTROL PADS ON THE DEHUMIDIFIER Control pads............................4 Other features..........................5 IDENTIFICATION OF PARTS Identification of parts ........................6 Positioning the unit .........................7 OPERATING THE UNIT When using the unit ........................7 Removing the collected water ......................8 CARE AND MAINTENANCE Care and cleaning of the dehumidifier ...................9 TROUBLESHOOTING TIPS... -
Page 3: Safety Precautions
SAFETY PRECAUTIONS To prevent injury to the user or other people and property damage, the following instructions must be followed. Incorrect operation due to ignoring of instructions may cause harm or damage. The seriousness is classified by the following indications. WARNING This symbol indicates the possibility of death or serious injury. -
Page 4: Electrical Information
SAFETY PRECAUTIONS CAUTION Care should be taken when Do not cover the intake or Do not use in areas using the unit in a room with exhaust openings with where chemicals are the following persons: handled. cloths or towels. This will cause the unit Infants, children, elderly people, A lack of air flow can lead deterioration due to... -
Page 5: Control Pads On The Dehumidifier
CONTROL PADS ON THE DEHUMIDIFIER NOTE: The control panel of the unit you purchased may be slightly different according to the models. Clean filter High fan indicator light indicator light Low fan Bucket full indicator light indicator light Timer on/off Auto defrost operation on Continuous indicator light... -
Page 6: Other Features
CONTROL PADS ON THE DEHUMIDIFIER Display Shows the set % humidity level from 35% to 85% or auto EC- Unit malfuction-- Please make sure whether the start/stop time (0~24) while setting, then shows the actual enviroment temperature is suitable for the stated 5% accuracy) room % humidity level in a range of 30% temperature in the manual or not.If not,please operate RH(Relative Humidity) to 90%RH(Relative Humidity). -
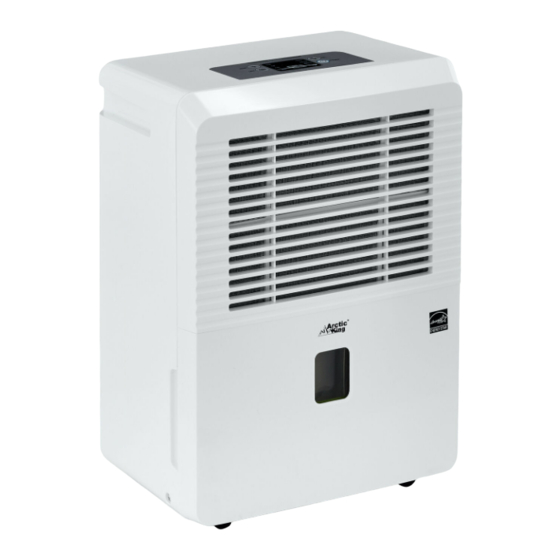
Page 7: Identification Of Parts
IDENTIFICATION OF PARTS Identification of par ts Front Control panel Air intake grille Air outlet grille Air filter (behind the grille) Water bucket Handle (both sides) Fig.2 Rear Drain hose outlet Caster Power Cord and plug Band(Used only when storing the unit.) NOTE: All the pictures in the manual are for explanation purposes only. -
Page 8: Positioning The Unit
OPERATING THE UNIT Positioning the unit A dehumidifier operating in a basement will have little or no effect in drying an adjacent enclosed storage area, such as a closet, unless there is adequate circulation of air in and out of the area. Do not use outdoors. -
Page 9: Removing The Collected Water
OPERATING THE UNIT Removing the collected water 1. Pull out the bucket a little. There are two ways to remove collected water. 1. Use the bucket When the unit is off,if the bucket is full, the unit will beep 8 times and the Full indicator light will flash, the digital display shows P2. -
Page 10: Care And Maintenance
CARE AND MAINTENANCE Care and cleaning of the dehumidifier Turn the dehumidifier off and remove the plug from the wall outlet before cleaning. 1. Clean the Grille and Case Use water and a mild detergent. Do not use bleach or abrasives. Do not splash water directly onto the main unit. -
Page 11: Troubleshooting Tips
TROUBLESHOOTING TIPS Before calling for service, review the chart below first yourself. Problem What to check Make sure the dehumidifier s plug is pushed completely into the outlet. Unit does not start Check the house fuse/circuit breaker box. Dehumidifier has reached its preset level or bucket is full. Water bucket is not in the proper position. - Page 12 Midea...
- Page 14 The design and specifications are subject to change without prior notice for product improvement. Consult with the sales agency or manufacturer for details.