
Related Manuals for Panasonic AJ-PG50EJ


Summary of Contents for Panasonic AJ-PG50EJ
- Page 1 Operating Instructions Memory Card Portable Recorder AJ-PG50 Model No. Before operating this product, please read the instructions carefully and save this manual for future use. ENGLISH W1214MN4017 -PS VQT5L34A-4 (E)
-
Page 2: Read This First
Operation at a voltage other than 120 V AC may require the use of a different AC plug. Please WARNING: contact either a local or foreign Panasonic Always keep memory cards (optional accessory) authorized service center for assistance in selecting out of the reach of babies and small children. - Page 3 Notice (U.S.A. only): Disposal may be regulated in your community due to Environmental considerations. For disposal or recycling information, please visit Panasonic website: http://www.panasonic.com/environmental or call 1-888-769-0149. Note: The rating plate is on the underside of the Recorder, Battery Charger and AC Adaptor.
- Page 4 Read this first! (continued) IMPORTANT SAFETY INSTRUCTIONS 1) Read these instructions. 2) Keep these instructions. 3) Heed all warnings. 4) Follow all instructions. 5) Do not use this apparatus near water. 6) Clean only with dry cloth. 7) Do not block any ventilation openings. Install in accordance with the manufacturer’s instructions. 8) Do not install near any heat sources such as radiators, heat registers, stoves, or other apparatus (including amplifiers) that produce heat.
- Page 5 If you lose the fuse cover the plug must not be used until a replacement cover is obtained. A replacement fuse cover can be purchased from your local Panasonic Dealer. 2. Replace the fuse Fuse Fuse indicates safety information.
- Page 6 3. Change the connection method used for the apparatus. 4. Connect the apparatus to another power outlet where the power is not shared by any other appliances. Manufactured by: Panasonic Corporation, Osaka, Japan Importer’s name and address of pursuant to EU rules: Panasonic Marketing Europe GmbH...
- Page 7 Please be advised that we are not liable for any accident or failure occurring as a result of use of a counterfeit battery pack. To ensure that safe products are used we would recommend that a genuine Panasonic battery pack is used.
- Page 8 Read this first! (continued) Brazil Only Brasil Apenas ■ Manuseio de baterias usadas Cobrir os terminais positivo (+) e negativo (-) com uma fita isolante adesiva, antes de depositar numa caixa destinada para o recolhimento. O contato entre partes metálicas pode causar vazamentos, gerar calor, romper a blindagem e produzir fogo. Não desmonte, não remova o invólucro, nem amasse a bateria.
- Page 9 • Playing AVC video that was obtained from a licensed provider. For details, refer to the MPEG LA, LLC website (http://www.mpegla.com). Website URL http://pro-av.panasonic.net/ About copyrights • Copyright laws may prohibit use, except for personal pleasure, of your recorded video and audio content without permission...
-
Page 10: Table Of Contents
Contents Read this first!..........2 Adding Metadata to Clips During Recording ... 52 Formatting P2 Cards and SD Memory Cards ..54 Checking the Card Status ........54 Usage Precautions ........11 Manual and Automatic CPS Authentication ..... 55 Connecting an External Device via the USB HOST Regarding this unit .......... -
Page 11: Usage Precautions
The format and delete functions on this unit or a computer will • Please note that Panasonic makes no guarantees regarding recordings in cases where images and/or audio were not re- only change the file management data and will leave the data corded as you intended due to problems with this unit or P2 on the memory card or storage device intact. -
Page 12: Ac Adaptor
Furthermore, please also • Change the password regularly. note that Panasonic is not liable to pay compensation for any • Panasonic and its affiliate companies would never directly damages arising from the use of this function. -
Page 13: Battery
Battery Battery characteristics This unit uses a rechargeable lithium-ion battery that uses its internal chemical reaction to generate electrical energy. This re- action is easily influenced by the ambient temperature and humidity, and the battery’s effective operating time is reduced as the temperature rises or falls. -
Page 14: Driver Installation
Before use, download the necessary drivers from the Panasonic website and install them on the personal computer. For the installation procedure, refer to installation manual on the Panasonic website. For the latest information on drivers, refer to the Panasonic website. Refer to (➝ “Website URL” page 9) Accessories For details on the supplied accessories, refer to the included leaflet. -
Page 15: Control Reference Guide
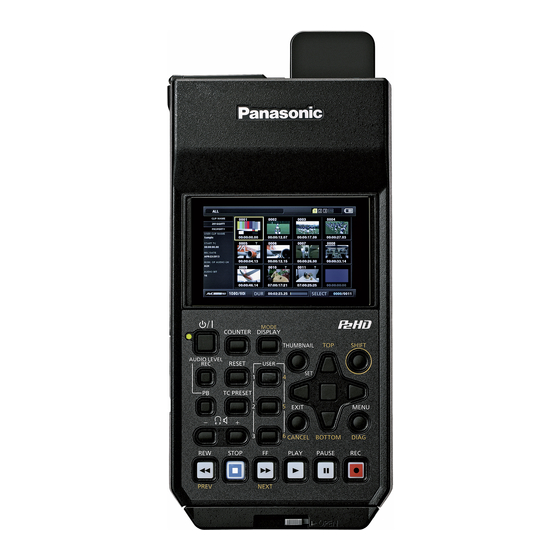
Control Reference Guide Controls 15 16 17 18 19 20 About button labels: Orange labels indicate alternate functions enabled by simultaneously pressing the [SHIFT] button.Press the [SHIFT] and [DISPLAY/MODE] buttons simultaneously to execute the [MODE] button function. DISPLAY, MODE button (Power) lamp... - Page 16 TC PRESET button REW, PREV button This button sets the TC or UB value. [REW] button: (➝ “Time Code, User Bits, and CTL” page 87) This button fast rewinds playback. The speed can be selected in the “FF.REW MAX” (➝ page (Monitor volume adjustment) buttons 98) menu item.
-
Page 17: Slots And I/O Controls
Slots and I/O Controls microP2 memory card slots (➝ “P2 Cards” page 26) microP2 memory card access lamps (➝ “P2 Card Access Lamp and P2 Card Status” page 26) EJECT button (➝ “P2 Cards” page 26) P2 memory card slot (➝... - Page 18 SD/SDHC/SDXC memory card slot and access lamp USB 3.0 HOST port (USB 3.0 Type A) Insert an SD/SDHC/SDXC memory card. (➝ “Connecting an External Device via the USB HOST Insert the cut-corner-edge first with the label-side up, until Port” page 57) the card latches into place.
-
Page 19: I/O Connectors And Power Components
I/O Connectors and Power Components ANALOG AUDIO IN jacks These jacks are for inputting analog audio. HD/SD-SDI IN/OUT jacks These jacks are for inputting and outputting serial digital component audio/video signals. The output jack for superimposition can be changed in the “OSD OUTPUT”... - Page 20 This fan is for cooling the unit. Install the unit where the ventilation holes will not be blocked. Note: If the fan is stopped while the power is on, the “FAN STOPPED” (➝ page 121) warning is displayed. Stop opera- tion and turn off the unit immediately, and contact your dealer.
-
Page 21: Preparation
Preparation Power Supply You can use a battery or AC adaptor to supply power to the unit. Charging the Battery The battery is not charged at the time of purchase. Before using the battery, fully charge it with the battery charger. We recommend keeping one spare battery on hand. -
Page 22: Using The Battery
• If the [CHARGE] lamp continues flashing even though the battery is at a normal temperature, the battery or battery charger may have malfunctioned. Contact your dealer. • When the battery is hot, the charging time will be longer than usual. •... -
Page 23: Using The Ac Adaptor
Using the AC Adaptor Installation Connect the AC power cable. Insert the DC power cable plug into the DC IN con- Connect the AC power cable in the order indicated in the nector. figure. Clamp the DC cord. Clamp To power outlet Removal Disconnect the AC power cable (for the AC adaptor) lamp... -
Page 24: How To Turn On/Off The Power
How to Turn On/Off the Power Turning On the Power From the power-off state, press the [ ] button for one second to turn the power on. After startup, the lamp lights green. lamp ] button Note: The following messages appear during startup. •... -
Page 25: Setting The Year, Month, Day, And Time
Setting the Year, Month, Day, and Time Time zone Set the clock before using the unit the first time. Time Time Area Area Press the [ ] button on the unit for one second to difference difference turn the power on. 00:00 Greenwich +01:00... -
Page 26: P2 Cards
P2 Cards P2 Card Access Lamp and P2 Card Status P2 Card Access Lamp P2 Card Status Lights green Recording possible Both writing and reading are possible. Lights orange Recording target Writing and reading are enabled and currently recording target. Flashing orange Card being accessed Writing or reading is in progress. - Page 27 P2 card recording times (Example of using one 64 GB card) “LINE&FREQ” setting (recording format) “REC FORMAT” setting (codec) Recording duration 1080-59.94P, 1080-50P AVC-I100 Approx. 32 minutes AVC-G25 Approx. 110 minutes 1080-59.94i, 1080-50i AVC-I100 Approx. 64 minutes AVC-G25 Approx. 220 minutes 720-59.94P, 720-50P AVC-I100 Approx.
-
Page 28: Handling Of Recording Data
Handling of Recording Data P2 memory cards and microP2 memory cards are semiconductor memory cards designed for the P2 series, Panasonic’s line of professional video and broadcast equipment. Recording data in the P2 format is ideally suited for com- Drive:\ puter processing because it is a file format. -
Page 29: Using Sd/Sdhc/Sdxc Memory Cards
SDHC: 4 GB to 32 GB SDXC: Over 32 GB Use of Panasonic SD, SDHC, and SDXC memory cards and miniSD, miniSDHC, microSD, microSDHC, and microSDXC cards is recommended. • The latest information on supported memory cards is available on our P2 Support website. -
Page 30: Available Modes
Available Modes This unit comes with three modes: Main mode, USB device mode, and playlist editing mode. You can select or change the mode by selecting one of the menu items displayed when you press the [MODE] button. Main mode has a thumbnail screen for displaying and managing clip thumbnails and playing clips and a recording/playback screen for recording and playback. -
Page 31: Main Mode
Main Mode Recording/Playback Screen Adjusting the recording audio levels Use the recording/playback screen for the following. • Recording to P2 cards Follow the procedure below to change the volume level for recording. • Playing back all cards in the order they were recorded Press the [AUDIO LEVEL-REC] button. - Page 32 AUTO REC Various types of recording When a camera compatible with the function is connected via HD SDI or HDMI, starting and stopping recording on the unit Hot swap recording can be automatically controlled using the REC START / STOP When P2 cards are inserted in both of the microP2 memory function on the camera.
- Page 33 P2 Viewer Plus. For information on P2 Viewer Plus, visit the Note: Panasonic website. (➝ “Website URL” page 9) • Dual codec recording is not possible in the following modes. • Proxy data cannot be played with the unit.
-
Page 34: Streaming Function
Streaming function You can perform live streaming of audio and video from the unit over the network (wired LAN, wireless LAN, 4G/LTE). Streaming video from the unit or an application software (e.g. P2 Browser, P2 Streaming Receiver) of a device connected to the unit through a network is transmitted to a server capable of receiving such signal. - Page 35 • For details on downloading the video streaming-compatible application software and the operating environment, visit the support desk at the following website: http://pro-av.panasonic.net/ • The streaming function cannot be used together with the dual codec recording and simultaneous recording. • The streaming function cannot be used together with the rec during upload function.
- Page 36 List of system modes and supported streaming output The following shows the relationship between system modes and streaming modes on this unit. ✔ • “ ” are supported, and “-” are not supported. SYSTEM MODE STREAMING MODE HD streaming SD streaming LINE&FREQ REC FORMAT AVC-G6, AVC-G (QoS)
-
Page 37: Playing Back Clips
Playing Back Clips Variable speed playback The playback speed can be varied to search for a scene. Playback Press the left or right cursor button during playback Before you start playback, set the playback frequency, for- or STILL. mat, and other settings in the menu. (➝ Setup Menu “SYSTEM Playback changes to high-speed or slow and indicated as MODE”... - Page 38 Frame-by-frame playback Press the [PAUSE] button to switch to still image mode. Press the up or down cursor button. • The up cursor button performs frame-by-frame playback in the forward direction and the down cursor button per- forms frame-by-frame playback in the backward direction. •...
- Page 39 Clip and text memo forward/rewind Switch to playback or a still image or other image dis- Press the [PREV] button or [NEXT] button. play state. The clip beginning or text memo position is located in accor- dance with the “SEEK POS SEL” (➝ page 98) menu item. Overview of all clip playback transitions This unit allows you to vary audio and video playback speed.
-
Page 40: Thumbnail Screen
Thumbnail Screen This unit has a thumbnail screen for managing clips. A “clip” consists of a set of video, audio, and additional information such as metadata, and a “shot” is a clip generated by a single normal start-to-stop recording operation. A shot that spans multiple P2 cards is handled as one clip. -
Page 41: Names And Functions Of The Parts Of The Thumbnail Screen
Names and Functions of the Parts of the Thumbnail Screen 10111213 Display status Duration The following information is displayed on the screen. Indicates the length (duration) of the clip at the cursor po- sition and the rough current playback position in relation to ALL: All clips the length of the clip. - Page 42 Clip number P2 card slot and storage device or NETWORK sta- Indicates the numbers assigned to P2 card clips, which tus indication are normally assigned in order from the earliest shooting Indicates the P2 card and storage device or NETWORK date.
- Page 43 Simple property indication Yellow indicates that a LAN cable is connected and that there is a link. Displays the properties of the clip at the cursor position. This is displayed when the “THUMBNAIL SIZE” (➝ page (Yellow) 94) menu item is set to “SMALL.” Red indicates an error with the unit.
-
Page 44: Changing The Thumbnail Display
Setting the display of clip information Changing the Thumbnail Display The display of clip information can be customized according The thumbnail screen can be customized according to the op- to purpose. erating conditions to improve efficiency. Example: Use the cursor buttons to select the “DATA DIS- •... -
Page 45: Playing Back Clips
Press the [SET] button to add a check mark for an Playing Back Clips item you want to display. Pressing the [SET] button adds a check mark to an un- checked item and clears the check mark from a checked item. - Page 46 • When clips in different compression formats are played back, the video and audio between clips may be distorted. • When clips with the same video format but different audio bit rates are played back continuously, the audio between clips will be muted.
-
Page 47: Selecting And Deselecting Clips
Selecting and Deselecting Clips Adding Text Memos and Shot Marks Select the clips you want to process on the thumbnail screen. A text memo can be added to a clip to mark a specific location of the clip. You can also add a shot mark to a clip to distin- guish it from other clips. -
Page 48: Copying Clips
After pressing the [SET] button to select the thumb- Use the cursor buttons to align the cursor with a copy nail for which you want to delete the text memo, destination in the list of the “COPY” (➝ page 93) press the [SET] button in the “DELETE”... -
Page 49: Deleting Clips
Deleting Clips Repairing and Reconnecting Clips Use the following procedure to delete unnecessary clips from Repairing bad clips a P2 card. The bad indicator (yellow ) is displayed for any clip with a prob- Select the clip to delete. lem caused by, for example, a sudden power outage during re- cording. -
Page 50: Viewing And Editing The Clip Information
View the clip metadata if necessary. Viewing and Editing the Clip Informa- tion Viewing the clip metadata information The detailed information of a clip can be displayed and checked on a screen. Use the cursor buttons to align the cursor with the tar- Use the cursor buttons to align the cursor with a metadata get clip. -
Page 51: Changing Thumbnails
Note: THUMBNAIL: Frame position (normally, start: 0) of the image used for the thumbnail and • To delete the latitude and longitude, enter a blank space for the thumbnail size (width, height) the altitude. They cannot be deleted separately. PROXY: Detailed information on proxy data •... -
Page 52: Adding Metadata To Clips During Recording
[SET] button. computer to process clips recorded on a P2 card that can be download free of charge from the Panasonic website. For the Use the cursor buttons to align the cursor with URL, refer to “Website URL” (➝ page 9). - Page 53 Checking and editing loaded metadata Metadata upload files The settings of the metadata loaded from an SD memory card can be checked. Loading a file Press the [MENU] button and select the “REC META Use the following procedure to load the metadata settings DATA”...
-
Page 54: Formatting P2 Cards And Sd Memory Cards
Checking the Card Status devices from which location data can be acquired (➝ “Website URL” page 9). http://panasonic.biz/sav/ The P2 card slot status, P2 card usage status, and other card Press the [EXIT] button to close the metadata confir- information can be displayed and checked on the screen. -
Page 55: Manual And Automatic Cps Authentication
P2 card status Manual and Automatic CPS When the remaining free space is displayed, the re- Authentication maining free space on the P2 card is indicated in the form of a bar meter and as a percentage value. When the used space is displayed, the used space on the P2 card is indicated in the form of a bar meter and Manual CPS authentication as a percentage value. - Page 56 Setting the CPS password with the software key- Automatic CPS authentication board A CPS password can be read from a SD memory card or input Select the “CPS PASSWORD” - “SET” (➝ page 92) into the unit. menu item. Setting the password The software keyboard for entering the CPS password ap- pears.
-
Page 57: Connecting An External Device Via The Usb Host Port
Connecting an External Device via the USB HOST Port Supported storage devices The following storage devices can be used. • Hard disk drives or solid state drives connected via USB 2.0/USB 3.0. Storage device types and available functions The available functions depend on the type of storage device used. The storage device type is displayed below “PARTITION:” on the left side of the EXPLORE screen. - Page 58 • A storage device is a high-precision instrument whose read and write functions may fail if used in an unsuitable environment. Please note that Panasonic accepts no liability whatsoever for data loss or other damage, either direct or indirect, arising from a storage device failing or for some other reason.
- Page 59 Align the cursor with “YES” in the confirmation mes- Connect a storage device. sage and press the [SET] button. A storage device that is not in the TYPE S or FAT format will be formatted in the TYPE S or FAT format. (➝...
- Page 60 Viewing storage device information Copying clips to a storage device (EXPLORE screen) You can copy just the selected clips rather than the entire card to a storage device. You can display storage device information, select the display of a storage device partition or folder thumbnails, and select a partition or folder as a target for operation (in the EXPLORE Display the thumbnail screen, use the cursor buttons screen).
- Page 61 Partition information Hold down the [SET] button (for at least 1 second). (for a TYPE S storage device) The partition or folder is selected and becomes A check mark is displayed for a partition selected as an operation target. NO.: Partition number (1, 2, 3...) MODEL: P2 card model name...
- Page 62 Deleting the last partition Clip information The last partition of a storage device can be deleted in the Displays the clip properties. “DELETE LAST PARTITION” (➝ page 94) menu item. Storage device information When TYPE S Note: • Move the cursor to the last partition beforehand. SERIAL: P2 card serial number •...
- Page 63 Viewing clip information • Pressing the [STOP] button during clip playback stops playback and redisplays the thumbnail screen. Various metadata information can be viewed for the clips • When playback is stopped, the cursor moves to the clip stored on a storage device. The information can be displayed played prior to stopping.
- Page 64 Copying to a P2 card by clip Writing back (importing) data from a stor- You can specify a clip on a storage device and copy it to a P2 age device to a P2 card card. Display the thumbnail screen of the storage device. ...
-
Page 65: Using The Unit Connected To A Network
Using the Unit Connected to a Network Network Connection This unit can connect to a network via wireless LAN, wired LAN, or 4G/LTE. Connecting a bonding device to the wireless LAN or wired LAN will allow for high-speed network connectivity. To use wireless LAN, connect an AJ-WM30/AJ-WM50 (sold separately) to the [USB3.0 HOST] port. -
Page 66: Preparing For Connection
Preparing for Connection For the wireless module AJ-WM30/AJ-WM50 Connect the AJ-WM30/AJ-WM50 wireless module (sold separately) to the [USB 3.0 HOST] port on the unit. Notes regarding use of wireless module For the latest information, visit the website. (➝ “Website URL” page 9) Note: In France, outdoor use is prohibited. -
Page 67: Network Settings
Network Settings Various settings need to be set to connect via a wireless LAN or wired LAN. Set the settings for the function you will use. DEFAULT GATEWAY: Wireless LAN Settings Default gateway (Factory default setting: 192.168.0.254) (This cannot be set.) These settings are for connecting to a mobile device (iPad/iP- PRIMARY DNS: hone), computer, or wireless access point via a wireless LAN. - Page 68 INFRA Mode SECONDARY DNS: Alternate DNS server setting (Factory default: 0.0.0.0) (If These settings are for connecting with a wireless access “DHCP” is set to “ENABLE” and assignment from the DNS point. server is possible, the value will be overwritten by the ex- ternally assigned DNS server value.
- Page 69 4G/LTE Mode Note: These settings are for connecting with a 4G/LTE USB modem. • The startup time after turning on the power may be longer due to starting of the network. • When you change the “NETWORK SEL” settings, the changes Select “4G/LTE”...
- Page 70 (For Mac OS) Wired LAN Settings • When "DHCP SERVER" is set to "ENABLE" in the unit set- tings These settings are for connecting to a computer via a wired [Configure IPv4]: Select [Using DHCP]. LAN. [Configure IPv6]: Select [Automatically]. •...
- Page 71 Client settings To transfer clips with the FTP function, you need to set the connection destination and other settings in advance. Set the settings in the “FTP CLIENT SERVICE” (➝ page 105) menu item. CLIENT SERVICE: Item Description Setting value Factory default setting SETTING DATA...
-
Page 72: Network Functions
6 to 15 characters long. For information on P2 Browser, refer to Operating Instruc- tions of P2 Web Application available from the following website. http://pro-av.panasonic.net/en/manual/index.html Main Mode: Using the Unit Connected to a Network... - Page 73 Status display Operation check tools, status indication, and initialization Press the [MENU] button to display the menu. (➝ “Menu Operations” page 89) You can check the network connection status of an FTP client. Checking the connection (PING) Use the cursor buttons to align the cursor with the “STATUS DISPLAY”...
-
Page 74: Using Ftp Client Functions
Note: Using FTP Client Functions There is a delay of a few seconds between the updating of the LAN indicator and the actual status. To use the FTP client functions, you need to set the NETWORK Folder information settings and FTP client settings in advance. PATH: Path of current folder on FTP server NO.:... -
Page 75: Viewing The Thumbnails Of Clips On An Ftp Server (Ftp Thumbnail Screen)
Operations in the FTP EXPLORE screen Viewing the Thumbnails of Clips on an FTP Server (FTP Thumbnail Right cursor button: Indicates the contents of the subfolder Screen) at the cursor position. Left cursor button: Indicates the contents of the folder at the level above the current folder. -
Page 76: Deleting Clips On The Ftp Server
FTP server/folder information Viewing FTP Server Clip Information URL: URL of connected FTP server USER ID: User ID of logged in user Various metadata information can be viewed for the clips on SSH: Indicates whether SSH is set to ENABLE or DIS- an FTP server. - Page 77 The server screen appears. Writing back from an FTP server (copy) The folders on the set server are displayed. Use the cursor buttons to select the transfer destination folder. Selected clips can be written back from an FTP server on the network to a P2 card or hard disk.
-
Page 78: Transferring Sd Memory Card Data
• Whether an error is generated when the remaining capacity Transferring SD Memory Card Data of the FTP server reaches 0 depends on the FTP server. If an error is not generated, use the procedure above to stop the operation. The data in an SD memory card can be transferred to an FTP •... -
Page 79: Rec During Upload Function
Writing back from an FTP server Rec during upload function (import) Clips recorded in the P2 card can be automatically transferred A folder selected from an FTP server on the network can to a server device on the network during recording/playback be written back to an SD memory card. - Page 80 Note: Transferring selected clips automatically • Upload of the clip will start after the rec during upload is set (manual selection mode) to enable. To prevent the upload error, do not remove the card from the P2 memory card slot and the microP2 memory card slot before the transfer finishes.
- Page 81 Operations on the upload list screen • While the rec during upload function is enabled, the setting values in the menu “NETWORK” (➝ page 105) cannot be You can delete, cancel, or re-transfer items from the upload changed or initialized. list.
-
Page 82: Usb Device Mode
P2 cards inserted in the P2 card slots of this unit as mass storage devices. Note that a separate USB driver, which can be downloaded free of charge from the Panasonic website, needs be installed on the computer.(➝ “Website URL”... -
Page 83: P2 Playlist Editing Mode
Instructions of P2 Web Application available from the fol- Align the cursor(*) with “PLAYLIST” in the selection lowing website. screen and press the [SET] button. http://pro-av.panasonic.net/en/manual/index.html “PLAYLIST” flashes on the LCD monitor and the modes Note: changes. When the mode changes, “PLAYLIST” appears •... -
Page 84: Screen Display
Screen Display OSD Display The OSD screen display toggles on and off each time you press the [DISPLAY] button. The formats, time codes, and modes are displayed as abbreviations on the playback and recording screens. Note: • Select whether to display the level meter on this display in the “OSD GRADE” (➝ page 108) menu item. You can also select the display items in the “OSD TC SELECT”... - Page 85 Compression format display Network status indicator Indicates the compression format during recording or re- Indicates the status of the network function. cording standby. • WLAN: Connected to wireless LAN (linked state) • WLAN : Not connected to wireless LAN (unlinked state) Indicates the compression format of the current clip during •...
-
Page 86: Deck Information (Diag) Display
Deck Information (DIAG) Display Press the [DIAG] button. This displays the deck information. Deck information includes [USER] button and warning information. The previous display is redisplayed. You can also return to the previous display by pressing the Press the [DIAG] button. [EXIT] or [MENU] button. -
Page 87: Time Code, User Bits, And Ctl
Time Code, User Bits, and CTL Time code Setting the Time Code and User Bits The time code is used when the time code signal generated Internal mode by the time code generator is to be recorded. The time code values are indicated on the display and in the superimposed display. - Page 88 When you finish setting the start values, press the External mode [SET] button. When the “RUN MODE” (➝ page 100) menu item is set to Press the [STOP] button to switch to stop mode. “FREE RUN,” the time code starts advancing immediately. To cancel this setting, press the [EXIT] button or [CANCEL] button.
-
Page 89: Setup Menu
Setup Menu Menu Operations Operate the menu as follows. Press the [SET] button. Note: • A confirmation screen is displayed for some menu items. • Use the cursor buttons to select a process and press the [SET] button. • A check mark is displayed before a set item. •... -
Page 90: Menu Structure
Menu Structure MENU CLIP PROPERTY Enabled in thumbnail screen mode. REPOSITION (Disabled in recording/playback screen mode.) DELETE FORMAT FORMAT STORAGE COPY EXPORT IMPORT REPAIR RE-CONNECT EXCH. THUMBNAIL EXPLORE AUTHENTICATE CHANGE PARTITION NAME DELETE LAST PARTITION DELETE FOLDER THUMBNAIL SETUP STORAGE COPY SETUP REC/PB REC/PB FUNCTION REC/PB SETUP... - Page 91 FILE SETUP DATA (SD CARD) Enabled in recording/playback SD CARD PROPERTY screen mode. (Disabled in thumb- nail screen mode.) FORMAT SD CARD LOAD USER DATA INITIALIZE SYSTEM SYSTEM MODE SYSTEM SETUP HOURS METER VERSION OPTION MENU Setup Menu: Menu Structure...
-
Page 92: Menu List
Menu List CLIP The CLIP menu is enabled in thumbnail screen mode. (It is disabled in recording/playback screen mode.) PROPERTY CLIP > PROPERTY _ is the factory default setting. Item Settings and brief function description FREQ indications Displays detailed clip information on the screen. Individual items can also be edited. For de- 59.94Hz 50Hz CLIP PROPERTY... - Page 93 CLIP > PROPERTY (Continued) Item Settings and brief function description FREQ indications After selecting the “FORMAT” menu item, format the P2 card in the P2 card slot to be spec- 59.94Hz 50Hz ified or SD memory card in the SD memory card slot. Note: •...
- Page 94 CLIP > PROPERTY (Continued) Item Settings and brief function description FREQ indications Sets or changes the names of partitions in a storage device. 59.94Hz 50Hz Note: CHANGE • The default value is the date and time when the partition was created. PARTITION NAME •...
- Page 95 CLIP > THUMBNAIL SETUP (Continued) Item Settings and brief function description FREQ indications Sets the items to display in the simplified property display on the left side of the thumbnails. 59.94Hz 50Hz USER CLIP NAME: Indicates the name of a user clip START TC: Indicates the start time code.
- Page 96 STORAGE COPY SETUP CLIP > STORAGE COPY SETUP _ is the factory default setting. Item Settings and brief function description FREQ indications Sets whether to perform verification during exporting. 59.94Hz 50Hz ON: Performs verification. OFF: Does not perform verification. VERIFY Note: This is enabled only for TYPE S formatted storage devices.
-
Page 97: Rec/Pb
REC/PB REC/PB FUNCTION REC/PB > REC/PB FUNCTION _ is the factory default setting. Item Settings and brief function description FREQ indications Selects the recording method. 59.94Hz 50Hz RECORDING NORMAL: Normal recording LOOP: Loop recording Selects whether recording and stopping are performed automatically in accordance with the 59.94Hz 50Hz record and stop signals of the HD SDI... - Page 98 REC/PB SETUP REC/PB > REC/PB SETUP _ is the factory default setting. Item Settings and brief function description FREQ indications Selects the slots for recording. 59.94Hz 50Hz microP2: Uses the microP2 memory card slots (card slots 1 and 2). P2: Uses the P2 memory card slot (card slot 3). REC MEDIA Note: Recording is not possible for a slot that is not selected but playback is possible.
- Page 99 DUAL CODEC SETUP REC/PB > DUAL CODEC SETUP Note: When a setting other than “NORMAL” is selected in the “RECORDING” setting menu item (➝ page 97), or when “ON” is selected in the “SIMUL REC” item (➝ page 97), proxy recording cannot be performed even if “CODEC USAGE” is set to “PROXY REC(P2)” or “PROXY REC(P2&SD).”...
- Page 100 TC/UB/CTL REC/PB > TC/UB/CTL _ is the factory default setting. Item Settings and brief function description FREQ indications Selects the 12- or 24-hour format for the CTL counter display. 59.94Hz 50Hz CTL DISPLAY ±12h: 12-hour format display 24h: 24-hour format display Sets the operating mode of the internal time code generator.
- Page 101 REC/PB > TC/UB/CTL (Continued) Item Settings and brief function description FREQ indications Sets the position to insert the VITC signal. 59.94Hz 50Hz • When set to 59.94 Hz: LINE 10 to LINE 16 to LINE 20 • When set to 50 Hz: LINE 7 to LINE 11 to LINE 22 VITC POS-1 Note:...
-
Page 102: I/F Setup
I/F SETUP CLOCK I/F SETUP > CLOCK For details, refer to “Setting the Year, Month, Day, and Time” (➝ page 25). BASIC I/F SETUP > BASIC _ is the factory default setting. Item Settings and brief function description FREQ indications Turns the beep sound on or off. - Page 103 VIDEO I/F SETUP > VIDEO _ is the factory default setting. Item Settings and brief function description FREQ indications Selects the video input signal. 59.94Hz 50Hz HD SDI: Selects the SDI connector (HD signal input). SD-SDI: Selects the SDI connector (SD signal input). HDMI: Selects the HDMI IN connector.
- Page 104 I/F SETUP > VIDEO (Continued) Item Settings and brief function description FREQ indications Selects the 3G-SDI output format for when “LINE&FREQ” (➝ page 114) is “1080-59.94P” or 59.94Hz 50Hz “1080-50P.” 3G-SDI OUT LEVEL-A: Selects the 3G-SDI LEVEL-A format. LEVEL-B: Selects the 3G-SDI LEVEL-B DL format. Selects the aspect ratio for down-conversion output.
- Page 105 NETWORK I/F SETUP > NETWORK _ is the factory default setting. Item Settings and brief function description FREQ indications Selects network connection method. 59.94Hz 50Hz WLAN: Connects via a wireless LAN. 4G/LTE: Connects via 3G/4G/LTE. LAN: Connects via the LAN connector on the unit. NETWORK SEL OFF: Does not use the network.
- Page 106 I/F SETUP > NETWORK (Continued) Item Settings and brief function description FREQ indications STREAMING SETTING Sets the method for starting video streaming. 59.94Hz 50Hz AJ-PG50: Starts/stops streaming from the unit. START TRIGGER RECEIVER: Operates the start/stop of the streaming distribution from the terminal on the network using the P2 Browser or the P2 Streaming Receiver.
- Page 107 I/F SETUP > NETWORK (Continued) Item Settings and brief function description FREQ indications Sets the channel to use when “DIRECT” is selected for “TYPE” and connected via a wireless 59.94Hz 50Hz LAN. CHANNEL AUTO (2.4GHz) CH11 Sets the channels to be used when “DIRECT” is selected in “TYPE”, “5GHz” is selected in 59.94Hz 50Hz “BAND”, and the camera is connected via wireless LAN.
- Page 108 I/F SETUP > NETWORK (Continued) Item Settings and brief function description FREQ indications NETWORK TOOLS LOG DISPLAY Displays the connection log. 59.94Hz 50Hz STATUS 59.94Hz 50Hz Displays the network status. DISPLAY INITIALIZE Initializes various network settings to restore them to the factory defaults. 59.94Hz 50Hz PING...
- Page 109 LCD MONITOR I/F SETUP > LCD MONITOR _ is the factory default setting. Item Settings and brief function description FREQ indications Turns off the backlight of the LCD monitor automatically if a set time (approximately 5 min- 59.94Hz 50Hz utes) elapses after any operation is performed. TIME OUT 5min: Turns off the backlight of the LCD monitor automatically after approximately 5 minutes.
- Page 110 USER BUTTON I/F SETUP > USER BUTTON You can assign specific functions set in menus to the [USER1] to [USER6] buttons. The settings are stored internally and retained even when the unit is turned off and on. The assigned functions and settings can be confirmed in the DIAG display.
-
Page 111: File
FILE The FILE menu is enabled in recording/playback screen mode. (It is disabled in thumbnail screen mode.) SETUP DATA (SD CARD) FILE > SETUP DATA (SD CARD) Item Settings and brief function description FREQ indications Loads the file selected from the list of setup data files saved to an SD memory card to the 59.94Hz 50Hz LOAD... - Page 112 INITIALIZE FILE > INITIALIZE Item Settings and brief function description FREQ indications Restores all menu settings to the factory default states. 59.94Hz 50Hz LOAD FACTORY If this is selected, the “SYSTEM RESTART” confirmation message appears. DATA Select “YES” to restart the system automatically. Saves the menu settings as user data to the memory of the unit.
- Page 113 Writing setup data to the user area Use the cursor buttons to move the cursor to the “SAVE USER DATA” (➝ page 112) menu item and then press the [SET] button. A confirmation message appears. Move the cursor to “YES” in the confirmation mes- sage and then press the [SET] button.
-
Page 114: System
SYSTEM SYSTEM MODE SYSTEM > SYSTEM MODE _ is the factory default setting. Item Settings and brief function description Sets the number of lines and frequency of the system, recording format, and audio quantization bit rate. When the num- ber of lines and frequency are selected, only the items that can be set with that frequency are displayed. When the fre- quency is changed, the unit needs to be restarted. - Page 115 SYSTEM > SYSTEM SETUP (Continued) Item Settings and brief function description FREQ indications When “EXTERNAL” on the “GPS” (➝ page 114) menu item is selected, this selects whether 59.94Hz 50Hz the location data will be saved when the power on this unit is switched off. HOLD: Location data will be saved (held), and this data will be used when recording from the time P.OFF GPS DATA...
-
Page 116: List Of Compatible Input And Output Formats
List of Compatible Input and Output Formats The following shows the compatible input/output formats that can be set in the “LINE&FREQ”, “REC FORMAT”, and other menu items. Video formats “LINE&FREQ” Compression formats Sampling Quantization 1080-59.94i 720-59.94p 1080-59.94p “REC FORMAT” 1080-50i 720-50p 1080-50p AVC-Intra200... -
Page 117: Using A Keyboard
Using a Keyboard Full Keyboard Numeric Keyboard The full keyboard is displayed when metadata input or other The numeric keyboard is displayed when you only need to en- alphanumeric input is required. ter numbers. Move the cursor to the character you want to enter and press Move the cursor to the number you want to enter and press the [SET] button. -
Page 118: For Long And Trouble-Free Operation
For Long and Trouble-Free Operation Maintenance Do not use benzine or thinner for cleaning. • Benzine and thinner may deform the unit and cause the paint to peel off. • Remove any DC input and disconnect the power cable from the outlet before cleaning. •... -
Page 119: Warning System
Warning System Warning Details When an error is detected after the power is turned on or during operation, the (POWER) lamp and a beep sound notify you that an error has occurred. Note: If multiple errors occur simultaneously, the one with the highest priority is displayed. System error Card eject error Monitor display... -
Page 120: Error Codes
Error Codes Code No. Displayed message Description Operation Displayed when an error occurs in reading and writing card TURN POWER OFF Card removal E-30 data.error To continue operation, turn the power off and then back on. TURN POWER OFF System mode error Format E-31... - Page 121 Displayed message Description Deck operation The voltage of the battery is low. Operation BATTERY NEAR END Replace the battery. continues Displayed if the [SLOT SEL] button (when assigned to a [USER] button) is Operation SLOT SEL INVALID pressed when it is not possible to switch the P2 card recording slot. continues Displayed while the clip information is being read or when the clip configura- tion has changed.
- Page 122 Displayed message Description Deck operation Displayed when a data error caused by the P2 card occurred during re- cording. It remains displayed after recording stops until the following operation is performed. CARD ERROR <> STOP Furthermore, it is displayed for 3 seconds when playback is stopped due to a P2 card error during playback.
- Page 123 Displayed message Description Deck operation Displayed when an error occurs with one of the cards during simultane- ous recording. ( is the slot number mark for indicating where the error Operation SIMUL REC WARNING <> occurred.) continues Recording will stop on the card on which the error occurred, but will con- tinue on the other card.
- Page 124 Display of thumbnail warning information Item Message Description Measure The data cannot be accessed because, for ex- Restore the media and clips to their normal states be- CANNOT ACCESS! ample, the content is corrupted. fore access. The thumbnail cannot be changed for a text Edit the settings or content to enable thumbnail dis- CANNOT CHANGE! memo that is indicated by a gray...
- Page 125 Item Message Description Measure An attempt was made to delete when no clip was NOT SELECTED! Select the clip you want to delete. selected. Multiple copies of the same clip (duplicated by copy- SAME CLIP IS The selected clips contain multiple copies of the ing) cannot be simultaneously copied.
- Page 126 Item Message Description Measure Not enough free space left on the storage de- Use a new storage device with enough free space or LACK OF CAPACITY! vice. a formatted storage device. The model numbers of the copy source P2 card MISMATCH Use P2 cards of the same model number or import and copy destination P2 card do not match.
-
Page 127: Updating The Firmware In This Unit
Download the update file, place the update file on an SD memory card, and then insert the SD memory card in the unit. For how to update the firmware, visit the Panasonic website (➝ “Website URL” page 9). Note: Only use SD memory cards that comply with the SD, SDHC, or SDXC standards in this unit. -
Page 128: Specifications
Specifications General Power supply: 7.2 V DC ( ) (during battery use) 12 V DC ( ) (during AC adaptor use) Power consumption: 21.4 W indicates safety information. Ambient operating temperature: 0 °C to 40 °C (32 °F to 104 °F) Ambient operating humidity: 10% to 80% (non-condensing) Ambient storage temperature:... - Page 129 VIDEO DIGITAL VIDEO Sampling frequencies: AVC-Intra200/AVC-Intra100/AVC-LongG50/AVC-LongG25/DVCPRO HD: (59.94 Hz) Y: 74.1758 MHz, P : 37.0879 MHz (50 Hz) Y: 74.2500 MHz, P : 37.1250 MHz AVC-Intra100/AVC-LongG25: (1080/59.94p) Y: 148.3516 MHz, P : 74.1758 MHz (1080/50p) Y: 148.5000 MHz, P : 74.2500 MHz DVCPRO50: Y: 13.5 MHz, P : 6.75 MHz...
- Page 130 AUDIO DIGITAL AUDIO Sampling frequency: 48 kHz (synchronized with video) Quantization: 16 bit (AVC-LongG12/DVCPRO HD/DVCPRO50/DVCPRO/DV) 16 bit/24 bit selectable (AVC-Intra 100/AVC-Intra 50) 24 bit (AVC-Intra200/AVC-LongG50/AVC-LongG25) Headroom: 12 dB/18 dB/20 dB (selectable) De-emphasis: T1=50 µs, T2=15 µs (ON/OFF auto select) AUDIO INPUT Analog inputs (CH1, CH2): XLR ×...
- Page 131 Battery charger Power source: 100 V - 240 V AC ( ), 50 Hz/60 Hz 0.4 A Power output: 8.4 V DC ( ), 1.2 A indicates safety information. Ambient operating temperature: 0 °C to 40 °C (32 °F to 104 °F) Ambient operating humidity: 10% to 80% (non-condensing) Approx.
-
Page 132: Index
Index Number Frame-by-frame playback ............. One clip playback ................1 CLIP PLAY ................Playing back ................3G-SDI OUT ..................Reconnecting ................. 4:3 MARKER ................... Recording ..................4G/LTE ....................Repairing ..................4G/LTE PROPERTY ..............Repeat playback ................Selecting .................. Variable speed playback ............... - Page 133 Error codes Initializing ..................EXCH. THUMBNAIL Network settings ..............................Initializing the network settings EXIT button ............................INPUT CH1 LEVEL EXPLORE ................................. INPUT CH2 LEVEL FTP server ................................Storage device ................INPUT SEL ................EXPORT ....................INT LOCK MODE ................
- Page 134 OSD display RTSP PORT ................................... OSD GRADE RUN MODE ..................................OSD OUTPUT ................ OSD TC SELECT ................SAVE ....................OUTPUT FORMAT ............... SAVE (SD CARD) ............... SAVE AS ..................P.OFF GPS DATA SAVE LOG (SD CARD) ................
- Page 135 Text memo indicator ............... Thumbnail ................... Chainging the thumbnail display ..........Changing ..................Displaying ..................FTP server ..................Names and functions of the parts ..........Storage device ................Warning information ..............THUMBNAIL button ................ THUMBNAIL INFO................THUMBNAIL SETUP ..............THUMBNAIL SIZE ................
- Page 136 Note for the battery symbol (bottom symbol) This symbol might be used in combination with a chemical symbol. In this case it complies with the requirement set by the Directive for the chemical involved. Web Site: http://www.panasonic.com © Panasonic Corporation 2014...