
Related Manuals for Pioneer XC-HM51DAB-5


Summary of Contents for Pioneer XC-HM51DAB-5
- Page 1 X-HM51DAB CD Receiver System XC-HM51DAB CD Receiver Discover the benefits of registering your product online at http://www.pioneer.co.uk (or http://www.pioneer.eu). Operating Instructions...
- Page 2 When you find it Do not install this unit in a poorly ventilated area, or in damaged, ask your nearest PIONEER authorized service locations exposed to high humidity or direct sunlight center or your dealer for a replacement.
- Page 3 (including products supported by this unit). • Pioneer is not responsible for any malfunction of the compatible Pioneer product due to communication error/malfunctions associated with your network connection and/or your connected equipment.
-
Page 4: Table Of Contents
Thank you for buying this Pioneer product. Please read through these operating instructions so that you will know how to operate your model properly. After you have finished reading the instructions, put them in a safe place for future reference. - Page 5 10 Bluetooth® Audio playback Music playback using Bluetooth wireless technology ........31 Pairing with the unit (Initial registration) .
-
Page 6: Before You Start
Before you start Chapter 1: Before you start • Do not heat batteries, disassemble them, or throw them What’s in the box into flames or water. • Batteries may have different voltages, even if they are the Please confirm that the following accessories are in the box same size and shape. -
Page 7: Part Names And Functions
Part names and functions Chapter 2: Part names and functions STANDBY/ON Remote control Switches the receiver between standby and on (page 14). Input function buttons Use to select the input source to this receiver (pages 18, 19, STANDBY/ON OPEN/CLOSE 23, 25, 30 and 31). -
Page 8: Detatching And Replacing The Front Grille (X-Hm51Dab Only)
Part names and functions 11 Tuner control buttons Detatching and replacing the front ST/MONO grille (X-HM51DAB only) Use to switch the sound mode between stereo and monaural. (page 25) The front grille of this speaker system is removable. Proceed RDS ASPM as follows: Use to search for RDS Auto station program memory (page 26). -
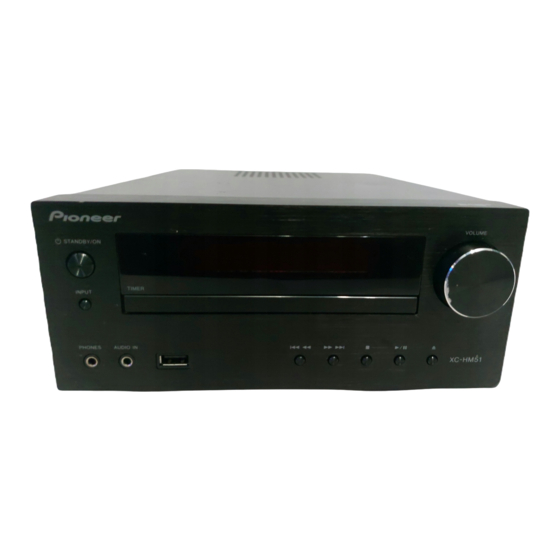
Page 9: Front Panel
Part names and functions Front panel VOLUME STANDBY/ON TIMER INPUT PHONES AUDIO IN STANDBY/ON button AUDIO IN socket Switches the receiver between standby and on (page 14). Use to connect an auxiliary component using a stereo minijack cable (page 30). -
Page 10: Display
Part names and functions Display Lights when the sound is muted. Timer function is set. Note Character display Displays various system information. • The mute icon will be displayed in red. Start playback. Pause playback. -
Page 11: Connections
Connections Chapter 3: Connections • Do not allow the speaker cable core to come into contact CAUTION with the receiver body. • Be sure to turn off the power and unplug the power cord from the power outlet whenever making or changing connections. -
Page 12: Using Other Subwoofer
Connections If not using the provided speaker wire Connecting antennas Twist exposed wire strands together. Connect the DAB/FM wire antenna as shown below. To improve reception and sound quality, connect external Loosen terminal and insert exposed wire. antennas (see Using external antennas below). Tighten terminal. -
Page 13: Plugging In
Connections Plugging in CAUTION • Do not use any power cord other than the one supplied with this unit. • Do not use the supplied power cord for any purpose other than that described below. Before making or changing the connections, switch off the power and disconnect the power cord from the AC outlet. -
Page 14: Getting Started
Getting started Chapter 4: Getting started To turn the power on General control Press the STANDBY/ON to turn the power on. Input function After use: When the INPUT on main unit is pressed, the current function Press the STANDBY/ON to enter the power stand-by mode. will change to different mode. -
Page 15: Sound Controls
Getting started Sound controls Setting the wake-up timer Used to change the existing timer setting, or to set a new Equalizer timer. When the EQUALIZER is pressed, the current mode setting Press STANDBY/ON to turn the power on. will be displayed. To change to a different mode, press the EQUALIZER repeatedly until the desired sound mode Press and hold CLOCK/TIMER. -
Page 16: Calling The Wake-Up Timer
Getting started Calling the wake-up timer Using Headphones An existing timer setting can be reused. Connect the headphones plug to the PHONES terminal. Follow steps 1 to 3 in “Setting the wake-up When the headphones are connected, there is no sound timer”. -
Page 17: Ipod/Iphone/Ipad Playback
Set the iPod/iPhone/iPad on the stand. iPad/iPad 2 Note • Pioneer does not guarantee that this unit plays iPod/ iPhone/iPad models other than the ones specified. • Some functions may be restricted depending on the model or software version. -
Page 18: Playing Ipod/Iphone/Ipad
iPod/iPhone/iPad playback Playing iPod/iPhone/iPad Connect your iPod/iPhone/iPad. • If an iPod/iPhone/iPad is connected while the unit is turned on, playback of the iPod/iPhone/iPad will not begin. Press USB as the input source. “USB/iPod” is shown on the main display. When the recognition is completed, will begin playing automatically. -
Page 19: Disc Playback
Disc playback Chapter 6: Disc playback This system can play back a standard CD, CD-R/RW in the CD CAUTION format and CD-R/RW with MP3 or WMA files, but cannot • Do not place two discs in one disc tray. record on them. Some audio CD-R and CD-RW discs may not •... -
Page 20: Advanced Cd Or Mp3/Wma Disc Playback
Disc playback Repeat play Advanced CD or MP3/WMA disc Repeat play can play one track, all tracks or a programmed sequence continuously. playback To repeat one track: Press REPEAT repeatedly until “REPEAT ONE” appears. Press STANDBY/ON OPEN/CLOSE DISPLAY FOLDER TUNE+ ENTER. -
Page 21: Programmed Play (Cd Or Mp3/Wma)
Disc playback Programmed play (CD or MP3/WMA) About downloading MP3/WMA You can choose up to 32 selections for playback in the order There are many music sites on the internet that you can you like. download MP3/WMA music files. Follow the instructions from the website on how to download the music files. -
Page 22: Specify The Folder To Play
Disc playback Specify the folder to play Switch the display contents To specify the folder to play, perform the following steps. Press DISPLAY. If the title, artist and album name has been written to the file, STANDBY/ON OPEN/CLOSE that information will be displayed. (The unit can only display DISPLAY FOLDER TUNE+... -
Page 23: Usb Playback
To repeat one track: • Pioneer does not guarantee that any file recorded on a Press REPEAT repeatedly until “REPEAT ONE” appears. Press USB storage device will play or that power will be ENTER. -
Page 24: Specify The Folder To Play
USB playback Specify the folder to play Playing in the desired order To specify the folder to play, perform the following steps. (Programmed Play) Press USB, and connect the USB storage device. The unit can play folders stored on a USB storage device in the desired order. -
Page 25: Using The Tuner
Using the tuner Chapter 8: Using the tuner To receive an FM stereo transmission: Listening to the radio broadcasts • Press ST/MONO to select stereo mode and “AUTO” will be displayed. The following steps show you how to tune in to FM radio Improving poor FM reception: broadcasts using the automatic (search) and manual (step) tuning functions. -
Page 26: To Recall A Memorised Station
Using the tuner To recall a memorised station You can search the following program types: News – News Finance – Stock market Press PRESET +/– to select the desired reports, commerce, trading, Current Affairs – Current etc. Affairs station. Children’s Progs – Programs Information –... -
Page 27: Information Provided By Rds
Using the tuner • If no station can be found, “NOT FOUND” will appear for Note 4 seconds. • If the same station is broadcasting on different frequencies, the strongest frequency will be stored in Information provided by RDS memory. Each time the RDS DISPLAY is pressed, the display will switch •... -
Page 28: Listening To The Dab
Using the tuner After the scan: Listening to the DAB+ The stations will be stored in alphanumeric order and the first station on the list will be selected and you will hear it through the speakers. About DAB+ (Digital Audio •... -
Page 29: Changing The Information Display
Using the tuner Changing the information display DAB Frequency table (BAND III) You can switch DAB+ display information. Frequency Label Frequency Label Press the DAB DISPLAY button. Each time the button is pressed, the information display 174.928 MHz 208.064 MHz changes in the following order. -
Page 30: Other Connections
Other connections Chapter 9: Other connections Connect the rear panel LINE IN audio jacks to your auxiliary CAUTION playback component. • Before making or changing the connections, switch off the power and disconnect the power cord from the AC This unit’s rear panel outlet. -
Page 31: Bluetooth® Audio Playback
Bluetooth SIG, Inc. and any use of such Pairing will start. marks by PIONEER CORPORATION is under license. Other • Place the Bluetooth capable device close to the unit. trademarks and trade names are those of their respective •... -
Page 32: Listen To Music On The Unit From A Bluetooth Capable
Bluetooth® Audio playback Listen to music on the unit from a Radio wave caution Bluetooth capable device This unit uses a 2.4 GHz radio wave frequency, which is a band used by other wireless systems (see list below). To prevent noise or interrupted communication, do not use this Press the BT AUDIO. -
Page 33: Radio Wave Reflections
Bluetooth® Audio playback • If you live in a heavily populated residential area (apartment, townhouse, etc.) and if your neighbor’s microwave is placed near your system, you may experience radio wave interference. If this occurs, move your unit to a different place. When the microwave is not in use, there will be no radio wave interference. -
Page 34: Additional Information
If the trouble cannot be rectified even after exercising the checks listed below, ask your nearest Pioneer authorized service center or your dealer to carry out repair work. • If the unit does not operate normally due to external effects such as static electricity disconnect the power plug from the outlet and insert again to return to normal operating conditions. - Page 35 Additional information Problem Check Remedy Unable to connect to a Are there any devices nearby that If so, either move these devices away from the unit, or stop using Bluetooth capable device, no emit electromagnetic waves in the other devices that emit electromagnetic waves. sound comes out at all or 2.4 GHz band (microwaves, wireless sound cuts out when...
- Page 36 Additional information Problem Check Remedy Power is not supplied to the Is AUTH ERROR displayed on the Turn the power off then back on. USB storage device. front panel display? No power is Turn the power off, then disconnect and reconnect the USB storage supplied if the power consumption is device.
-
Page 37: Playable Discs And Formats
Additional information Playable discs and formats • Commercially available audio CDs Audio CD • CD-R/ -RW/ -ROM discs containing music recorded in the CD-DA format WMA files recorded on CD-R/ -RW/ -ROM discs or USB storage devices MP3 files recorded on CD-R/ -RW/ -ROM discs or USB storage devices •... -
Page 38: Do Not Place Objects On This Unit
• This unit’s lens should not become dirty in normal use, but if for some reason it should malfunction due to dust or dirt, consult your nearest Pioneer authorized service center. Although lens cleaners for players are commercially available, we advise against using them... -
Page 39: About Ipod/Iphone/Ipad
Additional information About iPod/iPhone/iPad “Made for iPod,” “Made for iPhone,” and “Made for iPad” mean that an electronic accessory has been designed to connect specifically to iPod, iPhone, or iPad, respectively, and has been certified by the developer to meet Apple performance standards. -
Page 40: Specifications
Tuner section Frequency Range (FM) ....87.5 MHz to 108 MHz © 2013 PIONEER CORPORATION. Frequency Range (DAB)..174.928 MHz to 239.200 MHz All rights reserved. - Page 41 Additional information...
- Page 42 212-0031, Japan http://www.pioneer.eu [*] X-HM51DAB-K, XC-HM51DAB-K English: Dansk: Hereby, Pioneer, declares that this [*] is Undertegnede Pioneer erklærer in compliance with the essential herved, at følgende udstyr [*] requirements and other relevant overholder de væsentlige krav og provisions of Directive 1999/5/EC.
- Page 43 Português: Slovenščina: Pioneer declara que este [*] está Pioneer izjavlja, da je ta [*] v skladu z conforme com os requisitos essenciais bistvenimi zahtevami in ostalimi e outras disposições da Directiva relevantnimi določili direktive 1999/5/CE. 1999/5/ES. Română: Čeština: Pioneer tímto prohlašuje, že tento [*] je Prin prezenta, Pioneer declara ca acest ve shodě...
-
Page 44
253 Alexandra Road, #04-01, Singapore 159936 TEL: 65-6472-7555 PIONEER ELECTRONICS AUSTRALIA PTY. LTD. 5 Arco Lane, Heatherton, Victoria, 3202, Australia, TEL: (03) 9586-6300 PIONEER ELECTRONICS DE MEXICO S.A. DE C.V. Blvd.Manuel Avila Camacho 138 10 piso Col.Lomas de Chapultepec, Mexico, D.F. 11000 TEL: 55-9178-4270 K002_B3_En Printed in China
...