Quick Links
3-067-998-12(1)
A
1
2
AC/DC Adaptor/Charger
3
Operating Instructions
4
Mode d'emploi
Manual de instrucciones
使用说明书
9
0
WARNING
BATTERY LIFE
TIME TO CHG
qa
NORMAL FULL
h
qs
TM
SERIES
TM
B
SERIES
AC-VQ850D
Sony Corporation © 2001 Printed in Japan
3
2
Owner's Record
The model and serial numbers are located on the bottom of the unit.
Record the serial number in the space provided below.
Refer to these numbers whenever you call upon your Sony dealer
regarding this product.
Model No. AC-
Serial No.
1
WARNING
To prevent fire or shock hazard, do not
expose the unit to rain or moisture.
2
This symbol is intended to alert the user to the presence
of uninsulated "Dangerous voltage" within the
product's enclosure that may be of sufficient magnitude
to constitute a risk of electric shock to persons.
C
This symbol is intended to alert the user to the presence
of important operating and maintenance (servicing)
instructions in the literature accompanying the
appliance.
CAUTION
You are cautioned that any changes or modifications not expressly
3
approved in this manual could void your authority to operate this
equipment.
2
NOTICE FOR THE CUSTOMERS IN THE U.S.A AND CANADA
The Graphical Symbols with Supplemental Marking is located on the
bottom of the unit.
Note:
This equipment has been tested and found to comply with the limits for a
4
Class B digital device, pursuant to Part 15 of the FCC Rules. These limits
4
A
are designed to provide reasonable protection against harmful
interference in a residential installation. This equipment generates, uses,
and can radiate radio frequency energy and, if not installed and used in
accordance with the instructions, may cause harmful interference to radio
communications.
However, there is no guarantee that interference will not occur in a
particular installation. If this equipment does cause harmful interference
1
to radio or television reception, which can be determined by turning the
B
C
equipment off and on, the user is encouraged to try to correct the
interference by one or more of the following measures:
– Reorient or relocate the receiving antenna.
– Increase the separation between the equipment and receiver.
– Connect the equipment into an outlet on a circuit different from that to
which the receiver is connected.
– Consult the dealer or an experienced radio/TV technician for help.
NOTICE FOR THE CUSTOMERS IN THE UNITED KINGDOM
A moulded plug complying with BS 1363 is fitted to this equipment for
your safety and convenience.
2
Should the fuse in the plug supplied need to be replaced, a fuse of the
same rating as the supplied one and approved by ASTA or BSI to BS
D
1362 (i.e., marked with
or
mark) must be used.
If the plug supplied with this equipment has a detachable fuse cover,
be sure to attach the fuse cover after you change the fuse. Never use
the plug without the fuse cover. If you should lose the fuse cover,
please contact your nearest Sony service station.
Printed on 100% recycled paper using
VOC (Volatile Organic Compound)-free
vegetable oil based ink.
English
Thank you for purchasing the Sony AC/DC adaptor/charger.
Troubleshooting
AC-VQ850D is a generic trademark (name) for both AC-VQ850 and DCC-
VQ1.
Video equipmet does not
Before operating the unit, please read this manual thoroughly and retain it
work.
for future reference.
5
The AC-VQ850 AC adaptor/charger can be used as follows:
Connect the power cord (supplied) to a wall outlet, or connect the car
6
battery cord (DCC-VQ1) to the cigarette lighter socket in your car only
for negative (-) grounded cars.
7
• To charge a lithium ion type battery pack. Ni-Cd/Nickel hydrogen type
batteries are not rechargeable.
8
The following functions are available with the "InfoLITHIUM" battery
pack:
The battery is not charged.
– Quickly charging
– Remaining charge time display
• To enable the power supply to the video equipment, connection cords are
qd
Power immediately turns
included with this unit.
off even though there is
qf
What is the "InfoLITHIUM" ?
sufficient remaining battery
VCR/CAMERA
power.
The "InfoLITHIUM" is a lithium ion battery pack which can exchange data
qg
with compatible electronic equipment about its battery consumption. Sony
The display is not switched.
(Read "About the
recommends that you use the "InfoLITHIUM" battery pack with electronic
m
equipment having the
mark.
remaining time.")
qh
"InfoLITHIUM" is a trademark of Sony Corporation.
The CHARGE lamp blinks,
and "CHARGE ERROR" is
WARNING
displayed in the display
window.
To prevent fire or shock hazard, do not expose the unit to rain or moisture.
To avoid electrical shock, do not open the cabinet.
Refer servicing to qualified personnel only.
2
If other problems occur, check through the following chart.
AC power cord must be changed only at the qualified service shop.
Remove the battery pack from this unit, then install the same battery
3
For the customers in Canada
pack again.
4
CAUTION
1 1
TO PREVENT ELECTRIC SHOCK, MATCH WIDE BLADE OF PLUG TO
If the CHARGE lamp flashes
WIDE SLOT, FULLY INSERT.
again:
Install another battery pack.
Notes on Use
About the AC power cord plug
If the CHARGE lamp flashes
To remove
The AC-VQ850 comes in two models, differentiated by the shape of the AC
again:
Pour retirer
power cord plug.
The problem is with this unit.
Model
Shape of the plug
Model for USA/Canada
Polarized
Model for other countries/regions
Non polarized
Please contact your nearest Sony dealer in connection with the product
• The model for USA and Canada: One blade of the plug is wider than the
with the problem.
other for the purpose of safety and will fit into the wall outlet only one
way. If you are unable to insert the plug fully into the outlet, contact your
dealer.
To remove
Specifications
Pour retirer
About the remaining battery time
AC-VQ850
While charging the battery pack, this unit will show the remaining battery
Power requirements
time with your video equipment, etc. on the following conditions.
• Using the "InfoLITHIUM" battery pack
• Using the electronic equipment having the
mark
Power consumption
Make sure that you use the battery pack having the
mark.
Consult the operating instructions supplied with your video equipment if it
is applied to "InfoLITHIUM".
Though the following models are applied to "InfoLITHIUM", the
Output voltage
remaining battery time is not displayed on this unit.
DCR- SC100/SC100E/TRV7/TRV7E
CCD- TR555/TR555E/TR610E/TR710/TR710E/TR760E/TR790E/TR810E/
Application
TR820E/TR825E/TR910/TR910E/TR920E/TR930/TR1100E/
TR2200E/TR2300/TR2300E/TR3100E/TR3300/TR3300E/TR3400/
TRV31/TRV31E/TRV41/TRV41E/TRV51/TRV51E/TRV54E/
Operating temperature
TRV56E/TRV61E/TRV62/TRV64E/TRV72/TRV81/TRV81E/
Storage temperature
TRV82/TRV91E/TRV94/TRV94E/TRV101/TRV101E/
Dimensions
2
SC55/SC55E/SC65/SC65E
(Projections are not included (5
in the dimensions.)
GV-A500/A500E
Mass
Supplied accessories
3
If you use this battery pack with electronic equipment not having the
mark, the remaining battery capacity will not be indicated in minutes.*
DCC-VQ1
* The indication may not be accurate depending on the condition and environment
Input voltage
1 1
which the equipment is used under
Fuse rating
Cord length
Warranty for Recorded Content
Mass
Contents of the recording cannot be compensated if recording or playback
is not made due to a malfunction of the battery pack, AC power adaptor,
Design and specifications are subject to change without notice.
AC power adaptor/charger, etc.
Use a commercially available AC plug adaptor, if necessary, depending on
A
the design of the wall outlet.
Charging
Use only a lithium ion type battery pack. This unit cannot be used to
charge a Ni-Cd/Nickel hydrogen type battery pack.
• Attach the battery pack firmly.
• Charge the battery pack on a flat surface without vibration.
Charging temperature
The temperature range for charging is 0 °C to 40 °C (32 °F to 104 °F).
However, to provide maximum battery efficiency, the recommended
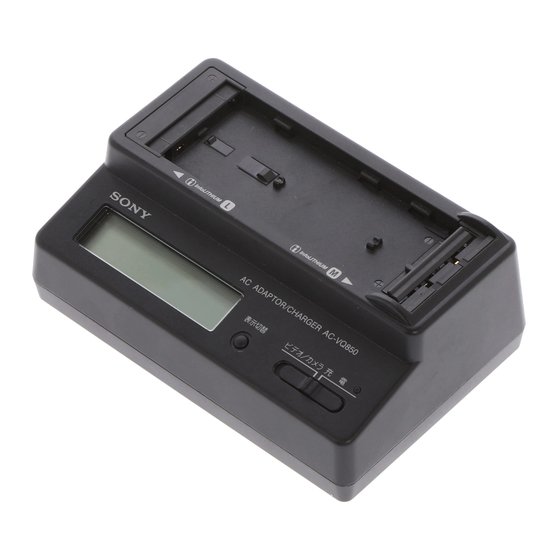
Identifying the parts
temperature range when charging is 10 °C to 30 °C (50 °F to 86 °F).
Others
1 Terminal shutter ("InfoLITHIUM" (M series))
2 Terminal shutter ("InfoLITHIUM" (L series))
• The negligible amount of electric current will flow into the AC adaptor/
3 DC IN connector (only for DCC-VQ1)
charger as long as the AC adaptor/charger is plugged into the wall outlet.
4 DC OUT connector
• Unplug the unit from the wall outlet if it will not be used for extended
5 CHARGE lamp
period of time. To disconnect the cord, pull it out by the plug. Never pull
6 Mode change switch
the cord itself.
• Do not operate the unit with a damaged cord or if it has been dropped or
7 DISPLAY CHANGE button
8 Display window
damaged.
• Use this unit near to a wall outlet. This is to ensure that the power plug
Display window
can be immediately unplugged from the wall outlet to turn the power off
9 "InfoLITHIUM" indicator
if some abnormality occurs during use.
0 WARNING indicator
• Use this car battery charger only for cars which use a 12 or 24 volt battery.
• There are cars which are negatively grounded and there are others which
qa TIME TO CHG (charge) indicator
qs Time indicator
are positively grounded.
qd BATTERY LIFE (battery remaining time) indicator
This unit is for negatively grounded cars only.
qf VCR/CAMERA indicator
• Use the unit with leaving the car engine going. If you use the unit with the
qg Full charge indicator
car engine stopped, the car battery may become unusable.
qh Remaining battery indicator
• Unplug the car battery cord from the cigarette lighter socket when not in
use. To disconnect the cord, pull it out by the plug. Never pull the cord
itself.
To Charge the Battery Pack
• The nameplate indicating operating voltage, power consumption, etc. is
located on the bottom.
• Be sure that nothing metallic comes into contact with the metal parts of
the unit or connecting plate. If it does, a short may occur and the unit
When the power cord and car battery cord (DCC-VQ1) are connected at
may be damaged.
the same time, power input from the battery cord is given priority.
• Always keep the metal contacts clean.
1 Set the mode change switch to CHARGE.
• Do not disassemble or convert the unit.
• Do not apply mechanical shock or drop the unit.
2 Connect the power cord or the car battery cord to this unit.
• While the unit is in use, it gets warm. But this is normal.
3 Connect the power cord to a wall outlet or a cigarette lighter
• Keep the unit away from AM receivers, because it will disturb AM
socket.
reception.
The beep sounds and the display window lights up.
• Do not place the unit in a location where it is:
— Extremely hot or cold
4 Install the battery pack.
— Dusty or dirty
Charging begins. When the remaining battery indicator becomes
— Very humid
and the CHARGE lamp lights up, normal charge is completed. For full
— Vibrating
charge, which allows you to use the battery slightly longer than "normal
• Placing this unit in locations subject to the direct sunlight such as on
charge", leave the battery pack attached until the CHARGE lamp goes
out.
dashboards or near heating apparatus may cause this unit to deform or
malfunction.
Remove the battery pack when required. It can be used even if the
charging is not completed.
If any difficulty should arise, unplug the unit and contact your nearest Sony
dealer.
Remaining battery indicator
Normal charge
PRECAUTION
Tht set is not disconnected from the AC power source (wall outlet) as long
as it is connected to the wall outlet, even if the set itself has been turned off.
To Install the battery pack
"InfoLITHIUM" (L series) (NP-F550, etc.)
Symptom
Cause/Solution
1 Place the battery pack on this unit with the b b b b b mark facing the
terminal shutter (L series).
•The power plug is disconnected from the
wall outlet.
2 Slide the battery pack in the direction of the arrow.
Press the battery pack until the terminal shutter enters completely
•The car battery cord (DCC-VQ1) is
into this unit.
disconnected from the cigarette lighter socket.
t Insert into the wall outlet or cigarette
"InfoLITHIUM" (M series) (NP-FM50, etc.)
lighter socket.
•The connector cable is not properly connected.
1 Place the battery pack on this unit with the B B B B B mark facing the
t Connect properly.
terminal shutter (M series).
•The mode change switch is set to CHARGE.
2 Slide the battery pack in the direction of the arrow.
t Set the mode change switch to VCR/
Press the battery pack until the terminal shutter lifts completely.
CAMERA.
•The mode change switch is set to VCR/
To remove the battery pack
CAMERA.
t Set the mode change switch to CHARGE.
NP-F550, etc.
(ill. B-1)
•Fully charge again.
Slide the battery pack in the direction of the arrow, then lift it straight out.
t The remaining battery power will be
correctly displayed.
NP-FM50, etc.
(ill. B-2)
Slide the battery pack in the direction of the arrow, then lift it straight out.
•The normal charge time is not displayed.
t The normal charge time is not displayed
Note
after the normal charge is completed.
When you install the battery pack, be sure not to strike it to the terminal of
•The full charge time is not displayed.
the AC adaptor/charger.
t The full charge time is not displayed after
the full charge is completed.
Charging time
•If the battery pack is charged in hot locations
such as in the direct sunlight, the device
The following table shows the charging time for the main battery pack
protection function operates to stop charging.
which is discharged completely.
t Return this unit to the recommended
temperature (10 °C to 30 °C), remove the
Battery pack
Charging time
Battery pack
battery and then re-attach it.
("InfoLITHIUM" (L series))
( "InfoLITHIUM" (M series))
NP-F550
115 (55)
NP-FM50
NP-F750
170 (110)
NP-FM70
NP-F960
245 (185)
NP-FM91
• Approximate minutes to charge an empty battery pack fully (Full charge).
If the CHARGE lamp lights and
• Approximate minutes in parentheses indicate the time when you charge
does not flash again:
normally (Normal charge).
If the CHARGE lamp goes out
• To ascertain the battery life, refer to the instruction manual of the video
because the charging time has
equipment which you use.
passed, there is no problem.
• The charging time may differ depending on the condition of the battery
pack or the temperature of the environment.
Notes
If the CHARGE lamp lights and
• When the mode change switch is set to VCR/CAMERA during charging,
does not flash again:
charging stops.
If the CHARGE lamp goes out
• If the CHARGE lamp does not light or flash, check that the battery pack is
because the charging time has
correctly attached to the AC adaptor/charger. If it is not attached it will
passed, the problem is with the
not be charged.
battery pack first installed.
To Check Charging
While charging, you can check the charging time on the display. After
starting charging in a minute, BATTERY LIFE lights up on the display.
The displayed remaining time is the approximate time when taking
photographs via the viewfinder. The remaining time is shorter when the
LCD display is used.
Press DISPLAY CHANGE while charging.
Each time you press DISPLAY CHANGE, the display changes as follows.
100 - 240 V AC, 50/60 Hz
12/24 V DC
The remaining battery time
(only for negative grounded cars)
when the battery pack being
25 W
Charge mode:
charged is attached to your
"InfoLITHIUM" electronic
35 VA (100 V AC), 50 VA (240 V AC)
Operating mode:
equipment
The time is not displayed when the
40 VA (100 V AC), 50 VA (240 V AC)
DC OUT:
remaining battery time is less than 5
8.4 V, 2.0 A in operating mode
minutes.
Battery charge terminal:
The remaining time until normal
8.4 V, 1.4 A in charge mode
charge is completed
Sony battery pack NP-FM30/FM50/FM70/
The normal charge time is not
FM90/FM91/F330/F530/F550/F730/F730H/
displayed after the normal charge is
F750/F930/F950/F960
completed.
0 °C to 40 °C (32 °F to 104 °F)
–20 °C to 60 °C (–4 °F to 140 °F)
Approx. 136 × 48 × 90 mm (w/h/d)
The remaining time until full
× 1
× 3
charge is completed
1
/
10
/
1
/
inches)
3
16
2
The full charge time is not displayed
after the full charge is completed.
Approx. 280 g (9.9 oz)
Connecting cord DK-415 (1), DK-215 (1),
AC power cord (1)
DC 12/24V
Notes
125 V 4 A
• The time display shows the approximate time when charging at 10 °C -
Approx. 1.5 m
30 °C. The time display may differ from the actual charging time
Approx. 80 g
depending on using conditions and circumstances.
• The time display may show "– – – –" in the following cases. However, this
is not a malfunction.
– The remaining battery time is less than 5 minutes.
– There is a difference between the displayed time and actual charging
time. Even if this happens, continue charging.
Wall outlet
• Full charge requires about 1 hour after normal charge is completed. If you
remove the battery pack between normal charge and full charge, the
AC-VQ850
charging time may not be displayed properly in the next charging.
• When a battery that has not been used for a long time is charged, the
displayed remaining time and full charge time sometimes differ from the
AC plug adaptor
actual times. This is not a malfunction. If this happens, charge the battery
pack until it is fully charged. The correct times can be displayed.
• When you attach a fully charged battery pack to this unit, "TIME TO CHG
FULL 1h" may appear on the display. However, this is not a malfunction.
• You may wait for a while after pressing DISPLAY CHANGE until the
display shows the time indication.
See illustration A.
• To display the remaining battery time of a new battery, attach it to your
video camera recorder and use it for about 20 seconds. Then, charge the
battery with this unit.
To Operate Video Equipment
For details of the connection, refer to the instruction manual of the video
equipment.
1 Set the mode change switch to VCR/CAMERA.
2 Connect the power cord or the car battery cord to this unit.
3 Connect the power cord to a wall outlet or a cigarette lighter
socket.
4 Connect the connecting cord A to the DC OUT connector of this
unit.
5 Connect the connecting cord to the video equipment.
When using the connecting cord DK-415
(DCR-TRV130, etc.)
(ill.C-1)
See illustration B.
While pressing the connecting plate B , slide it down.
To remove the connecting plate, slide it up while pressing the battery
release lever C.
When using the connecting cord DK-215
(DCR-TRV30, etc.)
(ill.C-2)
Open the cover, and insert the connecting plug D.
To remove the connecting plug, pull it out.
Notes
• If you set the mode change switch to CHARGE while operating the video
equipment, the power supply to the video equipment stops.
• You cannot charge the battery pack attached to this unit while supplying
the power to the video equipment.
• Keep this unit away from the video equipment if the picture is disturbed.
Fuse Replacement
If this unit is not working properly while using DCC-VQ1, check to see if
the fuse has blown out. If the fuse has blown out, replace it in the following
way.
Full charge
1 Twist the end of the plug and remove it.
2 Remove the blown out fuse.
3 Insert the new fuse and twist the end of the plug and tighten.
Notes
• Replace the fuse with a fuse of the same voltage (4 A, 125 V).
• If the car's cigarette lighter socket is dirty with ash, etc., the plug part will
become hot due to a poor connection. Be sure to clean it before using.
• When replacing the fuse, do not substitute anything for the specified fuse.
• If the fuse blows again soon after replacement, consult your nearest Sony
dealer.
Please contact your car dealer about the polarity that your car is grounded
or the voltage of your car battery, etc.
Français
Nous vous remercions pour l'achat de cet adaptateur secteur CA/CC/
chargeur Sony.
En cas de panne
(ill. B-1)
AC-VQ850D est une marque générique (nom) désignant les AC-VQ850 et
Symptômes
DCC-VQ1.
L'appareil vidéo ne
Avant d'utiliser l'appareil, veuillez lire attentivement ce manuel et le
fonctionne pas.
conserver pour toute référence future.
L'adaptateur secteur/chargeur AC-VQ850 peut être utilisé:
(ill. B-2)
Raccordez le cordon d'alimentation (fourni) à une prise secteur, ou le
cordon allume-cigares (DCC-VQ1) à la douille allume-cigares d'une
voiture à masse négative (-) seulement.
• Pour charger une batterie au lithium-ion. Les piles de type Ni-Cd/Nickel-
hydrogène ne sont pas rechargeables.
Les batteries "InfoLITHIUM" offrent les fonctions suivantes:
La batterie n'est pas
– Recharge rapide
– Indication du temps de charge restant
chargée.
• Pour alimenter un appareil vidéo, avec les cordons de liaison fournis avec
cet appareil.
L'alimentation est tout de
Que signifie "InfoLITHIUM"?
suite coupée, bien que
l'autonomie de la batterie
La batterie "InfoLITHIUM" est une batterie au lithium-ion qui peut
soit suffisante.
échanger des informations sur la consommation d'énergie avec les appareils
électroniques compatibles. Sony conseille d'utiliser une batterie
L'indication ne change pas.
(Voir "Iindication
"InfoLITHIUM"avec les appareils électroniques portant le logo
.
d'autonomie")
"InfoLITHIUM"est une marque de commerce de Sony Corporation.
AVERTISSEMENT
Afin d'éviter tout risque d'incendie ou d'électrocution, ne pas exposer cet
Charging time
Le voyant CHARGE
appareil à la pluie ou à l'humidité.
clignote, et "CHARGE
Afin d'écarter tout risque d'électrocution, garder le coffret fermé.
ERROR" apparaît.
Ne confier l'entretien de l'appareil qu'à un technicien qualifié.
105 (45)
150 (90)
Le cordon d'alimentation secteur de l'appareil doit être changé par un
professionnel uniquement.
205 (145)
Pour les utilisateurs au Canada
Si un autre problème se présente, consultez le tableau suivant.
ATTENTION
Retirez la batterie de l'appareil, puis remettez-la en place.
POUR EVITER LES CHOCS ELECTRIQUES, INTRODUIRE LA LAME LA
PLUS LARGE DE LA FICHE DANS LA BORNE CORRESPONDANTE DE
LA PRISE ET POUSSER JUSQU' AU FOND.
Si le témoin CHARGE
clignote encore:
Installez une autre batterie
Remarques sur l'utilisation
rechargeable.
Fiche du cordon d'alimentation secteur
Le modèle AC-VQ850 existe en deux versions, qui se différencient par la
Si le témoin CHARGE
fiche du cordon d'alimentation secteur.
clignote de nouveau:
Le problème vient de
Modèle
Forme de la fiche
l'appareil.
Modèle pour les Etats-unis
Polarisée
et le Canada
Modèle pour les autres pays
Non polarisée
ou régions
Veuillez contacter votre revendeur Sony et lui apporter l'appareil qui ne
• Modèle pour les Etats-Unis ou le Canada: Une des lames de la fiche est
fonctionne pas.
plus large que l'autre pour des raisons de sécurité et ne peut s'insérer que
dans un sens. Si vous ne parvenez pas à insérer complètement la fiche
dans la prise, contactez votre revendeur.
Spécifications
Indication d'autonomie
AC-VQ850
Pendant la recharge de la batterie, cet appareil indiquera l'autonomie de
Alimentation
l'appareil vidéo, etc. dans les cas suivants:
• Vous utilisez une batterie "InfoLITHIUM"
Consommation
• Vous utilisez un appareil électronique utilisant le logo
Assurez-vous que la batterie que vous utilisez porte la marque
.
Consultez le mode d'emploi fourni avec votre appareil vidéo s'il s'agit d'un
appareil "InfoLITHIUM".
Tension de sortie
Bien que les modèles suivants soient de type "InfoLITHIUM",
l'autonomie ne peut pas être indiquée par cet appareil.
DCR- SC100/SC100E/TRV7/TRV7E
Application
CCD- TR555/TR555E/TR610E/TR710/TR710E/TR760E/TR790E/TR810E/
TR820E/TR825E/TR910/TR910E/TR920E/TR930/TR1100E/
TR2200E/TR2300/TR2300E/TR3100E/TR3300/TR3300E/TR3400/
Température de fonctionnement
TRV31/TRV31E/TRV41/TRV41E/TRV51/TRV51E/TRV54E/
Température d'entreposage –20 °C à 60 °C (–4 °F à 140 °F)
TRV56E/TRV61E/TRV62/TRV64E/TRV72/TRV81/TRV81E/
Dimensions hors tout
TRV82/TRV91E/TRV94/TRV94E/TRV101/TRV101E/
SC55/SC55E/SC65/SC65E
Poids
GV-A500/A500E
Accessoires fournis
Si vous utilisez la batterie "InfoLITHIUM" avec des appareils électroniques ne portant
pas le logo
, l'autonomie de la batterie ne sera pas indiquée en
DCC-VQ1
minutes.*
Tension d'entrée
* Il se peut que l'indication ne soit pas précise. Cela dépend de la situation et de
Capacité du fusible
l'environnement dans lesquels l'appareil est utilisé
Longueur du cordon
Poids
Garantie concernant l'enregistrement
Aucune compensation ne peut être accordée si l'enregistrement ou la
La conception et les spécifications peuvent être modifiées sans préavis.
lecture n'a pas pu être effectué en raison d'un problème de batterie,
Si la fiche ne rentre pas dans la prise, utilisez une adaptateur de fiche (en
d'adaptateur secteur ou d'adaptateur secteur/chargeur, etc.
vente dans le commerce).
Recharge
N'utilisez que des batteries au lithium-ion avec l'adaptateur. L'adaptateur
AC-VQ850
ne peut être utilisé pour charger une batterie au Ni-Cd/Nickel-hydrogène.
• Fixez bien la batterie.
• Chargez la batterie sur une surface plane et sans vibrations.
Température de recharge
Nomenclature
La batterie peut être rechargée à une température comprise entre 0 °C et
40 °C (32 °F et 104 °F). Cependant, pour que son efficacité soit optimale,
il est conseillé de la recharger entre 10 °C et 30 °C (50 °F et 86 °F).
1 Obturateur de borne ("InfoLITHIUM" (modèles M))
2 Obturateur de borne ("InfoLITHIUM" (modèles L))
Divers
See illustration C.
3 Prise DC IN (DCC-VQ1 seulement)
4 Prise DC OUT
• Une quantité négligeable d'électricité circule dans l'appareil s'il reste
5 Témoin CHARGE
branché sur la prise murale.
6 Sélecteur de mode
• Débranchez l'appareil de la prise murale si vous n'avez pas l'intention de
7 Touche DISPLAY CHANGE
l'utiliser pendant un certain temps. Pour débrancher le cordon secteur,
tirez sur la fiche. Ne tirez jamais sur le cordon.
8 Fenêtre d'affichage
• N'utilisez pas l'appareil lorsque le cordon est endommagé, ou si
Fenêtre d'affichage
l'adaptateur est tombé ou a été endommagé.
9 Indicateur "InfoLITHIUM"
• Utilisez cet appareil près d'une prise murale. Vous pourrez débrancher
0 Indicateur WARNING
immédiatement la fiche de la prise murale pour éteindre l'appareil en cas
qa Indicateur TIME TO CHG (charge)
d'anomalie.
qs Indicateur de durée
• N'utilisez ce chargeur que dans des voitures avec batterie de 12 ou 24
qd Indicateur BATTERY LIFE (autonomie de la batterie)
volts.
• Il existe des voiture à masse négative et d'autres à masse positive.
qf Indicateur VCR/CAMERA
Cet appareil ne doit être utilisé que dans les voitures à masse négative.
qg Indicateur de charge complète
qh Indicateur de charge de la batterie
• Lorsque vous utilisez cet appareil, laissez tourner le moteur de la voiture,
sinon la batterie se videra.
• Débranchez le cordon allume-cigares de la douille allume-cigares de la
voiture lorsque vous ne l'utilisez pas. Pour débrancher le cordon, tirez sur
Pour charger une batterie
la fiche et jamais sur le cordon.
• La plaque signalétique indiquant la tension de fonctionnement, la
consommation électrique et d'autres informations électriques se trouve
Lorsque le cordon d'alimentation et le cordon allume-cigares (DCC-
sous l'appareil.
VQ1) sont tous deux raccordés à l'appareil, l'alimentation est fournie
• Evitez que des objets métalliques ne touchent les parties métalliques de
en priorité par le cordon allume-cigares.
l'appareil ou de la plaque de connexion. Un court-circuit pourrait se
produire et endommager l'appareil.
1 Réglez le sélecteur de mode sur CHARGE.
• Veillez à ce que les contacts soient toujours propres.
2 Branchez le cordon d'alimentation ou le cordon allume-cigares
• Ne pas démonter ni modifier l'appareil.
• Ne pas appliquer de chocs mécaniques à l'appareil ni le laisser tomber.
sur cet appareil.
• Quand l'appareil est utilisé, il devient chaud. C'est tout à fait normal.
• Ne pas laisser l'appareil près d'un récepteur AM, car il perturbera la
3 Branchez le cordon d'alimentation sur une prise secteur ou sur
réception AM.
une douille allume-cigares.
• Ne pas entreposer l'appareil dans les endroits suivants:
Un bip est audible et la fenêtre d'affichage s'allume.
— extrêmement chauds ou froids
4 Installez la batterie rechargeable.
— poussiéreux ou sales
— très humides
La recharge commence. Quand l'indicateur d'autonomie de la batterie
est plein
— exposés à des vibrations.
terminée. Pour une recharge complète qui vous permettra d'utiliser plus
• N'exposez pas cet appareil à la lumière directe du soleil, comme sur le
longtemps l'appareil vidéo, laissez la batterie en place jusqu'à ce que le
tableau de bord d'une voiture, ni à la chaleur d'un appareil de chauffage,
témoin CHARGE s'éteigne.
car il pourrait être déformé ou ne plus fonctionner.
Enlevez la batterie quand nécessaire. Elle peut être utilisée même si elle
En cas de problème, débranchez l'appareil et contactez votre revendeur Sony.
n'est pas complètement rechargée.
Indicateur de charge de la batterie
Charge normale
PRECAUTION
L'ensemble adaptateur-camescope n'est pas isolé de la source
d'alimentation secteur tant qu'il reste branché sur la prise murale (secteur),
même si le camescope a été mis hors tension.
Pour installer la batterie rechargeable
"InfoLITHIUM" (Modèle L) (NP-F550, etc.)
(ill. B-1)
1 Placez la batterie sur cet appareil avec le repère b b b b b orienté vers
Causes/Solutions
l'obturateur de borne (modèle L).
•Le cordon d'alimentation est débranché de la
2 Faites glisser la batterie dans le sens de la flèche.
prise secteur.
Appuyez sur la batterie jusqu'à ce que l'obturateur de borne soit
•Le cordon allume-cigares (DCC-VQ1) est
débranché de la prise allume-cigares.
complètement introduit dans cet appareil.
t Branchez-le sur une prise secteur ou une
"InfoLITHIUM" (Modèle M) (NP-FM50, etc.)
(ill. B-2)
douille allume-cigares.
•Le cordon de liaison n'est pas raccordé
1 Placez la batterie sur cet appareil avec le repère B B B B B orienté vers
correctement.
l'obturateur de borne (modèle M).
t Raccordez-le correctement.
2 Faites glisser la batterie dans le sens de la flèche.
•Le sélecteur de mode est réglé sur CHARGE.
Appuyez sur la batterie jusqu'à ce que l'obturateur de borne se soit
t Réglez-le sur VCR/CAMERA.
complètement relevé.
•Le sélecteur de mode n'est pas réglé sur
Pour enlever la batterie rechargeable
VCR/CAMERA.
t Réglez-le sur CHARGE.
NP-F550, etc.
(ill. B-1)
•Rechargez une nouvelle fois la batterie
Faites glisser la batterie dans le sens de la flèche, puis tirez-la tout droit.
complètement.
NP-FM50, etc.
(ill. B-2)
t L'autonomie n'est pas indiquée
Faites glisser la batterie dans le sens de la flèche, puis tirez-la tout droit.
correctement.
•Le temps d'une recharge normale n'est pas
Remarque
indiqué.
t Le temps d'une recharge normale n'est
Lorsque vous installez la batterie, veillez à ne pas heurter la borne de
l'adaptateur secteur/chargeur.
pas indiqué lorsque la recharge normale
est terminée.
Temps de recharge
•Le temps d'une recharge complète n'est pas
indiqué.
Le tableau suivant indique le temps de recharge quand la batterie
tLe temps d'une recharge complète n'est
principale est complètement déchargée.
pas indiqué lorsque la recharge complète
est terminée.
Batterie
Temps de
Batterie
•Si la batterie est rechargée dans un lieu
rechargeable
recharge
rechargeable
chaud, par exemple en plein soleil, le
("InfoLITHIUM" (Modèle L))
("InfoLITHIUM" (Modèle M))
dispositif de protection s'enclenche et la
NP-F550
115 (55)
NP-FM50
recharge s'arrête.
t Exposez l'appareil à la température
NP-F750
170 (110)
NP-FM70
recommandée (10 °C à 30 °C), enlevez la
batterie et rattachez-la.
NP-F960
245 (185)
NP-FM91
• Temps de recharge approximatif en minutes pour recharger
complètement une batterie vide (Recharge complète).
• Le temps entre parenthèses indiquent approximativement le nombre de
minutes pour une recharge normole (Recharge normale).
• Voir le mode d'emploi de l'appareil vidéo utilisé pour l'autonomie de la
Si le témoin CHARGE s'allume mais
batterie.
ne clignote pas de nouveau:
• Le temps de recharge varie selon l'état de la batterie et la température
Si le témoin CHARGE s'éteint parce
ambiante.
que la recharge est terminée, il n'y a
Remarques
aucun problème.
• Si vous réglez le sélecteur de mode sur VCR/CAMERA pendant la
recharge, la recharge s'arrêtera.
• Si le témoin CHARGE ne s'allume pas ou clignote, vérifiez que la batterie
Si le témoin CHARGE s'allume mais
est fixée correctement à l'adaptateur secteur/chargeur. Si elle n'est pas
ne clignote pas de nouveau:
rattachée correctement, elle ne se rechargera pas.
Si le témoin CHARGE s'éteint parce
que la recharge est terminée, le
Indication des temps
problème vient de la première
batterie rechargeable installée.
Pendant la recharge, vous pouvez vérifier le temps de recharge sur la
fenêtre d'affichage. Une minute après le début de la recharge, BATTERY
LIFE s'allume. Le temps indiqué désigne l'autonomie de la batterie lorsque
vous prenez des photos avec le viseur. L'autonomie sera plus courte si vous
utilisez l'écran LCD.
Appuyez sur DISPLAY CHANGE pendant la recharge.
A chaque pression de cette touche, l'affichage change de la façon suivante.
Autonomie lorsque la batterie
rechargée est rattachée à un
Secteur 100 - 240 V, 50/60 Hz
appareil électronique
12/24 V CC (voitures à masse négative)
"InfoLITHIUM"
25 W
Ce temps n'est pas indiqué si
Mode de charge:
l'autonomie est inférieure à 5 minutes.
35 VA (100 V secteur), 50 VA (240 V secteur)
Mode de fonctionnement:
Temps restant jusqu'à une
40 VA (100 V secteur), 50 VA (240 V secteur)
DC OUT:
recharge normale
8,4 V, 2,0 A en mode de fonctionnement
Le temps d'une recharge normale n'est
Borne de recharge de la batterie:
plus indiqué lorsque la recharge
8,4 V, 1,4 A en mode de charge.
normale est terminée.
Batterie rechargeable Sony NP-FM30/FM50/
FM70/FM90/FM91/F330/F530/F550/F730/
F730H/F750/F930/F950/F960
Temps restant jusqu'à une
recharge complète
0 °C à 40 °C (32 °F à 104 °F)
Le temps d'une recharge complète n'est
plus indiqué lorsque la recharge
Env. 136 × 48 × 90 mm (l/h/p)
complète est terminée.
× 1
× 3
(5
1
/
10
/
1
/
pouces)
16
2
3
Env. 280 g (9,9 on.)
Remarques
Cordon de liaison DK-415 (1), DK-215 (1),
Cordon d'alimentation secteur (1)
• Le temps indiqué est approximatif même quand la batterie est rechargée
entre 10 °C et 30 °C. Selon les conditions d'utilisation et les circonstances,
le temps peut être différent du temps réel.
CC 12/24 volts
• "– – – –" peut apparaître sur la fenêtre d'affichage dans les cas suivants. Il
125 V 4 A
ne s'agit pas d'une anomolie.
Approx. 1,5 m
– L'autonomie de la batterie est inférieure à 5 minutes.
Approx. 80 g
– Il y a une différence entre le temps affiché et le temps de recharge réel.
Continuez la recharge, si cet indicateur apparaît.
• Une recharge complète prend environ une heure. Si vous détachez la
batterie entre la recharge normale et la recharge complète, le temps risque
de ne pas être indiqué correctement lors de la recharge suivante.
• Si une batterie n'a pas été utilisée pendant longtemps, l'autonomie
Prise murale
indiquée et le temps de recharge complète peuvent être inexacts. C'est
normal. Dans ce cas, rechargez une nouvelle fois la batterie. Les temps
seront alors corrects.
• Quand vous raccordez une batterie complètement rechargée à cet
Adaptateur de fiche secteur
appareil, "TIME TO CHG FULL 1h"peut apparaître sur la fenêtre
d'affichage. Il ne s'agit pas d'une anomolie.
• Il faut attendre un certain temps après une pression de DISPLAY
CHANGE pour que le temps apparaisse.
• Pour connaître l'autonomie d'une batterie neuve, insérez-la sur l'appareil
Voir l'illustration A.
vidéo et utilisez-la pendant 20 secondes environ. Rechargez ensuite la
batterie sur cet appareil.
Pour utiliser l'appareil vidéo
Voir l'illustration C.
Pour le raccordement, reportez-vous au mode d'emploi de l'appareil vidéo.
1 Réglez le sélecteur de mode sur VCR/CAMERA.
2 Raccordez le cordon d'alimentation ou le cordon allume-cigares
sur cet appareil.
3 Raccordez le cordon d'alimentation à une prise secteur ou à une
douille allume-cigares.
4 Raccordez le cordon de liaison A à la prise DC OUT de cet
appareil.
5 Raccordez le cordon de liaison à l'appareil vidéo.
Si vous utilisez le cordon de liaison DK-415
(DCR-TRV130, etc.)
(ill.C-1)
Faites glisser la plaquette de connexion B tout en appuyant dessus.
Voir l'illustration B.
Pour retirer la plaquette de connexion, faites-la glisser vers le haut tout
en appuyant sur le levier de dégagement de la batterie C.
Si vous utilisez le cordon de liaison DK-215
(DCR-TRV30, etc.)
(ill.C-2)
Ouvrez le couvercle et introduisez la fiche D.
Pour retirer la fiche, tirez dessus.
Remarques
• Si vous réglez le sélecteur de mode sur CHARGE pendant l'utilisation de
l'appareil vidéo, l'alimentation sera coupée.
• Vous ne pouvez pas recharger la batterie quand elle est sur l'appareil
vidéo et l'alimente.
• Eloignez l'adaptateur de l'appareil vidéo s'il perturbe l'image.
Remplacement du fusible
et le témoin CHARGE s'allume, la recharge normale est
Si l'appareil ne fonctionne pas correctement lorsque rous utilisez le DCC-
VQ1, vérifier si le fusible n'a pas sauté. Si le fusible a sauté, remplacez-le de
la manière suivante.
1 Dévissez l'extrémité de la fiche et enlevez-la.
Charge complète
2 Enlevez le fusible sauté.
3 Installez un nouveau fusible, vissez l'extrémité de la fiche et
serrez-la.
Remarques
• Remplacez le fusible par un fusible de la même intensité (4 A, 125 V).
• Si la douille de l'allume-cigares de la voiture est recouverte de cendres ou
autre, la fiche risque de chauffer à cause d'un mauvais contact. Veillez à
nettoyer la douille.
• Remplacez le fusible uniquement par le fusible spécifié.
• Si le fusible saute juste après avoir été remplacé, consultez votre
revendeur Sony.
En ce qui concerne la polarité de la masse de la voiture, la tension de la
batterie de voiture ou autre, consultez votre concessionnaire auto.
Temps de
recharge
105 (45)
150 (90)
205 (145)

Related Manuals for Sony AC VQ850


Summary of Contents for Sony AC VQ850
- Page 1 • Placing this unit in locations subject to the direct sunlight such as on dashboards or near heating apparatus may cause this unit to deform or malfunction. If any difficulty should arise, unplug the unit and contact your nearest Sony dealer. Printed on 100% recycled paper using VOC (Volatile Organic Compound)-free vegetable oil based ink.
- Page 2 PRECAUCIÓN PARA EVITAR DESCARGAS ELÉCTRICAS, HAGA COINCIDIR LA CUCHILLA ANCHA DEL ENCHUFE CON LA RANURA ANCHA, E Póngase en contacto con su proveedor Sony más cercano en relación con INSÉRTELA COMPLETAMENTE. el producto afectado. Notas sobre la utilización...