Table of Contents
Available languages
Available languages
Quick Links
Table of Contents

Related Manuals for Black & Decker Vitessa IR2010


Summary of Contents for Black & Decker Vitessa IR2010
- Page 1 ADVANCED STEAM IRON PLANCHA CON SISTEMA AVANZADO DE VAPOR FER À VAPEUR PERFECTIONNÉ us e and care m an u a l man u al d e us o y c ui d ad o gui d e d’ ut i l i s ati o n e t d ’e n t re t i e n IR2010, IR2020, IR2030, IR2050, IR2110, IR2150...
- Page 2 Thank you for your purchase! Gracias por su compra! Merci de votre achat! Should you have any questions or concerns with your new product, please call our Customer Service Line at 1-800-231-9786 (US and Canada). Please do not return to the store. Si usted tiene alguna inquietud o pregunta con su producto, por favor llame a nuestra línea de servicio al cliente una atención inmediata 1-800-231-9786 (EE.UU/Canadá) 01-800-714-2503...
-
Page 3: Important Safety Instructions
IMPORTANT SAFETY INSTRUCTIONS When using your iron, basic safety precautions should always be followed, including the following: • READ ALL INSTRUCTIONS BEFORE USING. • Burns can occur from touching hot metal parts, hot water, or steam. Use caution • Only use iron for intended use. when you turn the iron upside down - there •... -
Page 4: Getting To Know Your
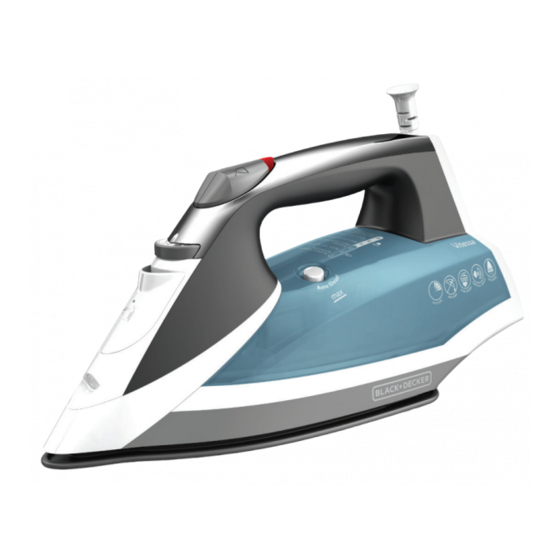
G E T T I NG TO KN OW YO UR V ITE SSA™ I RON Soleplate Power/auto shut-off light Spray nozzle Auto-Clean™ button Water-fill cover Dual position cord SmartSteam™ dial 10. Water tank Spray mist button Heel rest Burst of steam button Product may vary slightly from what is illustrated. -
Page 5: How To Use
HOW TO U SE This product is for household use only. G E T T ING STARTE D • Remove all labels, tags and stickers attached to the body, cord, or soleplate of the iron. • Remove and save literature. FILLING THE WATER TANK With the iron on a flat surface, with the soleplate down or tilted at 45°... -
Page 6: Setting Guide
Iron as long as needed. Note that if the iron is left inactive, the 3-Way Auto Shut off Safety feature will activate. Please see Additional Features section for more details. When finished ironing, turn the dial to the MIN setting and unplug from the outlet. - Page 7 SmartSteam™ Technology This technology gives you the control of both soleplate heat and steam level in one dial. On traditional irons the controls are separated, making it difficult to know what settings are right for each fabric. These simple controls take the guesswork out of ironing and ensure optimal results every time.
- Page 8 CL EA NI NG A N D C A R E This product contains no user serviceable parts. Refer to qualified service personnel. CLEANING OUTSIDE SURFACES Make sure the iron is unplugged and has completely cooled. Wipe the soleplate and outer surface with a soft, damp cloth. Water and small amounts of gentle household soaps, such as dishwashing liquid, can be used.
-
Page 9: Iro Ni N G T I Ps A N D Tr Ic Ks
STORING YOUR IRON Check that the iron is on the MIN setting, unplugged and completely cool. Empty the water tank by opening the water fill door and turning the iron upside down over a sink. Wrap the cord loosely around the heel of the iron and use the clip on the plug to clip the end of the cord to the wrapped cord. -
Page 10: Troubleshooting
TROUBLESHOOTING Problem Cause Solution The iron is plugged in, Power supply issue. Check that the plug is but the soleplate is not properly inserted into the heating. outlet or try plugging the iron into a different outlet. Not enough steam or no SmartSteam™... - Page 11 NE E D H E LP ? For service, repair or any questions regarding your appliance, please call our Customer Service Line at 1-800-231-9786. Please DO NOT return the product to the place of purchase. Also, please DO NOT mail product back to manufacturer, nor bring it to a service center.
-
Page 12: Instrucciones Importantes De Seguridad
INSTRUCCIONES IMPORTANTES DE SEGURIDAD Cuando se usan aparatos eléctricos, siempre se deben respetar las sigui- entes medidas básicas de seguridad: • LEA TODAS LAS INSTRUCCIONES ANTES DE supervisión de un adulto. No desatienda la USAR El APARATO. plancha cuando esté enchufada o sobre la tabla •... - Page 13 CON OZCA S U P L A N C HA V I T ESSA™ Suela Luz indicadora de funcionamiento/ apagado automático Boquilla de rocío Botón de limpieza automática Tapa del orificio de llenado Auto-Clean™ Dial de control SmartSteam™ Cable de dos posiciones Botón de rocío fino 10.
-
Page 14: Primeros Pasos
COMO USAR Este producto es para uso doméstico solamente. PRIMEROS PASOS • Retire todas las etiquetas y calcomanías adheridas al cuerpo, cable o suela de la plancha. • Retire y conserve la literatura. LLENADO DEL TANQUE DE AGUA Con la plancha colocada con la suela sobre una superficie plana e inclinada a un ángulo de 45 grados, abra la tapa del orificio de llenado. -
Page 15: Guía De Ajustes
Consejo: Para planchar en seco a temperatura baja, utilice los ajustes 1 a 3 en el dial de control SmartSteam™ o para utilizar una temperatura alta, simplemente vacíe el tanque de agua y siga las instrucciones correspondientes. Si vacía el tanque, una vez que la plancha se haya precalentado quizás tenga que presionar el botón de potente disparo de vapor varias veces para vaciar el tanque completamente. -
Page 16: Características Adicionales
CARACTERÍSTICAS ADICIONALES Diseño de Suela de Vapor Uniforme Su plancha con sistema avanzado de vapor Vitessa™ cuenta con nuestro diseño de suela de vapor uniforme. Esta suela fue diseñada para brindar un flujo de vapor más uniforme, desde el talón hasta la punta, permitiendole así dominar las arrugas rápidamente en cualquier área de su prenda. -
Page 17: Cuidado Y Limpieza
Consejo: Las barras de la ducha en su baño son un lugar perfecto. Sujete la prenda estirada desde la base o el costado (teniendo cuidado de mantener su mano alejada del vapor) y sujete la plancha con la otra mano. Coloque la suela calentada aproximadamente a una pulgada de distancia del tejido y presione el botón de potente disparo de vapor en el mango. - Page 18 SISTEMA DE LIMPIEZA AUTOMÁTICA AUTO-CLEAN™ Utilice esta función para mantener la plancha libre de acumulaciones. Para resultados óptimos a través del tiempo, es recomendado limpiar su plancha cada 2 a 4 semanas. Hogares con sistemas de agua más fuerte deben limpiar sus planchas con más frecuencia, cada 1 a 2 semanas.
- Page 19 CON S EJ OS Y TR UCOS PA RA E L P LA NCH AD O • Esta plancha esta diseñada para utilizarse con agua regular de la llave. Si su agua es muy dura, puede utilizar una mezcla de 50% de agua de la llave y 50% de agua destilada.
-
Page 20: Resolución De Problemas
RES O LU C IÓN DE P R O B LE MAS PROBLEMA CAUSA POSIBLE SOLUCIÓN La plancha está enchufada pero la Existe un problema con la fuente Verifique que el enchufe esté suela no está calentando. de energía. insertado correctamente en el tomacorriente o trate de enchufar la plancha a un tomacorriente diferente.