
Related Manuals for JVC AV-P960E


Summary of Contents for JVC AV-P960E
- Page 1 DIGITAL PRESENTER MANUEL D’INSTRUCTIONS : PRESENTOIR NUMERIQUE BEDIENUNGSANLEITUNG : DIGITALEN VORFÜHRERS MANUALE DI ISTRUZIONI : DIGITAL PRESENTER AV-P960E INSTRUCTIONS LWT0149-001B-H...
-
Page 2: Safety Precautions
L or coloured RED. WARNING–THIS APPARATUS MUST BE EARTHED Features Thank you for purchasing this JVC product. Before operating this unit, please read these instructions carefully to ensure the best possible performance. These instructions are for AV-P960E. Built-in SD Card Slot... -
Page 3: Table Of Contents
Indicates the page numbers or items to refer to. Contents of this manual ● The copyright of this manual belongs to JVC. Unauthorized reproduction of this manual whether in full or in part is prohibited. ● All product names stated in this manual are trademarks or registered trademarks of their respective companies. -
Page 4: Precautions
Compensation for the shooting contents ● JVC will not be in anyway liable for any failure to take or playback images due to problems arising from this product or the card used, and no compensation will be offered for the loss of contents. -
Page 5: Names And Functions
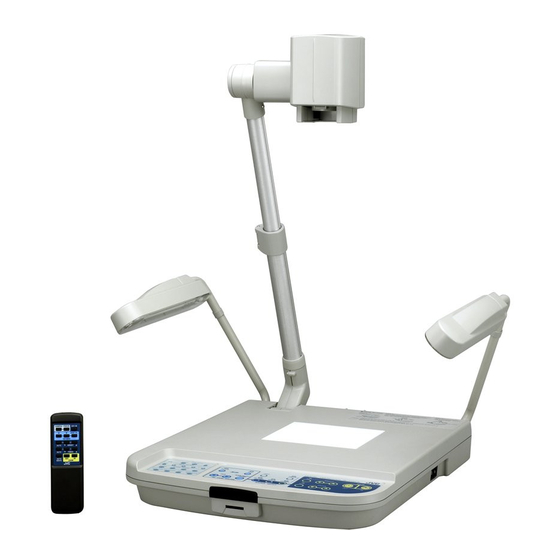
Names and Functions Overall View Rear Panel ☞ Page 7 Right Side Control Panel ☞ Page 6 1 Camera Head 7 Stage For capturing images of objects on the stage or surround- For placing objects (or materials). ing areas. Up to A3 landscape equivalent (376 mm x 282 mm) can be captured. -
Page 6: Control Panel
Names and Functions (continued) Control Panel USER SETUP DEFAULT USER SAVE ZOOM DELETE SAVE LIGHT FREEZE AUTO BRIGHT WHITE BALANCE BLUE AUTO PICTURE MEMORY CAMERA IMAGE SELECT PAGE ENTER SD CARD EXT IN CAMERA AUTO FOCUS NEGA POSI BW COLOUR TEXT MICROSCOPE SD CARD SYSTEM... - Page 7 SD CARD SYSTEM # Button Indicator Lamps 7 ~ 0 are functional only if SD card is inserted into the SD Indicator lamps will blink when button ! ~ * has been Slot. operated and the various settings are in the process of being changed.
-
Page 8: Rear Panel
Names and Functions (continued) Rear Panel Refer to page 10 ‘Connection’ for details on connecting with other devices. Caution Do not open the cover at the bottom of the arm and put your finger or insert object into it. This may cause malfunction or injury. AC IN MONITOR OUTPUT... -
Page 9: Before Using
Before Using Install according to the following steps. Lift up the right illumination Right Illumination Lift up the left illumination Lift up the camera head (camera arm) Left Illumination Hold the camera arm and hold down the unit firmly while slowly lifting the camera head until it reaches its maximum position and stops. -
Page 10: Connection
Connection Install according to the following steps. The [MONITOR OUTPUT] terminal is use to confirm the images. LCD Monitor Computer [MONITOR OUT] [RGB OUT] USB Terminal [USB] Terminal Power Switch Projector Left Illumination [AC IN] (supplied power cord) AC Power The LCD monitor, computer and projector are sold separately. -
Page 11: Presenting Printed Materials
Presenting Printed Materials Up to A3 landscape equivalent (376 mm x 282 mm) printed materials can be captured. Camera Head Adjusting the arm and camera head Adjust the arm and camera head in accordance with the size of the object. ●... -
Page 12: Presenting 3-Dimensional Objects
Presenting 3-dimensional Objects 3-D object placed on the stage can be captured. In addition, by adjusting the angle of the arm, the 3-D object can be captured at various angles. Adjusting the arm and camera head Adjust the arm and camera head in accordance with the size of the object. -
Page 13: Shooting Surrounding Objects
Shooting Surrounding Objects The camera head can be turned to shoot the surrounding objects. Camera Head Turn the camera head towards the object Remove the close-up lens Press and hold the claws while pulling out the lens. Adjusting the image Adjust the zoom, brightness and focus. -
Page 14: Presenting Slide Films
Presenting Slide Films Slide films with frame can be inserted directly into the camera head for presentation. Place a piece of white paper on the stage As the slide film makes use of the reflecting light from the stage surface, place a highly reflective white paper (B4 size or A3 size) on the stage. -
Page 15: Presenting Films And Other Transparent Materials
Presenting Films and Other Transparent Materials Films can be placed on the stage for presentation. Press the [LIGHT] button to turn on the back illumination The lighting source changes whenever the [LIGHT] button is pressed. Side Back illuminations illumination illuminations off Back Place the films and other transparent illumination... -
Page 16: Capturing Images Through A Microscope
Capturing Images Through a Microscope Images from the microscope can be captured by aligning the view piece of the microscope with the camera head. The procedures described below are for using the adaptable microscope ECLIPSE E200 from Nikon. Setting the microscope ●... -
Page 17: Saving Images In The Picture Memory
Saving Images in the Picture Memory Frequently used images can be saved in the picture memory of this unit. Switching between camera images and images from the picture memory is possible while presentation is in progress. Up to 3 images can be saved. Press the [CAMERA] button The camera image is outputted. -
Page 18: Adjusting The White Balance
Adjusting the White Balance Adjusting the White Balance Automatically This unit is adjusted to display the natural colour. However, the white balance can be re-adjusted with the following steps. Place a piece of white paper on the stage Adjusting zoom Adjust till the full screen becomes white. -
Page 19: Saving The Settings (User Setting Registration)
Saving the Settings (User Setting Registration) The recalled settings upon power up or when the [USER] button is pressed can be registered. Registration Adjusting the camera ● Adjust the camera to the settings to be registered. ● The following user settings are possible. ( ) are factory settings. •... -
Page 20: Storing Images In Sd Card
Storing Images in SD Card Images taken can be stored in the SD card (sold separately). Press the [CAMERA] button Insert the SD card ● To remove the SD card, push in the card before removing it from the card slot. Press the [SAVE] button for more than 2 seconds ●... -
Page 21: Viewing Image Data Stored In Sd Card
(Exif Conv.exe)] in the CD-ROM provided with this unit. For details, read JPEG conversion software’s Instruction [Exif Cnv.pdf] in the CD-ROM. (The software [JPEG conversion software (Exif Conv.exe)] can also be downloaded from http://www.jvc-victor.co.jp/english/pro/prodv/down- load/index.html.) ● If SD card image is selected without inserting the card, the output image will turn black. -
Page 22: Connecting To Computer Via The Usb Connector
Connecting to Computer via the USB Connector By connecting to the computer, image data or image memory stored in the SD card as well as image data stored in this unit can be downloaded to the computer. Compatible Computers OS: Windows Me/2000/XP When connecting for the first time With the Windows’... -
Page 23: Operating The Remote Control Unit
Operating the Remote Control Unit The following functions are available with the use of the remote control unit. 1 [CAMERA] To output the camera images. (☞ Page 6 5 [SOURCE SELECT] Buttons) 2 [FREEZE] To make the camera image still. CAMERA FREEZE EXT-IN... -
Page 24: Installing Lcd Monitor
Installing LCD Monitor Connect commercially available LCD monitor to the [MONITOR OUTPUT] terminal. It is convenient for adjusting viewing angle. Mount the LCD monitor mounting bracket (AV-ZK10, sold separately) to LCD monitor the LCD monitor using the screw sup- plied with the bracket. Mount the LCD monitor mounting bracket (AV-ZK10, sold separately) to this unit using the screw supplied with... -
Page 25: Troubleshooting
Troubleshooting When you encounter a problem, check the following points for a solution. If the problem persists, stop using this unit and consult your nearest JVC dealer. Refer to Page Symptoms Verify the following points ● Is the power plug connected to an AC outlet? No image appears. -
Page 26: Specifications
Specifications GENERAL Power requirements AC 100 V to 240 V 50 Hz / 60 Hz Current consumption 0.5 A Mass 5.6 kg (12.3 lbs.) OPTICAL Lens F1.8 to F2.8, f = 5.4 mm to 64.8 mm (12 times) Shooting area Max.: 376 mm x 282 mm (14-4/5"... - Page 27 Dimensions (WHD) (unit: mm) 495 (When folded) 491 (When extended) Specifications and appearance of this unit are subject to change for improvements without prior notice. E-27...
- Page 28 PRESENTOIR NUMERIQUE AV-P960E MANUEL D’ INSTRUCTIONS...
- Page 29 à ses propres frais. Caractéristiques Nous vous remercions de votre achat de ce produit JVC. Pour garantir la performance optimale de l’appareil, prière de lire soigneusement ces instructions avant la mise en marche. Ces instructions sont destinés au modèle AV-P960E.
- Page 30 Indique les numéros de pages ou les éléments à référencer. Sommaire du manuel ● Les droits d’auteur du présent manuel appartiennent à JVC. Toute reproduction du présent manuel, qu’elle soit partielle ou intégrale, est strictement interdite. ● Les noms des produits mentionnés dans le présent manuel sont des marques de commerce ou des marques déposées de leurs sociétés respectives.
-
Page 31: Précautions
Compensation pour le contenu des prises ● JVC ne peut en aucun cas être tenu responsable des échecs de prise ou de lecture d’images survenus suite à des problèmes inhérents à ce produit ou à la carte utilisée. Par ailleurs, aucune compensation n’est offerte pour la perte du contenu. -
Page 32: Noms Et Fonctions
Noms et fonctions Vue d’ensemble Panneau arrière ☞ Page 7 Côté droit Panneau de commande ☞ Page 6 1 Tête de la caméra 7 Stage Pour la capture d’images d’objet sur scène ou dans les envi- Pour l’emplacement d’objets (ou matériaux). rons. -
Page 33: Panneau De Commande
Noms et fonctions (suite) Panneau de commande USER SETUP DEFAULT USER SAVE ZOOM BRIGHT DELETE SAVE LIGHT FREEZE AUTO WHITE BALANCE BLUE AUTO PICTURE MEMORY CAMERA IMAGE SELECT PAGE ENTER SD CARD EXT IN CAMERA AUTO FOCUS NEGA POSI BW COLOUR TEXT MICROSCOPE SD CARD SYSTEM... - Page 34 [SD CARD SYSTEM] SYSTEME DE CARTE SD # Voyants lumineux des boutons 7 ~ 0 ne sont fonctionnels que si la carte SD est insérée dans le Les voyants lumineux clignotent lorsque vous appuyez sur le logement SD. bouton ! ~ * et que divers paramètres sont modifiés. 7 Bouton [IMAGE SELECT/ENTER] pour $ Boutons de réglage [WHITE BALANCE] la sélection d’images...
-
Page 35: Panneau Arrière
Noms et fonctions (suite) Panneau arrière Voir page 10 ‘Connexion’ pour de plus amples informations sur la connexion à d’autres périphériques. Attention N’ouvrez pas le couvercle en bas du bras. Ne placez ni votre doigt ni un objet. Vous risquez d’entraîner un dysfonctionnement de l’appa- reil ou des blessures. -
Page 36: Avant D'utiliser
Avant d’utiliser Procédez à l’installation selon les étapes suivantes. Soulèvement de l’éclairage droit Soulèvement de l’éclairage gauche Eclairage droit Soulèvement de la tête de la caméra Eclairage gauche (bras de la caméra) Tenez le bras de la caméra et maintenez fermement l’appareil tout en soulevant lentement la tête de la caméra jusqu’à... -
Page 37: Connexion
Connexion Procédez à l’installation selon les étapes suivantes. Le terminal [MONITOR OUTPUT] permet de confirmer les images. Moniteur LCD Ordinateur [MONITOR OUT] [RGB OUT] Terminal USB Terminal Interrupteur [USB] d’alimentation Projecteur Eclairage gauche [AC IN] ENTRÉE CA (cordon Alimentation CA d’alimentation fourni) Le moniteur LCD, l’ordinateur et le projecteur sont vendus séparément. -
Page 38: Présentation Des Matériaux Imprimés
Présentation des matériaux imprimés Capture de matériaux imprimés en format équivalent au format paysage A3 (376 x 282 mm). Tête de la caméra Réglage du bras et de la tête de la caméra Réglez le bras et la tête de la caméra en fonction de la taille de Bras l’objet. -
Page 39: Présentation Des Objets 3D
Présentation des objets 3D Un objet 3D placé sur la scène peut être capturé. En outre, si vous réglez l’angle du bras, l’objet 3D peut être capturé à divers angles. Réglage du bras et de la tête de la caméra Réglez le bras et la tête de la caméra en fonction de la taille de l’objet. -
Page 40: Prise D'objets Environnants
Prise d’objets environnants Vous pouvez tourner la tête de la caméra pour prendre les objets environnants. Tête de la caméra Tête de la caméra tournée en direction de l’objet Objectif gros plan enlevé Appuyez sur les pattes que vous maintenez enfoncées tout en tirant sur l’objectif. -
Page 41: Présentation Des Diapositives
Présentation des diapositives Les films de diapositive avec cadre peuvent être insérées directement dans la tête de la caméra pour présentation. Papier blanc placé sur la scène Dans la mesure où le film pour diapositive se sert de la lumière réfléchissante de la surface de la scène, placez un papier blanc réflecteur (taille B4 ou A3) sur la scène. -
Page 42: Présentation De Films Et D'autres Matériaux Transparents
Présentation de films et d’autres matériaux transparents Vous pouvez placer des films sur la scène pour présentation. Bouton [LIGHT] appuyé pour l’activa- tion du rétroéclairage La source d’éclairage change chaque fois que vous appuyez sur le bouton [LIGHT]. Eclairages Tous les éclairages Rétroéclairage latéraux éteints... -
Page 43: Capture D'images Via Un Microscope
Capture d’images via un microscope Vous pouvez capturer les images d’un microscope en alignant le corps binoculaire du microscope à la tête de la caméra. Les procédures décrites ci-dessous concernent l’utilisation d’un microscope adaptable ECLIPSE E200 fabriqué par Nikon. Réglage du microscope ●... -
Page 44: Enregistrement Des Images Dans La Mémoire D'images
Enregistrement des images dans la mémoire d’images Vous pouvez enregistrer les images utilisées fréquemment dans la mémoire d’images de cet appareil. La permutation entre les images de la caméra et celle de la mémoire d’image est possible pendant la présentation. Vous pouvez enregistrer 3 images. Bouton [CAMERA] appuyé... -
Page 45: Réglage De L'équilibre Des Blancs
Réglage de l’équilibre des blancs Réglage automatique de l’équilibre des blancs Vous pouvez régler cet appareil pour qu’il affiche les couleurs naturelles. Toutefois, l’équlibre des blancs peut être réajusté en procédant comme suit. Papier blanc placé sur la scène Réglage du zoom Continuez de régler jusqu’à... -
Page 46: Enregistrement Du Paramétrage (Enregistrement Des Paramètres De L'utilisateur)
Enregistrement du paramétrage (enregistrement des paramètres de l’utilisateur) Les paramétrages rappelés lors de la mise sous tension ou lorsque le bouton [USER] est enfoncé peuvent être enregistrés. Enregistrement Réglage de la caméra ● Ajustez la caméra aux paramètres devant être enregistrés. ●... -
Page 47: Enregistrement D'images Sur La Carte Sd
Enregistrement d’images sur la carte SD Les images prises peuvent être enregistrées sur la carte SD (vendue séparément). Bouton [CAMERA] appuyé Insertion de la carte SD ● Pour enlever la carte SD, appuyez sur la carte pour pouvoir la délo- ger de la fente de la carte. -
Page 48: Visualisation Des Données D'images Enregistrées Sur La Carte Sd
CD-ROM fourni avec cette unité. Pour plus de détails, veuillez lire les instructions relatives au logiciel de conver- sion JPEG [Exif Cnv.pdf] sur le CD-ROM. (Le logiciel [JPEG conversion software (Exif Conv.exe)] peut aussi être téléchargé à partir du site http://www.jvc-victor.co.jp/ english/pro/prodv/download/index.html.) ●... -
Page 49: Connexion D'un Ordinateur Via Le Connecteur Usb
Connexion d’un ordinateur via le connecteur USB Les données d’image ou la mémoire d’images enregistrées sur la carte SD ainsi que les données d’image enregistrées dans cet appareil peuvent être téléchargées vers un ordinateur. Ordinateurs compatibles SE: Windows Me/2000/XP Connexion initiale La capacité... -
Page 50: Utilisation De La Télécommande
Utilisation de la télécommande Les fonctions suivantes sont disponibles avec la télécommande. 1 [CAMERA] Pour sortir les images de la caméra. (☞ Page 6 5 Boutons [SOURCE SELECT]) 2 [FREEZE] Pour geler l’image de la caméra. CAMERA FREEZE EXT-IN (☞ Page 6 4 Bouton [FREEZE]) IMAGE SEL. -
Page 51: Installation Du Moniteur Lcd
Installation du moniteur LCD Connectez le moniteur LCD vendu dans le commerce au terminal [MONITOR OUTPUT]. Pratique pour le réglage de l’angle de visée. Fixez le support de montage (AV-ZK10, vendu séparément) au moniteur LCD avec la vis fournie avec le support. Moniteur LCD Fixez le support de montage du moni- teur LCD (AV-ZK10, vendu séparé-... -
Page 52: Résolution Des Problèmes
Résolution des problèmes Lorsque vous êtes confronté à un problème, vérifiez les points suivants pour trouver une solution. Si le problème persiste, n’utilisez pas l’appareil et consultez votre revendeur JVC. Symptômes Vérifiez les points suivants Voir page ● La fiche est-elle bien branchée dans la prise CA ? Pas d’images affichées. -
Page 53: Caractéristiques Techniques
Caractéristiques techniques GENERALITES Alimentation CA 100 V à 240 V 50 Hz / 60 Hz Consommation électrique 0,5 A Masse 5,6 kg (12,3 lb) OPTIQUE Objectif F1,8 à F2,8, f = 5,4 mm à 64,8 mm (12 fois) Champ de prise de vue Max: 376 x 282 mm (14-4/5 x 11-1/10 po) (format paysage A3 équivalent) Plage réglable de la distance focale De la surface de la scène à... - Page 54 Dimensions (LHP) (unité: mm) 495 (plié) 491 (étendu) Les caractéristiques techniques et le design du produit peuvent être modifiés sans préavis à des fins d’amélioration. F-27...
- Page 55 DIGITALES VORFÜHRGERÄT AV-P960E BEDIENUNGSANLEITUNG...
- Page 56 Merkmale Vielen Dank dafür, dass Sie sich für dieses JVC-Produkt entschieden haben. Bitte lesen Sie diese Dokumentation sorgfältig durch, bevor Sie das Gerät in Betrieb nehmen, denn nur so können Sie seine Leistungsfähigkeit optimal nutzen. Diese Dokumentation bezieht sich auf das Modell AV-P960E.
- Page 57 ☞ Verweist auf Seitenzahlen oder Bedienelemente. Inhalt dieses Handbuchs ● Urheberrecht für dieses Handbuch: JVC. Eine unautorisierte Reproduktion dieses Handbuchs ist auch in Auszügen unter- sagt. ● Alle in diesem Handbuch aufgeführten Produktnamen sind Warenzeichen oder eingetragene Warenzeichen der jeweiligen Unternehmen.
-
Page 58: Vorsichtsmaßnahmen
Haftungsausschluss ● JVC lehnt jede Verantwortung für die misslungene Aufnahme oder Wiedergabe von Bildern aufgrund von Problemen ab, die durch dieses Produkt oder die verwendete Karte entstehen. Eine Haftung für den Verlust von Bilddaten und anderen Inhalten ist ausge- schlossen. -
Page 59: Bedienelemente Und Funktionen
Bedienelemente und Funktionen Gesamtansicht Rückseite ☞ Seite 7 Rechte Seite Bedienfeld ☞ Seite 6 1 Kamerakopf 7 Auflage Zur Aufnahme von Bildern von Objekten auf der Auflage oder Hier werden Objekte (oder Medien) aufgelegt. Umgebungsbereichen. Der Aufnahmebereich entspricht dem A3-Querformat (376 x 282 mm). -
Page 60: Bedienfeld
Bedienelemente und Funktionen (Fortsetzung) Bedienfeld USER SETUP DEFAULT USER SAVE ZOOM DELETE SAVE LIGHT FREEZE AUTO BRIGHT WHITE BALANCE BLUE AUTO PICTURE MEMORY CAMERA IMAGE SELECT PAGE ENTER SD CARD EXT IN CAMERA AUTO FOCUS NEGA POSI BW COLOUR TEXT MICROSCOPE SD CARD SYSTEM SOURCE... - Page 61 Das [SD CARD SYSTEM] SD-Kartensystem # Anzeigelampe Die Bedienelemente 7 bis 0 sind nur bedienbar, wenn eine SD- Die Anzeige blinkt nach Betätigung einer Tasten ! bis *, Karte in den SD-Steckplatz eingelegt ist. während die jeweiligen Einstellungen geändert werden. $ [WHITE BALANCE]-Einstelltasten 7 [IMAGE SELECT/ENTER]-Tasten zur Hiermit stellen Sie verschiedene Parameter in Bezug auf den...
-
Page 62: Rückseite
Bedienelemente und Funktionen (Fortsetzung) Rückseite Informationen zum Anschluss anderer Geräte finden Sie unter der Überschrift ,Anschlie- ßen‘ auf Seite 10. Vorsicht Öffnen Sie niemals die Abdeckung am Fuß des Kameraarms. Führen Sie niemals Ihre Finger oder Gegenstände in diese Öffnung ein. Andernfalls kann dies Fehlfunktionen auslösen, ferner besteht Verletzungsgefahr. -
Page 63: Vor Inbetriebnahme
Vor Inbetriebnahme Stellen Sie die Verbindungen entsprechend den folgenden Anweisungen her. Stellen Sie die rechte Lampe auf Stellen Sie die linke Lampe auf Rechte Lampe Stellen Sie den Kamerakopf (Kamera- Linke Lampe arm) auf Greifen Sie zu diesem Zweck den Kameraarm und halten Sie das Gerät mit der anderen Hand fest, während Sie den Kameraarm langsam aufstellen, bis er seine Maximalstellung erreicht hat. -
Page 64: Anschließen
Anschließen Stellen Sie die Verbindungen entsprechend den folgenden Anweisungen her. Der [MONITOR OUTPUT]-Anschluss dient der Überprüfung der Bilder. LCD Monitor Computer [MONITOR OUT] [RGB OUT] USB-Anschluss [USB]- Anschluss Netzschalter Projektor Linke Lampe [AC IN] Netzkabeleingang (beiliegende Netzkabel) Netzverbindung LCD-Monitor, Computer und Projektor sind separat erhältlich. Schließen Sie den [RGB OUTPUT]- Anschluss an einen Projektor oder ein Anzeigegerät an. -
Page 65: Bedruckte Medien Zeigen
Bedruckte Medien zeigen Der Aufnahmebereich für bedruckte Medien entspricht dem A3-Querformat (376 x 282 mm). Kamerakopf Kameraarm und -kopf einstellen Stellen Sie den Kameraarm und -kopf entsprechend der Größe des Objekts ein. ● Vergewissern Sie sich, dass der Kamerakopf zentral über dem Ob- jekt positioniert ist. -
Page 66: Dreidimensionale Objekte Zeigen
Dreidimensionale Objekte zeigen Räumliche Objekte, die auf der Auflage stehen, können aufgenommen werden. Durch entsprechende Einstellung des Kameraarms lassen sich unterschiedliche Aufnahmewinkel realisieren. Kameraarm und -kopf einstellen Stellen Sie den Kameraarm und -kopf entsprechend der Größe des Objekts ein. ● Vergewissern Sie sich, dass der Kamerakopf zentral über dem Ob- jekt positioniert ist. -
Page 67: Umgebungsobjekte Aufnehmen
Umgebungsobjekte aufnehmen Der Kamerakopf kann gedreht werden, um die Umgebung aufzunehmen. Kamerakopf Kamerakopf in Richtung des Objekts neigen Nahaufnahmeobjektiv entfernen Drücken Sie die Halteklammern zusammen, während Sie das Objektiv herausziehen. Bild einstellen Stellen Sie Zoom, Helligkeit und Bildschärfe ein. Nahaufnahmeobjektiv [BRIGHT]-Taste [ZOOM]- Taste... -
Page 68: Dias Zeigen
Dias zeigen Gerahmte Dias können zur Präsentation direkt in den Kamerakopf eingelegt werden. Ein Blatt Papier auf die Auflage legen Da bei der Diadarstellung das von der Auflage reflektierte Licht genutzt wird, legen Sie ein Blatt stark reflektierenden Papiers (Größe B4 oder A3) auf die Auflage. Seitenlampen einstellen Stellen Sie die Lampen so ein, dass die Auflage gleichmäßig ausgeleuchtet ist. -
Page 69: Filme Und Andere Transparente Medien Zeigen
Filme und andere transparente Medien zeigen Sie können Filme zur Präsentation auf die Auflage legen. Betätigen Sie die [LIGHT]-Taste, um die Hintergrundlampe einzuschalten Bei jeder Betätigung der [LIGHT]-Taste wird zwischen den Lichtquel- len umgeschaltet. Alle Lampen Seitenlampen Hintergrundlampe Hintergrundlampe Legen Sie Filme oder andere transpa- rente Medien auf die Auflage Legen Sie den Film in die Mitte der Auflage und platzieren Sie den Kamerakopf direkt über dem Film. -
Page 70: Bilder Durch Ein Mikroskop Aufnehmen
Bilder durch ein Mikroskop aufnehmen Ein vergrößertes Mikroskopbild kann aufgenommen werden, indem das Okular des Mikroskops und der Kamerakopf aufeinander ausge- richtet werden. Die nachfolgend beschriebenen Bedienschritte beziehen sich auf das montierbare Mikroskop ECLIPSE E200, welches von der Firma Nikon hergestellt wird. Stellen Sie das Mikroskop ein ●... -
Page 71: Bilder Im Bildspeicher Sichern
Bilder im Bildspeicher sichern Häufig benutzte Bilder können im Bildspeicher dieses Geräts abgelegt werden. Zwischen den Bildern im Bildspeicher und dem Kamerabild kann während einer Präsentation umgeschaltet werden. Es lassen sich bis zu drei Bilder abspeichern. Betätigen Sie die [CAMERA]-Taste Das Kamerabild wird ausgegeben. -
Page 72: Weißabgleich Einstellen
Weißabgleich einstellen Automatische Einstellung des Weißabgleichs Das Gerät ist so eingestellt, dass die Farben natürlich wiedergegeben werden. Der Weißabgleich lässt sich allerdings einstellen. Gehen Sie dazu wie folgt vor: Legen Sie ein Blatt Papier auf die Auf- lage Zoom einstellen Stellen Sie den Zoom so ein, dass der gesamte Bildschirm weiß... -
Page 73: Einstellungen Speichern (Benutzereinstellungen Registrieren)
Einstellungen speichern (Benutzereinstellungen registrieren) Die Einstellungen des Geräts nach dem Einschalten oder nach Betätigung der [USER]-Taste können gespeichert werden. Einstellungen speichern Kamera einstellen ● Nehmen Sie die gewünschten Einstellungen an der Kamera vor. ● Die nachfolgend genannten Parameterwerte können gespeichert werden. -
Page 74: Bilder Auf Der Sd-Karte Speichern
Bilder auf der SD-Karte speichern Aufgenommene Bilder können auf einer SD-Karte (optional erhältlich) abgelegt werden. Drücken Sie auf die Taste [CAMERA] Führen Sie die SD-Karte ein ● Um die SD-Karte zu entnehmen, drücken Sie sie kurz in das Gerät hinein, um sie zu entsperren, bevor Sie sie herausziehen. Drücken Sie die Taste [SAVE] für mindestens zwei Sekunden ●... -
Page 75: Auf Der Sd-Karte Gespeicherte Bilddaten Anzeigen
CD-ROM zu verwenden. Weitere Informationen finden Sie in der Anleitung zur JPEG- Konvertierungssoftware [Exif Cnv.pdf] auf der CD-ROM. (Die Software kann auch im Internet unter http://www.jvc-victor.co.jp/english/pro/prodv/download/index.html herunter- geladen werden.) ● Wenn Sie die SD-Karte aufzurufen versuchen, ohne dass tatsächlich eine Karte in den Steckplatz eingeführt ist, wird ein schwarzes Ausgabebild angezeigt. -
Page 76: Computer Über Usb Anschließen
Computer über USB anschließen Wenn Sie einen Computer an das System anschließen, können Sie Bilddaten, die auf der SD-Karte oder im Gerät selbst gespeichert sind, zu diesem übertragen. Kompatible Computer Betriebssystem: Windows ME/2000/XP Hinweis zum ersten Anschlussvorgang Dank der Plug & Play-Funktionalität von Windows wird das Gerät vom Computer erkannt, und der hierfür benötigte Treiber wird automatisch installiert. -
Page 77: Fernbedienung Benutzen
Fernbedienung benutzen Die Fernbedienung bietet die nachfolgend beschriebenen Funktionen. 1 [CAMERA] Zeigt das Kamerabildes an. (☞ Seite 6 5 [SOURCE SELECT]-Taste) 2 [FREEZE] Friert das Kamerabild ein. CAMERA FREEZE EXT-IN (☞ Seite 6 4 [FREEZE]-Taste) IMAGE SEL. 3 [EXT-IN] SD CARD Gibt die Bildsignale aus, die am [EXT INPUT]-Anschluss anliegen. -
Page 78: Lcd-Monitor Installieren
LCD-Monitor installieren Sie können einen handelsüblichen LCD-Monitor an den [MONITOR OUTPUT]-Ausgang anschließen. Der Neigungswinkel lässt sich ein- stellen. Montieren Sie die LCD Monitorhalterung AV-ZK10 (optional erhältlich) mithilfe der der Halterung beiliegenden Schraube an LCD-Monitor den LCD-Monitor. Montieren Sie die Halterung für den LCD-Monitor AV-ZK10 (optional erhält- lich) mithilfe der der Halterung beilie- genden Schraube an dieses Gerät. -
Page 79: Problembehebung
Problembehebung Wenn ein Problem auftritt, überprüfen Sie zunächst die folgende Liste. Sollte das Problem fortbestehen, dann beenden Sie die Verwen- dung des Geräts und wenden Sie sich an Ihren JVC-Fachhändler. Symptome Lösungsvorschläge Siehe Seite ● Ist das Netzkabel an eine Netzsteckdose angeschlossen? Es erscheint kein Bild. -
Page 80: Technische Daten
Technische Daten ALLGEMEIN Stromversorgung 100 V bis 240 VAC, 50/60 Hz Leistungsaufnahme 0,5 A Gewicht 5,6 kg OPTISCH Objektiv F1.8 bis F2.8; f = 5,4 bis 64,8 mm (12-fach) Aufnahmebereich 376 x 282 mm (entspricht A3-Querformat) maximal Einstellbereich Fokussierung Von der Auflagenoberfläche bis zu einer Höhe von 50 mm darüber (Kamera direkt nach unten gerichtet, mit Nahaufnahmeobjektiv) ∞... - Page 81 Abmessungen (B x H x T) (Einheit: mm) 495 (zusammengelegt) 491 (ausgezogen) Technische Daten und äußeres Erscheinungsbild dieses Geräts können im Sinne technischer Verbesserung jederzeit ohne Vorankündigung geändert werden. G-27...
- Page 82 DIGITAL PRESENTER AV-P960E MANUALE DI ISTRUZIONI...
-
Page 83: Precauzioni Di Sicurezza
Caratteristiche Grazie per aver acquistato un prodotto JVC. Per ottenere le migliori prestazioni possibili, prima di utilizzare il prodotto, si raccomanda di leggere attentamente queste istruzioni. Le presenti istruzioni sono per il prodotto AV-P960E. -
Page 84: Indice
Indica i numeri di pagina o le voci a cui si fa riferimento. Contenuto del presente manuale ● I diritti di copyright di questo manuale appartengono alla JVC. È vietata qualsiasi riproduzione di questo manuale, tutto o in parte. ● Tutti i nomi di prodotti contenuti in questo manuale sono marchi commerciali o marchi registrati dai rispettivi titolari. I marchi come ™,... -
Page 85: Precauzioni
Indennizzi per la perdita dei contenuti ● La JVC non è in alcun modo responsabile per la mancata registrazione o riproduzione di immagini a causa di problemi correlati a questo prodotto o alla scheda usata e pertanto non sarà offerto alcun indennizzo per la perdita dei contenuti. -
Page 86: Nomi E Funzioni
Nomi e funzioni Prodotto completo Pannello posteriore ☞ Pagina 7 Lato destro Pannello di controllo ☞ Pagina 6 1 Telecamera 7 Area di ripresa Serve a catturare le immagini di oggetti poggiati sull’area di Per l’appoggio di oggetti (o materiale) da riprendere. ripresa o nell’area circostante. -
Page 87: Pannello Di Controllo
Nomi e funzioni (seguito) Pannello di controllo USER SETUP DEFAULT USER SAVE ZOOM BRIGHT DELETE SAVE LIGHT FREEZE AUTO WHITE BALANCE BLUE AUTO PICTURE MEMORY CAMERA IMAGE SELECT PAGE ENTER SD CARD EXT IN CAMERA AUTO FOCUS NEGA POSI BW COLOUR TEXT MICROSCOPE SD CARD SYSTEM... - Page 88 [SD CARD SYSTEM] SISTEMA A SCHEDA SD # Spie luminose I tasti 7 ~ 0 funzionano soltanto quando la scheda è inserita nello Le spie luminose lampeggiano quando vengono premuti i ta- slot SD. sti ! ~ * e durante la modifica delle varie impostazioni. 7 Tasto [IMAGE SELECT/ENTER] di sele- $ Tasti di regolazione [WHITE BALANCE] Per regolare le impostazioni relative al bilanciamento del bian-...
-
Page 89: Pannello Posteriore
Nomi e funzioni (seguito) Pannello posteriore Per informazioni dettagliate sulla connessione ad altri dispositivi, vedere ‘Connessione’ a pagina 10. Attenzione Non aprire il coperchio situato sotto il braccio, né inserirvi le dita o altri oggetti, altrimenti si potrebbero causare malfunzionamenti o subi- re lesioni. -
Page 90: Prima Dell'uso
Prima dell’uso Per l’installazione, osservare la procedura seguente. Sollevare la luce destra Luce destra Sollevare la luce sinistra Sollevare la telecamera (il braccio del- Luce sinistra la telecamera) Reggendo il braccio della telecamera, afferrare saldamente l’appa- recchio e sollevare la telecamera fino a che raggiunga la posizione più... -
Page 91: Connessione
Connessione Per l’installazione, osservare la procedura seguente. Il connettore [MONITOR OUTPUT] serve per la conferma delle immagini. Monitor LCD Computer [MONITOR OUT] [RGB OUT] Connettore USB Connettore Interruttore di [USB] alimentazione Proiettore Luce sinistra [AC IN] (cavo fornito di Alimentazione c.a. alimentazione) Il monitor LCD, il computer e il proiettore sono venduti separatamente. -
Page 92: Presentazione Di Stampati
Presentazione di stampati È possibile catturare stampati di dimensioni equivalenti al formato A3 orizzontale (376 mm x 282 mm). Telecamera Regolare il braccio e la telecamera Regolare il braccio e la telecamera in relazione alle dimensioni dell’oggetto da riprendere. ● Assicurarsi che la telecamera sia posizionata al centro dell’oggetto. Braccio ●... -
Page 93: Presentazione Di Oggetti Tridimensionali
Presentazione di oggetti tridimensionali È possibile catturare oggetti tridimensionali poggiati sull’area di ripresa. Inoltre, regolando l’angolazione del braccio, si possono catturare gli oggetti tridimensionali a varie angolazioni. Regolare il braccio e la telecamera Regolare il braccio e la telecamera in relazione alle dimensioni dell’oggetto da riprendere. -
Page 94: Ripresa Di Oggetti Circostanti
Ripresa di oggetti circostanti La telecamera può essere ruotata come necessario per riprendere gli oggetti circostanti. Telecamera Ruotare la telecamera verso l’oggetto da riprendere Rimuovere l’obiettivo per primi piani Per estrarre l’obiettivo, tenere premute le graffette. Regolare l’immagine Regolare lo zoom, la luminosità e la messa a fuoco. Obiettivo per primi piani Tasto [BRIGHT] Tasto [ZOOM]... -
Page 95: Presentazione Di Diapositive
Presentazione di diapositive Le diapositive con cornice possono essere inserite direttamente nella telecamera per le presentazioni. Poggiare un foglio di carta bianco sull’area di ripresa Poiché la pellicola utilizza la luce riflettente dell’area di ripresa, occorre posizionare un foglio di carta bianca altamente riflettente (formato B4 o A3) sull’area di ripresa. -
Page 96: Presentazione Di Pellicole E Trasparenze
Presentazione di pellicole e trasparenze Le pellicole possono essere collocate sul piano di visualizzazione per le presentazioni. Premere il tasto [LIGHT] per accende- re la retroilluminazione La fonte luminosa cambia ogni volta che viene premuto il tasto [LIGHT]. Tutte le fonti Luci laterali Retroilluminazione luminose spente... -
Page 97: Cattura Di Immagini Mediante Un Microscopio
Cattura di immagini mediante un microscopio Le immagini visualizzate al microscopio possono essere catturate allineando l’oculare del microscopio con la telecamera. Le procedure sotto descritte sono per l’uso del microscopio regolabile ECLIPSE E200 prodotto dalla Nikon. Impostazione del microscopio ● Preparare il microscopio alla visualizzazione delle immagini (ad esempio, regolare il fuoco). -
Page 98: Salvataggio Di Immagini Nella Memoria Immagini
Salvataggio di immagini nella memoria immagini Le immagini usate di frequente possono essere memorizzate nella memoria immagini dell’apparecchio. È possibile effettuare il passaggio dalle immagini della telecamera alle immagini della memoria nel corso di una presentazione. Si possono memorizzare fino a 3 immagini. Premere il tasto [CAMERA] Inizierà... -
Page 99: Bilanciamento Del Bianco
Bilanciamento del bianco Bilanciamento automatico del bianco Questo apparecchio è regolato in modo da visualizzare il colore naturale. Tuttavia, si può eseguire un bilanciamento del bianco osservando la seguente procedura. Poggiare un foglio di carta bianco sull’area di ripresa Regolare lo zoom Regolare fino a che tutto lo schermo diventi bianco. -
Page 100: Salvataggio Delle Impostazioni (Registrazione Delle Impostazioni Selezionate Dall'utente)
Salvataggio delle impostazioni (registrazione delle impostazioni selezionate dall’utente) Le impostazioni richiamate all’accensione o quando viene premuto il tasto [USER] possono essere memorizzate. Registrazione Regolare la telecamera ● Regolare la telecamera sulle impostazioni da memorizzare. ● Le seguenti impostazioni sono regolabili dall’utente. Le impostazioni tra ( ) sono predefinite. -
Page 101: Memorizzazione Di Immagini Sulla Scheda Sd
Memorizzazione di immagini sulla scheda SD Le immagini catturate possono essere memorizzate sulla scheda SD (venduta separatamente). Premere il tasto [CAMERA] Inserire la scheda SD ● Per estrarre la scheda SD, spingerla verso l’interno prima di rimuo- verla dallo slot. Premere il tasto [SAVE] per oltre 2 secondi ●... -
Page 102: Visualizzazione Delle Immagini Memorizzate Sulla Scheda Sd
[JPEG conversion software (Exif Conv.exe)] presente sul CD- ROM fornito. Per maggiori dettagli leggere le instruzioni del software di conversione JPEG [Exif Cnv.pdf] nel CD-ROM. (Il software [JPEG conversion software (Exif Conv.exe)] può anche essere scaricato da http://www.jvc-victor.co.jp/english/ pro/prodv/download/index.html.) ●... -
Page 103: Collegamento A Un Computer Mediante Connettore Usb
Collegamento a un computer mediante connettore USB Collegando la lavagna luminosa a un computer, è possibile trasferire al computer le immagini o la memoria immagini memorizzate nella scheda SD, nonché le immagini memorizzate nella lavagna. Computer compatibili Sistemi operativi: Windows Me/2000/XP Se si collega la lavagna al computer per la prima volta Grazie alla funzione ’plug and play’... -
Page 104: Utilizzo Del Telecomando
Utilizzo del telecomando Tramite il telecomando si possono usare le seguenti funzioni. 1 [CAMERA] Per l’output delle immagini della telecamera. (☞ Pagina 6 5 tasti [SOURCE SELECT]) 2 [FREEZE] Perché l’immagine della telecamera sia fissa. CAMERA FREEZE EXT-IN (☞ Pagina 6 4 tasti [FREEZE]) IMAGE SEL. -
Page 105: Installazione Del Monitor Lcd
Installazione del monitor LCD Collegare un monitor LCD disponibile in commercio al connettore [MONITOR OUTPUT]. Il monitor facilita la regolazione dell’angolo di visualizzazione. Installare la staffa di montaggio (AV- ZK10, venduta separatamente) sul monitor LCD usando la vite fornita in Monitor LCD dotazione. -
Page 106: Diagnostica
Diagnostica Se si verifica un problema, effettuare i seguenti controlli per individuare la soluzione. Se il problema persiste, non continuare a usare l’apparecchio e rivolgersi al rivenditore JVC più vicino. Sintomo Effettuare le seguenti verifiche Vedere pagina ● ll cavo di alimentazione è collegato a una presa c.a.? Immagine assente. -
Page 107: Dati Tecnici
Dati tecnici GENERALI Requisiti di alimentazione c.a. 100 V a 240 V 50 Hz / 60 Hz Consumo di corrente 0.5 A Massa 5.6 kg (12.3 lbs.) OTTICA Obiettivo F1.8 a F2.8, f = 5.4 mm to 64.8 mm (12 volte) Campo di ripresa Max.: 376 mm x 282 mm (14-4/5"... - Page 108 Dimensioni (LHP) (apparecchio: mm) 495 (chiuso) 491 (aperto) I dati tecnici e il design di questo apparecchio sono soggetti a modifiche e miglioramenti senza preavviso. I-27...
- Page 109 ® ® is a registered trademark owned by Victor Company of Japan, Limited. ® is a registered trademark in Japan, the U.S.A., the U.K. and many other countries. Printed in Thailand LWT0149-001B-H © 2004 Victor Company of Japan, Limited...