Quick Links
SPC729 Bluetooth Alarm Clock Radio with USB Port
Instruction Manual & Warranty
Thank you for your purchase of this quality clock. The utmost care has gone into the design and
manufacture of your clock. Please read these instructions and store them in a safe place for future
reference.
1 2 3
4 5 6 7 8
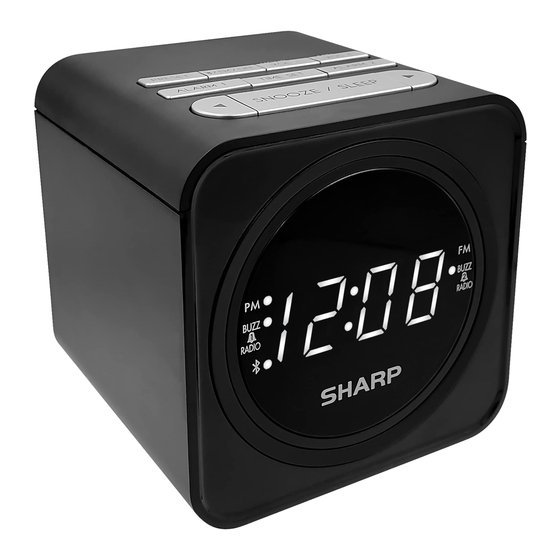
1. PM indicator
9. SNOOZE/SLEEP button
2. Alarm 1 indicator
10. TUNING >button
3. Bluetooth indicator
11. TIME SET button
4. Alarm 2 indicator
12. ALARM 2 button
5. FM indicator
13. MIN/VOL+ button
6.
/FM/OFF button
14. HOUR/VOL- button
7. ALARM 1 button
15. USB charging port
8. TUNING < button
16. DC 5V jack
CONNECTING TO THE POWER SUPPLY
Begin by plugging in the AC adapter into a standard household outlet and the other end of the cord into
the DC 5V jack at the back of the unit.
INSTALLING THE CLOCK & ALARM BACK UP BATTERIES
The clock time and alarm (if set) can be maintained during a power failure by 2 x AAA/ LR03 batteries (not
supplied). Once the power is restored, check the time to make sure it is accurate and re-set if necessary.
INSERTING THE BATTERIES
1. Open the battery compartment at the back of the unit by pressing on the catch and removing the cover.
2. Insert 2 x AAA/ LR03 batteries (preferably alkaline batteries) into the battery compartment, following
the polarity as shown on the diagram inside the compartment.
3. Replace the battery compartment cover.
USB CHARGING
To charge, connect your USB device to the USB port of this clock.
Note:
1. Use only with devices that require 5V USB power.
2. Each USB port provides 2,000mA recharging current. Devices requiring more than 2,000mA should not
be used.
3. Charging time may vary for different devices.
SETTING THE CLOCK
1. While the radio is off, press and hold the TIME SET button to activate time setting.
2. While holding down the TIME SET button, press the HOUR button to advance to the correct hour. The
PM indicator will light when the hour is advanced into the PM time.
.
9
10
12
14
15 16
11
13
3. While holding down the TIME SET button, press the MIN button to advance to the correct minute.
4. Release the TIME SET button when the correct time is shown on the display
SETTING THE ALARM
1. To set the alarm time, follow steps (1) to (4) above, using ALARM1/2 button, instead of the TIME SET
button
USING THE ALARM FUNCTION
1. Press the ALARM 1/2 button to select wake to beep or radio, and the selected alarm mode will light
up.
2. The beep or radio will come on at the set time.
3. To stop the alarm, press
/FM/OFF or ALARM 1/2 button and the alarm will sound again the next day.
4. To turn the alarm off completely, press the ALARM 1/2 button until the alarm indicator has
disappeared from front display.
Note: While the beep alarm volume is fixed and cannot be adjusted, the radio alarm volume can be
adjusted to your desired level using the VOLUME buttons. To select a radio station to wake up to, see
the section on "LISTENING TO THE RADIO".
SNOOZE FUNCTION
Pressing the SNOOZE button after the alarm sounds will cause the alarm to pause and the alarm will
sound again in 9 minutes. This will happen each time the SNOOZE button is pressed.
SLEEP FUNCTION
With this function, you can listen to the radio for up to 60 minutes, after which it will turn off automatically.
1. When the radio is turned on, press the SLEEP button repeatedly to select the duration: 60, 45, 30, 15,
05 minutes or OFF.
2. At the end of the set time, the radio turns off automatically.
3. To cancel the sleep function before the end of the set time, press the
the radio immediately.
LISTENING TO THE RADIO
1. Press the
/FM/OFF button to select the FM mode.
2. Press and hold the buttons to start automatic tuning up/down. Release the button when
the unit is receiving a station you would like to listen to. For manual fine-tuning, you can press it
briefly to adjust the frequency step by step.
3. Press the VOLUME +/- buttons to adjust the volume level.
4. Press the
/FM/OFF button to turn off the radio.
For optimum reception
In FM mode, extend and position the FM antenna to achieve optimum reception.
PRESET RADIO STATIONS
You can store up to 10 stations.
1. Use the buttons to search for a station. Press and hold the PRESET button to store the
station and a number to be assigned for the preset will flash.
Optional: Use the buttons to change the preset number to an alternative preset number.
2. Press the PRESET button again to confirm the preset.
3. Repeat steps (1) to (2) above to store other stations.
Listening to a preset station
While listening to the radio, press the PRESET button to select a preset station.
USING BLUETOOTH FUNCTION
1. Press the
/FM/OFF
button to enter Bluetooth mode and the Bluetooth indicator will flash.
When pairing, remain within 3 feet of the unit.
2. Using the native controls on your Bluetooth device, select the "SPC729" in your Bluetooth settings to
pair.
3. When successfully paired and connected, the Bluetooth indicator will light up.
4. Use the native controls on the connected Bluetooth device to select a track.
5. To play, skip or pause the track, use the native controls on the connected Bluetooth device.
6. Audio played through the connected Bluetooth device will now be heard through the speakers.
7. To adjust the volume, press the VOLUME +/- button on the alarm clock.
/FM/OFF button to turn off

Summary of Contents for Sharp SPC729
- Page 1 1. Use only with devices that require 5V USB power. 2. Using the native controls on your Bluetooth device, select the “SPC729” in your Bluetooth settings to 2. Each USB port provides 2,000mA recharging current. Devices requiring more than 2,000mA should not pair.
- Page 2 21. WARNING: The mains plug or appliance coupler is used as disconnect device, the disconnect device shall remain readily operable. This equipment is a Class II or double insulated electrical appliance. It has been designed in such a way that it does not require a safety connection to electrical SPC729 earth.