Philips EasyKey 5100 User Manual
Hide thumbs
Also See for EasyKey 5100:
- User manual (15 pages) ,
- User manual (24 pages) ,
- User manual (24 pages)
Table of Contents
Chapters
Table of Contents

Related Manuals for Philips EasyKey 5100


Summary of Contents for Philips EasyKey 5100
-
Page 3: Table Of Contents
目录 1 重要信息 5 如何使用易锁 开启 安全 警告 室外开锁 旧产品和电池的处理 -密码开启 -指纹开启 -卡片开启 2 安装您的易锁 室内开锁 产品清单 -旋扭开门 安装立体装配图 -按键开门 安装前须知 安装步骤 上锁 自动/手动模式 -室外上锁 3 了解您的易锁 -室内上锁 外面板 内面板 4 如何设置您的易锁 6 其他功能 设置前须知 恢复出厂设置 安全模式下, 如何设置易锁 一键静音功能 布防功能 -修改管理密码... -
Page 4: 重要信息
1 重要信息 安全 警告 ◆ 在使用易锁前, 请阅读并理解所有说明。 ◆不要将电池靠近火源, 以免发生爆炸 因 未 遵守 说 明 而 造 成 的 损 坏 不 在 保 修 范 围 内。 ◆请勿使用不符合安全规定的紧急电源给产 品供电 ◆建议使用制造商指定的附件/配件 ◆请 勿用 金 属 物 将 电 池引线 的 两 极 连 接 短 ◆仅使用本产品配置的碱性电池... -
Page 5: 安装您的易锁
2 安装您的易锁 产品清单 本产品清单仅供参考, 一切以实物包装内容为准。 ①外面板含硅胶垫 ②内面板含硅胶垫 ③侧扣板组件 EasyKey易锁 User Manual ④百洁布 ⑤固定板 ⑥用户手册 EasyKey易锁 Warranty Card EasyKey易锁 Quick Start EasyKey易锁 Guide 合格证 ⑦快速入门指南 ⑧保修卡 ⑨合格证 ⑩智能门卡x2 ⑪安装配件包 ⑫电池... - Page 6 安装立体装配图 1. 外面板(1套) 4. 后壳塑料垫(1个) 7. 内面板(1套) 2. 外面板硅胶垫(1个) 5. 固定板(1个) 8. M4X6沉头螺钉(4个) 3. 内面板硅胶垫(1个) 6. M5平头螺钉 (3个) 9.电池盒盖(1个)...
- Page 7 安装前须知 第一步|安装前确认开门方向 本智能锁产品适用于左外拉, 右内推, 右外拉, 左内推四种开向的门。 左开门 右开门 室内 室内 左内推 右内推 室外 室外 室内 室内 左外拉 右外拉 室外 室外 第二步| 了解后面板不同门向的安装效果 左开门 右开门 左开门 右开门 第三步|根据门向选择正确的开孔模版, 并开好孔 门边 左开门 右开门...
- Page 8 安装步骤 以下安装步骤说明, 适用于左开门。 如果是右开门, 后面板需要倒置过来。 侧扣板组件, 请根据门的实际情况选择合适的安装方式。 将前面板的连接线穿过门孔。 装上固定板, 固定好螺丝。 将 前 面 板 连 接 线 插 到 装上后面板, 固定好螺丝。 装上侧扣板, 固定好螺丝。 后面板上。 注意 请务必将多出的连接线藏于门孔内。...
-
Page 9: 了解您的易锁
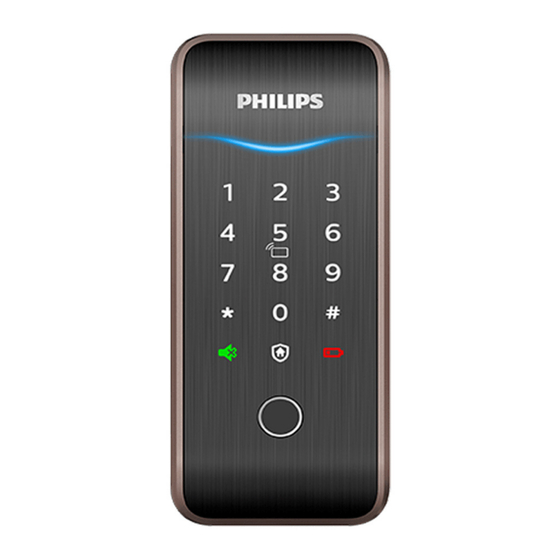
3 了解您的易锁 外面板 门锁状态提示灯 数字键盘区 卡片识别区 指纹传感器 紧急电源接口 低电量提示灯 布防键 静音按键 内面板 插舌 主锁舌 电池盖 自动/手动模式拨动开关 设置键 旋钮 开/关门按键... -
Page 10: 如何设置您的易锁
4 如何设置您的易锁 设置前须知 ◆易锁的系统模式分为 安全模式与一般模式, 出厂默认的系统模式为安全模式。 ◆安全模式与一般模式区别 安全模式 一般模式 管理密码 有 无 初始管理密码: 12345678 用户密码 10组 1组 6-12位 4-12位 有编号 “00-09” 无编号 进入管理模式的方式 通过输入管理密码 通过输入用户密码 一次性用户密码 1组 1组 访客密码 无 1组 指纹数量 100枚 100枚 有编号 “00-99” 无编号 智能卡数量 100张 100张 有编号... -
Page 11: 安全模式下, 如何设置易锁
◆图标注释 安全模式下, 如何设置易锁 修改管理密码 管理密码 一次性用 访客密码 户密码 按下设置键【s】 , 输入管理密码后, 按#确认。 用户密码 用户编号 用户编号 00-09 00-99 按【1】选择修改管理密码。 输入指纹 输入卡片 设置键 输入新的管理密码, 按【#】确认, 再次输入管理密 # 号键 码, 按【#】确认。语音提示设 置 成 功后, 按设 置键 【s】退出设置。 注意 1.进入管理模式必须在门锁开着的状态下。 2.开始设置及结束设置必须按【S】键, 以免误操作。 用户设置 3.进入菜单操作流程时, 如需返回上一级菜单, 请按 【*】键。... - Page 12 添加用户指纹 添加一次性用户密码 按下设置键【s】 , 输入管理密码后, 按#确认。 按下设置键【s】 , 输入管理密码后, 按#确认。 按 【2】 进入用户设置, 再按 【2】 进入添加用户指纹。 按【2】进入用户设置, 再按【4】进入添加一次性用 户密码 输入2位用户编号 ( 编号范围: 00-99 ) , 按 【 # 】 确认。 输入6~12位一次性用户密码, 按【#】确认, 再次 输入一次性用户密码, 按【#】确认。 语音提示添 加成功后, 按设置键【s】退出设置。 用户删除 将手指按压在指纹采集器上, 待听到语音提示 “ 请拿开手指,...
- Page 13 按 【 3】 进入删除用户, 再按 【4 】 进入删除一次性用户 密码。 按 【 3 】 进入删除用户, 再按 【2】 进入删除用户指纹。 输入管理密码, 按【#】确认。 语音提示删除成功 后, 按设置键【s】退出设置。 输入需要删除指纹信息的用户的2位【用户编号】 (编号范围: 00~99) , 按【#】确认。 语音提示删 全部删除 除成功后, 按设置键【s】退出设置。 注意 在语音提示输入用户编号时, 输入管理密码, 可 以删除全部用户指纹。 按住设置键【s】 , 输入管理密码后, 按#确认。 删除用户卡片...
-
Page 14: 一般模式下, 如何设置易锁
扩展功能 音量设置 按下设置键【s】 , 输入管理密码后, 按#确认。 按下设置键【s】 , 输入管理密码后, 按#确认。 按 【 4 】 进入系统设置, 再按 【 2 】 进入音量设置。 按【5】进入扩展功能。 或 或 或 选择您需要的音量: 静音模式请按【1】; 低音量 加入网络, 请按【1】; 退出网络, 请按【2】。扩展 请按【2】; 高音量请按【3】。 语音提示设置成功 功能设置前, 请下载和打开手机APP【飞利浦智 后, 按设置键【s】退出设置。 能锁】 , 并开启手机蓝牙通讯。 注意... - Page 15 修改用户密码 按下设置键【s】 , 输入用户密码后, 按#确认。 按 【 1 】 进入用户设置, 再按 【 3 】 进入添加用户卡片。 按下设置键【s】 , 输入用户密码后, 按#确认。 将卡片靠近卡片识别区, 直到 “嘀” 声响。 语音 按 【 1 】 进入用户设置, 再按 【 1 】 进入修改用户密码。 提示添加成功后, 按设置键【s】退出设置。 添加一次性用户密码 输入新的用户密码, 按【#】确认; 再次输入用户 密码,...
- Page 16 输入4-12位【访客密码】后, 按【#】确认。再次 输入用户密码, 按【#】确认。 语音提示删除成功 输入【访客密码】, 按【#】确认。 语音提示添加成 后, 按设置键【s】退出设置。 功后, 按设置键【s】退出设置。 注意 删除一次性用户密码 一般模式下, 您可以添加访客密码, 在删除访客 密码前, 该密码可一直作为出入密码使用, 但不具 有进入管理模式的权限。 用户删除 按下设置键【s】 , 输入用户密码后, 按#确认。 删除全部用户指纹 按 【2】 进入用户删除, 再按 【 3】 进入删除一次性用户 密码。 按下设置键【s】 , 输入用户密码后, 按#确认。 输入用户密码, 按【#】确认。 语音提示删除成功 后,...
- Page 17 全部删除 按【 3 】进入系统设置, 再按【2】进入语音设置。 按下设置键【s】 , 输入用户密码后, 按#确认。 或 或 选择您需要的音量: 静音模式, 请按【1】; 低音 量, 请按【2】; 高音量, 请按【3】。 语音提示设置 成功后, 按设置键【s】退出设置。 按 【 2 】 进入用户删除, 再按 【 5 】 进入删除全部用户信息。 语言设置 输入用户密码, 按【#】确认。 语音提示删除成功 后, 按设置键【s】退出设置。 按下设置键【s】 , 输入用户密码后, 按#确认。 系统设置...
-
Page 18: 如何使用易锁
5 如何使用易锁 开启|室外开锁 密码开门 指纹开门 卡片开门 输 入 密 卡 码 片 触 识 摸 指 别 式 纹 区 键 识 盘 别 区 区 触 摸 数 字 键 区 域,唤 醒 直接将已经添加指纹的手指放 将已经添加的卡片以正确的方 系 统。 到指纹传感器上。 式放在卡片识别区。 在数字键区输入已添加的... - Page 19 上锁| 自动/手动模式 【A】档表示自动模式: 关门后, 方舌自动打出, 门处于锁定状态。 【M】档表示手动模式: 关门后, 方舌不打出, 门 自动/手动 处于常开状态。 拨动开关位置 室外上锁 当门锁处于自动模式下, 关门后, 方舌自动打出实现上锁, 语音提示已关门。 当门锁处于手动模式下, 关门后, 方舌不打出。 需要验证用户指纹或密码或卡, 才能打出方舌上锁。 上锁成功后, 语音提示已关门。 室内上锁 当门锁处于自动模式下, 关门后, 方舌自动打出实现上锁, 语音提示已关门。 当门锁处于手动模式下, 关门后, 方舌不打出。 需要点按开/关门 按键, 才能打出方舌上锁。 上锁成功后, 语音提示已关门。 当门锁处于手动模式下, 关门后, 方舌不打出。 需要扭动旋钮至 红色刻度处(如左图所示)...
-
Page 20: 其他功能
6 其他功能 恢复出厂设置, 一键回到初始状态 功能: 清空所有用户信息, 恢复到出厂状态。 使用: 长按恢复出厂设置键【RES】5秒, 门锁系统内的所 有信息将被清空, 恢复到出厂设置状态。 一键静音功能 功能: 可一键快捷启用静音模式, 开门时屏蔽掉语音提 示, 适用于不打扰家人休息的场景。 使用: 1 .语 音 切 换 为 静 音:系 统 唤 醒 情 况 下, 长 按【静 音 键】2秒, 进入一次性静音模式, 呈现绿色灯光。 2.静音切换为语音: 系统唤醒情况下, 长按【临时语 音切换键】2秒,... - Page 21 布防功能 功能: 门锁一旦从室内开启, 将触发报警。 使用: 门锁上锁后, 长按布防键2秒, 即刻进入布防模式。 注意 布防模式不影响室外正常开启。 布防功能键 室内反锁 门上锁后, 长按开/关门按键, 语音提示已反锁。 注意 门锁在处于反锁状态下, 外面板功能锁定。手动 唤醒系统时, 键盘区域会显示15937(X), 并语 音提示已反锁, 表示已经启动反锁。 反锁状态下, 外面板无法进行操作, 室外需要验证管理密码或 室内开锁, 才能解除反锁。...
-
Page 22: 提示灯光的含义与使用
7 提示灯光的含义与使用 门锁状态提示灯 门锁状态提示灯 灯光颜色与所代表的含义 蓝色: 当系统唤醒时, 门锁状态提示灯呈现蓝色, 表示您可以进行门锁操作。 绿色: 当门锁成功开锁后, 门锁状态提示灯呈现 绿色, 表示已开门。 红色: 当门锁成功上锁后, 门锁状态提示灯呈现红 色, 表示已关门。 低电量提示灯 灯光颜色与所代表的含义 红色: 门锁系统唤醒时, 系统自动检测电池电压, 当电池电压过低时, 低电量提示灯亮起, 闪烁红色 灯光, 语音提示电量低, 请更换电池。 低电量提示灯... - Page 23 布防提示灯 灯光颜色与所代表的含义: 白色: 1.门锁上锁状态下, 布防指示灯单独亮起, 提示可启 用布防模式。 如已启用布防模式, 系统唤醒时, 布防指示灯会 亮起, 提示门锁在布防状态中 。 布防提示灯 静音状态提示灯 灯光颜色与所代表的含义: 白色: 表示为静音模式已关闭。 绿色: 表示为静音模式已开启。 静音状态提示灯...
-
Page 24: 故障排除
8 故障排除 报警功能的种类与报警方式 布防模式, 室内开启报警 触发: 门锁处于布防模式时, 从室内开启门锁, 将 触发报警。 警报方式: 连续反复警报声 关闭方式: 任意一种秘钥验证成功结束报警 低电量报警, 提示您及时更换电池 触发: 当系统唤醒后, 将自动检测电池电压, 当电 池电压不足时, 发出警报, 提示您及时更换电池。 警报方式: 语音提示电量低, 请更换电池 关闭方式: 自动关闭 防撬报警 触发: 门缝撬开后, 感应锁舌弹出 警报方式: 连续反复报警 关闭方式: 自动关闭或密钥验证成功关闭... - Page 25 防拆报警 如何触发: 前后板连接线断开 警报方式: 连续反复报警 关闭方式: 断开电源 如何使用紧急电源 当电池电压不足, 无法从外部开启时, 您可以通过使用 5V充电宝作为应急电源通过Micro USB接口给门锁上 电。 打开门锁后, 请立即更换电池。 应急电源接口 如何更换电池 飞利浦智能锁基础工作电源为4节5号碱性电池。 电池盒位于内面板上端, 向上推动电池盖, 即可取下电池。...
- Page 26 Philips和Philips盾牌图形是皇家飞利浦有限公司的注册商标, 其使用需遵循皇家飞利浦有限 公司的许可。 2017©深圳市柯尼斯智能科技有限公司 保留所有权利。 本产品由深圳市柯尼斯智能科技有限公司负责销售与售后, 深圳市柯尼斯智能科技有限公司是 本产品的担保人。 规格如有变更, 恕不另行通知。 版本: 2.9...
- Page 29 Contents 1 Important 5 How to use your EasyKey information Security Unlock Caution Opening from outside the door Disposal of used -With a PIN code products and batteries -With a fingerprint -With a card 2 Install your EasyKey Opening from inside the door -With rotary knob Packaging list -With Close button...
-
Page 30: Important Information
◆Do not expose products to Philips. Use of such accessories and environments where there is parts may void your warranty. water leakage or splashing. Disposal of used products ◆Do not expose the product to... -
Page 31: Install Your Easykey
2 Install your EasyKey Packaging list This packaging list is for reference only. Please refer to the actual packaging contents. ①Outsideescutcheon ②Inside escutcheon ③Striker (including silicone pad) (including silicone pad) EasyKey易锁 User Manual ④Scouring pad ⑤Mounting plate ⑥User manual EasyKey易锁 Warranty Card EasyKey易锁... -
Page 32: Exploded Views
Exploded views 7.Inside escutcheon (x1) 1. Outside escutcheon (x1) 4. Inner plastic pad (x1) 8.M4X6 chamfer head 2.Outsideescutcheon 5. Mounting plate (x1) screw (x4) silicone pad (x1) 6. M5 flat-head screw (x3) 9.Battery cover (x1) 3. Inside escutcheon silicone pad (x1) -
Page 33: Pre-Installation Instructions
Pre-installation instructions Step 1 | Check the door opening direction This product can be installed on doors of 4 types of opening directions: left-out pull, right-in push, right-out pull and left-in push. Left-handle open Right-handle open Indoor Indoor Left-in Right- in push push Outdoor... -
Page 34: Installation Steps
Installation steps The following installation steps apply to left-handle opening. If your door is right-handle opening, please turn the inside escutcheon upside down. Pass the connection wire Fix the mounting plate with through the door hole.。 screws. Insert the wire Fix the inside Fix the striker with into the inside... -
Page 35: Get To Know Your Easykey
3 Get to know your EasyKey Outside escutcheon Door status indicator light Keypad Card reader area Fingerprint sensor interface Emergency power Low battery indicator light Outside forced lock button Mute button Inside escutcheon Sensor latch bolt Main dead bolt Battery cover Auto/Manual modeswitch Settings button Rotary knob... -
Page 36: How To Set Up Your Easykey
4 How to set up your EasyKey Pre-setup Instructions There are 2 operating modes in the EasyKey: ◆Safe mode and Normal mode. Safe mode is the default mode. ◆Differences between safe mode and normal mode Safe mode Normal mode Master PIN code Default master PINcode:123456789 User PIN code 6-12 digits... -
Page 37: How To Set Up Your Easykey
How to set up your EasyKey ◆Icon annotation under safe mode Modify Master PIN code Master One-time Visitor PIN code user PIN PIN code code Press the settings button [S], enter mast er PIN code and press [#] to confirm. User PIN User User... -
Page 38: Delete A User
Register a fingerprint Register a one-time user PIN code Press [s], enter master PIN code Press [s], enter master PIN code and press [#] to confirm. and press [#] to confirm. Press [2] to enter user settings, Press [2] to enter user settings, then press [2] again to enter then press [4] to enter one- fingerprint registration. -
Page 39: System Settings
Delete a fingerprint Delete a one-time user PIN code Press [s], enter master PIN code Press [s], enter Master PIN code and press [#] to confirm. and press [#] to confirm. Press [3] to enter user deletion, then Press [3] to enter user deletion, press [2] to enter fingerprint deletion. -
Page 40: Extended Functions
To join a network, press [1]. To exit a network, press [2]. Before setting up the extended functions, please download the Philips EasyKey APP, Adjust the volume to your need: open the APP and enable Bluetooth For silent mode, press [1]; for lower function on your mobile phone. -
Page 41: How To Set Up Your Easykey Under Normal Mode
How to set up your Register a card EasyKey under normal mode User settings Press [s], enter master PIN code and press [#] to confirm. Modify User PIN code Press [1] to enter user settings, then press [3] to enter card registration. Press [s], enter master PIN code and press [#] to confirm. - Page 42 Press [2] to enter user deletion, then Press [1] to enter user settings, then press press [2] again to enter card emptying. [5] to enter Visitor PIN code registration. Enter a Visitor PIN code of 4 to 12 digits Enter user PIN code and press [#] to and press [#] to confirm.
-
Page 43: System Settings
Delete all user information Press [3] to enter system settings, then press [2] to enter volume settings. Press [s], enter master PIN code and press [#] to confirm. Adjust the volume to your need: For silent mode, press [1]; for lower volume, press [2];... -
Page 44: How To Use Your Easykey
5 How to use your EasyKey Unlock | Opening from outside the door With User PIN code Withfingerprint With card Enter a Touch PIN code keypad area 1.Touchthekeypadand Directly place the finger Place the card that wake up the system. of which the fingerprint has been successfully has been registered on... - Page 45 Lock | Auto/Manual modes [A] represents automatic mode where the main deadbolt can automatically pop up to get the door locked after closing the door. [M] represents manual mode where the main deadbolt won’t automatically pop up after closing the door and the door will remain open.
-
Page 46: Other Functions
6 Other functions Restore to factory settings (Back to initial state with one button) Function: Empty all user information and restore to factory settings Use: Long press the [RES] button for 5 seconds, then all the information in the lock system will be emptied and the lock will be restored to factory settings. -
Page 47: Outside Forced Lock Function
Outside forced lock function Function: Unlocking from inside will trigger an alarm. How to use: After the door is successfully locked, long press the functional button for 2 seconds to enter the outside forced lock mode. Attention Enabling the outside forced lock function will not affect unlocking from outside. -
Page 48: Use Of The Indicatorlights
7 Use of the indicator lights Lock status indicator light Colors of the light and the corresponding meanings: Blue: After the system wakes up, the light will glow blue, indicating that you can operate the lock. Green: After the door is unlocked, the light will glow green, indicating that the door has been opened. -
Page 49: Outside Forced Lock Indicator Light
Outside forced lock indicator light Colors of the light and the corresponding meanings: White: 1. When the door is locked, the light will light up alone, indicating that you can enable the outside forced lock function. 2. If you have enabled the outside forced lock function, the light will light up after the system wakes up, indicating this function is in use. -
Page 50: Troubleshooting
8 Troubleshooting Types of alarms and alarm modes Inside unlocking alarm under outside forced lock mode Triggering: If the lock is under outside forced lock mode, unlocking from inside will trigger the alarm. Alarm mode: Continuous repeated alarms Turning off: The alarm can be turned off by a successful verification of any type Low battery alarm, prompting you to replace the batteries in time Triggering: After waking up, the system... -
Page 51: How To Replace Batteries
Anti-dismantling alarm Triggering: The connection wire of the outside and inside escutcheons is disconnected. Alarmmode:Continuousrepeated alarms. Turning off: The alarm can be turned off by cutting off the power supply. How to apply an emergency power When the battery voltage is insufficient, and the door cannot be opened from the outside, you can power the lock through the Micro USB interface by using... - Page 52 The Philips trademark and the Philips Shield Emblem are registered trademarks of Koninklijke Philips N.V. used under license. 2017©Shenzhen Conex Intelligent Technology Co., Ltd. All rights reserved. This product is sold and serviced under the responsibility of Shenzhen Conex Intelligent Technology Co., Ltd, and Shenzhen Conex Intelligent Technology Co., Ltd is the warrantor in relation to this product.