Table of Contents
Quick Links
Table of Contents

Related Manuals for AEG AC1030S


Summary of Contents for AEG AC1030S
- Page 1 AC1030S Original instructions...
- Page 2 Important! It is essential that you read the instructions in this manual before assembling, operating and maintaining the product. Subject to technical modifications.
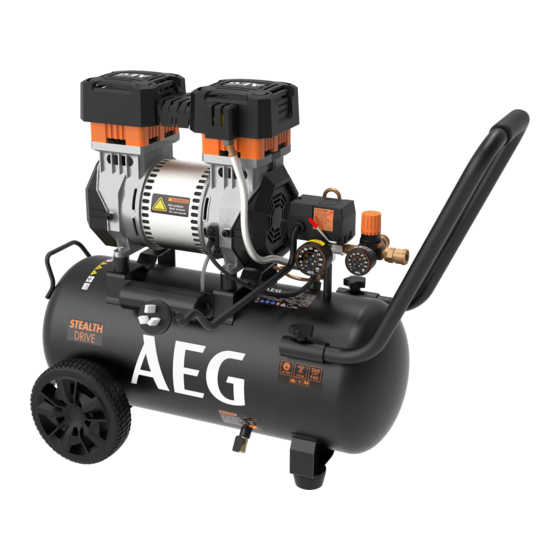
- Page 3 Fig. 1 1 - Air filter assembly x2 2 - Pressure relief valve 3 - Power cord 4 - Front handle 5 - AUTO/OFF switch 6 - Pressure regulator knob 7 - Regulator pressure gauge 8 - Tank pressure gauge 9 - Quick connect coupler 10 - Tank 11 - Rubber foot x2...
- Page 4 Fig. 6a Fig. 6b Fig. 7 Fig. 9 1 - Quick connect coupler 2 - Quick connect air fitting 3 - To close (counterclockwise) 4 - Pressure relief valve 5 - Regulator locking ring Fig. 8 1 - AUTO position 4 - Regulated pressure gauge 2 - OFF position 5 - To open (clockwise)
- Page 5 Fig. 10 Fig. 11 1 - Pressure relief valve 1 - Drain valve 2 - To close 2 - Open position 3 - To release air 3 - Closed position Fig. 12 1 - Air filter housing 2 - Air filter 3 - Air filter cover 4 - Air hose...
-
Page 6: General Safety Warnings
TECHNICAL DATA AIR COMPRESSOR AC1030S Rated motor power 1200 W Rated current Air outlets 2 pcs, 6.35mm (1/4”) NITTO style connector/ coupler (suitable for NITTO fitments) Quick connector fitting size 6.35 mm (1/4”) BSP thread Weight 30.3 kg Input 220 - 240 V AC, 50 Hz... -
Page 7: Air Compressor Safety Warnings
■ Never leave a tool unattended with the air hose attached. AIR COMPRESSOR USE AND CARE ■ Never point any air tool toward yourself or others. ■ Do not exceed the pressure rating of any component in the system. ■ Do not operate this air compressor if it does not contain a legible ■... -
Page 8: Residual Risks
RESIDUAL RISKS WARNING Even when the product is used as prescribed, it is still impossible If any parts are damaged or missing do not operate this product to completely eliminate certain residual risk factors. The following until the parts are replaced. Use of this product with damaged or hazards may arise and the operator should pay special attention to missing parts could result in serious personal injury. -
Page 9: Operation
3. Secure the step bolt with an M10 hex nut. 4. Lower the air compressor until it sits securely on a flat surface. 4. Attach the wheel axle cover to the centre of the wheel. ATTACHING/DISCONNECTING AIR HOSE 5. Repeat the above steps to install the other wheel on the right. See figure 7. -
Page 10: Checking The Pressure Relief Valve
DRAINING THE TANK 2. If not already installed, attach hose to compressor as previously instructed. See figure 10-11. 3. Attach 6.35 mm (1/4 in.) quick connect air fitting to accessory or To prevent tank corrosion and keep moisture out of the air used, the tool you intend to use. -
Page 11: General Maintenance
AEG service centre. Do not dispose of electric tools together with Use only AEG accessories and spare parts. Should components need household waste material. Electric tools and to be replaced which have not been described, please contact one of electronic equipment that have reached the end of our AEG service agents (see our list of guarantee/service addresses). -
Page 12: Troubleshooting
TROUBLESHOOTING PROBLEM POSSIBLE CAUSE SOLUTION Compressor will not run Loss of power or overheating Check for proper use of extension cord. No electrical power Check to be sure unit is plugged in. Check fuse/breaker. Blown shop/house fuse Replace shop/house blown fuse. Shop/house breaker open Reset shop/house breaker, determining why problem happened. - Page 13 PROBLEM POSSIBLE CAUSE SOLUTION Air output lower than normal Broken inlet valves Take compressor to service centre. Connections leaking Tighten connections. Hose or tool leaking Check/replace leaking hose/tool.
-
Page 14: Parts List
PARTS LIST... - Page 15 Description Description Description Description Bolt M4*8 Protection ring Limit block Bolt M5*12 Tank Left crankcase Valve Quick valve Bolt M8*20 Adjusting washer Valve plate Pressure gauge Washer Bolt M6*18 Valve Support Cushion foot Connecting rod Washer Quick valve Drain valve Piston cup Bolt Connector...
- Page 16 Techtronic Industries N.Z. Limited Unit C, 70 Business Parade South AEG is a registered trade mark used under license from AB Electrolux (publ) Highbrook, Auckland 2013, New Zealand NITTO is a registered trade mark owned by Nitto Kohki Co., Ltd.