Samsung GT-S6012 User Manual
Hide thumbs
Also See for GT-S6012:
- User manual (98 pages) ,
- User manual (34 pages) ,
- Quick start manual (41 pages)
Table of Contents
Quick Links
Table of Contents

Related Manuals for Samsung GT-S6012


Summary of Contents for Samsung GT-S6012
- Page 1 GT-S6012 User Manual www.samsung.com...
- Page 2 Applications and their functions may vary by country, region, or hardware specifications. Samsung is not liable for performance issues caused by applications from any provider other than Samsung. Samsung is not liable for performance issues or incompatibilities caused by edited registry settings or modified operating system software.
- Page 3 No part of this guide may be reproduced, distributed, translated, or transmitted in any form or by any means, electronic or mechanical, including photocopying, recording, or storing in any information storage and retrieval system, without the prior written permission of Samsung Electronics.
- Page 4 About this manual Trademarks • S AMSUNG and the SAMSUNG logo are registered trademarks of Samsung Electronics. ™ ™ ™ ™ ™ • T he Android logo, Google , Google Maps , Google Mail , YouTube , Google Play ™...
-
Page 5: Table Of Contents
Table of Contents Entering text Getting started Connecting to a Wi-Fi network Device layout Setting up accounts Buttons Transferring files Package contents Securing the device Installing the SIM or USIM card and Upgrading the device battery Charging the battery Inserting a memory card Communication Turning the device on and off Phone... - Page 6 YouTube More settings FM Radio SIM card manager Sound Display Application & media stores Wallpaper Motion Play Store Storage Samsung Apps Battery Game Hub Applications manager Music Hub Accounts and sync Location services Utilities Security Language and input Memo Back up and reset...
-
Page 7: Getting Started
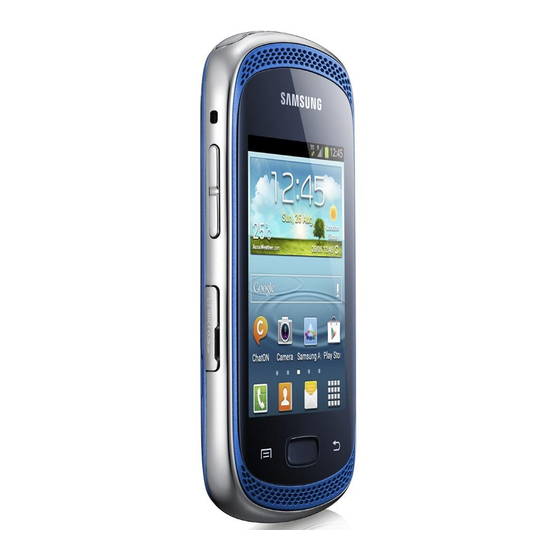
Getting started Device layout Speaker/Earpiece Proximity sensor Power button Touch screen Home button Music button Menu button Back button Speaker Microphone Headset jack Multipurpose jack GPS antenna Rear camera Volume button Back cover Memory card slot Main antenna... -
Page 8: Buttons
Getting started Do not cover the antenna area with your hands or other objects. This may cause connectivity problems or drain the battery. Do not use a screen protector. This causes sensor malfunctions. Do not allow water to contact the touch screen. The touch screen may malfunction in humid conditions or when exposed to water. -
Page 9: Package Contents
Device Battery Quick start guide Use only Samsung-approved software. Pirated or illegal software may cause damage or malfunctions, which are not covered by the warranty. The items supplied with the device and any available accessories may vary depending on the region or service provider. -
Page 10: Installing The Sim Or Usim Card And
Getting started Installing the SIM or USIM card and battery Insert the SIM or USIM card provided by the mobile telephone service provider, and the included battery. Remove the back cover. Be careful not to damage your fingernails when you remove the back cover. Do not bend or twist the back cover excessively. - Page 11 SIM card slot of your device. Use caution not to lose or let others use the SIM or USIM card. Samsung is not responsible for any damages or inconveniences caused by lost or stolen cards.
- Page 12 Getting started Removing the SIM or USIM card and battery Remove the back cover. Pull out the battery. Pull out the SIM or USIM card.
-
Page 13: Charging The Battery
Charge the battery before using it for the first time. Use the charger to charge the battery. A computer can be also used to charge the device by connecting them via the USB cable. Use only Samsung-approved chargers, batteries, and cables. Unapproved chargers or cables can cause the battery to explode or damage the device. - Page 14 If the device is not charging properly, take the device and the charger to a Samsung Service Centre. After fully charging, disconnect the device from the charger. First unplug the charger from the device, and then unplug it from the electric socket.
-
Page 15: Inserting A Memory Card
Getting started Reducing the battery consumption Your device provides options that help you save battery power. By customising these options and deactivating features in the background, you can use the device longer between charges: When you are not using the device, switch to sleep mode by pressing the Power button. Close unnecessary applications with the task manager. - Page 16 Do not remove the memory card while the device is transferring or accessing information. Doing so can cause data to be lost or corrupted or damage to the memory card or device. Samsung is not responsible for losses that result from the misuse of damaged memory cards, including the loss of data.
-
Page 17: Turning The Device On And Off
Getting started Turning the device on and off When turning on the device for the first time, follow the on-screen instructions to set up your device. Press and hold the Power button for a few seconds to turn on the device. Follow all posted warnings and directions from authorised personnel in areas where the use of wireless devices is restricted, such as aeroplanes and hospitals. -
Page 18: Locking And Unlocking The Device
Getting started Locking and unlocking the device When not in use, lock the device to prevent unwanted operation. Pressing the Power button turns off the screen and puts the device into lock mode. The device automatically gets locked if it is not used for a specified period. To unlock the device, press the Power button or the Home button when the touch screen is turned off, and then tap anywhere on the screen, and then flick your finger in any direction. -
Page 19: Switching Between Networks
Getting started Switching between networks The device has two SIM card slots that allow you to insert up to two SIM or USIM cards. When you insert two SIM or USIM cards, you can use two different subscriptions on the same network without the need to carry two devices at the same time. -
Page 20: Basics
Basics Indicator icons The icons displayed at the top of the screen provide information about the status of the device. The icons listed in the table below are most common. Icon Meaning No signal Signal strength Currently accessing SIM or USIM card Roaming (outside of normal service area) GPRS network connected EDGE network connected...