Table of Contents
Quick Links
Table of Contents

Summary of Contents for Motorola KEY 3000
- Page 1 KVL 3000 Key Variable Loader User's Guide 68P81131E16-O *6881131E16*...
- Page 2 This warranty extends only to individual products, batteries are excluded. Because each radio sys tem is unique, Motorola disclaims liability for range, coverage, or operation of the system as a whole under this warranty except by a separate written agreement signed by an officer of Motorola.
-
Page 3: Chapter 8 Viewing And Printing Log Records
IMPORTANT! Read this information before operating your KVL 3000 Depending on the options ordered, the KVL 3000 Key Variable Loader has the capability of being configured to operate in ASN (Advanced Securenet) mode or ASTRO 25 mode. KVL 3000s ordered with only Option X795 operate in ASN mode only. -
Page 5: Table Of Contents
Table of Contents Table of Contents About This Guide Purpose of Manual ........Target Audience . - Page 6 KVL 3000 User's Guide Chapter 3 Performing Initial Programming Perform Initial Programming ......Chapter 4 Entering and Loading Keys Entering Traffic and Shadow Keys .
- Page 7 Chapter 1 " Controls and Indicators ASTRO 25 OPERATION Chapter 1 Quick Start Instructions About These Quick Start Instructions ..... . Quick Start Procedures .
- Page 8 KVL 3000 User's Guide Chapter 8 Viewing and Printing Log Records About Log Records ........Viewing Log Records on KVL 3000 Display .
-
Page 9: About This Guide
About This Guide chapter contents Purpose of Manual Target Audience Related Manuals Organization of this Manual Error and Concerns Reporting KVL 3000 User's Guide 68P81131E16-O 10/15/99... -
Page 10: Purpose Of Manual
This manual provides step by step instructions for using the KVL 3000 Key Variable Loader to create and store encryption keys, and then load these encryption keys into other Motorola secure equipment, such as radios, fixed encryption units, etc. Target Audience This manual is intended for use by experienced technicians familiar with similar types of equipment. -
Page 11: Input/Output Ports
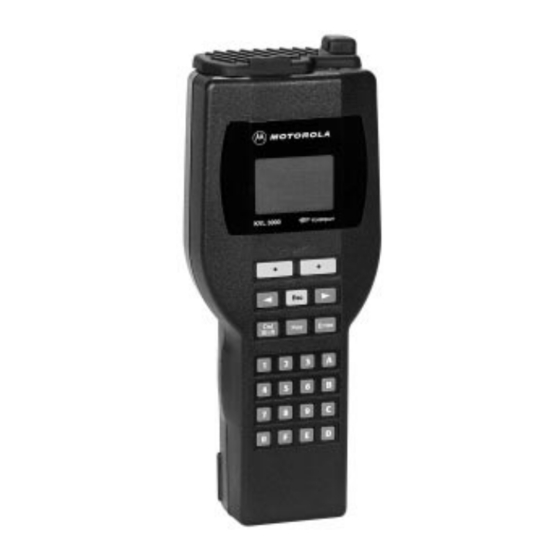
Chapter 1 Controls and Indicators chapter contents Controls and Indicators Input/Output Ports Status Indicators KVL 3000 User's Guide 68P811xxxxx-O 10/15/99... - Page 12 KVL 3000 User's Guide Controls and Indicators...
- Page 13 Chapter 1 Controls and Indicators Display Provides 4 line, 12 character (4 x 12) LCD display to show menus, key entries, status indicators, and other user data Esc Key Press to return to the previous menu or press to abort any operation in progress Arrow Keys Press right and left arrow keys to navigate through menus and lists...
- Page 14 KVL 3000 User's Guide Input/Output Ports The input/output ports for the KVL 3000 are shown below. RS232 PORT PCMCIA SLOT INFRARED PORT (FUTURE) KEYLOAD PORT...
-
Page 15: Status Indicators
Chapter 1 Controls and Indicators Status Indicators The following status indicators appear in the top row of the KVL 3000 display. Indicates low charge on Main Battery; charge immediately Indicates valid modem card is inserted into PCMCIA port (top of KVL 3000) Indicates KVL 3000 modem attempting to connect to KMC (or KMF) modem Indicates KVL 3000 modem and KMC... - Page 16 KVL 3000 User's Guide Notes...
- Page 17 Chapter 2 Preparing the KVL 3000 for Use chapter contents Unpack and Take Inventory Install the Coin Cell Battery Charge and Install the Main Battery Applying Power Using the Desktop Stand KVL 3000 User's Guide 68P81131E16-O 10/15/99...
-
Page 18: Unpack And Take Inventory
KVL 3000 User's Guide Unpack and Take Inventory Open the box, remove the foam cover, and remove the items as shown. Perform a quick inventory to make sure all items are present. Important! After unpacking items, immediately inspect the equipment for any visual damage and report the extent of any damage to the transportation company. -
Page 19: Install The Coin Cell Battery
Chapter 2 Preparing the KVL 3000 for Use Install the Coin Cell Battery The KVL 3000 requires a 3 V coin cell battery (supplied) to maintain date and time when the Main Battery is removed (or dead). Install the battery as shown below. Using a coin or flat bladed screwdriver, remove the battery cover. -
Page 20: Charge And Install The Main Battery
(supplied). This battery must be charged overnight before its initial use with the KVL 3000. A variety of chargers are available from Motorola (see Appendix D). Charge the battery according to the instructions provided with the charger. Then, install the battery as shown below. -
Page 21: Applying Power
Chapter 2 Preparing the KVL 3000 for Use Applying Power Once the main battery is fully charged and attached to the KVL 3000, press the Pwr button to turn the unit on. The following will happen: D All status indicator icons will display, D SELF TEST will appear. -
Page 22: Using The Desktop Stand
KVL 3000 User's Guide Using the Desktop Stand The KVL 3000 is shipped with a desktop stand that can be attached to the KVL 3000. This stand allows the keyloading cable to be routed down and away from the KVL 3000 so that the KVL 3000 can remain upright and stable while sitting on a desktop surface. -
Page 23: About These Quick Start Instructions
Chapter 1 Quick Start Instructions chapter contents About These Quick Start Instructions Quick Start Procedures KVL 3000 User's Guide 68P81131E16-O 10/15/99 ASN Operation... - Page 24 KVL 3000 User's Guide About these Quick Start Instructions For those of you who are already familiar with the KVL 3000, these Quick Start Instructions provide an abbreviated procedure for preparing your KVL 3000 for use and entering and loading a single encryption key from the KVL 3000 to a target device.
- Page 25 Chapter 1 Quick Start Instructions Quick Start Procedures Install the coin cell battery (Chapter 2, behind Getting Started tab). Note Steps 1 and 2 need be performed only once. Steps 3 thru 5 are performed on a per key basis. Charge and install the rechargeable main battery (Chapter 2, behind Getting Started tab).
- Page 26 KVL 3000 User's Guide Quick Start Procedures Enter an encryption key into the KVL 3000 memory (Chapter 4, within this tab). TKEY 0 13251325 46585E04 SLOT FILLED Connect the KVL 3000 to a target device (e.g., radio). Transfer (load) the key to the target device (Chapter 4, within this tab).
-
Page 27: Description Of Kvl 3000
Chapter 2 Overview of KVL 3000 chapter contents Description of KVL 3000 Key Features Using the KVL 3000 Using the Menu System KVL 3000 User's Guide 68P81131E16-O 10/15/99 ASN Operation... - Page 28 The KVL 3000 Key Variable Loader is a battery powered portable unit used to create, store, and transfer encryption keys used by Motorola's secure communications products (e.g., radios, DIUs, CIUs, RNCs, etc.). The KVL 3000 (shown below) is comprised of a...
- Page 29 D Menu System User Interface allows system specific and user settings to be configured D Supports software upgrades via PCMCIA Card slot and Motorola's FLASHportt technology D Supports the following encryption algo rithms: - DES (CFB, XL, and OFB) - DVP...
-
Page 30: Using The Kvl 3000
KVL 3000 User's Guide Using the KVL 3000 Overview of Encryption Concepts Secure communications systems are designed to provide coded (encrypted") voice and data signals between some or all links in the system (including RF links and network links). In order to do this, each device (e.g., radio, fixed encryption unit) is loaded with a multi digit encryption variable (a key"). - Page 31 Chapter 2 Overview of KVL 3000 Using the KVL 3000 (continued) Overview of Entering and Loading Keys Encryption keys are entered by the user into the KVL 3000 memory locations (slots). The keys may then be transferred (loaded) to a target device, such as a secure radio.
-
Page 32: Using The Menu System
KVL 3000 User's Guide Using the Menu System Menu Architecture The KVL 3000 Menu System is organized as shown on the facing page. Each menu selection is summarized below. MAIN Menu H TRAF Provides access to screen used for entering Traffic type encryption keys H SHAD Provides access to screen used for entering Shadow type encryption keys... - Page 33 MAIN MENU (See Note 1) TRAF SHAD CONFIG GROUP SHARE PORT Chapter 4 Chapter 4 Chapter 7 Chapter 6 Chapter 4 Chapter 5 Migration CONFIG MENU (See Note 1) ALGO PASSWD DATE TIME SPLIT SLOT KMC SHARE LIDS SOUND TIMEO BAUDR FIPS SYSKEY DIAL...
- Page 34 KVL 3000 User's Guide Using the Menu System (continued) Menu Architecture (continued) H ALGO Provides access to screen used for activating/deactivating algorithms, setting default algorithm, turning prompt on/off H PASSWD Provides access to screen used for entering Supervisor and Operator passwords (required for FIPS operation;...
- Page 35 Chapter 2 Overview of KVL 3000 Using the Menu System (continued) Menu Architecture (continued) H BAUDR Provides access to screen used Note The default BAUDR for setting the baud rate used by the KVL setting is 9600 3000 to communicate via the RS232 port directly or via modem (2400, 4800, 9600, 19200, and 57600) Note If FIPS is ON, the...
- Page 36 KVL 3000 User's Guide Using the Menu System (continued) Navigating Through the Menus Each time you power up the KVL 3000 in ASN mode, the display shown below appears. The title ASN displays to indicate that you are in the ASN Main Menu.
-
Page 37: Chapter 3 Performing Initial Programming
Chapter 3 Performing Initial Programming chapter contents Perform Initial Programming KVL 3000 User's Guide 68P81131E16-O 10/15/99 ASN Operation... - Page 38 KVL 3000 User's Guide Perform Initial Programming Introduction Before using your KVL 3000 to enter and load encryption keys, several parameters that determine how the KVL 3000 operates must be programmed. The parameters are divided into two categories: D User Preference D System Dependent Instructions for programming these parameters begin on the next page.
- Page 39 Chapter 3 Performing Initial Programming Perform Initial Programming (continued) User Preference Parameters The parameters and settings in this category are not required for operation of the KVL 3000, but instead provide a way of customizing certain functions to suit each individual user. Set Power Down Timeout The Power Down Timeout feature allows you to program a time...
- Page 40 KVL 3000 User's Guide Perform Initial Programming (continued) User Preference Parameters (continued) Turn On/Off Display Backlighting KVL 3000 powers up with display backlighting turned off. If desired, you may turn on backlighting at any time by pressing and holding the Del/Shift key, then pressing the B key.
- Page 41 Chapter 3 Performing Initial Programming Perform Initial Programming (continued) User Preference Parameters (continued) Setup the Algorithms The KVL 3000 is capable of supporting up to two encryption algorithms (e.g., DES, DVI XL, etc.), depending on the options ordered at the time of purchase. Using the ALGO menu selection, you can turn an algorithm off (requires dual algorithm KVL 3000), make one of the two algorithms the...
- Page 42 KVL 3000 User's Guide Perform Initial Programming (continued) Use the keys to select the desired algorithm. Then use the to select ON/OFF to turn the algorithm off. Note You can not turn off the default algorithm. Also, you can not turn off the algorithm in a single algorithm KVL 3000, or if the other algorithm (dual algorithm KVL 3000s) is turned off.
- Page 43 Chapter 3 Performing Initial Programming Perform Initial Programming (continued) User Preference Parameters (continued) Use the key to select SETUP . The following screen will appear. ALGO>DES IS ON IS DEFAULT ON/OFF DEFLT Use the keys to select the non default algorithm. Then use the key to select DEFLT to make this algorithm the default.
- Page 44 KVL 3000 User's Guide Perform Initial Programming (continued) User Preference Parameters (continued) Use the key to select PROMPT. The following screen will appear. ALGO PROMPT IS ON Use the key to select OFF. (Note that with the prompt turned off, any keys you enter will automatically be assigned the default algorithm.) ASN Operation...
- Page 45 Chapter 3 Performing Initial Programming Perform Initial Programming (continued) User Preference Parameters (continued) Set Time and Date The KVL 3000 contains an internal real time clock that is used to timestamp (with date and time) the log entries. If you wish to have these entries timestamped, you must set the time and date.
- Page 46 KVL 3000 User's Guide Perform Initial Programming (continued) User Preference Parameters (continued) To set the date ... Navigate to the CONFIG menu, then navigate to and select DATE. The following screen will appear: DATE IS 01/01/00 EDIT Use the key to select EDIT. The following screen will appear.
- Page 47 Chapter 3 Performing Initial Programming Perform Initial Programming (continued) User Preference Parameters (continued) Turn On/Off Sharing In addition to loading keys into target devices, the KVL 3000 can also share" its keys with another KVL 3000. In order to share keys, the sharing feature must be turned on in both the source and target KVL.
- Page 48 KVL 3000 User's Guide Perform Initial Programming (continued) User Preference Parameters (continued) Set Up Passwords The KVL 3000 provides two levels of security access, Supervisor and Operator. The Supervisor has access to all functions and features. The Operator has access to all functions except Edit and Clear (although can edit the Operator password).
- Page 49 Chapter 3 Performing Initial Programming Perform Initial Programming (continued) User Preference Parameters (continued) Enter the desired Supervisor password. The password must contain 6 characters using any of the keypad buttons 0 thru F. When finished, press the Enter key. Repeat for the Operator password. The following screen will...
- Page 50 KVL 3000 User's Guide Perform Initial Programming (continued) User Preference Parameters (continued) Select Default Target Slot This setting allows the KVL 3000 to load keys to a default slot on the target unit. Setting a default eliminates the need to select a target slot during a keyload operation (although you can override the default if desired when loading keys).
- Page 51 Chapter 3 Performing Initial Programming Perform Initial Programming (continued) System Dependent Parameters The parameters and settings in this category must be set depending on the particular system in which the KVL 3000 will be operating. Create the MDC ID (OTAR Only) The MDC ID is used when the KVL 3000 communicates with a KMC (in an Advanced SECURENETt...
- Page 52 KVL 3000 User's Guide Perform Initial Programming (continued) System Dependent Parameters (continued) Set KMC Phone Number (OTAR Only) When using modem connection communicate with the KMC, the KVL 3000 must know the dial up phone number for the KMC. Enter this phone number as follows: From the MAIN menu, navigate to and select KMC.
- Page 53 Chapter 3 Performing Initial Programming Perform Initial Programming (continued) System Dependent Parameters (continued) Select Modem Baud Rate (OTAR Only) When using a direct (cable) or modem connection to communicate with the KMC, the baud rate of the KMC must be selected. Select this baud rate as follows: Navigate to the CONFIG menu, then navigate to and select BAUDR.
- Page 54 KVL 3000 User's Guide Perform Initial Programming (continued) System Dependent Parameters (continued) Turn LIDS Prompt On/Off (ASTRO Only) Logical IDs (LIDS) provide an additional level of security in ASTRO systems. With the LIDS prompt turned on, you are prompted to enter a Note LIDS are required 4 digit LID each time you enter a key.
- Page 55 Chapter 3 Performing Initial Programming Perform Initial Programming (continued) System Dependent Parameters (continued) Turn FIPS On/Off When turned on, FIPS operation causes the KVL 3000 to operate in a mode that is compliant with the U.S. Federal Information Processing Standard (FIPS) 140 1 guidelines.
- Page 56 KVL 3000 User's Guide Perform Initial Programming (continued) System Dependent Parameters (continued) Enter System Key (DVI XL Only) KVL 3000 requires a 128 digit System Key to communicate DVI XL systems. Each KVL 3000 is shipped from the factory with a default System Key.
- Page 57 Chapter 3 Performing Initial Programming Perform Initial Programming (continued) System Dependent Parameters (continued) Press to select YES. The following screen will appear. SYSKEY BYTE 01 Enter the 128 digit System Key. The display will show SLOT FILLED when completed. Press the Enter key. The display will show BUSY...
- Page 58 KVL 3000 User's Guide Perform Initial Programming (continued) System Dependent Parameters (continued) Set Traffic/Shadow Key Memory Split (Only if more than 512 traffic keys) The KVL 3000 can store a total of 1024 encryption keys (traffic and shadow combined). If the memory split value is set to 512, then each key type takes up an equal partition in the key memory (i.e., 512 traffic keys and 512 shadow keys).
- Page 59 Chapter 3 Performing Initial Programming Perform Initial Programming (continued) Press to select EDIT. The following screen will appear. ENTER # OF TKEYS: >512J The KVL 3000 prompts you to enter the number of slots you wish to assign for Traffic Keys. Press the Del/Shift key to back out"...
- Page 60 KVL 3000 User's Guide Perform Initial Programming (continued) Changing Split Value from 512 to 800 Split Value 512 Traffic Keys Shadow Keys Before È È È After Split Value 800 È È = Shadow Keys 224 thru 511 are erased È...
- Page 61 Chapter 3 Performing Initial Programming Perform Initial Programming (continued) System Dependent Parameters (continued) Set Modem Dialing to Pulse or Tone When downloading keys from a KMC to the KVL 3000 via a modem connection, the KVL 3000 can be set to dial using either pulses or DTMF tones, depending on the type of phone line being used.
- Page 62 KVL 3000 User's Guide Notes ... 3-26 ASN Operation...
- Page 63 Chapter 4 Entering and Loading Keys chapter contents Entering Traffic and Shadow Keys Loading Traffic Keys Loading Shadow Keys Deleting Keys Zeroizing Keys Using Group Maps KVL 3000 User's Guide 68P81131E16-O 10/15/99 ASN Operation...
- Page 64 KVL 3000 User's Guide Entering Traffic and Shadow Keys To enter a Traffic Key or a Shadow Key into the KVL 3000 internal key database, perform the following: Use the key to select TRAF or SHAD from the Main Menu. The following screen will appear (Traffic menu shown).
-
Page 65: Chapter 4 Entering And Loading Keys
Chapter 4 Entering and Loading Keys Entering Traffic and Shadow Keys (continued) Use the key to select ACCEPT. The following screen will appear. TKEY 0 ACCEPT Enter the encryption key using the keypad. The specific byte number is Note (For DES keys only) As you enter each displayed as you enter the key numbers. - Page 66 KVL 3000 User's Guide Entering Traffic and Shadow Keys (continued) If the LID prompt is turned on, the following screen appears, prompting you to enter a 4 digit LID. Enter the LID using the keypad. Note The KVL 3000 will not accept traffic keys of the same algorithm type with duplicate LIDs (i.e.,...
-
Page 67: Loading Traffic Keys
Chapter 4 Entering and Loading Keys Loading Traffic Keys Introduction There are multiple procedures for loading traffic keys from the KVL 3000 to a target device. Each procedure varies depending on the type of target device, as follows: D SECURENET Single Key Radio (page 4-6) D Advanced SECURENET Multiple Key Radio (page 4-8) - Page 68 KVL 3000 User's Guide Loading Traffic Keys (continued) Loading Traffic Keys (SECURENET Single Key Target Radio) In this procedure, a single key is loaded to the single key SECURENET target radio. Turn on the KVL 3000 and the target radio, then connect them using the appropriate cable.
- Page 69 Chapter 4 Entering and Loading Keys Loading Traffic Keys (continued) When finished, the following screen will appear to confirm that the key was loaded to the target radio: KEY LOAD SUCCESSFUL z End of This Procedure z ASN Operation...
- Page 70 KVL 3000 User's Guide Loading Traffic Keys (continued) Loading Traffic Keys (Advanced SECURENET Multiple Key Target Radio) In this procedure, a single key is loaded to a multiple key Advanced SECURENET target radio. Turn on the KVL 3000 and the target radio, then connect them using the appropriate cable.
- Page 71 Chapter 4 Entering and Loading Keys Loading Traffic Keys (continued) For normal key loading, you will load the key into the target's main key storage. To do this, follow steps 6 through 8. For diagnostics purposes, you may instead load the key directly into a special diagnostics location (i.e., the hybrid).
- Page 72 KVL 3000 User's Guide Loading Traffic Keys (continued) 10. Use the key to select XFER. The following screen will appear: LOADING KEY XXXX TO HYBD 11. When finished, the screen will display KEY LOAD SUCCESSFUL to confirm that the key was loaded to the hybrid in the target radio.
- Page 73 Chapter 4 Entering and Loading Keys Loading Traffic Keys (continued) Loading Traffic Keys (ASTRO Single Key Target Radio) In this procedure, a single key is loaded to the microprocessor in an ASTRO target radio. Turn on the KVL 3000 and the target radio, then connect them using the appropriate cable.
- Page 74 KVL 3000 User's Guide Loading Traffic Keys (continued) When finished, the following screen will appear to confirm that the key was loaded to the target radio: KEY LOAD SUCCESSFUL z End of This Procedure z 4-12 ASN Operation...
- Page 75 Chapter 4 Entering and Loading Keys Loading Traffic Keys (continued) Loading Traffic Keys (ASTRO Multiple Key Target Radio) In this procedure, a single key is loaded to the microprocessor in a ASTRO target radio. Turn on the KVL 3000 and the target radio, then connect them using the appropriate cable.
- Page 76 KVL 3000 User's Guide Loading Traffic Keys (continued) Use the keys to select the desired target slot, then press the Enter key. Use the key to select XFER. The following screen will appear while the key is being loaded: LOADING KEY 0000 TO XXXX When finished, the following screen will appear to confirm that the key was loaded...
- Page 77 Chapter 4 Entering and Loading Keys Loading Traffic Keys (continued) Loading Traffic Keys (Fixed Unit Target; More than 16 keys; DVI XL Algorithm) In this procedure, a single key is loaded to a fixed unit (e.g., CIU, DIU, RNC, etc.). Turn on the KVL 3000 and the target fixed unit, then connect them using the appropriate cable.
- Page 78 KVL 3000 User's Guide Loading Traffic Keys (continued) Use the keypad to enter the location number into which you wish to store the System Key. When finished, press the Enter key. The following screen will appear: TRAF LOAD TO 0 XFER Use the keys to select the...
- Page 79 Chapter 4 Entering and Loading Keys Loading Traffic Keys (continued) When finished, the following screen will appear to confirm that the key was loaded to the target fixed unit: KEY LOAD SUCCESSFUL z End of This Procedure z 4-17 ASN Operation...
- Page 80 KVL 3000 User's Guide Loading Traffic Keys (continued) Loading Traffic Keys (Fixed Unit Target; More than 16 keys; Other than DVI XL Algorithm) In this procedure, a single key is loaded to a fixed unit (e.g., CIU, DIU, RNC, etc.) with more than 16 key locations and an algorithm other than DVI XL or a Custom Application algorithm.
- Page 81 Chapter 4 Entering and Loading Keys Loading Traffic Keys (continued) Use the keys to select the desired target slot, then press the Enter key. Use the key to select XFER. The following screen will appear while the key is being loaded: LOADING KEY XXXXX TO XXXX When finished, the following screen will...
-
Page 82: Loading Shadow Keys
KVL 3000 User's Guide Loading Shadow Keys In this procedure, you will load a shadow key to either a Common Shadow Key (CSK) slot or a Unique Shadow Key (USK) slot in the target device. (Shadow Keys are only applicable for target devices in OTAR systems.) Turn on the KVL 3000 and the target radio, then connect them using the appropriate... - Page 83 Chapter 4 Entering and Loading Keys Loading Shadow Keys (continued) Use the keys to select the desired target slot (either CSK or USK). When finished, press the Enter key. Use the key to select XFER. The following screen will appear: LOADING KEY XXXX TO CSK When finished, the following screen will...
-
Page 84: Deleting Keys
KVL 3000 User's Guide Deleting Keys in KVL 3000 The delete feature allows you to erase an encryption key (traffic or shadow) stored in a specific key slot in the KVL 3000's memory. Deleting permanently erases the encryption key currently stored in the slot. The slot is then considered to be undefined"... -
Page 85: Zeroizing Keys In Target Devices
Chapter 4 Entering and Loading Keys Zeroizing Keys in Target Devices Introduction Important! In order to The zeroize feature allows you to erase an zerioze keys, encryption key (traffic or shadow) stored in a KVL 3000 and the target specific key slot in a secure target device (e.g., device must be equipped radio). - Page 86 KVL 3000 User's Guide Zeroizing Keys in Target Devices (continued) Use the key to select LOAD. The following screen will appear: TRAF ZEROIZE LOAD TO 0 XFER Use the keys to select the desired key location (slot) in the target device you wish to zeroize (or use the keypad to directly enter the location number).
- Page 87 Chapter 4 Entering and Loading Keys Zeroizing Keys in Target Devices (continued) Press and hold the Del/Shift key, then press the 0 key to enter zeroize mode. The following screen will appear: SHAD ZEROIZE LOAD TO USK XFER Use the keys to select USK or CSK.
-
Page 88: Using Group Maps
KVL 3000 User's Guide Using Group Maps Introduction The KVL 3000 provides a convenient feature called group mapping." This feature allows you to group several keys stored in the KVL 3000 memory and map each one to a specific target slot. - Page 89 Chapter 4 Entering and Loading Keys Using Group Maps (continued) Use the key to select EDIT. The following screen will appear. Note that the S" in S TRAF" stands for Source" (i.e., KVL 3000 slot), and that the D" in D TRAF" stands for Destination" (i.e., target slot).
- Page 90 KVL 3000 User's Guide Using Group Maps (continued) Repeat steps 4 and 5 until you have mapped the desired number of source and target keys (up to 16). After reaching traffic slot number 15, the next press of key will display the Common Shadow Key screen, as shown: GROUP MAP 0 S SHAD 0...
- Page 91 Chapter 4 Entering and Loading Keys Using Group Maps (continued) The offset number is used for target devices with more than 16 key slots (e.g., a CIU has 1024 slots, a DIU has 512 key slots). The number you enter specifies into which group of 16 target slots the keys in this group map will be loaded.
- Page 92 KVL 3000 User's Guide Using Group Maps (continued) Loading a Group Map Turn the KVL 3000 and the target unit on. Connect them using the appropriate cable. Navigate to and select GROUP in the Main Menu. The following screen will appear: GROUP MAP>0 EDIT...
- Page 93 Chapter 4 Entering and Loading Keys Using Group Maps (continued) The progress of the group load operation is displayed in the bottom line of the display. When finished, the following screen will appear to confirm that the group of keys was loaded to the target unit: GROUP TRANSFER...
- Page 94 KVL 3000 User's Guide Notes ... 4-32 ASN Operation...
-
Page 95: About Sharing
Chapter 5 Sharing Keys Between KVLs chapter contents About Sharing Setting Up Connections Share All Keys Share Selected Key Share Group Map and Associated Keys KVL 3000 User's Guide 68P81131E16-O 10/15/99 ASN Operation... - Page 96 KVL 3000 User's Guide About Sharing Introduction In addition to loading keys into target devices, the KVL 3000 can also share" its keys with another KVL 3000 (or previous KVL model). When finished, the target KVL will contain all of Note Sharing can not the traffic keys, shadow keys, group maps, and be performed between a...
- Page 97 Chapter 5 Sharing Keys Between KVLs Setting Up Connections Introduction In order to share keys between two KVLs, a KVL to KVL Transfer Cable (Model TKN8209) is required. Connecting the KVL 3000s Connect the transfer cable between the two KVLs as shown below. TKN8209 TRANSFER CABLE...
- Page 98 KVL 3000 User's Guide Share All Keys In this scenario, all traffic and shadow keys, as well as group maps (if present) and the KMC sourced indexes present) transferred from the source KVL to the target KVL. Important! In order to perform a Share All procedure, the target KVL must support the same algorithms (e.g., DES and DVI XL, or DES and DVP XL) as the source KVL.
-
Page 99: Share Selected Keys
Chapter 5 Sharing Keys Between KVLs Share Selected Keys In this scenario, a specific traffic or shadow key is shared from the source KVL to the target KVL. (This procedure is identical to loading a key from the KVL to a target radio. The KVL will recognize that it is loading to another KVL and automatically switch to a share operation.) Important! In order to share a selected key,... -
Page 100: Share Group Maps And Associated Keys
KVL 3000 User's Guide Share Group Map and Associated Keys In this scenario, a specific group map (and associated keys) is shared from the source KVL to the target KVL. (This procedure is identical to loading a group map from the KVL to a target radio. -
Page 101: Overview
Chapter 6 Using KVL 3000 in OTAR Systems chapter contents Overview Programming the USK Loading Keys from KVL to KMC Loading Keys from KMC to KVL (Direct Connection) Loading Keys from KMC to KVL (Modem Connection) KVL 3000 User's Guide 68P81131E16-O 10/15/99 ASN Operation... - Page 102 KVL 3000 User's Guide Overview Introduction The Motorola Over the Air Rekeying (OTAR) system is a secure communications system in which encryption keys can be sent to subscriber units via radio transmission (instead of directly connecting a KVL to load keys). This type of...
- Page 103 Chapter 6 Using KVL 3000 in OTAR Systems Programming the For OTAR operation, a Unique Shadow Key (USK) must be programmed into the KVL 3000 for each algorithm being used. Each USK is a Important! The multi character key typically assigned by the needs to be entered only Crypto/Security Officer for the system, and is one time.
- Page 104 KVL 3000 User's Guide Programming the USK (continued) To create a USK, perform the following: Navigate to the CONFIG menu, then select USK. The following screen will appear: KVL USK >DES READY CLEAR EDIT Use the keys to toggle to the desired algorithm (for dual algorithm units only).
- Page 105 Chapter 6 Using KVL 3000 in OTAR Systems Loading Keys from KVL 3000 to In this procedure, encryption keys that have been entered and stored in the KVL 3000 are transferred to the KMC one at a time. This scenario requires that the KVL 3000 be connected directly to the KMC via a key load cable.
- Page 106 KVL 3000 User's Guide Loading Keys from KVL 3000 to KMC (continued) Use the key to select LOAD. The following screen will appear: TRAF xxxx LOAD TO XXXX XFER Note that you do not have to select a target slot when transferring a key to the KMC.
- Page 107 Chapter 6 Using KVL 3000 in OTAR Systems Loading Keys from KMC to the KVL 3000 using Direct Connection In this procedure, encryption keys stored in the KMC are downloaded to the KVL 3000 via a direct cable connection. Note The KVL 3000 must have a USK assigned for the algorithm type of the keys being downloaded, and the USK must match the USK defined in the KMC.
- Page 108 KVL 3000 User's Guide Loading Keys from KMC to the KVL 3000 using Direct Connection (continued) Use the key to select KMC from the Main Menu. The following screen will appear: MODEM DIRECT Use the key to select DIRECT. The following screen will appear: KMC DIRECT RS232...
- Page 109 Chapter 6 Using KVL 3000 in OTAR Systems Loading Keys from KMC to the KVL 3000 using Direct Connection (continued) The KVL 3000 will communicate with the KMC to begin the download process. While the keys are being downloaded, the display will show a single digit (first a 1, then a 2) sequentially scrolling back and forth across the display.
- Page 110 KVL 3000 User's Guide Loading Keys from KMC to the KVL 3000 using Modem Connection PCMCIA Modem Card Procedure In this procedure, encryption keys stored in the KMC are downloaded to the KVL 3000 via a Note The KVL 3000 PCMCIA modem card.
- Page 111 Chapter 6 Using KVL 3000 in OTAR Systems Loading Keys from KMC to the KVL 3000 using Modem Connection (continued) Use the key to select KMC from the Main Menu. The following screen will appear: MODEM DIRECT Use the key to select MODEM. The following screen will appear: ENTER PH# Enter the dial up phone number of the...
- Page 112 KVL 3000 User's Guide Loading Keys from KMC to the KVL 3000 using Modem Connection (continued) When finished entering phone number, press the Enter key. The following screen will appear: KMC MODEM RS232 PCMCIA Use the key to select PCMCIA. The following screen will appear: KMC TO KVL DOWNLOAD...
- Page 113 Chapter 6 Using KVL 3000 in OTAR Systems Loading Keys from KMC to the KVL 3000 using Modem Connection (continued) When the keys have been successfully downloaded, the KVL 3000 will terminate the connection, and the following screen will appear: KMC TO KVL DOWNLOAD SUCCESSFUL...
- Page 114 KVL 3000 User's Guide Loading Keys from KMC to the KVL 3000 using Modem Connection (continued) External Modem Procedure In this procedure, encryption keys stored in the KMC are downloaded to the KVL 3000 via an RS232 cable connection to an external modem. Note The KVL 3000 must have a USK assigned for the algorithm type of the keys being downloaded, and the USK must match the USK...
- Page 115 Chapter 6 Using KVL 3000 in OTAR Systems Loading Keys from KMC to the KVL 3000 using Modem Connection (continued) Use the key to select KMC from the Main Menu. The following screen will appear: MODEM DIRECT Use the key to select MODEM. The following screen will appear: ENTER PH# Enter the dial up phone number of the...
- Page 116 KVL 3000 User's Guide Loading Keys from KMC to the KVL 3000 using Modem Connection (continued) When finished entering phone number, press the Enter key. The following screen will appear: KMC MODEM RS232 PCMCIA Use the key to select RS232. The following screen will appear: KMC TO KVL DOWNLOAD...
- Page 117 Chapter 6 Using KVL 3000 in OTAR Systems Loading Keys from KMC to the KVL 3000 using Modem Connection (continued) When the keys have been successfully downloaded, the KVL 3000 will terminate the connection, and the following screen will appear: KMC TO KVL DOWNLOAD SUCCESSFUL...
- Page 118 KVL 3000 User's Guide Notes... 6-18 ASN Operation...
-
Page 119: About Log Records
Chapter 7 Viewing and Printing Log Records chapter contents About Log Records Viewing Log Records on KVL 3000 Display Clearing Log Records Transferring Log Records to a PC Printing Log Records to a Serial Printer Log Record Format KVL 3000 User's Guide 68P81131E16-O 10/15/99 ASN Operation... - Page 120 KVL 3000 User's Guide About Log Records Introduction The KVL 3000 maintains a running record of the most recent 128 successful keyload operations. Each record is timestamped and contains detailed information about particular keyload, including the type of key (traffic or shadow), the key number, and the target slot into which the key was loaded.
- Page 121 Chapter 7 Viewing and Printing Log Records View Log Records on KVL 3000 Display Accessing the Log Records Navigate to and select Log in the Main Menu. The following screen will appear (typical screen shown). This is the most recent log record. Month/Day Hours/Minutes 10/31...
- Page 122 KVL 3000 User's Guide Clearing Log Records With any of the log records showing on the KVL 3000 display, press to select CLEAR. The following screen will appear: Note Only supervisors can clear the log records. END OF LOG PRINT CLEAR Remember! In order to clear the log records,...
-
Page 123: Transferring Log Records To A Pc
Chapter 7 Viewing and Printing Log Records Transferring Log Records to a PC The KVL 3000 may be connected to a COM port on a PC (typically a laptop) and transfer the log records to the PC. The records may then be printed from the PC or saved on the PC as a file. -
Page 124: Transferring Log Records To A Pc
KVL 3000 User's Guide Transferring Log Records to a PC (continued) Press to select PRINT. The log records will be transferred to the open communications window on the PC. When finished, you may either print the log records to a printer connected to the PC, or save the log records as a file on the PC. -
Page 125: Printing Log Records To A Serial Printer
Chapter 7 Viewing and Printing Log Records Printing Log Records to a Serial Printer The log records may be printed directly to a serial printer connected to the KVL 3000. Connect an appropriate cable between the KVL 3000 RS 232 port and a serial printer. -
Page 126: Log Record Format
KVL 3000 User's Guide Log Record Format When printing to a serial printer or to a PC, the log records are formatted as shown below: Typical Log Record DATE TIME GROUP KVLSLOT KEYLID UNITID UNITPID S0001 1aa1 0031 $011 10/19/98 21:45 T0435 1311... -
Page 127: Interpreting Error Messages
Chapter 8 Troubleshooting chapter contents Interpreting Error Messages Performing Resets KVL 3000 User's Guide 68P81131E16-O 10/15/99 ASN Operation... - Page 128 KVL 3000 User's Guide Interpreting Error Messages Introduction Two types of error messages are provided by the KVL 3000. D Operator Error and Status Messages Displayed when operator performs an il legal or disallowed action (such as enter ing an invalid value, entering a duplicate LID, etc.), or during normal operation in response to an operator initiated function (e.g., attempting to load a key to a target...
-
Page 129: Chapter 9 Troubleshooting
Chapter 8 Troubleshooting Operator Error and Status Messages Error/Status Probable Cause and Remedy Message Probable Cause(s): 1) Group map data corrupted BAD GROUP Remedy(s): 1) Enter Re enter the Group Map; MAP CRC if problem persists, return to service center Probable Cause(s): 1) Attempt was made to enter the same password for both Supervisor... - Page 130 KVL 3000 User's Guide Error/Status Probable Cause and Remedy Message Probable Cause(s): 1) the group load operation has failed for some reason. GROUP TRANSFER Remedy(s): 1) Press/hold Del/Shift key, then FAILED press E key to display a more de tailed error message Probable Cause(s): 1) A key load operation has failed for some reason...
- Page 131 Chapter 8 Troubleshooting Error/Status Probable Cause and Remedy Message Probable Cause(s): 1) KVL 3000 has not been pro KMC TO KVL grammed with an MDC ID DOWNLOAD Remedy(s): 1) Navigate to ID in the CONFIG NO MDC ID menu, then enter the proper MDC ID Probable Cause(s): 1) PCMCIA modem could not be initiated when attempting a dial up...
- Page 132 KVL 3000 User's Guide Error/Status Probable Cause and Remedy Message Probable Cause(s): 1) Faulty Keyload Cable or con nection 2) Target device is turned off 3) Target device is incompatible with KVL 3000 RESPONSE Remedy(s): 1) Ensure proper keyload cable FROM TARGET connections at each end;...
- Page 133 Chapter 8 Troubleshooting Error/Status Probable Cause and Remedy Message Probable Cause(s): 1) Sharing has failed for some rea son. SHARE ALL Remedy(s): 1) Press/hold Del/Shift key, then FAILED press E key to display a more de tailed error message Probable Cause(s): 1) Key entered into KVL 3000 has incorrect parity WRONG PARITY...
- Page 134 KVL 3000 User's Guide Interpreting Error Messages (continued) Internal Error Messages When this type of error occurs, the display will show KEY LOAD FAILED (or other generic error message). Press and hold the Del/Shift key, then press the E key to display a more detailed error message.
- Page 135 Chapter 8 Troubleshooting Internal Error Messages Internal Error Message Probable Cause and Remedy (Press Shift-E) Probable Cause(s): 1) The two KVLs have different al gorithms SHARE Remedy(s): 1) Sharing can only be performed ENCRYPTION between two KVLs with compatible MISMATCH algorithms;...
-
Page 136: Performing Resets
KVL 3000 User's Guide Performing Resets Introduction Resetting causes the KVL 3000 to return to factory settings (i.e., erases the USK, all stored Note For KVL 3000s keys, Group Maps, Log Records, passwords, equipped for dual mode and resets the configuration settings to the operation (ASN factory defaults). -
Page 137: About These Quick Start Instructions
Chapter 1 Quick Start Instructions chapter contents About These Quick Start Instructions Quick Start Procedures KVL 3000 User's Guide 68P81131E16-O 10/15/99 ASTRO 25 Operation... - Page 138 KVL 3000 User's Guide About these Quick Start Instructions For those of you who are already familiar with the KVL 3000, these Quick Start Instructions provide an abbreviated procedure for preparing your KVL 3000 for use and entering and loading a single encryption key from the KVL 3000 to a target device.
- Page 139 Chapter 1 Quick Start Instructions Quick Start Procedures Install the coin cell battery (Chapter 2, behind All Models tab). Note Steps 1 and 2 need be performed only once. Steps 3 thru 5 are performed on a per key basis. Charge and install the rechargeable main battery (Chapter 2, behind All Models tab).
- Page 140 KVL 3000 User's Guide Quick Start Procedures Enter an encryption key into the KVL 3000 memory (Chapter 4, within this tab). CKR:00254 13251325 46585E04 SLOT FILLED Connect the KVL 3000 to a target device (e.g., radio). Transfer (load) the key to the target device (Chapter 5, within this tab).
- Page 141 Chapter 2 Overview of KVL 3000 chapter contents Description of KVL 3000 Key Features Using the KVL 3000 Using the Menu System KVL 3000 User's Guide 68P81131E16-O 10/15/99 ASTRO 25 Operation...
-
Page 142: Description Of Kvl 3000
The KVL 3000 Key Variable Loader is a battery powered portable unit used to create, store, and transfer encryption keys used by Motorola's secure communications products (e.g., radios, DIUs, CIUs, RNCs, etc.). The KVL 3000 (shown below) is comprised of a... -
Page 143: Key Features
D Menu System User Interface allows system specific and user settings to be configured D Supports software upgrades via PCMCIA Card slot and Motorola's FLASHportt technology D Supports the following encryption algo rithms: - DES (XL and OFB) - DVP XL... -
Page 144: Using The Kvl 3000
KVL 3000 User's Guide Using the KVL 3000 Overview of Encryption Concepts Secure communications systems are designed to provide coded (encrypted") voice and data signals between some or all links in the system (including RF links and network links). In order to do this, each device (e.g., radio, fixed encryption unit) is loaded with a multi digit encryption variable (a key"). - Page 145 Chapter 2 Overview of KVL 3000 Using the KVL 3000 (continued) Overview of Entering and Loading Keys Encryption keys are entered by the user into the KVL 3000 memory locations [organized by Common Key Reference (CKR) number]. The keys may then be transferred (loaded) to a target device, such as a secure radio.
-
Page 146: Using The Menu System
KVL 3000 User's Guide Using the Menu System Menu Architecture The KVL 3000 Menu System is organized as shown on page 2-9. The menu selections for the Main Menu (shown on the facing page) are summarized below. All other menu selections are described in the appropriate chapters in this section of the manual. - Page 147 MAIN MENU (See Note 1) UPDATE LIST TARGET KEYS GROUPS CONFIG PORT Chapter 7 Chapter 7 Chapter 7 Chapter 5 Chapter 4 Chapter 4 Chapter 3 Chapter 8 Migration Notes The PORT menu selection appears only onKVL 3000 models that are equipped with both X795 ASN Operation and U239 ASTRO 25 Operation options.
- Page 148 KVL 3000 User's Guide Using the Menu System (continued) Navigating Through the Menus Each time you power up the KVL 3000 in ASTRO 25 mode, the display shown below appears. The title ASTRO 25 displays to indicate that you are in the Main Menu. The two choices at the bottom of the display (UPDATE and LIST) are the first two items in the Main Menu.
- Page 149 (Note 4) (Note 4) (Note 1) TARGET KEYS GROUPS CONFIG PORT (Note 4) MODEM LOAD ZERO VIEW ALGO PRINT VIEW (Note 4) DIRECT PASSWD CLEAR KEYS (Note 4) SETUP DATE (Note 4) GROUP GROUP TGTRSI (Note 3) RENAME TIME (Note 4) (Note 4) KMFRSI (Note 3)
- Page 150 Chapter 3 Performing Initial Programming chapter contents Perform Initial Programming KVL 3000 User's Guide 68P81131E16-O 10/15/99 ASTRO 25 Operation...
- Page 151 KVL 3000 User's Guide Perform Initial Programming Introduction Before using your KVL 3000 to enter and load encryption keys, several parameters that determine how the KVL 3000 operates can be programmed. The parameters are divided into two categories: D User Preference D System Dependent Instructions for programming these parameters begin on the next page.
-
Page 152: Chapter 3 Performing Initial Programming
Chapter 3 Performing Initial Programming Perform Initial Programming (continued) User Preference Parameters The parameters and settings in this category are not required for operation of the KVL 3000, but instead provide a way of customizing certain functions to suit each individual user. Set Power Down Timeout The Power Down Timeout feature allows you to program a time... - Page 153 KVL 3000 User's Guide Perform Initial Programming (continued) User Preference Parameters (continued) Turn On/Off Display Backlighting KVL 3000 powers up with display backlighting turned off. If desired, you may turn on backlighting at any time by pressing and holding the Del/Shift key, then pressing and releasing the B key, then releasing the Del/Shift key.
- Page 154 Chapter 3 Performing Initial Programming Perform Initial Programming (continued) User Preference Parameters (continued) Enable/Disable Algorithms The KVL 3000 is Note The KVL 3000 can capable of supporting multiple encryption support the following algorithms (see sidenote), depending on the combinations of algo options ordered at the time of purchase.
- Page 155 KVL 3000 User's Guide Perform Initial Programming (continued) User Preference Parameters (continued) Set Time and Date The KVL 3000 contains an internal real time clock that is used to timestamp (with date and time) the log entries. If you wish to have these entries timestamped, you must set the time and date.
- Page 156 Chapter 3 Performing Initial Programming Perform Initial Programming (continued) User Preference Parameters (continued) To set the date ... Navigate to the CONFIG menu, then navigate to and select DATE. The following screen will appear: THE DATE IS 01/01/00 EDIT FORMAT Note The KVL 3000 supports North American and European date formats.
- Page 157 KVL 3000 User's Guide Perform Initial Programming (continued) User Preference Parameters (continued) Set Up Passwords The KVL 3000 provides two levels of security access, Supervisor and Operator. The Supervisor has access to all functions and features. The Operator has access to a limited set of functions and features (see Menu Tree on page 2-9).
- Page 158 Chapter 3 Performing Initial Programming Perform Initial Programming (continued) User Preference Parameters (continued) Enter the desired Supervisor password. The password must contain 6 characters Note Operator pass using any of the keypad buttons 0 thru F. word Supervisor When finished, press the Enter key. password must be differ ent from each other.
- Page 159 KVL 3000 User's Guide Perform Initial Programming (continued) User Preference Parameters (continued) Turn Sharing On/Off In addition to loading keys into target devices, the KVL 3000 can also share" its keys with another KVL 3000. In order to share keys, the sharing feature must be turned on in both the source and target KVL.
- Page 160 Chapter 3 Performing Initial Programming Perform Initial Programming (continued) System Dependent Parameters The parameters and settings in this category must be set depending on the particular system in which the KVL 3000 will be operating. Turn KMF Mode On/Off (OTAR Only) order to communicate with a Key Management Facility (KMF) in an OTAR system, the KVL 3000 must have the KMF Mode turned on.
- Page 161 KVL 3000 User's Guide Perform Initial Programming (continued) System Dependent Parameters (continued) Select RS232 or Serial Port Baud Rate When using the KVL 3000 serial port to communicate with external equipment (such as a KMF, a printer for log printing, or an external modem), the proper baud rate must be selected.
- Page 162 Chapter 3 Performing Initial Programming Perform Initial Programming (continued) System Dependent Parameters (continued) Turn FIPS On/Off When turned on, FIPS operation (available only with DES algorithm) causes the KVL 3000 to operate in a mode that is compliant with the U.S. Federal Information Processing Standard (FIPS) 140 1 guidelines.
- Page 163 KVL 3000 User's Guide Perform Initial Programming (continued) System Dependent Parameters (continued) Enter System Key (DVI XL Only) KVL 3000 requires a 128 digit System Key to communicate DVI XL systems. Each KVL 3000 is shipped from the factory with a default System Key.
- Page 164 Chapter 3 Performing Initial Programming Perform Initial Programming (continued) System Dependent Parameters (continued) Press to select YES. The following screen will appear. SYSKEY BYTE 01 Enter the 128 digit (64 bytes) System Key. The display will show SLOT FILLED when completed.
- Page 165 KVL 3000 User's Guide Notes ... 3-16 ASTRO 25 Operation...
-
Page 166: Entering Keys
Chapter 4 Entering Keys into the KVL 3000 chapter contents Entering Keys Deleting Keys Creating Key Groups Modifying Key Groups KVL 3000 User's Guide 68P81131E16-O 10/15/99 ASTRO 25 Operation... - Page 167 KVL 3000 User's Guide Entering Keys To enter a Traffic Encryption Key (TEK) or a Key Encryption Key (KEK) into the KVL 3000 internal key database, perform the following: Use the key to select KEYS from the Main Menu. The following screen will appear (typical screen shown).
- Page 168 Chapter 4 Entering Keys into the KVL 3000 Entering Keys (continued) Use the keys to select the desired algorithm for this key. Then use key to select ACCEPT. The Note If you have only following screen will appear. one algorithm enabled (using CONFIG menu), you will not be prompted for an algorithm.
- Page 169 KVL 3000 User's Guide Entering Keys (continued) Press the Enter key. The following screen will appear briefly to confirm your entry. NEW KEY WAS SUCCESSFULLY CREATED. The following screen will then appear, showing the key you just created and awaiting entry of a new key (by selecting NEW).
- Page 170 Chapter 4 Entering Keys into the KVL 3000 Deleting Keys in KVL 3000 The delete feature allows you to erase an encryption key (TEK or KEK) stored in a specific CKR location in the KVL 3000's memory. Deleting permanently erases the encryption key currently stored in the location.
- Page 171 KVL 3000 User's Guide Creating Key Groups Introduction The KVL 3000 provides a convenient feature called key groups." This feature allows you to associate several keys stored in the KVL 3000 memory with a specified Group Name. You can then load the entire group of keys to the target device in a single operation.
- Page 172 Chapter 4 Entering Keys into the KVL 3000 Creating Key Groups (continued) Use the key to select NEW. The following screen will appear. ENTER NEW GROUP NAME> You will now create a name for this group. Use the keys to sequence forward/backward through the alphabet Note In addition to let until the desired letter is displayed.
- Page 173 KVL 3000 User's Guide Creating Key Groups (continued) You will now associate (add) the desired keys to this group (see sidenote). Use the keys to select the first Note Normally, each key you wish to add (or directly enter the key added to the group CKR using the keypad), then use the will have a defined"...
-
Page 174: Modifying Key Groups
Chapter 4 Entering Keys into the KVL 3000 Modifying Key Groups Introduction Once the KVL 3000 contains one or more key groups, you may modify the groups in the following ways: D View the Keys in a Group (page 4-9) D Add Keys to a Group (page 4-11) D Delete Keys from a Group (page 4-13) D Delete a Group (page 4-15) - Page 175 KVL 3000 User's Guide Modifying Key Groups (continued) Use the keys to sequence forward/backward (alphabetically Group Name) through the groups in the KVL 3000. When the desired Group Name is displayed, use the key to select VIEW. The following screen will appear. GRP:TEST1 HAS XX KEYS CKR 00001...
- Page 176 Chapter 4 Entering Keys into the KVL 3000 Modifying Key Groups (continued) Adding Keys to a Group Navigate to and select GROUPS in the Main Menu. The following screen will appear with first group (alphabetically) displayed: GRP:ALPHA1 HAS NN KEYS VIEW Use the keys to sequence...
- Page 177 KVL 3000 User's Guide Modifying Key Groups (continued) Use the key to select ADD. The following screen will appear. GRP:TEST1 CKR 00001 SELECT DONE Use the keys to select the CKR Note If desired, you for the key you wish to add (or enter the may add undefined"...
- Page 178 Chapter 4 Entering Keys into the KVL 3000 Modifying Key Groups (continued) Deleting Keys from a Group Navigate to and select GROUPS in the Main Menu. The following screen will appear with first group (alphabetically) displayed: GRP:ALPHA1 HAS NN KEYS VIEW Use the keys to sequence...
- Page 179 KVL 3000 User's Guide Modifying Key Groups (continued) Use the keys to select the CKR for key you wish to delete. Then press the Del/Shift key. The following screen will appear. OK TO ERASE CKR:XXXXX FROM GROUP? Use the key to select YES. z End of This Procedure z 4-14 ASTRO 25 Operation...
- Page 180 Chapter 4 Entering Keys into the KVL 3000 Modifying Key Groups (continued) Deleting a Group Navigate to and select GROUPS in the Main Menu. The following screen will appear with first group (alphabetically) displayed: GRP:ALPHA1 HAS NN KEYS VIEW Use the keys to sequence forward/backward (alphabetically...
- Page 181 KVL 3000 User's Guide Modifying Key Groups (continued) Use the key to select YES. The message GRP SUCCESSFULLY DELETED will appear briefly to indicate that the group has been deleted from the KVL 3000. z End of This Procedure z 4-16 ASTRO 25 Operation...
- Page 182 Chapter 4 Entering Keys into the KVL 3000 Modifying Key Groups (continued) Renaming a Group Navigate to and select GROUPS in the Main Menu. The following screen will appear with first group (alphabetically) displayed: GRP:ALPHA1 HAS NN KEYS VIEW Use the keys to sequence forward/backward (alphabetically...
- Page 183 KVL 3000 User's Guide Modifying Key Groups (continued) Use the key to select RENAME. The following screen will appear. GRP:TEST1 RENAME TO> Enter a new name as described on page 4-7. When finished, press the Enter key. The message GRP RENAMED TO XX will appear briefly to confirm the name change.
-
Page 184: Introduction
Chapter 5 Loading Keys into Target Devices chapter contents Introduction Loading Keys into Target Devices Zeroizing Keys in Target Devices Viewing Keys in Target Devices KVL 3000 User's Guide 68P81131E16-O 10/15/99 ASTRO 25 Operation... - Page 185 KVL 3000 User's Guide Introduction Loading keys from the KVL 3000 to a target device (e.g., a secure radio) is performed from the TARGET menu selection in the Main Menu. Once in this menu, you have the option of performing the following three tasks: D LOAD Allows you to load keys (selected key, all keys in the KVL 3000, or by Key Group) into a target device connected to...
- Page 186 Chapter 5 Loading Keys into Target Devices Loading Keys into Target Devices Loading Selected Key Turn on the KVL 3000 and the target radio, then connect them using the appropriate cable. Use the key to select TARGET from the Main Menu. The following screen will appear: TARGET LOAD...
-
Page 187: Loading Keys Into Target Devices
KVL 3000 User's Guide Loading Keys into Target Devices (continued) Use the keys to select the key you wish to load to the target radio (or use the keypad to directly enter the CKR, then press Enter). Use the key to select LOAD. The following screen will appear while the key is being loaded. - Page 188 Chapter 5 Loading Keys into Target Devices Loading Keys into Target Devices (continued) Loading a Key Group Turn on the KVL 3000 and the target radio, then connect them using the appropriate cable. Use the key to select TARGET from the Main Menu.
- Page 189 KVL 3000 User's Guide Loading Keys into Target Devices (continued) Use the keys to select the Key Group you wish to load to the target radio. Use the key to select LOAD. The following screen will appear while the Key Group is being loaded.
- Page 190 Chapter 5 Loading Keys into Target Devices Loading Keys into Target Devices (continued) Loading All Keys Turn on the KVL 3000 and the target radio, then connect them using the appropriate Note In order to load all cable. keys from the KVL 3000 Use the key to select TARGET from into the target device, the...
- Page 191 KVL 3000 User's Guide Loading Keys into Target Devices (continued) Use the key to select YES. The following screen will appear while the keys are being loaded. LOADING ALL KEYS INTO TARGET... When finished, the following screen will appear to confirm that all the keys in the KVL 3000 were loaded to the target radio.
-
Page 192: Zeroizing Keys In Target Devices
Chapter 5 Loading Keys into Target Devices Zeroizing Keys in Target Devices Introduction The zeroize feature allows you to erase an encryption key(s) stored in a secure target device (e.g., radio). Zeroizing permanently erases the encryption key from the CKR memory location in the target device. - Page 193 KVL 3000 User's Guide Zeroizing Keys in Target Devices (continued) Use the key to select KEY. The KVL 3000 will query the target for the keys currently stored. The following (typical) screen will then appear: CKR 00001 ALG:DES-XL KID:1234 ZERO Use the keys to select the key you wish to zeroize in the target radio (or...
- Page 194 Chapter 5 Loading Keys into Target Devices Zeroizing Keys in Target Devices (continued) When finished, the following screen will appear to confirm that the key was zeroized in the target radio. Use the key to select OK. CKR:00001 ZEROIZED SUCCESSFULLY z End of This Procedure z 5-11 ASTRO 25 Operation...
- Page 195 KVL 3000 User's Guide Zeroizing Keys in Target Devices (continued) Zeroizing Using Key Groups Turn on the KVL 3000 and the target radio, then connect them using the appropriate cable. Use the key to select TARGET from the Main Menu. The following screen will appear: TARGET LOAD...
- Page 196 Chapter 5 Loading Keys into Target Devices Zeroizing Keys in Target Devices (continued) Use the keys to select the Key Group you wish to use to zeroize keys in the target device. For example, if group ALPHA1 contains keys with CKR 1, 2, 5, and 15, then selecting group ALPHA1 will zeroize (in the next step) CKR 1, 2, 5, and 15 in the target device.
- Page 197 KVL 3000 User's Guide Zeroizing Keys in Target Devices (continued) Zeroizing All Keys Turn on the KVL 3000 and the target radio, then connect them using the appropriate cable. Use the key to select TARGET from the Main Menu. The following screen will appear: TARGET LOAD...
- Page 198 Chapter 5 Loading Keys into Target Devices Zeroizing Keys in Target Devices (continued) Use the key to select YES. The following screen will appear while the keys are being zeroized. Note In OTAR, zeroiz ing All Keys erases all keys in the target, includ ing the KLK (if used).
-
Page 199: Viewing Keys In Target Devices
KVL 3000 User's Guide Viewing Keys in Target Devices Turn on the KVL 3000 and the target radio, then connect them using the appropriate cable. Use the key to select TARGET from the Main Menu. The following screen will appear: TARGET LOAD ZERO... - Page 200 Chapter 5 Loading Keys into Target Devices Viewing Keys in Target Devices (continued) Use the key to select KEYS. The KVL 3000 will query the target device, retrieve a listing of the keys stored in the target device, and display the first key, as shown below.
- Page 201 KVL 3000 User's Guide Notes ... 5-18 ASTRO 25 Operation...
-
Page 202: About Sharing
Chapter 6 Sharing Keys Between KVLs chapter contents About Sharing Setting Up Connections Share All Keys Share Selected Key Share Key Groups and Associated Keys KVL 3000 User's Guide 68P81131E16-O 10/15/99 ASTRO 25 Operation... - Page 203 KVL 3000 User's Guide About Sharing Introduction In addition to loading keys into target devices, the KVL 3000 can also share" its keys with another KVL 3000. For example, when finished with a Share All operation, the target KVL 3000 will contain all of the TEKs, KEKs, and Key Groups as the source KVL 3000.
- Page 204 Chapter 6 Sharing Keys Between KVLs Setting Up Connections Introduction In order to share keys between two KVLs, a KVL to KVL Transfer Cable (Model TKN8209) is required. Connecting the KVL 3000s Connect the transfer cable between the two KVLs as shown below. TKN8209 TRANSFER CABLE...
- Page 205 KVL 3000 User's Guide Share All Keys In this scenario, all TEKs and KEKs, as well as Key Groups (if present) are transferred from the source KVL 3000 to the target KVL 3000. Important! In order to perform a Share All procedure, the target KVL 3000 must support the same algorithms (e.g., DES and DVI XL, or DES and DVP XL) as the source KVL (assuming there is...
-
Page 206: Share All Keys
Chapter 6 Sharing Keys Between KVLs Share All Keys (continued) Use the keys to display ALL, then use the key to select it. The following (typical) screen will appear: LOAD ALL KEYS INTO THE TARGET? Use the key to select YES. The following screen will appear while the keys are being loaded. -
Page 207: Share Selected Key
KVL 3000 User's Guide Share Selected In this scenario, a specific TEK or KEK is shared from the source KVL 3000 to the target KVL 3000. Important! In order to share a selected key, the target KVL must be able to support the algorithm of the key being shared. - Page 208 Chapter 6 Sharing Keys Between KVLs Share Selected Keys (continued) Use the keys to select the key you wish to share with the target KVL 3000 (or use the keypad to directly enter the location number, then press Enter). Use the key to select LOAD.
-
Page 209: Share Key Groups And Associated Keys
KVL 3000 User's Guide Share Key Group and Associated Keys In this scenario, a specific Key Group (including Key Group Name and the associated keys) is shared from the source KVL 3000 to the target KVL 3000. With both KVLs turned on and connected via the transfer cable, navigate to and select TARGET in the Main Menu of the source KVL 3000. - Page 210 Chapter 6 Sharing Keys Between KVLs Share Key Group and Associated Keys (continued) Use the keys to select the Key Group you wish to share with the target KVL 3000. Use the key to select LOAD. The following screen will appear while the Key Group is being loaded.
- Page 211 KVL 3000 User's Guide Notes ... 6-10 ASTRO 25 Operation...
-
Page 212: Chapter 7 Using Kvl 3000 In Otar Systems
Chapter 7 Using KVL 3000 in OTAR Systems chapter contents Overview Setting Up KVL 3000 for KMF Operation Loading Keys from KVL to KMF Loading Keys from KMF to KVL (Direct Connection) Loading Keys from KMF to KVL (Modem Connection) Using the Store and Forward Feature Viewing/Loading OTAR Configuration Parameters KVL 3000 User's Guide... - Page 213 KVL 3000 User's Guide Overview Introduction The Motorola Over the Air Rekeying (OTAR) system is a secure communications system in which encryption keys can be sent to subscriber units via radio transmission (instead of directly connecting a KVL to load keys). This type of...
- Page 214 Chapter 7 Using KVL 3000 in OTAR Systems Overview (continued) D Download encryption keys from the KMF into the KVL 3000 This scenario incorporates two methods of download ing keys: Individual keys are downloaded to the KVL 3000 key database, and must then be loaded directly into target devices.
- Page 215 KVL 3000 User's Guide Setting Up KVL 3000 for KMF Operation Introduction Before using your KVL 3000 to interchange keys with a KMF, several KMF related parameters must be programmed. These are: D UKEK Unique Key Encryption Key required per algorithm in the KVL 3000 for OTAR systems;...
- Page 216 Chapter 7 Using KVL 3000 in OTAR Systems Setting Up KVL 3000 for KMF Operation (continued) Enter UKEK For OTAR operation, a Unique Key Encryption Key (UKEK; functionally similar to the USK for ASN operation) must be programmed into the KVL 3000 for each algorithm being used.
- Page 217 KVL 3000 User's Guide Setting Up KVL 3000 for KMF Operation (continued) Use the keys to select the desired algorithm. Then use to select EDIT. The following screen will appear. ENTER THE UKEK KID >J Enter the 4 digit KID and press the Enter key.
- Page 218 Chapter 7 Using KVL 3000 in OTAR Systems Setting Up KVL 3000 for KMF Operation (continued) Select Main or Backup KMF The KVL 3000 can support dial up phone numbers for a Main and a Backup KMF. The KMFSEL setting determines which number is dialed when making a modem connection to a KMF.
- Page 219 KVL 3000 User's Guide Setting Up KVL 3000 for KMF Operation (continued) Select Tone or Pulse Dialing The KVL 3000 can support Tone or Pulse dialing when making a modem connection to a KMF. Select the desired dialing method as follows. Navigate to the KMF menu, then navigate to and select SETUP .
- Page 220 Chapter 7 Using KVL 3000 in OTAR Systems Setting Up KVL 3000 for KMF Operation (continued) Enter Main and Backup KMF Phone Numbers The KVL 3000 can support dial up phone numbers for a Main and a Backup KMF. Enter the dial up phone numbers as follows.
- Page 221 KVL 3000 User's Guide Setting Up KVL 3000 for KMF Operation (continued) Use the keys to select the phone number you wish to view (either MAIN or BACKUP). The following screen will appear (MAIN selected). MAIN PH#: EDIT Press the key to select EDIT.
- Page 222 Chapter 7 Using KVL 3000 in OTAR Systems Setting Up KVL 3000 for KMF Operation (continued) Hints and Tips for Entering Phone Numbers D Press the Del/Shift key to backspace and delete the digit to the left of the flashing cursor.
- Page 223 KVL 3000 User's Guide Setting Up KVL 3000 for KMF Operation (continued) Entering the KMFRSI The KMF requires a Radio Set Identifier (RSI) in order to operate in the OTAR system. The KVL 3000 will only accept keys and KMMs from the KMF with this RSI. Enter the RSI as follows.
- Page 224 Chapter 7 Using KVL 3000 in OTAR Systems Setting Up KVL 3000 for KMF Operation (continued) Press the key to select EDIT. A warning screen will appear notifying you that editing the KMFRSI will destroy any Store and Forward messages and target status updates that may be stored in the KVL 3000.
- Page 225 KVL 3000 User's Guide Setting Up KVL 3000 for KMF Operation (continued) Entering the MNP The Message Number Period (MNP) is used in an ASTRO 25 system feature that provides additional security in the over the air rekeying of subscriber units. The MNP number may range from 0 thru 65535, and serves as an offset value used in synchronizing OTAR rekeying transmissions.
- Page 226 Chapter 7 Using KVL 3000 in OTAR Systems Setting Up KVL 3000 for KMF Operation (continued) Press the key to select EDIT. The following screen will appear. MNP: Enter the desired MNP number (0 thru Note Entering an MNP 65535; entry of leading zeroes not value of 0 or 65535 dis required) and then press the Enter key to ables Message Number...
- Page 227 KVL 3000 User's Guide Setting Up KVL 3000 for KMF Operation (continued) Entering the KVLRSI The KVL 3000 requires a Radio Set Identifier (RSI) in order to operate in the OTAR system. Enter the RSI as follows. Navigate to the KMF menu, then navigate to and select SETUP .
- Page 228 Chapter 7 Using KVL 3000 in OTAR Systems Setting Up KVL 3000 for KMF Operation (continued) Press the key to select EDIT. The following screen will appear. KVLRSI: Enter the desired KVLRSI number (7 digits maximum; entry of leading zeroes not required) and then press the Enter key to accept the entry.
- Page 229 KVL 3000 User's Guide Loading Keys from KVL 3000 to In this procedure, encryption keys that have been entered and stored in the KVL 3000 are transferred to the KMF one at a time. This scenario requires that the KVL 3000 be connected directly to the KMF via a key load cable.
- Page 230 Chapter 7 Using KVL 3000 in OTAR Systems Loading Keys from KVL 3000 to KMF (continued) Use the key to select TARGET from the Main Menu. The following screen will appear: TARGET LOAD ZERO Use the key to select LOAD. The following screen will appear: LOAD GROUP...
- Page 231 KVL 3000 User's Guide Loading Keys from KVL 3000 to KMF (continued) Use the keys to select the key you wish to load to the KMF (or use the keypad to directly enter the location number, then press Enter). Use the key to select LOAD.
- Page 232 Chapter 7 Using KVL 3000 in OTAR Systems Loading Keys from KMF to the KVL 3000 using Direct Connection In this procedure, encryption keys stored in the KMF are downloaded to the KVL 3000 via a direct cable connection. Note The KVL 3000 must have a UKEK assigned for the algorithm type of the keys being downloaded, and the UKEK must match the UKEK defined for this KVL 3000 in the KMF.
- Page 233 KVL 3000 User's Guide Loading Keys from KMF to the KVL 3000 using Direct Connection (continued) Use the key to select KMF from the Main Menu. The following screen will appear: MODEM DIRECT Use the key to select DIRECT. The following screen will appear: KMF –...
- Page 234 Chapter 7 Using KVL 3000 in OTAR Systems Loading Keys from KMF to the KVL 3000 using Direct Connection (continued) The KVL 3000 will communicate with the KMF to begin the download process. Messages will appear in the display to indicate the progress of the download process.
- Page 235 KVL 3000 User's Guide Loading Keys from KMF to the KVL 3000 using Modem Connection PCMCIA Modem Card Procedure In this procedure, encryption keys stored in the KMF are downloaded to the KVL 3000 via a Note The KVL 3000 PCMCIA modem card.
- Page 236 Chapter 7 Using KVL 3000 in OTAR Systems Loading Keys from KMF to the KVL 3000 using Modem Connection (continued) Use the key to select KMF from the Main Menu. The following screen will appear: MODEM DIRECT Use the key to select MODEM. The following screen will appear: KMF –...
- Page 237 KVL 3000 User's Guide Loading Keys from KMF to the KVL 3000 using Modem Connection (continued) Use the key to select DIAL. The following screen will appear: STARTING Note To abort DOWNLOAD downloading operation, FROM KMF... press the Esc key. The KVL 3000 will dial and connect with the KMF via the modem connection.
- Page 238 Chapter 7 Using KVL 3000 in OTAR Systems Loading Keys from KMF to the KVL 3000 using Modem Connection (continued) External Modem Procedure In this procedure, encryption keys stored in the KMF are downloaded to the KVL 3000 via an RS232 cable connection to an external modem.
- Page 239 KVL 3000 User's Guide Loading Keys from KMF to the KVL 3000 using Modem Connection (continued) Use the key to select KMF from the Main Menu. The following screen will appear: MODEM DIRECT Use the key to select MODEM. The following screen will appear: KMF –...
- Page 240 Chapter 7 Using KVL 3000 in OTAR Systems Loading Keys from KMF to the KVL 3000 using Modem Connection (continued) Use the key to select DIAL. The following screen will appear: STARTING DOWNLOAD FROM KMF... The KVL 3000 will dial and connect with the KMF via the modem connection.
-
Page 241: Using The Store And Forward Feature
KVL 3000 User's Guide Using the Store and Forward Feature Introduction The Store and Forward feature (supported only in ASTRO 25 operation) offers a simplified and more secure method of transferring keys and other messages from a KMF to target devices (via the KVL 3000). - Page 242 Chapter 7 Using KVL 3000 in OTAR Systems Using the Store and Forward Feature (continued) Updating a Target Device In this procedure, it is assumed that the KMF has downloaded Store and Forward messages to the KVL 3000. These messages include keys and identify the target devices for which the keys are intended.
- Page 243 KVL 3000 User's Guide Using the Store and Forward Feature (continued) If the target device has Store and Forward keys stored in the KVL 3000, the following screen will appear. Otherwise, a message will indicate that There is no update for this unit."...
- Page 244 Chapter 7 Using KVL 3000 in OTAR Systems Using the Store and Forward Feature (continued) Viewing the Store and Forward List In this procedure, it is assumed that the KMF has downloaded Store and Forward messages to the KVL 3000. The target units for which there are messages may be viewed by selecting List from the Main Menu.
- Page 245 KVL 3000 User's Guide Using the Store and Forward Feature (continued) While Viewing the Store and Forward List ... D You may Update a specific target unit by connecting the KVL 3000 to the target unit, scrolling to the unit's Store and For ward entry, and pressing the key to select UPDATE.
- Page 246 Chapter 7 Using KVL 3000 in OTAR Systems THIS PAGE INTENTIONALLY LEFT BLANK 7-35 ASTRO 25 Operation...
-
Page 247: Viewing/Loading Otar Configuration Parameters
KVL 3000 User's Guide Viewing/Loading OTAR Configuration Parameters Introduction The following parameters are required by target devices in order to operate within an OTAR system: D TGTRSI D KMFRSI D MNP In most cases, these parameters are loaded into the target devices automatically by the KVL 3000 during the initial Store and Forward update. - Page 248 Chapter 7 Using KVL 3000 in OTAR Systems Viewing/Loading OTAR Configuration Parameters (continued) Viewing a Target's TGTRSI, KMFRSI, and Note These parame ters are viewable only In this procedure, you will connect the KVL 3000 when KMF is enabled (via to a target device (radio.
- Page 249 KVL 3000 User's Guide Viewing/Loading OTAR Configuration Parameters (continued) Use the keys to navigate to TGTRSI, KMFRSI, or MNP (as desired), then press to select the desired parameter. The KVL 3000 will query the target retrieve selected parameter. The following screen will appear (TGTRSI shown): INDIVIDUAL TARGET RSI:...
- Page 250 Chapter 7 Using KVL 3000 in OTAR Systems Viewing/Loading OTAR Configuration Parameters (continued) Loading a TGTRSI, KMFRSI, or MNP into Target Device In this procedure, you will connect the KVL 3000 to a target device (radio. DIU, RMC, etc.) and load a TGTRSI, KMFRSI, or MNP into the device.
- Page 251 KVL 3000 User's Guide Viewing/Loading OTAR Configuration Parameters (continued) Use the keys to navigate to TGTRSI, KMFRSI, or MNP (as desired), then press to select the desired parameter. The following screen will appear (TGTRSI shown): ENTER THE TGTRSI> Enter the desired TGTRSI (or KMFRSI or MNP), then press to select LOAD.
- Page 252 Chapter 8 Viewing and Printing Log Records chapter contents About Log Records Viewing Log Records on KVL 3000 Display Clearing Log Records Transferring Log Records to a PC Printing Log Records to a Serial Printer Log Record Format KVL 3000 User's Guide 68P81131E16-O 10/15/99 ASTRO 25 Operation...
- Page 253 KVL 3000 User's Guide About Log Records Introduction The KVL 3000 maintains a running record of the most recent 128 successful target operations. Each record is timestamped and contains detailed information about particular operation (Load or Zero), the key's CKR, and the target's RSI.
- Page 254 Chapter 8 Viewing and Printing Log Records View Log Records on KVL 3000 Display Accessing the Log Records Navigate to and select Log in the Main Menu. The following screen will appear (typical screen shown; see sidebar for details on interpreting this screen).
- Page 255 KVL 3000 User's Guide Clearing Log Records With any of the log records showing on the KVL 3000 display, perform the following to clear the log. (You must be a supervisor to clear the log.) Press to select CLEAR. The following screen will appear: DO YOU WANT TO CLEAR THE...
- Page 256 Chapter 8 Viewing and Printing Log Records Transferring Log Records to a PC The KVL 3000 may be connected to a COM port on a PC (typically a laptop) and transfer the log records to the PC. The records may then be printed from the PC or saved on the PC as a file.
- Page 257 KVL 3000 User's Guide Transferring Log Records to a PC (continued) Press to select PRINT. The log records will be transferred to the open communications window on the PC. When finished, you may either print the log records to a printer connected to the PC, or save the log records as a file on the z End of This Procedure z ASTRO 25 Operation...
- Page 258 Chapter 8 Viewing and Printing Log Records Printing Log Records to a Serial Printer The log records may be printed directly to a serial printer connected to the KVL 3000. Connect an appropriate cable between the KVL 3000 RS 232 port and a serial printer.
- Page 259 KVL 3000 User's Guide Log Record Format When printing to a serial printer or to a PC, the log records are formatted as shown below: Typical Log Record DATE TIME TARGET RSI OPERATION GROUP ALIAS 00689121 load key 00252 10/19/99 21:45 00006783 load all...
- Page 260 Chapter 9 Troubleshooting chapter contents Interpreting Error Messages Performing Resets KVL 3000 User's Guide 68P81131E16-O 10/15/99 ASTRO 25 Operation...
-
Page 261: Interpreting Error Messages
KVL 3000 User's Guide Interpreting Error Messages Introduction Two types of error messages are provided by the KVL 3000 in ASTRO 25 mode: D User Entry Errors Displayed when op erator performs an illegal or disallowed action (such as entering an invalid value, entering a duplicate KID, etc.). - Page 262 Chapter 9 Troubleshooting User Entry Errors Error/Status Probable Cause and Remedy Message Probable Cause(s): 1) You have attempted to enter a key into the KVL 3000 with a KID that is already assigned to an existing CANNOT ENTER key of the same algorithm type. SAME KID FOR THIS ALGO!! Remedy(s):...
- Page 263 KVL 3000 User's Guide Interpreting Error Messages (continued) Operational Error Messages The table on the next page shows all Operational Errors presented in alphabetical order, along with probable causes and remedies. ASTRO 25 Operation...
- Page 264 Chapter 9 Troubleshooting Operational Error Messages Operational Probable Cause and Remedy Error Message Probable Cause(s): 1) You have attempted to load a key with an algorithm type that is not supported by the target. 2) You have attempted to load a Key Group and one or more of the keys in the group has an algorithm ALGO IS NOT...
- Page 265 FIX? messages to be erased. Important! If you experience fre quent database corruptions, power the KVL down (do not fix database) and contact the Motorola Service Center. Probable Cause(s): 1) You have exceeded the KVL 3000's memory capacity (i.e., the KVL 3000 memory is full of keys and/or Store and Forward mes sages).
- Page 266 ASTRO 25 mode. 4) Make sure target is properly configured (via RSS) to support key loading. 5) Contact Motorola Service Center 6) Enable sharing (ON) in ASTRO 25 mode via CONFIG menu in target KVL. Probable Cause(s): 1) Target has reached memory ca pacity.
- Page 267 KVL 3000 User's Guide Operational Probable Cause and Remedy Error Message Probable Cause(s): 1) When sharing and performing a Load Key or Load Group operation with a DVI XL key, the System Key in TARGET'S the source KVL must match the Sys SYSKEY DOES tem Key in the target KVL.
- Page 268 Chapter 9 Troubleshooting Operational Probable Cause and Remedy Error Message Probable Cause(s): 1) You have attempted to repeat a Store and Forward keyload to a tar get (a n appears next to the entry in the List view to indicate that the UNIT HAS Update operation has already been BEEN UPDATED...
- Page 269 KVL 3000 User's Guide Table 1 List of Allowed Operations Targets Portable/ Mobile Mobile Operation Radio LOAD KEY LOAD GROUP LOAD ALL LOAD TGTRSI LOAD KMFRSI LOAD MNP ZERO ALL ZERO GROUP ZERO KEY VIEW KEYS VIEW TGTRSI VIEW KMFRSI VIEW MNP UPDATE 9-10...
-
Page 270: Performing Resets
Chapter 9 Troubleshooting Performing Resets Introduction Resetting causes the KVL 3000 to return to factory settings (i.e., erases the UKEKs, all Note For KVL 3000s stored keys, passwords, and resets the equipped for dual mode configuration settings to the factory defaults). operation (ASN ASTRO 25), note that re... - Page 271 KVL 3000 User's Guide Notes ... 9-12 ASTRO 25 Operation...
- Page 272 Chapter 1 Using the Key Porting Feature chapter contents Overview of Key Porting Feature Porting Keys within the KVL 3000 Copying Keys from a KMC to a KMF Copying Keys from a KMF to a KMC KVL 3000 User's Guide 68P81131E16-O 10/15/99...
- Page 273 KVL 3000 User's Guide Overview of Key Porting Feature Introduction The KVL 3000 (when equipped with both X795 and U239 options) is capable of storing keys in both ASN and ASTRO 25 formats. The key porting" feature allows you to copy an ASN traffic or shadow key from its ASN memory location (stored to a PID and containing a LID) and load it into an empty ASTRO 25 TEK or KEK...
-
Page 274: Chapter 1 Using The Key Porting Feature
Chapter 1 Using the Key Porting Feature Example of Porting a Key from ASN to ASTRO 25 ASN Memory in ASTRO 25 Memory KVL 3000 in KVL 3000 (Split Value of 512 Assumed) KEYS KEYS TRAF>2 CKR>00005 ALGO DES ALGO DES XL LID 1234 KID 1234 DATA=... -
Page 275: Overview Of The Key Porting Feature
KVL 3000 User's Guide Overview of Key Porting Feature (continued) Key Porting Restrictions and Guidelines Please observe the following restrictions and guidelines when porting keys: D Only keys with DES (XL or OFB), DVP XL, and DVI XL algorithms can be ported D TEKs of the same algorithm type stored in ASTRO 25 memory can not have duplicate KIDS (including 0000) -
Page 276: Porting Keys Within The Kvl 3000
Chapter 1 Using the Key Porting Feature Porting Keys within the KVL 3000 Porting a Key from ASN to ASTRO 25 The following example describes how to port an existing traffic key from ASN memory to ASTRO 25 memory within the KVL 3000. Make sure the KVL 3000 is in ASN operating mode (described in Switching Between ASN and ASTRO 25 Operation... - Page 277 KVL 3000 User's Guide Porting Keys within the KVL 3000 (continued) Use the keys to select the traffic key you wish to port (or use the keypad to directly enter the location number). (In this example, 15 has been selected.) Use the key to select SELECT.
- Page 278 Chapter 1 Using the Key Porting Feature Porting Keys within the KVL 3000 (continued) Use the keys to select DES XL or DES OFB. (In this example, DES XL has been selected.) Use the key to select ACCEPT. The following screen will appear: PORT KEY FROM ASN TO ASTRO 25?
- Page 279 KVL 3000 User's Guide Porting Keys within the KVL 3000 (continued) Porting a Key from ASTRO 25 to ASN The following example describes how to port an existing Traffic Encryption Key (TEK) from ASTRO 25 memory to ASN memory within the KVL 3000.
- Page 280 Chapter 1 Using the Key Porting Feature Porting Keys within the KVL 3000 (continued) Use the key to select SELECT. The following screen will appear: PORT CKR:00005 PID>J Use the keypad to enter the PID for the ASN memory location into which you wish to port the key.
- Page 281 KVL 3000 User's Guide Porting Keys within the KVL 3000 (continued) Use the key to select YES. The key will be ported, as indicated by a short chirp" emitted from the KVL 3000. The following screen will appear, awaiting the next CKR to be selected for porting (if desired).
-
Page 282: Copying Keys From A Kmc To A Kmf
Chapter 1 Using the Key Porting Feature Copying Keys from a KMC to a Overview Copying existing keys from a KMC and loading them into a KMF involves the following three major steps: D Connect the KVL 3000 to the KMC and load the desired keys from the KMC into the KVL 3000 memory D Port the keys (which are in ASN format) to... - Page 283 KVL 3000 User's Guide Copying Keys from a KMC to a KMF (continued) Load the Keys from KVL 3000 into KMF Make sure the KVL 3000 is in ASTRO 25 mode described Switching Between ASN and ASTRO 25 Operation behind the MIGRATION tab).
-
Page 284: Copying Keys From A Kmf To A Kmc
Chapter 1 Using the Key Porting Feature Copying Keys from a KMF to a Overview Copying existing keys from a KMF and loading them into a KMC involves the following three major steps: D Connect the KVL 3000 to the KMF and load the desired keys from the KMF into the KVL 3000 memory D Port the keys (which are in ASTRO 25... - Page 285 KVL 3000 User's Guide Copying Keys from a KMF to a KMC (continued) Load the Keys from KVL 3000 into KMC Make sure the KVL 3000 is in ASN mode (as described in Switching Between ASN and ASTRO 25 Operation behind the MIGRATION tab).
-
Page 286: Chapter 2 Switching Between Asn / Astro
Chapter 2 Switching Between ASN / ASTRO 25 chapter contents Switching Between ASN and ASTRO 25 Operation KVL 3000 User's Guide 68P81131E16-O 10/15/99... - Page 287 KVL 3000 User's Guide Switching Between ASN and ASTRO 25 Operation The KVL 3000 provides two modes of operation: ASN (Advanced Securenet) and ASTRO 25. Note The KVL 3000 is Using the menu, you may switch between shipped from the factory modes of operation, as follows.
-
Page 288: Appendix A Acronyms And Abbreviations
Appendix A Acronyms and Abbreviations Appendix A Acronyms and Abbreviations Advanced Securenet Console Interface Unit CKEK Common Key Encryption Key Common Shadow Key Digital Encryption Standard DES CFB Digital Encryption Standard - Cipher Feedback DES OFB Digital Encryption Standard - Output Feedback DES XL Digital Encryption Standard - Counter Ad... - Page 289 KVL 3000 User's Guide IMBE Improved Multi Band Excitation (coding) Input/Output Key Encryption Key Key ID Key Loss Key Key Management Controller Key Management Facility Key Management Messages Key Variable Loader Liquid Crystal Display Light Emitting Diode Logical ID Message Number Period OTAR Over the Air Rekeying...
- Page 290 Appendix A Acronyms and Abbreviations PCMCIA Personal Computer Memory Card Interna tional Association Random Access Memory Radio Frequency Radio Network Controller Radio Set Identifier Radio Service Software Traffic Encryption Key Unique Shadow Key UKEK Unique Key Encryption Key VSELP Vector Sum Excited Linear Predictor...
- Page 291 KVL 3000 User's Guide Notes ...
-
Page 292: Appendix B Performance Specifications
Appendix B Performance Specifications Appendix B Performance Specifications Physical 226 mm Long (includes Connector Boot) Dimensions 89 mm Wide 48 mm Thick (High Capacity Battery Included) Weight 714 g (High Capacity Battery Included) Encryption DES-CFB DES-XL Supported Encryption Ap DES-OFB plications DVP-XL DVI-XL... - Page 293 KVL 3000 User's Guide Regulatory Compliance and Approvals Safety EN 60950 Electromagnetic Compatibility CISPR 22 Class B European EMC Directive 89/336 EEC EN 50081-1 Class B EN 50082-2 EN 55022 Class B IEC 801.2, IEC 801.3, IEC 801.4 FCC Part 15 Subpart B* * This device is verified to comply with part 15 of the FCC Rules.
-
Page 294: Appendix C Models And Options
Appendix C Models and Options Appendix C Models and Options Model Complement for T5795A KVL 3000 Item Description CLN6738 KVL 3000 Main Circuit Board CLN7051 4 x 12 LCD Display CLN7064 Chassis CLN7063 Housing Assembly CLN6985 Hardware CLN7135 Nameplate CNN6002 Battery NTN7395 High Capacity Ni Cad Battery... - Page 295 KVL 3000 User's Guide Interface Cables Option Description TDN9390 C724 MTS 2000t, XTS 3000t TKN8209 C540 MTX300S and STX Series TKN8210 C541 MICORt mobile and base, portable repeater TKN8229 C542 Series II CIU, SYNTORt, SYNTOR Xt, MCX 1000t, PX300-St, KMC TKN8506 C544 Sabert, ASTRO Sabert...
- Page 296 Appendix C " Models and Options For existing non ASTRO 25 KVLs equipped with DES: Required Desired Upgrade Model/Options To obtain most current KVL Operating Software Model N1796 with (non ASTRO 25, with DES) Option U224 To add ASTRO 25 and obtain most current KVL Model N1796 with Operating Software Option U239...
- Page 297 KVL 3000 User's Guide Notes ...
-
Page 298: Index
Index Index ASTRO 25, 6-3 controls, 1-2 adding, keys to a group, ASTRO 25, copying keys 4-11 from KMC to KMF, 1-11 algorithm, setting default, ASN, from KMF to KMC, 1-13 algorithms enable/disable, ASTRO 25, 3-5 setting up, ASN, 3-5 date and time, setting applying, power, 2-5 ASN, 3-9... - Page 299 KVL 3000 User's Guide keys deleting ASN, 4-22 features, KVL 3000 ASTRO 25, 4-5 ASN, 2-3 entering, ASTRO 25, 4-2 ASTRO 25, 2-3 loading into target devices, AS FIPS, turning on/off TRO 25, 5-3 ASN, 3-19 porting, within KVL 3000, 1-5 ASTRO 25, 3-13 viewing in target devices, ASTRO 25, 5-16...
- Page 300 Index traffic keys menu system, how to use, 2-6 ASN, 4-5 ASN, 2-6 ASTRO 25, 5-2 MNP, entering, ASTRO 25, 7-14 loading keys modem dialing, setting pulse or KMC to KVL tone, ASN, 3-25 direct connection, ASN, 6-7 modes, switching, between ASN and modem connection, ASN, 6-10 APCO, 2-2 KMF to KVL...
- Page 301 KVL 3000 User's Guide pulse selected keys dialing, selecting, ASTRO 25, ASN, 5-5 ASTRO 25, 6-6 setting modem dialing, ASN, turn on/off, ASTRO 25, 3-10 3-25 sharing keys purpose, of manual, I-2 about ASN, 5-2 ASTRO 25, 6-2 connections, setting up ASN, 5-3 quick start ASTRO 25, 6-3...
- Page 302 Index UKEK, entering, ASTRO 25, 7-5 viewing, keys in target devices, AS TRO 25, 5-16 unpacking, KVL 3000, 2-2 using KVL 3000 ASN, 2-4 ASTRO 25, 2-4 Menu System, 2-6 zeroizing, keys ASN, 2-6 ASN, 4-23 USK, programming, ASN, 6-3 ASTRO 25, 5-9...
- Page 303 KVL 3000 User's Guide Notes...