Table of Contents
Quick Links
SERVICE MANUAL
Ver 1.1 2005. 12
• INSTRUCTION MANUAL is shown at the end of this document.
SPECIFICATIONS
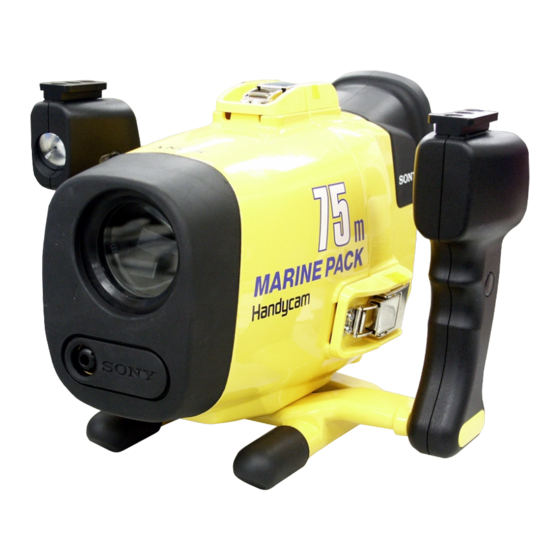
MPK-DVF7
9-876-862-11
MPK-DVF7
Features and Precautions
• This marine pack can be used with the following Sony Handycam camcorders:
–
NTSC system-based: DCR-HC90/HC43/HC42/HC40/HC33/HC32/HC30/HC21/HC20/
DVD803/DVD703/DVD653/DVD602/DVD403/DVD203/DVD103/DVD92/PC109/PC108/
PC107
–
PAL system-based: DCR-HC90E/HC43E/HC42E/HC40E/HC39E/HC33E/HC32E/HC30E/
HC22E/HC21E/HC20E/HC19E/HC18E/HC17E/DVD803E/DVD703E/DVD653E/
DVD602E/DVD403E/DVD203E/DVD202E/DVD103E/PC109E/PC108E/PC107E/PC106E
• Recording at depths of up to 75 meters (246 feet) is possible.
• The following operations can be performed underwater.
–
Power on/off
–
Recording start/stop
–
Auto focusing on/off
–
Tape photo recording
–
Electric zoom function
• LCD screen monitor.
About the LCD monitor
• Install the camcorder in the marine pack and set the POWER switch to ON to make images
appear on the LCD monitor.
• The remaining battery time indicator displayed on the LCD monitor refers to remaining time of
the camcorder battery time, not the remaining time of the LCD monitor battery.
• You can use the monitor for approximately 6 hours with four new AA alkaline dry batteries.
O-ring maintenance is very important. If O-ring maintenance is not
followed according to instructions, a water leak may occur and
cause the marine pack to sink. Waterproofing is achieved by
perfect sealing of the O-ring to the entire contact surface.
Sony EMCS Co.
MPK-DVF7
Canadian Model
AEP Model
MARINE PACK
Published by DI Technical Support Department
US Model
2005L1600-1
©2005.12
Table of Contents

Related Manuals for Sony MPK-DVF7

Summary of Contents for Sony MPK-DVF7
- Page 1 Ver 1.1 2005. 12 AEP Model • INSTRUCTION MANUAL is shown at the end of this document. SPECIFICATIONS Features and Precautions • This marine pack can be used with the following Sony Handycam camcorders: – NTSC system-based: DCR-HC90/HC43/HC42/HC40/HC33/HC32/HC30/HC21/HC20/ DVD803/DVD703/DVD653/DVD602/DVD403/DVD203/DVD103/DVD92/PC109/PC108/ PC107 –...
- Page 2 • Items marked “*” are not stocked since they Replace these components with Ne les remplacer que par une Sony parts. pièce portant le numéro spécifié. are seldom required for routine service. Some Be sure to check up waterproof Soyez sûr de vérifier vers le haut delay should be anticipated when ordering these after repair.
- Page 3 3-977-972-01 SHEET, GUARD RUBBER ADHESIVE 3-950-907-01 RING (S-8), O 3-977-264-01 RUBBER, GUARD 3-977-366-01 SCREW +P M2X4, PRECISION 3-976-666-01 RAIL, BASE A-1092-412-A MOUNTED BOARD, LM-067 3-977-995-01 SHEET, FRONT PROTECTOR ADHESIVE 3-091-281-01 COVER (KA), MICROPHONE 3-052-492-01 GUARD, STRAP 3-977-369-01 SCREW +P M3X8 MPK-DVF7 — 3 —...
- Page 4 à imperméable à l’ eau. 0 106 1-517-414-71 FLUORESCENT TUBE (0.55 INCH) Replace these components with Ne les remplacer que par une Sony parts. pièce portant le numéro spécifié. Be sure to check up waterproof Soyez sûr de vérifier vers le haut after repair.
- Page 5 3-944-944-11 SCREW, +K (5X30) 3-061-196-01 PIPE, BATTERY LID INSULATING 3-061-209-01 LID (B), BLIND 3-950-887-01 RING (P-4), O 3-061-195-01 LID, BATTERY 3-976-692-01 FIXED (LARGE) 3-061-208-01 LID (A), BLIND 3-061-202-01 SCREW +K M4X20 3-944-943-01 SHOE, ACCESSORY 3-944-944-21 SCREW, +K 5 MPK-DVF7 — 5 —...
- Page 6 3-960-767-11 SCREW, CAMERA FITTING 2-547-524-01 BASE (I) A-7097-118-A BASE (G) BLOCK ASSY 2-547-523-01 BASE (H) 3-091-224-01 BELT, MAGIC 2-547-525-01 SPACER H A-7073-655-A DZ-3 MOUNT 2-391-512-00 RING (5), RETAINING, E TYPE 1-782-557-22 CORD, CONNECTION (LCD MONITOR) 3-051-579-02 BASE (SMALL), SLIDE MPK-DVF7 — 6 —...
- Page 7 à imperméable à l’ eau. Replace these components with Ne les remplacer que par une (PORTUGUESE, SWEDISH, ITALIAN, DUTCH) Sony parts. pièce portant le numéro spécifié. 2-549-729-31 MANUAL, INSTRUCTION (AEP) Be sure to check up waterproof Soyez sûr de vérifier vers le haut (RUSSIAN, ARABIC, TRADITIONAL CHINESE, after repair.
- Page 8 2-549-729-11 (1) Marine Pack Operating Instructions Mode d’emploi Manual de instrucciones Bedienungsanleitung MPK-DVF7 ©2005 Sony Corporation...
- Page 9 Owner’s Record The model and serial numbers are located inside of the unit. Record the serial number in the space provided below. Refer to these numbers whenever you call upon your Sony dealer regarding this product. Model No. MPK-DVF7 Serial No.
-
Page 10: Table Of Contents
Electric zoom function • LCD screen monitor. Sony does not accept liability for damage to the video camera recorder, battery, etc. in the marine pack, or for the loss of prerecorded material if a water leakage caused by incorrect operation occurs. -
Page 11: Supplied Accessories
Supplied Accessories Check that the following accessories are supplied with your marine pack. 1 Camera mounting shoe F (1) 0 Underwater wide-conversion lens (VCL- MK2) (1) 2 Camera mounting shoe G (1) qa Sunshade (1) 3 Camera mounting shoe H (1) qs Reflex prevention ring (2) 4 Camera mounting shoe I (1) ø... -
Page 12: Preparations
Preparations Preparing your camcorder Before installing your camcorder in the marine pack, prepare the camcorder according to this chapter. The procedure may be different depending on your camcorder type. Refer also to the operating instructions supplied with your camcorder. You can also install camcorder models different to the one shown in the illustration. Remove the lens cap, shoulder strap, conversion lens, filter or lenshood from the camcorder. - Page 13 Preparations (continued) Attach the camera mounting shoe. For DCR-HC90/HC90E/ DVD803/DVD803E/DVD403/ DVD403E Use the mounting shoe H, spacer, and the screw plate. The camcorder of the illustration may differ from the camcorder you use. Refer to the following table to confirm the position for attaching the screw plate, according to your camcorder.
- Page 14 For DCR-DVD703/DVD703E/ DVD653/DVD653E/DVD602/ DVD602E/DVD203/DVD203E/ DVD202E/DVD103/DVD103E/ DVD92/DVD92E Use the mounting shoes H and I, the spacer, and the screw plate. The position for attaching the screw plate to shoe H, is 4. 1 Attach the screw plate to shoe I so that the catch on the reverse side of the shoe clicks into Camera place.
- Page 15 Preparations (continued) For DCR-PC109/PC109E/PC108/ PC108E/PC107/PC107E/PC106E Use the mounting shoe G only. 1 Attach the mounting shoe G firmly to the camcorder. 2 Connect the A/V connecting cable of the shoe to the camcorder’s A/V jack. Camera mounting shoe G 3 Attach the battery adaptor that comes with the mounting shoe G to battery terminal of the camcorder.
-
Page 16: Preparing The Marine Pack (Installing The Battery)
Preparing the marine pack (installing the battery) Remove the grip. Undo the screw on the bottom side of the marine pack. Insert the Sony CR2 lithium battery into the grip. WARNING Battery may explode if mistreate. Do not recharge, disassemble or dispose of in fire. - Page 17 Preparations (continued) Insert the batteries (optional) into the LCD monitor battery compartment. Use four new AA alkaline dry batteries. We recommend using alkaline dry batteries made by Sony Corporation. Notes • Be sure to use four batteries of the same type.
-
Page 18: Installing The Camcorder To The Marine Pack
Installing the camcorder to the marine pack You can also install camcorder models different from the one shown in the illustration. For DCR-HC90/HC90E/HC43/HC43E/HC42/HC42E/HC40/HC40E/HC39E/ HC33/HC33E/HC32/HC32E/HC30/HC30E/HC22E/HC21/HC21E/HC20/HC20E/ HC19E/HC18E/HC17E/HC16E/DVD803/DVD803E/DVD703/DVD703E/ DVD653/DVD653E/DVD602/DVD602E/DVD403/DVD403E/DVD203/ DVD203E/DVD202E/DVD103/DVD103E/DVD92/DVD92E Connect the remote cord and the microphone cord to the camcorder. front shell For DCR-HC90/HC90E/HC43/HC43E/HC42/ HC42E/HC39E/HC33/HC33E/HC32/HC32E/ HC22E/HC21/HC21E/HC19E/HC17E/DVD803/... - Page 19 Preparations (continued) Insert the camcorder, sliding the mounting shoe along the guide rail of the marine pack until the mounting shoe clicks into place. Connect the monitor cord to part A (see illustration) of the marine pack. The cords are placed in the plug holders of the marine pack at the factory.
- Page 20 Connect the monitor cord to the jack of camera mounting shoe G. The cords are placed in the plug holders of the marine pack at the factory. Pull the plugs out of the holders when in use. Then, fasten the latches securely, and attach the grip. For details, see below.
-
Page 21: Underwater Recording
Underwater recording Before diving Check for water leakage. Check that the equipment operates correctly and that there is no water leakage at a depth of about one meter (3 feet) before you dive deeper. Take care not to expose the equipment to salty air. Do not drop water on the equipment. Do not open the marine pack underwater or on the beach. - Page 22 Subject size underwater Since the refractive index underwater is higher than in air, objects appear 1/4 closer, and therefore larger. This phenomenon affects the lens on the camcorder as well as the human eye and the area recorded is narrower. Using the supplied wide-conversion lens is recommended. Operate the camera with slow and stable motions When recording, keep your body stable.
-
Page 23: Recording
Recording Now you are ready for underwater recording. When you dive with the camcorder, dive slowly, paying attention to the surrounding environment. Be careful not to strike the marine pack against rocks or reef, etc. POWER switch ZOOM button AUTO FOCUS ON/OFF button REC lamp (red) -
Page 24: Attaching The Supplied Accessories
Attaching the supplied accessories Attaching the supplied wide-conversion lens The wide-conversion lens is recommended when you want to take pictures of wide areas. Note however, that objects will appear smaller. Note This supplied wide-conversion lens is to be used only underwater. Attach the wide-conversion lens until it fits firmly. -
Page 25: Using The Underwater Video Light (Optional)
To switch off the lamp, disconnect the remote control cable. Check the cause of the leak. If the camcorder is wet, take it to the nearest Sony dealer immediately. We recommend you purchase property damage insurance for underwater materials in case of emergency. -
Page 26: Removing The Camcorder
Removing the camcorder Before opening the marine pack, rinse it with fresh water and dry with a soft cloth. When you open the marine pack, make sure you are dry. And take care that no water drips from your wet suit. For DCR-HC90/HC90E/DVD803/DVD803E/DVD703/DVD703E/DVD653/ DVD653E/DVD602/DVD602E/DVD403/DVD403E/DVD203/DVD203E/ DVD202E/DVD103/DVD103E/DVD92/DVD92E... - Page 27 Removing the camcorder (continued) For DCR-HC43/HC43E/HC42/HC42E/HC40/HC40E/HC39E/HC33/HC33E/ HC32/HC32E/HC30/HC30E/HC22E/HC21/HC21E/HC20/HC20E/HC19E/ HC18E/HC17E/HC16E Remove the grip. Unfasten 3 latches and open the marine pack. Disconnect the monitor cord. Take the camcorder out of the front shell. Hold the camera mounting shoe by the knobs and extract the camcorder.
- Page 28 For DCR-PC109/PC109E/PC108/PC108E/PC107/PC107E/PC106E Remove the grip. Unfasten 3 latches and open the marine pack. Disconnect the monitor cord from the camera mounting shoe G. Take the camcorder out of the front shell. Hold the camera mounting shoe by the knobs and extract the camcorder.
-
Page 29: Note On The O-Ring
Note on the O-ring What is an O-ring? • An O-ring is part of the water-proof packing that is used on underwater cameras, watches, and other diving equipment. • The O-ring acts to preserve the waterproof qualities of the marine pack and other equipments. O-ring How the O-ring waterproofs O-ring... -
Page 30: Handling The O-Ring
Handling the O-ring Set the O-ring in place Avoid setting the O-ring in dusty or sandy locations. Remove the O-ring. Do not use pointed or metal objects to remove the O-ring. These objects might scratch or damage the marine pack groove or O-ring. Inspect the O-ring. - Page 31 Note on the O-ring (continued) Apply a coating of grease to the O-ring. • Apply a small drop of grease onto the O-ring and evenly coat the entire surface of the O-ring with your finger. • Do not use paper or cloth as fibre may stick to the O-ring. •...
-
Page 32: Maintenance
Grease Use the supplied grease. Using other manufacturer’s grease will damage the O-ring, and cause water leaks. O-ring and grease You can obtain O-rings and grease at your nearest Sony dealer. O-ring (model No. 3-977-362-01) Grease (model No. 3-071-370-01) -
Page 33: Caution On Handling
Caution on handling After using The metal parts will rust and the movement of the operation switches will be impaired if you leave salt water on the marine pack. If sea water enters through scratches in the coating, the salt can corrode the metal parts of the marine pack unit and cause the coating to peel off. -
Page 34: Identifying Parts And Controls
Identifying parts and controls Monitor plug Battery check Remote indicator control Rear shell transmitter Front shell LCD monitor battery compartment Video light shoe Lithium battery compartment Front glass Remote control detector Underwater microphone Grip (monaural) AUTO FOCUS ON/OFF button POWER switch Guide rail O-ring Remote cord... -
Page 35: Specifications
Specifications Material Aluminum alloy, glass, plastic (ABS, PC) Waterproofing O-ring, 3 latches Usable depth Up to 75 m (246 feet) Underwater microphone Condenser microphone (monaural) Controllable function Power on/off, recording start/stop, auto focus on/off, power zooming, tape photo recording Dimensions Approx. - Page 36 Reverse 987686212.pdf Revision History S.M. Rev. Ver. Date History Contents issued 2005.01 Official Release — — 2005.12 Correction-1 • Correction of exploded views S.M. correction: Page 2, 3, 6, 7 MPK-DVF7...