Table of Contents
Quick Links
Table of Contents

Related Manuals for Frigidaire FD26NGDC


Summary of Contents for Frigidaire FD26NGDC
- Page 1 Grill Assembly Built-In Instructions 10-12 16-17...
-
Page 2: Welcome & Congratulations
Your satisfaction is our number one priority. We know you’ll enjoy your new gas grill and Thank You for choosing our product. We hope you consider us for future purchases. -
Page 3: General Safety Instructions
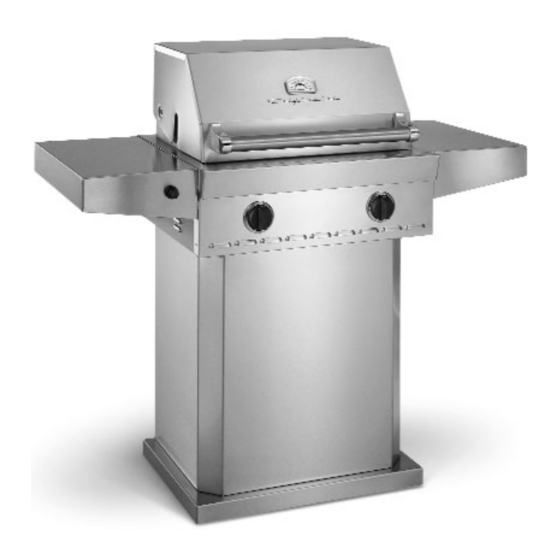
- Follow the installation and servicing instructions provided with this product. Have your grill installed by a qualified service techni- cian. Locate the main gas supply valve so that you know how to shut the gas off to your grill. If you smell gas, make sure all gas connections are tight before operation. - Page 4 Grill Features: FD26 Roll top grill hood Grilling/Cooking surface Electronic ignitor: main burners Control knobs: main burners Convection vents Handle Warming shelf Side shelf Pedestal base...
-
Page 5: Grill Components List
Grill Components List Cart Parts 3 sided pedestal base Base Wheel channels Grill Parts Stainless steel grill head Stainless steel side shelves Electronic ignitor Flavor grid Porcelain bar grates Stainless steel warming rack Drip pan Hose and regulator (LP models only) -
Page 6: Grill Assembly
(See Fig. 3) Have someone help you pick up the grill and set it on the top of the cart, with the rear of the grill above the opening . Make sure the 4 bolt heads fall through the large opening of the key hole slots in the top of the cart. - Page 7 Side Shelves Attachment Attach the shelf with the ignitor to the left side of grill and the other shelf to the right by inserting the shelf hooks into the slots on the side of the grill and pushing down on the shelf assembly until level with grill.
- Page 8 Drip Pan Installation The drip pan is located under the grill head. Slide Drip Tray in from the rear of the grill and cart, fitting the ledges on the two rails that are located on the bottom of the grill.
-
Page 9: Built-In Instructions
Built-In Instructions The Frigidaire Grill can be installed as a built-in Grill. If installed as a built-in Grill, the Grill surround must be constructed of Non-combustible material. Planning and Design Start by identifying the number and size of components you want to include: Grill, side burner, access doors for storage or other items you may wish to furnish such as: refrigerator, sink, warming drawer. - Page 10 *If using a backsplash apron or rear wall, locate electrical service on the left hand side for rotisserie motor connection. *A minimum clearance of 12” from the back must be maintained between the grill and any combustible construction such as wood siding of a residence, 3”...
-
Page 11: Gas Requirements
Attach the natural gas regulator (supplied with your grill) to the brass fitting coming out the bottom, backside of the grill (be sure the arrow on the regulator is pointing up towards the grill). Attach your gas line to the 3/8”... - Page 12 L.P. Gas Installation Frigidaire Gas Grills that are set to operate with L.P. gas come with a high capacity hose and regulator assembly. (Note: Only use the pressure regulator and hose assembly supplied with the grill or a replacement pressure regulator and hose assemblies specified by Frigidaire). This assembly is designed to connect directly to a standard 20 lb.
-
Page 13: Leak Testing
Check all gas supply fittings before each use and each time the gas supply cylinder is connected to the regula- tor. Have a Qualified Service Technician leak test the grill any time a part of the gas system is replaced. Also have a Qualified Service Technician perform a leak test at least once a year whether or not the L.P. -
Page 14: Using The Grill
Do not use the grill in garages, breezeway, sheds or any enclosed area. Never operate the grill in enclosed areas as this could lead to a carbon monoxide buildup, which could result in injury or death. Place the grill on a level surface. -
Page 15: Lighting The Grill
Grill surface as possible and pass a lit, long stem match through the spaces in the Grill rack to the ports of the back crossover burner between the flavor grids. Position the match near the burner ports and push and turn the control knob counter clockwise to the “HIGH”... -
Page 16: Care And Maintenance
The cooking grates can be cleaned immediately after cooking is completed and after turning off the flame. Wear a barbecue mitt and scrub the cooking grates with a damp cloth. If the grill is allowed to cool down, cleaning the grates will be easier if removed from the grill and cleaned with a mild detergent. -
Page 17: Troubleshooting
The burners make a popping noise. The Grill heats unevenly. Before calling customer service If the Grill does not function properly, use the following checklist. Problem Grill will not light when the ignitor button is pushed. Low heat with knob in “High” position. - Page 18 Spider and Insect Warning Spider and insects can nest in the burners of this or any other Grill and cause the gas to flow from the front of the burn- er. This is very dangerous condition which can cause a fire to occur behind the valve panel, thereby damaging the Grill and making it unsafe to operate.
-
Page 19: Warranty
LIMITED LIFETIME WARRANTY Frigidaire Grills have a Lifetime Warranty on all stainless steel parts, 15 years on stainless burners and a 5 year warranty on all other parts. IMPORTANT: We recommend you return the warranty registration card so that you can be contacted with any questions of safety arise that could affect you.