
Related Manuals for Pioneer HTZ-323BD


Summary of Contents for Pioneer HTZ-323BD
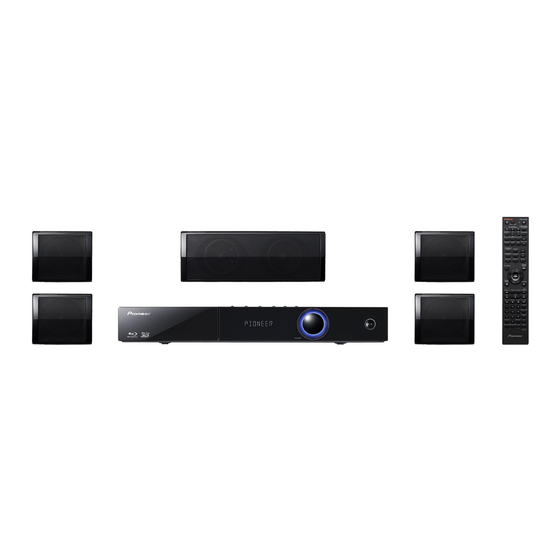
- Page 1 HTZ-323BD Blu-ray Disc surround system HTZ-322BD HTZ-222BD XV-BD422B Blu-ray Disc receiver XV-BD222B XV-BD122B S-BD422 Speaker System S-BD222 S-BD122...
- Page 2 Safety Information Thank you for buying this Pioneer product. Please read through these operating instructions so you will know how to operate your model properly. After you have finished reading the instructions, put them away in a safe place for future reference.
- Page 3 When you find it device for the unit, you will need to unplug it from the damaged, ask your nearest PIONEER authorized AC outlet to shut down all power. Therefore, make service center or your dealer for a replacement.
- Page 4 Notes on Copyrights • This item incorporates copy protection technology that is protected by U.S. patents • Because AACS (Advanced Access Content and other intellectual property rights of System) is approved as content protection Rovi Corporation. Reverse engineering and system for Blu-ray Disc format, similar to use disassembly are prohibited. of CSS (Content Scramble System) for DVD • Under the U.S. Copyright laws and Copyright format, certain restrictions are imposed on laws of other countries, unauthorized playback, analog signal output, etc., of AACS recording, use, display, distribution, or protected contents. The operation of this revision of television programs, videotapes, product and restrictions on this product may BD-ROM discs, DVDs, CDs and other vary depending on your time of purchase materials may subject you to civil and/or as those restrictions may be adopted and/ criminal liability. or changed by AACS after the production of this product. • Furthermore, BD-ROM Mark and BD+ are additionally used as content protection systems for Blu-ray Disc format, which imposes certain restrictions including playback restrictions for BD-ROM Mark and/or BD+ protected contents. To obtain additional information on AACS, BD-ROM Mark, BD+, or this product, please contact an authorized Customer Service Center. • Many BD-ROM/DVD discs are encoded with copy protection. Because of this, you should only connect your player directly to your TV,...
- Page 5 Important Notice for TV colour system The colour system of this player differs according to currently playing discs. For example, when the player plays the disc recorded in the NTSC colour system, the image is output as an NTSC signal. Only the multi system colour TV can receive all signals output from the player. • If you have a PAL colour system TV, you will see just distorted images when using discs or video contents recorded in NTSC. • The multi system colour TV changes the colour system automatically according to input signals. In case that the colour system is not changed automatically, turn it off and then on to see normal images on screen. • Even if the disc recorded in NTSC colour system are well displayed on your TV, these may not be recorded correctly on your recorder.
-
Page 6: Table Of Contents
Operating the TV with the player’s remote control Introduction – TV preset code list – Supplied accessories – Accessories of speaker box (HTZ-323BD) Playback – Accessories of speaker box (HTZ-322BD) – Accessories of speaker box (HTZ-222BD) Playing discs or files –... - Page 7 Playback from Home Media Troubleshooting Gallery – Picture – Sound About Home Media Gallery – Playback – About network playback – Control function Playback file on the network – Network Disc/USB playback – Others – Playing back image files Playing in the desired order (Playlist) –...
-
Page 8: Before You Start
Video cable (1) Remote control (1) Screws M4 x 12 (4) Screws M3.5 x 12 (2) (They are used to fix the (These screws are used to upper and lower cabinet.) fix the surround speakers Battery (2) FM antenna (1) to the stands.) Accessories of speaker box (HTZ-222BD) Power cord • Operating instructions (This document) Accessories of speaker box Screws M4x12 Non-skid pads (5) [Taping type] (4) (HTZ-323BD) (These screws are used to fix the speakers to the stands.) WARNING Non-skid pads (1) Screws M4 x 16 (16) Store small parts out of the reach of (They are used to fix to the children and infants. If accidentally base and lower cabinet.) swallowed, contact a doctor immediately. Screws M4 x 12 (8) (They are used to fix the upper and lower cabinet.) -
Page 9: Putting The Batteries In The Remote Control
If the fluid should leak, wipe it carefully off the inside of the case, then insert new batteries. If a battery should leak and the fluid should get on your skin, flush it off with large quantities of water. • When disposing of used batteries, please comply 3. Close the rear cover. with governmental regulations or environmental Close securely (a click should be heard). public institution’s rules that apply in your country/ area. Software update Product information on this player is provided on the Pioneer website. Check this website for update and service information on your Blu-ray disc player. IN Europe: http://www.pioneer.eu/ The batteries included with the player have been provided to allow you to check IN U.K.: product operation and may not last long. We http://www.pioneer.eu/ recommend using alkaline batteries that have http://www.pioneer.co.uk/ a longer life. IN Russia: http://www.pioneer.eu/ http://www.pioneer-rus.ru/ IN Hong Kong: http://www.pioneerhongkong.com.hk/... -
Page 10: Types Of Discs/Files That Can Be Played
Before you start Types of discs/files that can be played Playable discs Discs with the logo marks below indicated on the disc label, package or jacket can be played. Caution • Only the discs that have been finalized can be played. Application format Disc type Logo DVD- CD-DA DATA- BDMV BDAV DVD VR Video DTS-CD DISC BD-ROM ... - Page 11 Before you start • "Blu-ray Disc", "Blu-ray" and "Blu-ray Disc" logo About audio formats are trademarks of Blu-ray Disc Association. The following audio formats are supported on this player: • is a trademark of DVD Format/Logo Licensing Corporation. • Dolby TrueHD • Dolby Digital Plus Discs that cannot be played • Dolby Digital • HD DVDs • DTS-HD Master Audio...
- Page 12 Before you start BONUSVIEW functions such as playback Playing DVDs of secondary video (Picture-in-Picture) and secondary audio can be used. The data used with the BONUSVIEW functions (the secondary video (Picture-in-Picture) and This label indicates playback compatibility with secondary audio data) may be stored in the DVD-RW discs recorded in VR format (Video storage. For details on secondary video and Recording format). However, for discs recorded secondary audio playback, refer to the disc’s with a record-only-once encrypted program, instructions. playback can only be achieved using a CPRM compatible device.
- Page 13 Before you start Playing CDs About video, audio, and image files and folders Regarding copy protected CDs: This player is designed to conform to the specifications Audio and image files can be played on this of the Audio CD format. This player does not player when the folders on the disc or USB support the playback or function of discs that device are created as described below. do not conform to these specifications. Example of folder structure: DualDisc playback Root A DualDisc is a two-sided disc, one side of 001.jpg/001.mp3 which contains DVD content - video, audio, etc. - while the other side contains non-DVD xxx.jpg/xxx.mp3 content such as digital audio material. 01 Folder Folder 001.jpg/001.mp3 The DVD side of a DualDisc can be played on xxx.jpg/xxx.mp3 this player.
- Page 14 Before you start Playable files Note Video, image and audio files recorded on ® • This DivX Certified device must be registered in order to play DivX Video-on-Demand (VOD) DVDs, CDs or USB devices can be played. content. First generate the DivX VOD registration code for your device and submit it during the Caution registration process. Important: DivX VOD content • In DVD, only the one recorded by the ISO 9660 file is protected by a DivX DRM (Digital Rights system can be played. Management) system that restricts playback to • Some files may not be playable. registered DivX Certified devices. If you try to play DivX VOD content not authorized for your device, • For some files, it may not be possible to use certain the message Authorization Error will be displayed functions during playback. and your content will not be played. Learn more at • It may not be possible to play some files, even if www.divx.com/vod. they have the extension of a file playable on this – This player’s DivX VOD registration code can player. be checked at HOME MENU d Initial Setup d • Files protected by DRM (Digital Rights Playback d DivX(R) VOD DRM d Registration Management) cannot be played (not including...
- Page 15 Before you start Table of Playable Files Playable media BD-R/RE/-R DL/ Playable files RE DL/-R LTH, File specifications (Extensions) DVD-R/RW/-R DL/ USB devices Network +R/+RW/+R DL, CD-R/RW Sampling frequencies: Up to 48 kHz Bit rate: Up to 320 kbps (.mp3) Audio type: MPEG-1 Audio Layer 3 Sampling frequencies: Up to 48 kHz Bit rate: Up to 192 kbps (.wma) Audio type: WMA version 9 Sampling frequencies: Up to 192 kHz LPCM Quantization bitrate: 16 bit (.wav) Channel: 2ch Sampling frequencies: Up to 192 kHz FLAC...
-
Page 16: Trademarks And Licenses
Before you start Trademarks and licenses The terms HDMI and HDMI High-Definition “x.v.Colour”, and are Multimedia Interface, and the HDMI Logo trademarks of Sony Corporation. are trademarks or registered trademarks of HDMI Licensing, LLC in the United States and other countries. YouTube™ is a trademark of Google Inc. Manufactured under license from Dolby Laboratories. “Dolby” and the double-D Picasa™ Web Albums is a trademark of symbol are trademarks of Dolby Laboratories. Google Inc. This product includes technology owned by Microsoft Corporation and cannot be used or distributed without a license from Microsoft Licensing, Inc. Manufactured under license under U.S. Patent Nos: 5,956,674; 5,974,380; 6,226,616; 6,487,535; 7,392,195; 7,272,567; 7,333,929; 7,212,872 & other U.S. and worldwide patents issued & pending. DTS-HD, the Symbol, & DTS-HD and the Symbol together are registered trademarks & DTS-HD Master Audio | Essential is a trademark of DTS, Inc. Product includes software. © DTS, Inc. All Rights Reserved. -
Page 17: Remote Control
Before you start Remote control • • • • • • • • • 1 • • • • • • • • • (STANDBY/ON): Press to turn the power on and off. FUNCTION: Changes the input source or function. When switching while viewing the display window on the player 1. The input source switches every time the FUNCTION is pressed. 2. Select the desired input source and press ENTER. When switching while viewing the TV monitor 1. Press FUNCTION to display the [Source Menu]. - Page 18 Before you start VOL +/– : Adjusts speaker volume. • • • • • • • • • 7 • • • • • • • • • SOUND RETRIEVER: Switches Sound Retriever CLEAR: Press to clear the numeric number, etc. setting (See page 56). REPEAT: See page 39. CD/SACD: See page 42. A-B: See page 39. USB REC: Records an audio. Color buttons: Use these to navigate BD-ROM DISPLAY: Displays or exits On- Screen Display. menus. MUTE: Mute the unit. PROGRAM: Registers FM radio stations. • • • • • • • • • 4 • • • • • • • • • BOOKMARK: Create a BOOKMARK (See page 40).
-
Page 19: Front Panel
Before you start Front panel 1 Disc tray 3 MIC 2 Operation buttons 4 PORTABLE IN (STANDBY/ON) 5 (PLAY/PAUSE) Switches the unit ON or OFF. 6 USB port Note 7 Volume control If the power does not turn OFF, pressing the 8 Remote control sensor (STANDBY/ON) button for more than 5 seconds Point the remote control to this, then reboots the unit and the operation becomes... -
Page 20: Rear Panel
Before you start Rear panel 1 AC IN 7 Antenna Connector Plug into the power source. 8 OPTICAL IN 1/2 2 SPEAKERS connectors 9 HDMI OUT 3 Cooling Fan a HDMI IN 1/2 4 VIDEO OUT b LAN port 5 AUX IN (L/R) 6 ADAPTER PORT... -
Page 21: Connecting
Connecting Chapter 2 2. Attach the non-skid pads to the base of each speaker. Connecting • Surround speaker (HTZ-322BD only) Assemble the speakers Non-skid pads Speaker setup for HTZ-323BD/ HTZ-322BD Preparing the speakers 1. Connect the wires to the player. Insert the cables connected to the player to • Center speaker the same colored connector on the speaker. Non-skid pads 3. Mount the front/surround speaker. Caution 1 Insert the lower cabinet to the base so that • These speaker terminals carry HAZARDOUS LIVE... - Page 22 Connecting 3 Insert the upper cabinet to the lower cabinet. 4 Fix the upper cabinet and the lower cabinet from the backside of the speaker using the two screws (M4 x 12). Caution • Be careful not to tighten screws excessively. If excessive force is used to tighten screws, the threads of screw and/or nut may be damaged. Use a middle-sized manual screwdriver during assembly. Do not use power screwdrivers or oversized screwdrivers that may exert excessive force on the screws and nuts. Confirm that no foreign matter is stuck to the base or the lower cabinet during assembly. If the unit is assembled with foreign matter stuck between the base and lower cabinet, the unit may not be assembled securely, resulting in tipping or falling. • Do not stand on the speaker stand base of the tall speaker to push or swing the speaker. The speaker may fall and break, or someone may be injured. Pay special attention to children.
- Page 23 Connecting Wall mounting the speaker for • Surround speaker (HTZ-322BD only) HTZ-323BD/HTZ-322BD The surround speakers (HTZ-322BD only) and Mounting screw the center speaker have a mounting hole which (not supplied) can be used to mount the speaker on the wall. 5 mm Before mounting 10 mm Remember that the speaker system is heavy 5 mm to 7 mm and that its weight could cause the screws to work loose, or the wall material to fail to support it, resulting in the speaker falling. Make sure that the wall you intend to mount the speakers on is strong enough to support them. Do not mount on plywood or soft surface walls. Mounting screws are not supplied. Use screws suitable for the wall material and support the weight of the speaker.
-
Page 24: Additional Notes On Speaker For Htz-323Bd/Htz-322Bd
Connecting Additional notes on speaker Front left speaker (L)/ Front right speaker (R): for HTZ-323BD/HTZ-322BD Place the front speakers to the sides of the monitor or screen and as flush with the screen Install the main front left and right speakers at surface as possible. an equal distance from the TV. Center speaker: Precautions: Place the center speaker below or in front of The center speaker supplied with this system the monitor or screen. are magnetically shielded. However, depending Surround left speaker (L)/ on the installation location, color distortion Surround right speaker (R): may occur if the speaker is installed extremely Place these speakers behind your listening close to the screen of a television set. If this position, facing slightly inwards. -
Page 25: Speaker Setup For Htz-222Bd
Make sure that the wall you intend to mount the speakers on is strong enough to support them. Do not mount on plywood or soft surface walls. Mounting screws are not supplied. Use screws suitable for the wall material and support the weight of the speaker. Caution Caution • If you are unsure of the qualities and strength of • These speaker terminals carry HAZARDOUS LIVE the wall, consult a professional for advice. voltage. To prevent the risk of electric shock when connecting or disconnecting the speaker cables, • Pioneer is not responsible for any accidents or disconnect the power cord before touching any damage that result from improper installation. uninsulated parts. • Do not connect any speakers other than those Mounting screw supplied to this system. (not supplied) • Do not connect the supplied speakers to any 5 mm amplifier other than the one supplied with this system. Connection to any other amplifier may 10 mm result in malfunction or fire. 5 mm to 7 mm 2. Attach the non-skid pads to the base of... -
Page 26: Additional Notes On Speaker For Htz-222Bd
Connecting Additional notes on speaker Front left speaker (L)/ Front right speaker (R): for HTZ-222BD Place the front speakers to the sides of the monitor or screen and as flush with the screen Install the main front left and right speakers at surface as possible. an equal distance from the TV. Center speaker: Precautions: Place the center speaker below or in front of The center speaker supplied with this system the monitor or screen. are magnetically shielded. However, depending Surround left speaker (L)/ on the installation location, color distortion Surround right speaker (R): may occur if the speaker is installed extremely Place these speakers behind your listening close to the screen of a television set. If this position, facing slightly inwards. case happens, turn the power switch of the Subwoofer: television set OFF, and turn it ON after 15 min. -
Page 27: Connecting To Your Tv
Connecting Connecting to Your TV HDMI connection If you have a HDMI TV or monitor, you can Make one of the following connections, connect it to this player using a HDMI cable depending on the capabilities of your existing ® (High Speed HDMI /™ Cable). Connect the equipment. HDMI terminal on the player to the HDMI • HDMI connection (page 27) terminal on a HDMI compatible TV or monitor. • Video connection (page 28) Note Rear of the unit • Depending on your TV and other equipment you wish to connect, there are various ways you could connect the player. Use only one of the connections described in this manual. • Please refer to the manuals of your TV, stereo system or other devices as necessary to make the best connections. • Make sure the player is connected directly to the HDMI TV. Tune the TV to the correct video input channel. cable • Do not connect your player via your VCR. The image could be distorted by the copy protection system. -
Page 28: Video Connection
Connecting Antenna connection Video connection Connect the VIDEO OUT terminal on the player Connect the supplied antenna for listening to to the video in terminal on the TV using a video the radio. cable. You can hear the sound through the system’s speakers. Rear of the unit Rear of the unit Video cable Note • After connecting the FM wire antenna, keep it as horizontal as possible. Be sure to fully extend the FM wire antenna. -
Page 29: Connections With External Device
Connecting Connections with PORTABLE IN connection external device You can enjoy the sound from your portable audio player through the speakers of this system. AUX connection Connect the headphones (or line out ) terminal of the portable audio player into the PORTABLE You can enjoy the sound from an external IN socket of this unit. And then select the component through the speakers of this [Portable In] option by pressing FUNCTION and system. ENTER. Connect the analog audio output terminals of your component into the AUX L/R (INPUT) on this unit. And then select the [AUX] option by pressing FUNCTION and ENTER. Rear of the unit MP3 Player, etc... White Note To the audio output • When inserting the PORTABLE IN terminal, support terminals of your the top of the unit with your hand to prevent it from component moving. (TV, VCR, etc.) -
Page 30: Optical In 1/2 Connection
Connecting OPTICAL IN 1/2 connection HDMI IN 1/2 connection You can enjoy the sound from your component You can enjoy the pictures and sound from with a digital optical connection through the your component through this connection. speakers of this system. Connect the HDMI OUT terminal of your component into the HDMI IN 1 or 2 terminal Connect the optical output terminal of your component into the OPTICAL IN 1 or 2 terminal on this unit. And then select the [HDMI IN 1/2] on the unit. And then select the [Optical IN 1/2] option by pressing FUNCTION and ENTER. option by pressing FUNCTION and ENTER. Rear of the unit Rear of the unit To the HDMI OUT terminal of your component (set-top box, digital satellite receiver, To the digital optical video game output terminal of machine, etc.) your component Note... -
Page 31: Connecting Optional Bluetooth® Adapter
Connecting Connecting optional Bluetooth® ADAPTER When the Bluetooth ADAPTER (Pioneer Model No. AS-BT100 or AS-BT200) is connected to this unit, a product equipped with Bluetooth wireless technology (portable cell phone, digital music player, etc.) can be used to listen to music wirelessly. Connect a Bluetooth ADAPTER to the ADAPTER PORT terminal on the rear panel. *For instructions on playing the Bluetooth wireless technology device, see Pairing the Bluetooth ADAPTER and Bluetooth wireless technology device on page 54. Rear of the unit ® Bluetooth ADAPTER Note • Do not move the unit while the Bluetooth ADAPTER is connected. Doing so could cause damage or faulty contact. -
Page 32: Connecting To Your Home Network
Connecting Connecting to your Home Network Broadband service This player can be connected to a local area network (LAN) via the LAN port on the rear panel. By connecting the unit to a broadband home network, you have access to services such as BD-LIVE interactivity and Online content services. Router Wired network connection Using a wired network provides the best performance, because the attached devices connect directly to the network and are not subject to radio frequency interference. Please refer to the documentation for your network device for further instructions. Connect the player’s LAN port to the corresponding port on your Modem or Router PC and/or DLNA certified server using a commercially available LAN or Ethernet cable. Note • When plugging or unplugging the LAN cable, hold the plug portion of the cable. When unplugging, do not pull on the LAN cable but unplug while pressing down on the lock. Rear of the unit • Do not connect a modular phone cable to the LAN port. • Since there are various connection configurations, please follow the specifications of your telecommunication carrier or internet service... - Page 33 Connecting Notes on network connection: • xDSL modem is required to use xDSL service and a cable modem is required to use cable • Many network connection problems during modem service. Depending on the access set up can often be fixed by re-setting the method of and subscriber agreement with router or modem. After connecting the player your ISP , you may not be able to use the to the home network, quickly power off and/ internet connection feature contained in this or disconnect the power cord of the home player or you may be limited to the number network router or cable modem. Then power of devices you can connect at the same time. on and/or connect the power cord again. (If your ISP limits subscription to one device, • Depending on the internet service provider this player may not be allowed to connect (ISP), the number of devices that can when a PC is already connected.) receive internet service may be limited by • The use of a “Router” may not be allowed the applicable terms of service. For details, or its usage may be limited depending on contact your ISP . the policies and restrictions of your ISP . For • Our company is not responsible for any details, contact your ISP directly.
-
Page 34: Usb Device Connection
Connecting USB device connection This player can play movie, music and photo files contained in the USB device. 1. Insert a USB device to the USB port until it About USB devices fits into place. The USB devices that can be connected to the player are as shown below. • USB 2.0-compatible memory devices • FAT16 or FAT32 file system, minimum 1 GB capacity (2 GB or more recommended) Note • Devices formatted with a file system other than the above cannot be used. Such devices may however be usable if they are formatted from the player. Note • USB devices may not be recognized if they contain • Devices may not work if connected to the USB port multiple partitions. via a memory card reader or USB hub. • Some USB devices may not operate with this • Use a USB cable with a length of 2 meters or less. player. • When inserting the USB terminal, support the • Operation of USB devices is not guaranteed. top of the unit with your hand to prevent it from moving. -
Page 35: Getting Started
• Before turning on the power, check that the connections between the player and other devices for the connected TV. are correct. Also, turn on the power of the devices Use / to select, then press ENTER. connected to the player before turning on the 6. Select the appropriate aspect for the player’s power. connected TV. • When using a Pioneer Flat Screen TV or front Use / to select, then press ENTER. projector compatible with the Control function, set Control to On on the connected device before 7. Close the Setup Navigator menu. turning on the player’s power. Press ENTER. y Setup Navigator finishes and the setting Note is stored. -
Page 36: Operating The Tv With The Player's Remote Control
Caution • For some models it may not be possible to operate the TV with the player’s remote control, even for TVs of brands listed on the manufacturer code list. • The setting may be restored to the default after the batteries are replaced. If this happens, reset it. 1. Input the 2-digit manufacturer code. Press the number buttons (0 to 9) to input the code while pressing TV CONTROL . Note y The factory default setting is 00 (PIONEER). y If you make a mistake when inputting the code, release TV CONTROL then start over from the beginning. y When there are multiple codes for a manufacturer, try inputting them in the indicated order until the TV can be operated. 2. Check that the TV can be operated. Operate the TV using TV CONTROL. – Press to turn the TV’s power on and off. INPUT SELECT – Press to switch the TV’s input. -
Page 37: Tv Preset Code List
Getting Started TV preset code list Manufacturer Code(s) PIONEER 00, 31, 32, 07, 36, FRONTECH 31, 42, 46 MAGNAVOX 07, 10, 03, 12, SALORA 31, 32, 42, 43 42, 51, 22 FRONTECH/PROTECH 32 SAMBERS 49 ACURA 44 FUJITSU 48 MANESTH 39, 46 SAMSUNG 07, 38, 44, 46, ADMIRAL 31 FUNAI 40, 46, 58 MARANTZ 07 69, 70 AIWA 60 GBC 32, 42 MARK 07 SANYO 35, 45, 48, 21, 14, AKAI 32, 35, 42 GE 00, 01, 08, 07, 10, 11, MATSUI 07, 39, 40, 42, 44, AKURA 41 SBR 07, 34 17, 02, 28, 18 47, 48 ALBA 07, 39, 41, 44 GEC 07, 34, 48 MCMICHAEL 34... -
Page 38: Playback
Playback Chapter 4 If the disc menu is displayed Playback For some discs, the disc menu is displayed automatically when playback starts. The contents of the disc menu and the way to Playing discs or files operate depend on the disc. Resuming playback from where it was This section describes the player’s main stopped (resume playback function) operations. y When STOP is pressed during For the types of discs and files that can be playback, the point at which the disc played, see page 10. Video, image and audio stopped is stored in the memory. When files recorded on discs are played with the PLAY is pressed after that, playback Home Media Gallery (page 47). -
Page 39: Forward And Reverse Scanning
Playback Forward and reverse scanning Step forward and step reverse During playback, press REV or While playback is paused, press / or /. FWD. y The scanning speed switches each time y The picture moves a step forward or the button is pressed. The speed steps reverse each time the button is pressed. depend on the disc or file (the speed is To resume normal playback displayed on the TV screen). Press PLAY. ... -
Page 40: Playing In The Desired Order (Programmed Play)
Playback Making bookmarks To cancel Repeat Play y Press REPEAT several times during You can make bookmarks on the video Repeat Play. currently playing and play back the scene later. Note During playback, press BOOKMARK. y The bookmark is made. y Repeat Play is canceled in the following cases: – When you search outside the repeat range. y Maximum number of bookmarks are 12. – When you start other Repeat Play or Playing the bookmarked scene Random Play. 1. Press and hold BOOKMARK for a few Playing in the desired order seconds. -
Page 41: Playing Photos As Slideshows
Playback Playing photos as slideshows Switching the subtitles This function plays the photos, switching them For discs or files on which multiple subtitles automatically. are recorded, the subtitles can be switched during playback. During playback, press INDEX. y Display the thumbnail of image files. The Caution maximum number is 12 at once. y The subtitles cannot be switched for discs y If you select one of the image and press recorded by a DVD or BD recorder. Also refer to ENTER, slideshow will start from the the operating instructions for the device used for recording. image you selected. During playback, press SUBTITLE. Rotating/inverting photos y The current subtitle and total number of When a slideshow is playing or paused, the recorded subtitles are displayed on the display switches as shown below when the /... -
Page 42: Switching The Audio
Playback Switching the audio Displaying the disc information For discs or files on which multiple audio streams/channels are recorded, audio streams/ Press DISPLAY. channels can be switched during playback. The disc information appears on the TV screen. During playback, press AUDIO. To switch off the information display, press y The current audio and total number of DISPLAY again. recorded audio streams are displayed on The information display differs between during the TV screen. To switch the audio, press playback and when playback is stopped. AUDIO again. y The audio can also be switched by selecting Audio from the TOOLS menu. y If the audio is not switched when AUDIO is pressed, switch it from the disc menu screen. Switching the CD/SACD playback area 1. -
Page 43: Enjoying Bonusview Or Bd-Live
Playback Enjoying BONUSVIEW or Note BD-LIVE • Operation of USB flash drives is not guaranteed. • Playback of BD-LIVE function data differs This player is compatible with BD-Video depending on the disc used. For details, consult BONUSVIEW and BD-LIVE. the user instructions supplied with the disc. When using BD-Video discs compatible with • To enjoy the BD-LIVE function, a network BONUSVIEW, you can enjoy such functions connection and settings are required (pages 32 and 61). as secondary video (picture in picture) (page 45) and secondary audio (page 45). With BD- • BD-LIVE is a function that provides for connection Video discs supporting BD-LIVE, special video to the Internet. Discs supporting the BD-LIVE function may send ID codes identifying this player images and other data can be downloaded and the disc to the contents provider via the from the Internet. Internet. Data recorded on BD video and downloaded from BD-LIVE is stored on the USB flash drive (external memory). To enjoy these functions, connect a USB flash drive (minimum 1 GB capacity, 2 GB or greater recommended) supporting USB 2.0 High Speed (480 Mbit/s) to the USB port. • When you insert or remove a USB flash drive, be sure to turn the player’s power off. -
Page 44: Playback Functions
Playback Playback functions The functions that can be used differ according to the type of disc and file. In some cases, some of the functions cannot be used. Check the usable functions on the table below. Disc/file type DVD-R Function BD-R DVD- /-RW Video Image Audio Audio AVCREC AVCHD /-RE Video file file file format) Forward and reverse scanning Playing specific titles, chapters or tracks Skipping content Slow motion play Step forward and step reverse A-B Repeat play Repeat Play... -
Page 45: Using The Tools Menu
Playback Using the TOOLS menu Item Description Ins Search Skip forward 30 seconds. Various functions can be called out according Ins Replay Skip backward 10 seconds. to the player’s operating status. Slide Show Switch the playback speed while playing the picture slide show. 1. Display the TOOLS menu. Press TOOLS during playback. Transition Change the style of the slide show while playing the picture slide show. 2. Select and set the item. Use / to select, then press ENTER. 1. One of these types of information is displayed, depending on the type of disc. Note 2. Secondary video mark is displayed for scenes at which secondary video is recorded if PIP Mark is y Items that cannot be changed are displayed in set to On (page 59). -
Page 46: Playing A Specific Title, Chapter, Track Or File (Search)
Playback Playing a specific title, chapter, Continuing playback from a track or file (Search) specified position (Continued Viewing Playback) 1. Select Title or Chapter (track/file). Use / to select, then press ENTER. This function allows you to continue playback from a position you specify to be played next 2. Input the Title or Chapter (track/file) time, even after turning the power off. number. Use the number buttons (0 to 9) or / to ... -
Page 47: Playback From Home Media Gallery
Playback from Home Media Gallery Chapter 5 • The following files are allowed to be played from Home Media Gallery: Playback from Home – PCs running Microsoft Windows Vista or XP with Windows Media Player 11 installed Media Gallery – PCs running Microsoft Windows 7 with Windows Media Player 12 installed – DLNA-compatible digital media servers (on PCs About Home Media or other components) Files stored in a PC or DMS (Digital Media Server) Gallery as described above can be played by Digital Media Player (DMP). The player supports the use of such DMP . • To play back audio files stored on components on the network, you must turn on the DHCP server function of your router. In case your router does not have the built-in DHCP server function, it is necessary to set up the network manually. Otherwise, you cannot play back files stored on components on the network. See page 62. - Page 48 Playback from Home Media Gallery ® ® Pioneer is not responsible for any malfunction DLNA , the DLNA Logo and DLNA CERTIFIED of the player and/or the Home Media are trademarks, service marks, or certification Gallery features due to communication marks of the Digital Living Network Alliance. errors/malfunctions associated with your Content playable over a network network connection and/or your PC, or other connected equipment. Please contact your PC • Even when encoded in a compatible format,...
-
Page 49: Playback File On The Network
Playback from Home Media Gallery Playback file on the Disc/USB playback network 1. Press HOME MEDIA GALLERY to display the Home Media Gallery. 1. Press HOME MEDIA GALLERY to The Home Media Gallery can also be display the Home Media Gallery. displayed by selecting Home Media Gallery The Home Media Gallery can also be from Home Menu, then pressing ENTER. displayed by selecting [Home Media Gallery] 2. -
Page 50: Playing In The Desired Order (Playlist)
Playback from Home Media Gallery Playing in the desired Playing the playlist order (Playlist) 1. Press HOME MEDIA GALLERY to display the Home Media Gallery. The discs that can add tracks and files to the The Home Media Gallery can also be Playlist are as shown below. displayed by selecting Home Media Gallery from Home Menu, then pressing ENTER. • DVDs/CDs/USB devices on which audio files are recorded 2. Select Playlist. Use / to select, then press ENTER. Adding tracks/files 3. -
Page 51: Playing The Web Contents
ENTER. – Register your user name and password on the To stop playback, press EXIT. Playback of PC before you use Picasa Web Albums. the video stops and the Home Menu screen – When you access Picasa from this player for the reappears. first time, select the New User icon and enter your registered user name and password. • Depending on the Internet connection environment, it may not be possible to play web contents properly. • To access to web contents, this player requires a broadband Internet connection. A contract with an Internet provider is required for a broadband Internet connection. • Access to content provided by third parties requires a high speed Internet connection and may also require account registration and a paid subscription. Third party content services may be changed, suspended, interrupted, or discontinued at any time without notice, and Pioneer disclaims any liability in connection with such occurrences. Pioneer does not represent or warrant that content services will continue to be provided or available for a particular period of time, and any such warranty, express or implied, is disclaimed. • Disc playback and this function cannot be used at the same time. -
Page 52: Other Operating
Other Operating Chapter 7 6. Set the recording speed Use / / / to select [Speed] and press Other Operating ENTER. y The recording speed will change each time ENTER is pressed. The recording Recording Audio CD to a speed will change as shown below. USB device Normal: when recording while listening to the music. You can record audio CD to a USB device using Fast: will record at approx 4x speed. You this player. cannot listen to the music. 1. Insert an USB device into the USB port 7. -
Page 53: Radio Operations
Other Operating Radio Operations Deleting all the saved stations 1. Press and hold STOP for two seconds. Be sure that FM aerial is connected. (Refer to [ERASE ALL] will flash up on the display the page 28) window. Listening to the radio 2. Press STOP to erase all of the saved radio stations. 1. Press FUNCTION until FM appears in the Improving poor FM reception display window and press ENTER. The last received station is tuned in. Press AUDIO on the remote control. This will 2. Scanning will start when either the or change the tuner from stereo to mono and the button is pressed. usually improve the reception. Press / repeatedly. Press TUNE –/+ on the front panel of the player repeatedly. -
Page 54: Bluetooth® Adapter For Wireless Enjoyment Of Music
• It must be necessary that the Bluetooth wireless technology enabled device supports 3. Enter the PIN code. A2DP profiles. Pin code: 0000 This unit cannot be set with any PIN code Note other than 0000. • Pioneer does not guarantee proper connection and 4. When the unit and a Bluetooth operation of this unit with all Bluetooth wireless technology enabled devices. wireless technology enabled device are successfully paired, [SINK] will be • About one minute is required between turning the power on and completion of startup. displayed in the unit’s display window. -
Page 55: Karaoke
Other Operating Karaoke Note • This unit does not support AVRCP . 1. Press KARAOKE on the remote control. • This unit does not support Mono Headset Profile Karaoke Setup under Initial Setup will be (Hands Free Profile). displayed on the TV screen. • A Bluetooth wireless technology enabled device cannot be operated by this unit. 2. Turn the Karaoke Switch on. Select [Karaoke Setup] d [Karaoke Switch] • This unit cannot be used to listen to one seg sounds on a Bluetooth wireless technology enabled d [On] using cursor and press ENTER. device. Music contents protected by SCMS-T 3. -
Page 56: Sound
Other Operating Sound Press SOUND on the remote control to display the sound select menu on the TV screen. Use cursor button to make a selection, then press ENTER. Press SOUND to exit the Sound Menu. Note • When HDMI IN 1 or HDMI IN 2 are selected, the Sound Menu cannot be displayed. Switch to other input source and then switch the Sound. • When HDMI IN 1 or HDMI IN 2 is selected, VIRTUAL 3D SOUND and SOUND RETRIEVER buttons do not function. • When disc/file is paused, SOUND menu cannot be displayed. Please switch SOUND when disc/file is being played. Setting Options Explanation Sound Retriever A WMA or MP3 file is played with high sound quality. This is only valid for files with the extension “.wma” or “.mp3”. The effect depends on the file. Try different settings, and choose High the one providing the best effect. Equalizer Add a variety of effects to the output sound. Select a mode that suits your personal tastes. News This mode is suited to the news. Gaming This mode is suited to video games. Movie This mode is suited to movies. Music This mode is suited to music. Surround Virtual 3D Min Effect is minimum Virtual 3D Sound: Has the effect of creating a 3D sound space. -
Page 57: Advanced Settings
Advanced settings Operating the initial setup Chapter 8 Advanced settings screen 1. When playback is stopped, display the Changing the settings Home Menu screen. HOME MENU. Press 2. Select and set Initial Setup. Use / to select, then press ENTER. 3. Select the item and change the setting. Use / / / to select, then press ENTER. - Page 58 Advanced settings Setting Options Explanation DRC (Dynamic Range Select this to output audio signals without using the DRC function. Control) Select this to adjust the range between the loudest and softest sounds (dynamic range) for playback at average volume. Use this when it is hard to hear dialog or when watching movies at midnight. Auto Select to switch the DRC setting On/Off automatically according to the input audio signal from the disc. This only affects Dolby TrueHD signals. • This affects such audio signals as Dolby Digital, Dolby TrueHD, and Dolby Digital Plus. • Depending on the disc, the effect may be weak. Speaker Setup Adjust the Trim (output level) and Delay (distance from viewers) of the speakers. Please see "Adjust speaker settings" for more details (page 61). Test Tone Output a test tone from the speakers. Color Space Select this to output the video signals as RGB signals. Choose this if the colors seem too faint and the black seems too bright. YCbCr Select this to output the video signals as YCbCr 4:4:4 signals. YCbCr 422 Select this to output the video signals as YCbCr 4:2:2 signals. Full RGB Select this to output the video signals as RGB signals. Choose this if the colors seem too dense and all the dark colors are displayed in a uniform black. Resolution Auto Select this to choose the resolution of the video signals output from the HDMI OUT terminal automatically. 480I/576I Output the video signals from the HDMI OUT terminal with the selected resolution.
- Page 59 Advanced settings Setting Options Explanation IP Setting Select this to set the IP address of the player and DNS server (page 61). Proxy Server Only set the proxy server if so instructed by your Internet service provider (page 62). Information Displays the values of the MAC address, IP address, subnet mask, default gateway, DNS server (primary) and DNS server (secondary). Connection Test Select this to test the network connection (page 62). Internet Connection Enable Select this when connecting to the Internet. Disable Select this when not connecting to the Internet. BD-Live Connection Permitted All discs are allowed to connect to BD-LIVE. Partial Permitted Only discs whose safety has been confirmed are allowed to connect to BD- LIVE. Prohibited No disc is allowed to connect to BD-LIVE. DLNA Enable Select this when connecting to DLNA server. Disable Select this when not connecting to DLNA server. available languages Choose a language for the on-screen displays from the listed languages. Audio available languages Choose a language from the listed languages to set the default audio * For some discs, it may language for BD-ROM and DVD-Video playback. not be possible to change to the selected language.
- Page 60 Advanced settings Setting Options Explanation Screen Saver The screen saver is not activated. 1 min The screen saver will be activated if no operation has been performed for more than one minute/two minutes/three minutes. Operating the remote 2 min control can deactivate the screen saver. 3 min Auto Power Off Select this if you do not want the power to turn off automatically. 10 min The power will be automatically turned off if no operation has been performed for more than 10 minutes/20 minutes/30 minutes. 20 min 30 min Quick Start Select to shorten the required time to boot up. Select to perform normal bootup. Update Disc Select the method of software updating. (page 64) USB Storage Network Load Default Restore the settings to the factory default. System Information Check the system version number. Disc Auto Update Display the software update screen when the disc with the player’s update file is loaded. The software update screen must be displayed manually. (page 64) BUDA BUDA Information Display and set up the BUDA data on the connected USB device. BUDA Setup Karaoke Switch Select when not using Karaoke.
- Page 61 Advanced settings Adjusting the video Setting the IP address 1. Select and set Display Setting d Video 1. Select and set Network d IP Setting d Adjust d Next Screen. Next Screen. Use / to select, then press ENTER. Use / to select, then press ENTER. 2.
- Page 62 Advanced settings Setting the proxy server Testing the network connection Only set the proxy server if so instructed by Select and set Network d Connection your Internet service provider. Test d Start. Use / to select, then press ENTER. 1. Select and set Network d Proxy Server d Next Screen. [Network is OK.] is displayed once the Use / to select, then press ENTER.
- Page 63 Advanced settings Registering or Changing the password Changing the Parental Lock level for viewing DVDs/BD-ROMs Use this procedure to register or change the code number required for the Parental Some DVD-Video discs containing scenes Lock settings. of violence, for example, have Parental Lock About default password of this unit levels (check the indications on the disc’s jacket or elsewhere). To restrict viewing The default password is [0000]. these discs, set the player’s level to the level y This unit might ask you to enter a lower than the discs. password when you change the 1. Select and set Security d Parental password.
-
Page 64: Software Updating
Depending on the Internet connection • Connecting to the Internet. conditions, downloading may take a long time. • Using a disc. y Steps 1 to 5 are the operations performed by the user (they are intended to download the • Using a USB flash drive. software from the Internet). Product information on this player is provided y Steps 6 to 8 are the operations performed on the Pioneer website. Check the website (automatically) by the player (they are intended to update the software). shown on page 9 for update and service information on your Blu-ray disc player. 1. Connect to the Internet. 2. When playback is stopped, display the Caution Home Menu screen. • Do not unplug the power cord or remove the USB HOME MENU. -
Page 65: Restoring All The Settings To The Factory Default Settings
Advanced settings Restoring all the settings to Updating using a USB flash drive/disc the factory default settings Note y When an update file is provided on the Pioneer 1. Check that the player’s power is turned website, use your computer to download it onto a USB flash drive or disc. Carefully read 2. When playback is stopped, display the the instructions on downloading update files Home Menu screen. -
Page 66: Language Code Table And Country/Area Code Table
Advanced settings Language code table and country/area code table Language code table Language name, language code, input code Abkhazian, ab/abk, 0102 French, fr/fra, 0618 Malagasy, mg/mlg, 1307 Slovenian, sl/slv, 1912 Afar, aa/aar, 0101 Galician, gl/glg, 0712 Malay, ms/msa, 1319 Somali, so/som, 1915 Afrikaans, af/afr, 0106 Georgian, ka/kat, 1101 Malayalam, ml/mal, 1312 Sotho, Southern, st/sot, 1920 Albanian, sq/sqi, 1917 German, de/deu, 0405 Maltese, mt/mlt, 1320... -
Page 67: Troubleshooting
Troubleshooting Chapter 9 Troubleshooting Incorrect operation is often mistaken for trouble or malfunction. If you think that there is something wrong with this component, check the points below. Sometimes the trouble may lie in another component. Inspect the other components and electrical appliances being used. If the trouble cannot be rectified even after checking the points below, ask your nearest Pioneer authorized service center or your dealer to carry out repair work. Picture Problem Check Remedy No picture is displayed Is the video cable properly y Connect the cable properly according to the connected devices (page or the picture is not connected? 27). displayed properly. y Disconnect the cable (video/audio cable or HDMI cable), then reinsert it firmly and all the way in. Is the video cable damaged? If the cable is damaged, replace it with a new one. Is the input setting on the Read the operating instructions for the connected components and connected TV right? switch to the proper input. Is the output video resolution Press RESOLUTION to switch the video resolution output from the HDMI properly set? OUT terminal (page 17). y Is the player connected with 1080p or Deep Color video signals may not be output properly, an HDMI cable other than a depending on the HDMI cable being used or the player’s settings. If you ®... -
Page 68: Sound
Troubleshooting Sound Problem Check Remedy y No sound is output. y Is the disc played back in No sound is output during slow motion play and forward and reverse slow motion? scanning. y Sound is not output properly. y Is the disc played back in fast forward or fast reverse? Are the cables properly y Connect the cable properly according to the connected devices connected? (page 27). y Insert the cable firmly and all the way in. Is the audio cable damaged? If the cable is damaged, replace it with a new one. Is Audio Output properly set? Set Audio Output properly, according to the connected device (page 58). Are the connected components Read the operating instructions for the connected components and properly set? check the volume, input, speaker settings, etc. Multi-channel sound is Is multi-channel sound Use the menu screen or AUDIO to switch the disc’s sound to multi- not output. selected? channel. -
Page 69: Control Function
Cable? used. Is this player connected to the If video signals are being output from a terminal other than the HDMI OUT terminal, the Control function does not work. Connect to the TV TV using an HDMI cable to watch the picture? using an HDMI cable (page 27). Does the connected device y The Control function will not work with devices of other brands that support the Control function? do not support the Control function, even when connected using an HDMI cable. y The Control function will not work if devices that do not support the Control function are connected between the Control-compatible device and the player. y See page 16. y Even when connected to a Pioneer product compatible with the Control function, some of the functions may not work. Also refer to the operating instructions for the connected device. Is Control set to On on the Set Control to On on the connected device. The Control function connected device? operates when Control is set to On for all devices connected to the HDMI OUT terminal. Once connections and settings of all the devices are finished, be sure to check that the player’s picture is output to the Flat Screen TV. (Also, check after changing the connected devices and connecting and/or disconnecting HDMI cables.) If the player’s picture is not being output to the Flat Screen TV, the Control function may not work properly. For details, refer to the operating instructions of the connected device. Network Problem Check Remedy y BD-LIVE function Perform Connection Test (page 62). If "Networks is OK." is displayed,... - Page 70 Troubleshooting Problem Check Remedy The component connected to If the client is automatically authorized, you need to enter the the network is not properly set. corresponding information again. Check whether the connection status is set to “Do not authorize”. There are no playable audio Check the audio files stored on the component connected to the files on the component network. connected to the network. Playback does not start. The component is currently Check whether the component is properly connected to this unit or the disconnected from this unit or power supply. the power supply. The PC is not properly The corresponding IP address Switch on the built-in DHCP server function of your router, or set up the operated. is not properly set. network manually according to your network environment. The IP address is being The automatic configuration process takes time. Please wait. automatically configured. The audio files stored Windows Media Player 11 or Install Windows Media Player 11 or Windows Media Player 12 on your on components on the Windows Media Player 12 is not network, such as a PC, currently installed on your PC. cannot be played back. Audio files were recorded in Play back audio files recorded in MP3, WAV (LPCM only), MPEG-4 AAC, formats other than MP3, WAV FLAC, or WMA. Note that some audio files recorded in these formats (LPCM only), MPEG-4 AAC, may not be played back on this unit.
-
Page 71: Others
Troubleshooting Others Problem Check Remedy Power does not Is the power cord properly y Plug the power cord securely into the power outlet. turned on. connected? y Unplug the power cord, wait several seconds, then plug the power cord back in. Power turns OFF without Auto Power Off is set. The display will move to screen saver mode in 1 warning minutes and will automatically power OFF in about 30 minutes. The player’s power turns The player’s power may turn off together with the power of the TV Is Control set to On? connected to the HDMI OUT terminal. If you do not want the player’s off automatically. power to turn off when the TV’s power is turned off, set Control to Off (page 58). The player's power turns Is Control set to On? The player's power may turn on together with the power of the TV on automatically. connected to the HDMI OUT terminal. If you do not want the player's power to turn on when the TV's power is turned on, set Control to Off (page 58). Cannot be operated with Are you operating the remote Operate from within 7 m of the remote control sensor. the remote control. control from a point too far away from the player? Are the batteries dead? -
Page 72: Appendix
Appendix Chapter 10 Appendix Specifications General Power requirements AC 110 V to 240 V, 50 Hz/60 Hz Power consumption 190 W (In Standby mode: Less than 0.5 W) Dimensions (W x H x D) Approx. 430 mm x 345 mm x 62 mm Net Weight (Approx.) 3.4 kg Operating temperature 5 °C to 35 °C Operating humidity 5 % to 85 % Inputs/Outputs VIDEO OUT 1.0 V (p-p), 75 Ω, sync negative, RCA jack x 1 ® HDMI IN/OUT (video/audio) 19 pin (HDMI /™ Connector) ANALOG AUDIO IN 2.0 Vrms (1 kHz, 0 dB), 600 Ω, RCA jack (L, R) x 1 DIGITAL IN (OPTICAL) 3 V (p-p), Optical jack x 2 (48 kHz, 96 kHz sampling) PORTABLE IN 0.5 Vrms (3.5 mm stereo jack) ADAPTER PORT 5 V, 100 mA Mic jack x 1 4 pin A Type x 2 Tuner FM Tuning Range 87.5 MHz to 108.0 MHz Antenna input 75 Ω unbalanced Amplifier Power output (RMS) THD 30 % Total... - Page 73 Appendix Speakers for HTZ-323BD S-BD422 • Front (Left/Right) Net Dimensions Type 2 Way 250 mm x 1110 mm x 250 mm (W x H x D) Impedance Rated 4 Ω Net Weight 3.5 kg • Surround speaker (Left/Right) Net Dimensions Type 1 Way 250 mm x 1110 mm x 250 mm (W x H x D) Impedance Rated 4 Ω Net Weight 3.4 kg • Center speaker Net Dimensions Type 1 Way 230 mm x 80 mm x 90 mm (W x H x D) Impedance Rated 3 Ω Net Weight 0.7 kg • Subwoofer...
- Page 74 Appendix Speakers for HTZ-222BD S-BD122 • Front/Surround speaker (Left/Right) Net Dimensions Type 1 Way 95 mm x 80 mm x 90 mm (W x H x D) Impedance Rated 4 Ω Net Weight 0.3 kg • Center speaker Net Dimensions Type 1 Way 230 mm x 80 mm x 90 mm (W x H x D) Impedance Rated 3 Ω Net Weight 0.7 kg • Subwoofer Net Dimensions Type 1 Way 200 mm x 340 mm x 270 mm (W x H x D) Impedance Rated 3 Ω Net Weight 3.4 kg • Design and specifications are subject to change without notice.
-
Page 75: Maintenance
Appendix Maintenance Notes on discs Handling discs Handling the unit Do not touch the playback side of the disc. Hold the disc by the edges so that fingerprints When shipping the unit do not get on the surface. Never stick paper or Please save the original shipping carton and tape on the disc. packing materials. If you need to ship the unit, for maximum protection, re-pack the unit as it Storing discs was originally packed at the factory. After playing, store the disc in its case. Do not Keeping the exterior surfaces clean expose the disc to direct sunlight or sources of • Do not use volatile liquids such as insecticide heat and never leave it in a parked car exposed spray near the unit. to direct sunlight. • Wiping with strong pressure may damage Cleaning discs the surface. Fingerprints and dust on the disc can cause • Do not leave rubber or plastic products in poor picture quality and sound distortion. -
Page 76: Important Information Relating To Network Services
Important Information Relating to Network Services All information, data, documents, communications, downloads, files, text, images, photographs, graphics, videos, webcasts, publications, tools, resources, software, code, programs, applets, widgets, applications, products and other content (“Content”) and all services and offerings (“Services”) provided or made available by or through any third party (each a “Service Provider”) is the sole responsibility of the Service Provider from whom it originated. The availability of and access to Content and Services furnished by the Service Provider through the PIONEER Device are subject to change at any time, without prior notice, including, but not limited to the suspension, removal or cessation of all or any part of the Content or Services. Should you have any inquiry or problem related to the Content or Services, you may refer to the Service Provider’s website for the most up-to-date information. PIONEER is neither responsible nor liable for customer service related to the Content and Services. Any question or request for service relating to the Content or Services should be made directly to the respective Content and Service Providers. Please note that PIONEER is not responsible for any Content or Services provided by the Service Provider or any changes to, removal of, or cessation of such Content or Services and does not warrant or guaranty the availability of or access to such Content or Services. © 2012 PIONEER CORPORATION. All rights reserved. - Page 78 安全資訊 感謝您購買本先鋒產品。 請徹底閱讀此份操作手冊,以便知道如何正確操作您的機器。 手冊閱讀完後,請妥善保管以供未來參考之用。 重要 小 心 有 觸 電 的 危險 請 勿 打 開 等邊三角形內帶有箭頭的閃電符號,其目的 注意 等邊三角形內的驚嘆號,旨在提醒使用者注 為警告使用者,注意本產品機殼內未絕緣的 為避免觸電危險,請勿拆卸上下蓋(或背面 意本機所附帶之操作及維護等相關重要說 「危險電壓」,避免造成觸電的危險。 板),以避免觸電或受傷,機內無任何可供 明。 維修使用的零件,若需維修服務請聯絡專業 維修人員。 D3-4-2-1-1_A1_Zhtw 通風注意事項 注意 安裝本機時,請確定在本機四周預留足夠的空間以利通 本產品為第一級雷射產品,依雷射產品的安全性規範 風(頂部10 cm、背面10 cm、及兩側10 cm以上)。 IEC 60825-1:2007。 警告 第一級雷射產品 機殼上具有之縫隙及開口用於通風,以確保本產品之正 常操作並防止過熱。為避免火災,請勿堵塞開口或用物...
- Page 79 本產品只適宜一般家庭用途。如果是由於應用在其他 若本機之交流電源插頭與您欲使用的交流電源插座不 符,請拆下插頭並換上合適的。僅可由專業技術人員 非家庭用途(如做為商業用途而長期使用於餐廳中,或 於本機的電源供給電纜上更換及安裝交流電源插頭。 者使用於汽車或船中)而導致發生故障並需要修理,在 若在連接至交流電插座上時切斷插頭,可能導致觸 保用期間必須承擔修理費用。 K041_A1_Zhtw 電。請確認插頭於移除後已予妥善處理。 當本機處於長時間未使用之情形(如假期中)時,請 電源線注意事項 將主電源插頭自牆上插座拔除以切斷電源。 D3-4-2-2-1a_A1_Zhtw 請手持插頭部分挪動電源線。拔下插頭時勿拉拽電源線, 且勿用濕手去碰電源線,因為這樣可能會導致短路或電 擊。勿將本裝置、家具或其他物件壓在電源線上,或以其 注意 本機STANDBY/ON開關不完全將電源自交流電插 他方式擠壓電源線。切勿將電源線打結或和其他的線綁 座切斷。因電源線為本機主要電源切斷裝置,您需要 縛。電源線的佈線應防止被人踩在上面。電源線受損可能 將插頭拔除以切斷所有電力。因此,請確認本機安裝 會導致火災,或造成人員觸電。經常檢查電源線。如果您 時電源線可輕易自交流電插座拔除以防止意外。為防 發現電源線受損,請就近至先鋒公司授權維修中心或銷售 止火災,當本機處於長時間未使用之情形(如假期 商進行更換。 中)時,請將主電源插頭自牆上插座拔除以切斷電 S002*_A1_Zhtw 源。 警告 D3-4-2-2-2a*_A1_Zhtw 為防止火災,請勿將明火源(如點燃的蠟燭)放置於本 機上。 D3-4-2-1-7a_A1_Zhtw...
- Page 80 版權相關注意事項 • 本產品含有受美國專利權及其他 Rovi 公 司的知識產權保護的版權保護技術。嚴禁 • 由於 AACS(先進內容接收系統)是受 逆向工程或分拆。 藍光光碟 格式的內容保護系統認可 , 和 • 在美國著作權法及其他國家的著作權法保 DVD 格式的 CSS(內容擾亂系統)的用 護下,未經授權的錄製、使用、播放、發 途相似 , 受 AACS 保護的內容 , 在錄放、 布或修改電視節目、錄影帶、BD-ROM 光 模擬訊號輸出等情況有可能受到限制。在 碟、DVD、CD 及其他素材,將受到民刑 本產品生產後,AACS 可能會採用及(或) 事的制裁。 修改相關限制,因此須視您購買的時機, 本產品的操作性及限制內容可能有所不 同。 • 另外,由於另加使用 BD-ROM Mark 及 BD+ 作為藍光光碟格式的內容保護系統, 這實施了一定的限制,包括播放 BD-ROM Mark 及 / 或 BD+ 所保護內容的限制。請 洽詢授權客服中心,瞭解更多關於...
- Page 81 電視色彩規格的重要注意事項 本播放器的色彩規格會隨著目前所播放的光 碟而變。 舉例而言,播放器播放 NTSC 色彩規格的光 碟時,影像會以 NTSC 訊號輸出。 唯有具備多重色彩規格的電視機才可接收本 播放器的輸出訊號。 • 若您的電視使用 PAL 色彩規格,觀賞以 NTSC 規格所錄製的光碟時僅會看見 失真 影像。 • 具有多重規格的彩色電視可依據輸入的訊 號自動切換色彩規格。若未自動 切換色彩 規格,請關機後重開,然後檢視畫面中的 一般影像。 • 即使您的電視機可正確播放以 NTSC 色彩 規格所錄製的光碟,錄影機也有可 能無法 錄製這些光碟影像。...
- Page 82 19 前面板 39 –重複播放(重複播放) 20 後面板 40 –依想要的順序播放(編序播放) 40 –設定書籤 2 接線方式 40 –縮放 41 –像投影片一樣播放相片 21 組裝揚聲器 41 –切換拍攝角度 21 –揚聲器安裝HTZ-323BD/HTZ-322BD 41 –切換字幕 23 –HTZ-323BD/HTZ-322BD的壁掛式 42 –切換音訊 揚聲器 42 –切換CD/SACD播放區域 24 –HTZ-323BD/HTZ-322BD揚聲器的 42 –顯示碟片資訊 其他注意事項 43 –使用BONUSVIEW或BD-LIVE 24 –為HTZ-323BD/HTZ-322BD的系統...
- Page 83 5 從Home Media Gallery中播放 9 故障排除 47 關於Home Media Gallery 67 –畫面 47 –關於網路播放 68 –聲音 49 播放網路上的檔案 68 –播放 49 Disc/USB播放 69 –控制功能 49 –播放影像檔案 69 –網路 50 依想要的順序播放(Playlist) 71 –其他問題 50 –新增曲目/檔案 50 –播放Playlist 10 附錄 50 –從Playlist 中刪除曲目/檔案 72 規格 75 維護 6 播放網路內容...
- Page 84 遙控器(1) 螺絲 M4x12(4) 螺絲 M3.5x12(2) (用於固定上方和下方機殼。 ) (這些螺絲是用來將環繞揚 聲器固定在底座上。 ) 揚聲器音箱之配件 電池(2) FM 天線(1) (HTZ-222BD) 電源線 螺絲 M4x12 防滑墊(5) [ 一字型 ] (4) •操作手冊 ( 此文件 ) ( 這些螺絲是用來將揚聲器 固定在底座上。) 揚聲器音箱之配件 (HTZ-323BD) 警告 請將小零件存放在小孩與嬰兒無法拿取 之處。若意外吞入,請立即送醫。 防滑墊(1) 螺絲 M4x16 (16) (用於固定在底部和下方機 殼上。 ) 螺絲 M4x12(8) (用於固定上方和下方機殼。 )...
- Page 85 • 為了避免電池液洩漏,如果打算長時間不使用 遙控器(一個月或以上) ,請取出電池。如果電 池液洩漏,請小心擦乾淨電池槽的內部,然後 請先插入負 極( * )側。 插入新電池。如果電池漏液且液體沾到您的皮 膚,請用大量清水沖洗。 • 處理廢舊電池時,請遵守政府條例或適用於貴 國或地區的環境公共指令規則。 軟體更新 3. 關閉後蓋。 緊緊關上(應會聽到「喀」一聲) 。 先鋒網站附有本播放機的產品資訊。請檢查 此網站是否有本 Blu-ray disc 播放機的更新 及服務資訊。 歐洲: http://www.pioneer.eu/ 英國: http://www.pioneer.eu/ http://www.pioneer.co.uk/ 俄國: 您可利用播放機隨附的電池檢查產品操作, http://www.pioneer.eu/ 但無法持續太久。 建議使用可延長使用壽命 http://www.pioneer-rus.ru/ 的鹼性電池。 香港: http://www.pioneerhongkong.com.hk/ 新加坡: http://www.pioneer.com.sg/ firmwaredownload 澳洲:...
- Page 86 使用前 Zhtw 可播放的碟片/檔案類型 可播放碟片 本播放機可播放碟片標籤、包裝或封套上有以下所示標誌的碟片。 小心 • 只有已終結的碟片才能播放。 應用程式格式 碟片類型 標誌 DVD- CD-DA DATA- BDMV BDAV DVD VR Video DTS-CD DISC BD-ROM BD-R BD-RE DVD-ROM 2,3,4 ...
- Page 87 使用前 Zhtw • 「 Blu-ray Disc」 、 「Blu-ray」及「Blu-ray 關於音訊格式 Disc」 標誌皆為 Blu-ray Disc 聯合會的商標。 本播放機支援下列音訊格式: • 是 DVD Format/Logo Licensing • Dolby TrueHD Corporation 的商標。 • Dolby Digital Plus 無法播放的碟片 • Dolby Digital • HD DVDs • DTS-HD Master Audio • DVD-RAM 碟片 •...
- Page 88 使用前 Zhtw 播放 DVD 「BONUSVIEW」是 Blu-ray Disc 聯合會的 商標。 此標籤指示與 VR 格式(視訊錄製格式)燒 透過網際網路可以使用下載電影預告片、 錄的 DVD-RW 碟片的播放相容性。對於僅 其他音訊和字幕語言與播放線上遊戲等的 以燒錄一次加密程式燒錄的碟片,只能使用 BD-LIVE 功能。使用 BD-LIVE 功能下載 CPRM 相容裝置來播放。 的資料(預告片等)儲存在儲存裝置中。 AVCHD 是一種高傳真(HD)數位攝錄影機 如需有關 BD-LIVE 功能的詳細資訊,請參 格式,使用高效率的轉碼技術將高傳真影像 閱碟片的說明。 錄製在特定媒體上。 「AVCHD」和「AVCHD」標誌是 Panasonic Corporation 和 Sony Corporation 的商標。 關於區碼 「BD-LIVE」標誌是...
- Page 89 使用前 Zhtw 播放 CD 關於視訊、音訊及影像檔案和資料夾 關於防盜拷 CD:此播放機乃是設計為符合 當光碟或 USB 裝置上的資料夾以下列所述 音訊 CD 格式的規格。此播放機不支援不符 方式建立時,即可在此播放器上播放聲音與 合這些規格的碟片的播放與提供的功能。 影像檔案。 資料夾架構範例: DualDisc 播放 DualDisc 是一種雙面碟片,一面包含 DVD 內容(視訊、音訊等) ,而另一面則包含非 001.jpg/001.mp3 DVD 內容,例如數位音訊內容。 xxx.jpg/xxx.mp3 DualDisc 的 DVD 面可在此播放機上播放。 001.jpg/001.mp3 該碟片非 DVD、音訊內容的一面,則與本播 xxx.jpg/xxx.mp3 放機不相容。 001.jpg/001.mp3 置入或退出...
- Page 90 使用前 Zhtw 可播放檔案 附註 ® 本播放機可以播放 DVD、CD 和 USB 裝置上 • 必須註冊此 DivX 認證的裝置才能播放 DivX 錄製的視訊、影像和音訊檔。 隨選視訊(VOD)內容。在註冊程序期間,會 先產生供您的裝置使用的 DivX VOD 註冊碼, 小心 然後送出該代碼。重要事項:DivX VOD 內容 受 DivX DRM(數位版權管理)系統的保護, • 在 DVD 中,只能播放以 ISO 9660 檔案系統燒 限制在已註冊的 DivX 認證裝置上播放。如果您 錄的碟片。 嘗試在您未經授權的裝置上播放 DivXVOD 內 •...
- Page 91 使用前 Zhtw 可播放檔案表 可播放媒體 BD-R/RE/-R DL/ 可播放檔案 RE DL/-R LTH, 檔案規格 (副檔名) DVD-R/RW/-R DL/ USB 裝置 網路 +R/+RW/+R DL, CD-R/RW 取樣訊率:高達 48 kHz 位元率:高達 320 kbps (.mp3) 音訊類型:MPEG-1 Audio Layer 3 取樣訊率:高達 48 kHz 位元率:高達 192 kbps (.wma) 音訊類型:WMA 版本 9 取樣訊率:高達 192 kHz LPCM 量化位元率:16 位元 (.wav) 聲道:雙聲道 取樣訊率:高達 192 kHz FLAC 量化位元率:16 位元,24 位元...
- Page 92 使用前 Zhtw 商標及授權 HDMI 一詞及 HDMI High-Definition 「x.v.Colour」 、 及 為 Multimedia Interface 和 HDMI Logo 皆為 Sony Corporation 的商標。 HDMI Licensing, LLC 在美國及其他國家的 註冊商標。 YouTube ™ 為 Google Inc. 的商標 由 Dolby Laboratories 授權製造。 Picasa ™ Web Albums 為 Google Inc. 的商標 「杜比」 、 「Dolby」與雙 D 標誌是 Dolby 本產品採用 Microsoft Corporation 開發之 Laboratories 的商標。...
- Page 93 使用前 Zhtw 遙控器 • • • • • • 1 • • • • • (STANDBY/ON) :按下可開啟或關閉電源。 FUNCTION:變更輸入來源或功能。 在播放器上檢視顯示視窗並切換時 1. 每次按下 FUNCTION 就會切換輸入來源。 2. 選取想要的輸入來源並按下 ENTER。 檢視電視顯示器並切換時 1. 按下 FUNCTION 可顯示 [Source Menu]。 2. 每次按下 FUNCTION 就會切換輸入來源,您也 可以使用游標 / 切換輸入來源。 3. 選取想要的輸入來源並按下 ENTER。 * 也可透過 [HOME MENU] d [Source Menu] 並 按下 ENTER 顯示 Source Menu 畫面。 FUNCTION 按鈕會切換 [Source Menu] 的輸入來...
- Page 94 使用前 Zhtw • • • • • • 4 • • • • • • • • • • • 7 • • • • • TOP MENU:按下可顯示 BD-ROM 或 DVD- CLEAR:按下以清除數字等。 Video 的頂部選單。 REPEAT:請參閱第 39 頁。 POPUP MENU/MENU:按下可顯示 BD-ROM A-B:請參閱第 39 頁。 或 DVD-Video 選單。 彩色按鈕:請使用這些按鈕瀏覽 BD-ROM 選單。 ( 上 / 下 / 左 / 右 ) :可導覽螢幕 PROGRAM:註冊 FM 無線電台。...
- Page 95 使用前 Zhtw 前面板 1 光碟托盤 3 MIC 2 操作鈕 4 PORTABLE IN(便攜式裝置輸入 ) (STANDBY/ON) 鈕 5 (PLAY/PAUSE) 開啟或關閉播放器。 6 USB 埠 附註 7 音量控制 如果沒有「關閉」電源,請按下 8 遙控感應器 (STANDBY/ON)按鈕 5 秒鐘以上將此 將遙控器指向本感應器,然後在大約 7 裝置重新開機,就可以操作裝置。...
- Page 96 使用前 Zhtw 後面板 1 AC IN 7 天線接頭 插入電源。 8 OPTICAL IN 1/2 2 SPEAKERS 接頭 9 HDMI OUT 3 冷卻風扇 a HDMI IN 1/2 4 VIDEO OUT b 網路埠 5 AUX IN(L/R) 6 ADAPTER PORT...
- Page 97 接線方式 Zhtw 第 2 章 2. 將防滑墊安裝至各個揚聲器的底部。 接線方式 ‧環繞揚聲器(僅 HTZ-322BD) 組裝揚聲器 防滑墊 揚聲器安裝 HTZ-323BD/HTZ- 322BD 對於揚聲器底座 1. 將揚聲器線連接至播放機上。 將已連接播放機的連接線插入揚聲器上相 同顏色的接頭。 小心 3. 安裝前置 / 環繞揚聲器。 • 揚聲器端子帶有有害的電壓。連接或切斷電源 1 將下方機殼插入底部, 使線孔固定於背面。 線時,為避免觸電之風險,請在接觸任何未絕 緣部分前先將電源切斷。 • 切勿連接任何並非專為本系統所提供的揚聲器。 • 切勿將隨附的揚聲器連接至並非隨本系統所 提供的擴大機上, 否則將有可能導致系統故...
- Page 98 接線方式 Zhtw 3 將上方機殼插入下方機殼。 4 使用 2 個螺絲(M4x12) ,從揚聲器的 背面來固定上方機殼和下方機殼。 小心 • 注意不要將螺絲扭得太緊。若過度扭動螺絲, 可能會導致螺絲或螺帽的紋路受損。組裝時, 請使用中型尺寸的手動螺絲刀。請勿使用電動 螺絲刀或過大尺寸的螺絲刀,以免對螺絲或螺 帽施加過度的力量。組裝時,請確認底部或下 方機殼上沒有任何異物。組裝時,若本裝置的 底部和下方機殼之間留有異物,裝置可能無法 安全地組裝完成,可能造成傾斜或掉落。 • 請勿站在高揚聲器的基座上推動或搖動揚聲器, 否則可能造成人員受傷。請特別注意兒童。...
- Page 99 接線方式 Zhtw HTZ-323BD/HTZ-322BD 的壁 掛式揚聲器 環繞揚聲器(僅 HTZ-322BD)和中央揚聲 器均有 1 個安裝孔,該孔可以將揚聲器安裝 在牆上。 在固定之前 須謹記揚聲器系統極重,因此其重量可能會 造成螺絲鬆動或壁材脫落而無法支撐,進而 導致揚聲器掉落,故請確定準備用於固定揚 聲器的牆壁其強度足以支撐。 切勿固定於三 合板或軟質的壁面上。 本系統並未提供固定螺絲。請使用適合該壁 材且可支撐揚聲器重量的螺絲。 小心 • 若是您不確定牆壁的材質和強度,請向專家諮 詢意見。 • Pioneer 對於任何由於安裝不當所造成的意外或 損害,概不負責。...
- Page 100 的中心可減少牆壁回音。 依舊,此時請將揚聲器擺放在遠離電視機的 裝置 位置。 由於重低音並未採防磁設計,因此最好不要 靠近電視機或顯示器擺放。 磁性儲存媒體 (如 小心 磁片及磁帶,或錄影帶)亦最好不要存放在 • 請小心謹慎並切勿讓孩童將手或任何物體伸入 重低音的附近。 揚聲器導管內 * 切勿將前置/環繞揚聲器僅 HTZ-323BD 及 揚聲器導管:在揚聲器音箱裡產生低音的地方。 重低音安裝至牆上或天花板上,以免掉落而 • 請把中置揚聲器放到兒童不能觸模的安全位置, 造成傷害。 否則也許會導致揚聲器掉下,令人受傷及 / 或 物件損毀。 為 HTZ-323BD/HTZ-322BD 的 • 揚聲器含有電磁零件,因此電視機螢幕 (CRT) 或 PC 顯示器螢幕上可能會出現彩色不均的現 系統定位 象。請在遠離電視機螢幕 (CRT) 或 PC 顯示器...
- Page 101 裝於牆上。 1. 將揚聲器線連接至播放機上。 在固定之前 將已連接播放機的連接線插入揚聲器上相 同顏色的接頭。 須謹記揚聲器系統極重,因此其重量可能會 造成螺絲鬆動或壁材脫落而無法支撐,進而 導致揚聲器掉落,故請確定準備用於固定揚 聲器的牆壁其強度足以支撐。 切勿固定於三 合板或軟質的壁面上。 本系統並未提供固定螺絲。請使用適合該壁 材且可支撐揚聲器重量的螺絲。 小心 • 若是您不確定牆壁的材質和強度,請向專家諮 詢意見。 • Pioneer 對於任何由於安裝不當所造成的意外或 損害,概不負責。 小心 • 揚聲器端子帶有有害的電壓。連接或切斷電源 線時,為避免觸電之風險,請在接觸任何未絕 緣部分前先將電源切斷。 • 切勿連接任何並非專為本系統所提供的揚聲器。 • 切勿將隨附的揚聲器連接至並非隨本系統所提 供的擴大機上, 否則將有可能導致系統故障或 起火。 2. 將防滑墊安裝至各個揚聲器的底部。...
- Page 102 接線方式 Zhtw HTZ-222BD 揚聲器的其他注意 左前揚聲器 (L)/ 右前揚聲器 (R): 事項 將前側揚聲器置於螢幕或畫面的兩側,並盡 請將主要的左右前置揚聲器安裝於與電視等 量保持畫面的平整。 距的位置。 中央揚聲器: 將中央揚聲器放在顯示器或螢幕的下方或前 安全注意事項: 方。 此系統所附的中央揚聲器具有防磁設計。否 左側揚聲器環繞 (L)/ 則一旦有任何裸露的揚聲器線碰觸到背面面 右側揚聲器環繞 (R): 板時,其將可導致電源基於安全措施而切斷。 將這些揚聲器置於您聆聽位置的後側,正面 前置、中置及環繞三組隨本系統所提供的揚 稍微向內。 聲器,均採防磁設計。 不過,仍須視安裝位 低音揚聲器: 置而定,若是將揚聲器安裝得太過靠近電視 低音揚聲器的位置非特別重要,因為低音較 機的螢幕, 還是可能會發生色彩失真的情況。 無方向性。 但需將低音揚聲器置於前側揚聲 一旦發生此種情況時,請先關掉電視機的電 器附近。 將低音揚聲器轉向房間的中心可減 源,15 到 30 分鐘後再將其打開。若是問題 少牆壁回音。 依舊,此時請將揚聲器擺放在遠離電視機的 裝置 位置。...
- Page 103 接線方式 Zhtw 連接至您的電視機 HDMI 連線 若您使用 HDMI 電視機或顯示器,則可使 視您現有設備的功能,使用以下其中一項連 ® / ™ Cable) 用 HDMI 線(High Speed HDMI 接方式。 連接至本播放器。連接播放器的 HDMI 孔至 • HDMI 連線(第 27 頁) HDMI 相容電視機或顯示器的 HDMI 孔。 • 視訊連接(第 28 頁) 附註 機組背面 • 視您要連接的電視機及其他設備,有多種連接 播放器的方式。僅使用本手冊所說明的其中一 種連線方式。...
- Page 104 接線方式 Zhtw 連接天線 視訊連接 使用視訊線,連接播放器上的視訊輸出 連接隨附的天線以收聽廣播。 (VIDEO OUT)孔至電視機的影片輸入孔。 可透過系統的喇叭來聆聽聲音。 機組背面 機組背面 視訊 附註 • 在連接 FM 天線後,請盡量保持水平狀。務必 電視機 完全伸長 FM 天線。...
- Page 105 接線方式 Zhtw 連接外部裝置 連接 PORTABLE IN 孔 可透過本系統的喇叭來欣賞可攜式聲音播放 連接 AUX 器的音樂。 連接可攜式聲音播放器的耳機(或 line 可透過本系統的喇叭來欣賞外部裝置的聲 out)孔至本機的 PORTABLE IN 孔。按下 音。 FUNCTION 及 ENTER,選擇 [Portable In] 選 連接裝置的類比聲音輸出孔至本機上的 AUX 項。 L/R (INPUT)。按下 FUNCTION 及 ENTER, 選擇 [AUX] 選項。 機組背面 白色 MP3 播放器等等 紅色 至電視機、VCR 等裝 置的聲音輸出孔 附註 • 插入 PORTABLE IN 端子時,請用手撐住裝置 的頂端,避免裝置移動。...
- Page 106 接線方式 Zhtw 連接 OPTICAL IN 1/2 孔 連接 HDMI IN 1/2 可透過本系統的喇叭,使用數位光纖連線的 可使用此連接方法,欣賞外部裝置上的影音 方式來欣賞其他裝置上的音樂。 內容。 請將設備的光纖輸出端子連接至裝置上的 連接外部裝置的 HDMI OUT 孔至本機的 OPTICAL IN 1 或 2 端子。 按下 FUNCTION HDMI IN 1 或 2 孔。按下 FUNCTION 及 及 ENTER,選擇 [Optical IN 1/2] 選項。 ENTER,選擇 [HDMI IN 1/2] 選項。 機組背面 機組背面 至機上盒、數位 至外部裝置上的數 衛星接收器、電 位光纖輸出孔 視遊戲機等外 部裝置的 HDMI OUT 孔...
- Page 107 接線方式 Zhtw 連接選用的 ® Bluetooth ADAPTER Bluetooth ADAPTER (先鋒型號 AS-BT100 或 AS-BT200)連接本機時,搭載 Bluetooth 無線技術的產品(行動電話、數位音樂播放 器等)就能以無線的方式聆聽音樂。 將 Bluetooth ADAPTER 連接至後面板上的 ADAPTER PORT 端子。 * 關於播放 Bluetooth 無線技術裝置的指 示,請參閱第 54 頁的用來配對 Bluetooth ADAPTER 及 Bluetooth 無線技術裝置乙節。 機組背面 ® Bluetooth ADAPTER 附註 • 請勿移動連接 Bluetooth ADAPTER 的接收器。 這麼做可能會造成受損或接觸不良。...
- Page 108 接線方式 Zhtw 連接至您的家用網路 本播放器可以透過後面板的區域網路 (LAN) 寬頻服務 接口連接區域網路。 把播放器連接至寬頻家居網路,就可以使用 各種服務,例如 BD-Live 互動及線上服務。 有線網路連線 使用有線網路直接連接裝置到網路,不受到 無線電頻率的干擾,可提供最佳效能。 路由器 請參見您的網路裝置手冊,瞭解相關詳情。 用另購的網路線將播放器的 LAN 連接埠連 上數據機或路由器上相對應的連接埠。 附註 • 插入或拔除網路線時,必須握住網路線的插頭 處。拔除網路線時,請勿拉扯網路線,而是壓 下卡榫再拔除。 • 勿連接模組化電話線至網路埠。 • 由於有多種連線設定方式,請按照電信業者或 PC 及 / 或 DLNA 認證的伺服器 網路服務提供商的規格操作。 • 若您要存取電腦或 DLNA 伺服器內的內容,則 必須透過路由器將本播放器與這些裝置連接在...
- Page 109 接線方式 Zhtw 網路連線注意事項: • 您的 ISP 可能不允許使用或限制使用「路 由器」 。請洽詢您的 ISP,瞭解相關詳情。 • 重設路由器或數據機,可解決許多設定時 • 請關閉您家用網路中所有未使用的網路設 發生的網路連線問題。連接播放器至家用 備。部分裝置會產生網路流量。 網路後,快速關閉及(或)取下家用網路 路由器或纜線數據機的電源線。然後再次 • 為實現更好的傳輸,請盡量將播放機放在 開啟電源及(或) 連接電源線。 靠近無線接入點的場所。 • 網路服務提供商(ISP)可能會根據服務 • 盡量靠近無線接入點,或調整播放機的方 條款,限制能接收網路服務的裝置數量。 向,以確保播放器和無線接入點之間沒有 請洽詢您的 ISP,瞭解相關詳情。 阻擋物。 • 本公司不對因您的寬頻網路連線或其他相 連設備發生通訊錯誤/故障,而造成播放 器 及(或)網際網路連線功能故障的情況 負責。...
- Page 110 接線方式 Zhtw 連接 USB 裝置 本播放器可播放 USB 裝置的電影、音樂與 照片檔案。 1. 將 USB 裝置置入 USB 埠, 直到卡住為止。 關於 USB 裝置 可連接至播放機的 USB 裝置如下所示。 • USB 2.0 相容記憶裝置 • FAT16 或 FAT32 檔案系統,最少 1 GB 容量(建議使用 2 GB 或以上) 附註 • 無法使用上述以外的檔案系統格式化的裝置。 如果這類裝置以播放機格式化,則仍可以使用。 • 如果 USB 裝置包含多個分割磁碟,則無法識別 附註...
- Page 111 開始操作 Zhtw 第 3 章 如果未顯示 Setup Navigator 選單 開始操作 按下 HOME MENU 以顯示 Home Menu,選擇 Initial Setup d Setup Navigator d Start,然後按 ENTER。 使用 Setup Navigator 選 3. 啟動 Setup Navigator。 單進行設定 按下 ENTER. y S etup Navigator 開始。 在下列情況下使用播放機時,務必執行這些 4. 選擇 OSD 語言。 設定。...
- Page 112 • 有些機型可能無法以播放機的遙控器來操作電 視機,即使是列在製造商代碼表上的品牌電視 機。 • 更換電池後,設定可能還原為原廠預設值。如 果發生這種情況,請重新設定。 1. 輸入 2 位數製造商代碼。 按下 TV CONTROL 時,使用數字按鍵 (0 至 9)輸入代碼。 附註 y 原廠預設值是 00 (PIONEER)。 y 如果輸入代碼時發生錯誤,請放開 TV CONTROL 並從頭開始。 y 一家製造商有多個代碼時,請嘗試依指示的 順序輸入代碼,直到可以操作電視機為止。 2. 檢查是否可以操作電視機。 使用 TV CONTROL 操作電視機。 – 按下可開啟或關閉電視機電源。 INPUT SELECT– 按下可切換電視機的輸...
- Page 113 開始操作 Zhtw 電視機預設代號清單 製造商代碼 PIONEER 00, 31, 32, 07, 36, FRONTECH 31, 42, 46 MAGNAVOX 07, 10, 03, 12, SALORA 31, 32, 42, 43 42, 51, 22 FRONTECH/PROTECH 32 SAMBERS 49 ACURA 44 FUJITSU 48 MANESTH 39, 46 SAMSUNG 07, 38, 44, 46,...
- Page 114 播放 Zhtw 第 4 章 如果顯示碟片選單 播放 有些碟片在播放開始時會自動顯示碟片選 單。碟片上的碟片選單內容和操作方法各有 不同。 播放碟片或檔案 從停止播放所在位置恢復播放(恢復播 放功能) 本節說明播放機的主要操作。 y 如果在播放時按下 STOP,碟片停止 有關可播放的碟片和檔案類型,請參閱第 所在位置會儲存在記憶體中。按下 10 頁。使用 Home Media Gallery 播放燒錄 PLAY 後,從該位置恢復播放。 在碟片上的視訊、影像和音訊檔案(第 47 頁) 。 y 若要取消恢復播放功能,在播放停止時 按下 STOP。 1. 按 STANDBY/ON 開啟電源。 開啟電視機電源,然後預先切換輸入。...
- Page 115 播放 Zhtw 快轉和倒轉掃描 漸進快轉和漸進倒轉 播放期間按下 REV 或 FWD。 暫停播放時,按下 / 或 / 。 y 每按一次按鍵就會切換掃描速度一次。 y 每按一次按鍵,畫面就會漸進快轉或倒 速度間距視碟片或檔案而定(速度顯示 轉一步。 在電視機畫面上) 。 恢復正常播放 恢復正常播放 按下 PLAY。 按下 PLAY。 重複播放標題或曲目內的特定...
- Page 116 播放 Zhtw 依想要的順序播放(編序播放) 設定書籤 您可將目前播放的視訊設定書籤,並在稍後 1. 播放期間按下 PROGRAM。 播放該場景。 y 顯示程式畫面。 播放期間按下 BOOKMARK。 2. 選擇節目編號。 y 已設定書籤。 使用 / 選擇,然後按 ENTER。 y 書籤最大數量為 12。 3. 選擇您要播放的標題。 播放書籤場景 使用 / 選擇,然後按 。 4. 選擇您要播放的章節。 1. 按住 BOOKMARK 幾秒鐘。 使用 / 選擇,然後按...
- Page 117 播放 Zhtw 像投影片一樣播放相片 切換字幕 此功能可播放相片,並自動切換。 有些錄有多種字幕的碟片或檔案在播放時可 以切換字幕。 播放期間按下 INDEX。 y 顯示影像檔案的縮圖。最大數量為一次 小心 12 個。 y 無法切換在 DVD 或 BD 錄影機上錄製的碟 y 若您選擇其中一幅影像並按下 ENTER, 片字幕。另請參閱用於錄製的裝置的操作手 冊。 投影片將從您選擇的位置開始播放。 播放期間按下 SUBTITLE。 旋轉/倒轉相片 y 目前的字幕及錄製字幕總數都會顯示在 播放或暫停投影片時,按下 / / 電視螢幕上。 按鍵會讓顯示幕如下所示切換。 若要切換字幕, 請再按一次 SUBTITLE。 按鍵:...
- Page 118 播放 Zhtw 切換音訊 顯示碟片資訊 有些錄有多個音訊串流/聲道的碟片或檔案 按下 DISPLAY。 在播放時可以切換音訊串流/聲道。 碟片資訊顯示在電視螢幕上。要關閉資訊顯 示,請再按一次 DISPLAY。 播放期間按下 AUDIO。 顯示的資訊在播放期間和停止播放時不同。 y 目前的音訊及錄製音訊串流總數都會顯 示在電視螢幕上。若要切換音訊,請再 按一次 AUDIO。 y 在 TOOLS 選單中選擇 Audio 也可以切 換音訊。 y 如果按下 AUDIO 時沒有切換音訊,請 從碟片選單畫面切換。 切換 CD/SACD 播放區域 1. 選擇您要播放的區域。 在停止模式中按...
- Page 119 播放 Zhtw 使用 BONUSVIEW 或 BD-LIVE 附註 • 不保證 USB 隨身碟的操作。 本播放機相容於 BD-Video BONUSVIEW 及 BD-LIVE。 • BD-LIVE 功能資料的播放視使用的碟片而有不 同。 關於詳細資料, 請洽詢碟片隨附的操作手冊。 使用相容於 BONUSVIEW 的 BD-Video 碟片 • 若要使用 BD-LIVE 功能,需完成網路連接及設 時,您可以作為第二視訊(子母畫面) (第 定(第 32 及 61 頁) 。 45 頁)及第二音訊(第...
- Page 120 播放 Zhtw 播放功能 可使用的功能視碟片和檔案的類型而定。有些功能在某些情況中無法使用。查看下表上的可 用功能。 碟片/檔案類型 DVD-R 功能 BD-R DVD- /-RW 視訊 影像 音訊 AVCREC AVCHD 音訊 CD /-RE Video (VR 格 檔案 檔案 檔案 式 ) 快轉和倒轉掃描 播放指定標題、 章節或曲目 跳過內容 慢動作播放 漸進快轉和漸進倒 ...
- Page 121 播放 Zhtw 使用 TOOLS 選單 1. 視碟片類型而定,會顯示其中一類這些資訊。 2. 如果 PIP Mark 設定為 On,則第二視訊標記在 錄製第二視訊的場景時顯示(第 59 頁) 。 根據播放機的操作狀態來調用各種功能。 3. 如果 Secondary Audio Mark 設定為 On,則第 二音訊標記在錄製第二音訊的場景時顯示(第 1. 顯示 TOOLS 選單。 59 頁) 。 播放時按下 TOOLS。 附註 2. 選擇並設定項目。 使用 / 選擇,然後按 ENTER。 y 視碟片類型而定可選擇的項目。 y 錄製的第二音訊串流類型視碟片和檔案而...
- Page 122 播放 Zhtw 播放指定標題、章節、曲目或 從指定位置繼續播放(繼續檢 檔案(搜尋) 視播放) 此功能允許您從指定下次播放的位置繼續播 1. 選擇 Title 或 Chapter(曲目/檔案) 。 放,即使在關閉電源後也有效。 使用 / 選擇,然後按 ENTER。 2. 輸入標題或章節(曲目/檔案)編號。 設定 使用數字按鍵(0 至 9)或 / 輸入數 在播放期間,要開始繼續檢視播放的位置 字。 按下 CONTINUED。 y 若要搜尋標題 32,請輸入 3 和 2,然 指定位置的經過播放時間會顯示在電視螢 後按 ENTER。 幕上。 y 按下...
- Page 123 從Home Media Gallery中播放 Zhtw 第 5 章 • 下列檔案允許自 Home Media Gallery 中播放: 從 Home Media Gallery – 執行 Microsoft Windows Vista 或 XP 及安裝 了 Windows Media Player 11 的 PC 中播放 – 執行 Microsoft Windows 7 及安裝了 Windows Media Player 12 的 PC – DLNA 相容數位媒體伺服器(在 PC 或其他 元件上) 關於 Home Media Gallery 如上述儲存在 PC 或 DMS(數位媒體伺服器) 中的檔案可透過數位媒體播放機(DMP)播放。...
- Page 124 從Home Media Gallery中播放 Zhtw ® ® 對於播放機和/或 Home Media Gallery 功 DLNA 、DLNA 標誌及 DLNA CERTIFIED 能,若因發生與您的電腦連線和/或 PC 有 皆為 Digital Living Network Alliance 的商標、 關之通訊錯誤和/或故障,因而造成任何故 服務標誌或認可標誌。 障,先鋒一概不負責。請洽您的 PC 廠商或 可透過網路播放的內容 網際網路服務供應商。 • 即使以相容格式編碼時,某些檔案可能仍 Windows Media 是 Microsoft Corporation 於 無法正確播放。 美國及/或其他國家的商標或註冊商標。 • 視所使用的伺服器類型或版本而定,可能 本產品採用 Microsoft Corporation 開發之技 不支援某些功能。 術,未獲 Microsoft Licensing, Inc. 授權不得 • 支援的檔案格式會視伺服器不同而有所差 使用或散佈本技術。 異。就檔案來說,您的伺服器不支援的檔...
- Page 125 從Home Media Gallery中播放 Zhtw 播放網路上的檔案 Disc/USB 播放 1. 按 HOME MEDIA GALLERY 以顯示 1. 按 HOME MEDIA GALLERY 以顯示 Home Media Gallery。 Home Media Gallery。 從 Home Menu 選擇 Home Media 從 Home Menu 選擇 Home Media Gallery, 然後按 ENTER 也可以顯示 [Home Gallery,然後按 ENTER 也可以顯示 Media Gallery]。 Home Media Gallery。 2. 選擇含有您要播放檔案的伺服器。 2. 選擇碟片或 USB。 使用 / 選擇,然後按 ENTER。 3. 選擇您要播放的檔案。...
- Page 126 從Home Media Gallery中播放 Zhtw 依想要的順序播放 播放 Playlist (Playlist) 1. 按 HOME MEDIA GALLERY 以顯示 Home Media Gallery。 可新增曲目和檔案至 Playlist 的碟片如下所 從 Home Menu 選擇 Home Media 示。 Gallery,然後按 ENTER 也可以顯示 • 可燒錄音訊檔的 DVD/CD/USB 裝置。 Home Media Gallery。 2. 選擇 Playlist。 新增曲目/檔案 使用 / 選擇,然後按 ENTER。 使用此程序新增曲目和檔案,然後建立 3. 選擇要播放的曲目/檔案。 Playlist。 使用 / 選擇,然後按 ENTER。 從選擇的曲目/檔案開始播放,然後繼...
- Page 127 播放網路內容 Zhtw 播放項目 第 6 章 播放網路內容 小心 您必須事先將播放機連接至網際網路。請參閱第 您可利用播放機在網際網路上享受某些串流 32 頁的 透過 LAN 介面連接網路 以了解詳細的資 內容。 訊。 可用的網路內容 • YouTube(MPEG4 AVC H.264) • Picasa 附註 關於 YouTube • 可播放下列大小的 YouTube 視訊。 – 標準品質(400 x 226 像素、200 kbps) – 一般品質(480 x 360 像素、512 kbps) – 高品質(854 x 480 像素、900 kbps) –...
- Page 128 其他操作 Zhtw 第 7 章 6. 設定記錄速度 使用 / / 選取 [Speed] 並按下 其他操作 ENTER。 y 每次按下 ENTER 就會變更記錄速度。 記錄速度的變更方式如下。 將聲音 CD 記錄到 USB Normal:在聆聽音樂時記錄。 裝置 Fast:將以約 4 倍的速度記錄。您無 法聆聽音樂。 您可使用此播放器將聲音 CD 記錄到 USB 裝 置。 7. 開始記錄。 使用 / / 選取 [Start] 並按下 1. 將...
- Page 129 其他操作 Zhtw 操作收音機 刪除所有已儲存的電台 1. 按住 STOP 兩秒。 確定已連接 FM 天線。 (請參閱第 28 頁) 顯示視窗將會閃爍 [ERASE ALL]。 收聽收音機 2. 按 STOP 以刪除所有儲存的廣播電台。 1. 按下 FUNCTION 直到顯示視窗中顯示 改善 FM 接收不良情況 FM,然後按下 ENTER。 按下遙控器上的 AUDIO。即可將調頻器由 播放器會調整至前次收聽的電台。 立體聲切換成單音,如此即可改善接收情況。 2. 按下 或 按鈕之後, 就會開始掃瞄。 或 複按下 / 按鈕。...
- Page 130 其他操作 Zhtw 享受無線音樂的 在支援藍牙無線技術的裝置上 ® 聆聽音樂 Bluetooth ADAPTER 將裝置與支援藍牙無線技術的裝置配 • Bluetooth 無線技術裝置:行動電話 對(初始註冊) 。 • Bluetooth 無線技術裝置:數位音訊播放器 • 未配備 Bluetooth 無線技術的裝置:數位 在開始配對之前,請先確定支援藍牙無線技 音樂播放器 + Bluetooth 音訊發射器(另 術的裝置已經啟動。請參閱支援藍牙無線技 售) 術之裝置的使用手冊,瞭解詳細資訊。配對 作業只需要執行一次。 無線音樂播放 1. 按下 FUNCTION 且將輸入來源變更為 Bluetooth ADAPTER (先鋒型號 AS-BT100 BLUETOOTH,並按下 ENTER。 或...
- Page 131 其他操作 Zhtw 卡拉 OK 附註 • 此裝置不支援 AVRCP。 1. 按下遙控器上的 KARAOKE 按鈕。 • 此裝置不支援「單聲道耳機設定檔(Mono 電視機螢幕上將會顯示 Initial Setup 下的 Headset Profile) 」 (免持聽筒設定檔(Hands Karaoke Setup。 Free Profile) ) 。 • 無法透過此裝置操作支援藍牙無線技術的裝置。 2. 啟動「卡拉 OK 開關(Karaoke Switch) 」 。 • 無法使用此裝置在支援藍牙無線技術的裝置上 使用游標選取 [Karaoke Setup] d 聆聽 One Seg 聲音。無法聆聽受 SCMS-T 保護 [Karaoke Switch] d [On],然後按下...
- Page 132 Virtual 3D Min 效果最低 虛擬 3D 聲音(Virtual 3D Sound) : 具有創造 3D 聲音空間的效果。 Virtual 3D Mid 效果中等 Virtual 3D Max 效果最高 5 Speaker Mode1 前置揚聲器的聲音將由後置揚聲器輸出,此模式對 2 聲道音 (HTZ-323BD/HTZ-222BD) 訊來源與 5.1 聲道音訊來源都有效。 5 Speaker Mode2 相同的聲音將從重低音揚聲器以外的 5 個揚聲器輸出,此模 (HTZ-323BD/HTZ-222BD) 式對 2 聲道音訊來源與 5.1 聲道音訊來源都有效。 Dolby PL II Movie Dolby Pro Logic II 可讓您在 5.1 聲道上播放立體聲來源,此 (HTZ-323BD/HTZ-222BD) 模式對 2 聲道音訊來源有效。...
- Page 133 進階設定 Zhtw 第 8 章 操作 Initial Setup 畫面 進階設定 1. 停止播放時,顯示 Home Menu 畫面。 按下 HOME MENU。 2. 選擇並設定 Initial Setup。 變更設定 使用 / 選擇,然後按 ENTER。 3. 選擇項目與變更設定。 使用 / / 選擇,然後按 ENTER。 關閉 Initial Setup 畫面 按下 HOME MENU 或 RETURN。 附註 • 項目是否可以選擇視播放機狀態而定。 •...
- Page 134 進階設定 Zhtw 設定 選項 說明 DRC(Dynamic Range 選擇此設置可不使用 DRC 功能即輸出音訊訊號。 Control) 選擇此設置在最吵雜與最輕柔聲音(動態範圍)間調整範圍,並以平均 音量進行播放。難以聽清楚對話或在深夜觀看電影時,請使用此設置。 Auto 選擇此項目以依據碟片的輸入音訊訊號自動開啟/關閉 DRC 設定。這 只會影響 Dolby TrueHD 訊號。 • 這會影響如 Dolby Digital、Dolby TrueHD 及 Dolby Digital Plus 等音訊訊號。 • 視碟片而定,音效可能會變弱。 Speaker Setup 調整揚聲器的」 「縮減(Trim) 」 (輸出等級(output level) )與「延遲(Delay) (與觀賞者 的距離(distance from viewers) ) 。 請參閱「調整揚聲器設定(Adjust speaker settings) 」瞭解詳細資訊(第 61 頁) 。 Test Tone 從揚聲器輸出測試音。...
- Page 135 進階設定 Zhtw 設定 選項 說明 IP Setting 選擇此設置以設定播放機和 DNS 伺服器的 IP 位址(第 61 頁) 。 Proxy Server 請只在您的網際網路服務供應商指示這樣做時,設定代理伺服器(第 62 頁) 。 Information 顯示 MAC 位址、 IP 位址、 子網路遮罩、 預設閘道、 DNS 伺服器(主要)及 DNS 伺服器(次 要)的數值。 Connection Test 選擇此以測試網路連線(第 62 頁) 。 Internet Connection Enable 連接至網際網路時,請選擇此設置。 Disable 不連接至網際網路時,請選擇此設置。...
- Page 136 進階設定 Zhtw 設定 選項 說明 Screen Saver 螢幕保護程式未啟動。 1 min 若超過一分鐘/兩分鐘/三分鐘沒有執行任何操作,將啟動螢幕保護程 式。操作遙控器會停用螢幕保護程式。 2 min 3 min Auto Power Off 如果不要電源自動關閉,請選擇此選項。此為歐規以外機種的預設設定 值。 10 min 若超過 10 分鐘 /20 分鐘 /30 分鐘沒有執行任何操作, 電源將自動關閉。 歐規機種的預設設定值為 30 分鐘。 20 min 30 min Quick Start 選擇縮短開機所需的時間。 選擇執行正常開機。 Update Disc 選擇軟體更新的方式。 (第 64 頁) USB Storage Network Load Default 還原設定為原廠預設值。...
- Page 137 進階設定 Zhtw 調整視訊 設定 IP 位址 1. 選擇及設定 Display Setting d Video 1. 選擇並設定 Network d IP Setting d Adjust d Next Screen。 Next Screen。 使用 / 選擇,然後按 ENTER。 使用 / 選擇,然後按 ENTER。 2. 選擇項目與變更設定。 2. 設定 IP 位址。 使用 / 選擇項目,然後使用 / 使用 / / 設定播放機或...
- Page 138 進階設定 Zhtw 設定代理伺服器 測試網路連線 請只在您的網際網路服務供應商指示這樣做 選擇並設定 Network d Connection Test 時,設定代理伺服器。 d Start。 使用 / 選擇,然後按 ENTER。 1. 選擇並設定 Network d Proxy Server d Next Screen。 一完成測試後,即顯示 [Network is OK.]。 使用 / 選擇,然後按 ENTER。 如果顯示任何其他訊息,請檢查連線和/ 或設定(第 32 和 61 頁) 。 2. 在 Proxy Server 選擇並設定 Use 或 Not use。...
- Page 139 進階設定 Zhtw 登錄或變更密碼 變更觀賞 DVD/BD-ROM 的成人鎖定等 級 使用此程序登錄或變更成人鎖定設定所需 的代碼。 有些含有暴力場景等不宜場景的 DVD- Video 碟片有成人鎖定等級(查看碟片封 關於本機預設密碼 套或其他位置上的指示) 。若要限制觀賞 預設密碼為 [0000]。 這些碟片,請將播放機的成人鎖定等級設 y 變更密碼後,本機可能會要求您輸入密 定為低於碟片的等級。 碼。 1. 選擇並設定 Security d Parental Control y 若您重設本機,您的密碼會同時變回預 d Next Screen。 設設定。 使用 / 選擇,然後按 ENTER。 1. 選擇並設定 Security d Change 2. 輸入密碼。...
- Page 140 進階設定 Zhtw 軟體更新 更新連線至網際網路 播放機的軟體可使用以下方式之一更新。 附註 • 連線至網際網路。 y 視網際網路連線情況而定,下載可能需要一 段長時間。 • 使用碟片。 y 步驟 1 至 5 是由使用者執行的操作(想要從 • 使用 USB 隨身碟。 網際網路上下載軟體) 。 先鋒網站附有本播放機的產品資訊。請檢查 y 步驟 6 至 8 是由播放機(自動)執行的操作 第 9 頁的網站是否有本 Blu-ray disc 播放機 (想要更新軟體)...
- Page 141 進階設定 Zhtw 將所有設定還原成原廠預設值 使用 USB 隨身碟/碟片進行更新 1. 檢查播放機的電源是否開啟。 附註 2. 停止播放時,顯示 Home Menu 畫面。 y 先鋒網站上提供更新檔案時,請使用電腦下 載至 USB 隨身碟或碟片。請詳閱關於先鋒 按下 HOME MENU。 網站提供下載更新檔案的指示。 3. 選擇並設定 Initial Setup。 y 將更新檔案儲存在 USB 隨身碟或碟片的根 使用 / 選擇,然後按 ENTER。 目錄中。請勿儲存在資料夾中。 4. 選擇並設定 Options d Load Default d y 請勿將更新檔案以外的檔案放在 USB 隨身 Next Screen。...
- Page 142 進階設定 Zhtw 語言代碼表和國家代碼/區碼表 語言代碼表 語言名稱、語言代碼、輸入代碼 Abkhazian, ab/abk, 0102 French, fr/fra, 0618 Malagasy, mg/mlg, 1307 Slovenian, sl/slv, 1912 Afar, aa/aar, 0101 Galician, gl/glg, 0712 Malay, ms/msa, 1319 Somali, so/som, 1915 Afrikaans, af/afr, 0106 Georgian, ka/kat, 1101 Malayalam, ml/mal, 1312 Sotho, Southern, st/sot, 1920 Albanian, sq/sqi, 1917 German, de/deu, 0405 Maltese, mt/mlt, 1320...
- Page 143 故障排除 Zhtw 第 9 章 故障排除 不正確的操作方式,常被誤以為是系統問題或故障。如果您認為本元件有問題,請就以下各 重點進行檢查。有時候問題可能出在其他元件上。仔細檢查其他使用的元件和電器設備。對 照以下各點後,若仍無法修正問題,請洽詢您所在地附近的先鋒授權服務中心或經銷商以進 行維修。 畫面 問題 檢查 解決方法 未顯示影像,或影像 視訊連接線的連接是否正 y 根據連接裝置正確連接連接線(第 27 頁) 。 顯示不正常。 確? y 中斷連接線(視訊/音訊連接線或 HDMI 連接線) ,然後再 重新確實且徹底插入。 視訊連接線是否損壞? 如果連接線損壞,請換用新連接線。 連接之電視的輸入設定是 請閱讀所連接設備的操作手冊並切換至正確輸入。 否正確? 輸出視訊解析度的設定是 按下 RESOLUTION 可切換從 HDMI OUT 端子輸出的視訊解 否正確? 析度(第...
- Page 144 故障排除 Zhtw 聲音 問題 檢查 解決方法 y 沒有聲音。 y 是否以慢動作播放碟片? 慢動作播放和前進與倒轉掃描時,不會輸出任何聲音。 y 聲音輸出不正常。 y 是否以快速前進或快速倒 轉播放碟片? y 根據連接裝置正確連接連接線(第 27 頁) 。 是否有正確連接連接線? y 牢牢地插入連接線,並一直到底。 音訊連接線是否損壞? 如果連接線損壞,請換用新連接線。 Audio Output 的設定是否 根據連接的裝置正確設置 Audio Output(第 58 頁) 。 正確? 是否已正確設定連接的設 請參閱所連接設備的操作手冊,然後檢查音量、輸入、揚聲 備? 器設定等。 不輸出多聲道聲音。 是否有選擇多聲道聲音? 使用選單畫面或...
- Page 145 故障排除 Zhtw 控制功能 問題 檢查 解決方法 控制功能沒有作用。 HDMI 連接線的連接是否 若要使用「控制」功能,請將平面電視連接至 HDMI OUT 端 正確? 子(第 27 頁) 。 ® / ™ Cable。如果使用 High Speed 您正使用的 HDMI 連接 使用 High Speed HDMI ® / ™ Cable 以外的 HDMI 連接線,控制功能可能無法正 線是否為 High Speed HDMI ® / ™ Cable ? HDMI 常作用。...
- Page 146 故障排除 Zhtw 問題 檢查 解決方法 連線網路的設備上沒有可 請檢查連線網路的設備上所儲存的音訊檔案。 播放的音訊檔案。 沒有開始播放。 " 設備目前與此裝置或電源 請檢查設備是否與此裝置或電源正確連接。 中斷連接。" PC 沒有正確運作。 未正確設定對應的 IP 位址。請啟動路由器內建的 DHCP 功能,或依照您的網路環境手動 設定網路。 正在自動設定 IP 位址。 自動設定程序需要一些時間,請稍待。 無法播放網路上的設 您的 PC 目前未安裝 請在您的 PC 安裝 Windows Media Player 11 或 Windows 備(例如 PC)所儲存 Windows Media Player 11 Media Player 12。 的音樂檔案。 或...
- Page 147 故障排除 Zhtw 其他問題 問題 檢查 解決方法 電源沒有關閉。 電源線的連接是否正確? y 將電源線插頭穩固地插入電源插座。 y 拔下電源線,稍等幾秒鐘後再插上電源線。 在沒有警告的情況下 已設定 Auto Power Off。顯示器將於 1 分鐘內移至螢幕保護 關閉電源 模式,並於約 30 分鐘時自動關閉電源。 電源自動關閉。 Control 是否設定為 On? 播放機的電源會隨著連接至 HDMI OUT 端子的電視機電源一 起關閉。如果不想要播放機的電源隨著電視機的電源關閉, 請將 Control 設定為 Off(第 58 頁) 。 電源自動開啟。 Control 是否設定為 On? 播放機的電源會隨著連接至 HDMI OUT 端子的電視機電源一 起開啟。如果不想要播放機的電源隨著電視機的電源開啟,...
- Page 148 附錄 Zhtw 第 10 章 附錄 規格 一般 電源需求 AC 110 V 至 240 V, 50 Hz/60 Hz 耗電 190 W(待機模式:低於 0.5 W) 尺寸(寬 x 高 x 深 ) Approx. 430 mm x 345 mm x 62 mm 淨重(概略值) 3.4 kg 運作溫度 5 ℃至 35 ℃ 運作濕度 5 % 至 85 % 輸入/輸出 VIDEO OUT 1.0 V(p-p), 75 Ω, sync negative, RCA 孔 x 1 ® / ™ Connector) HDMI IN/OUT (影片/聲音) 19 pin(HDMI ANALOG AUDIO IN 2.0 Vrms(1 kHz, 0 dB), 600 Ω, RCA 孔 (L, R) x 1 DIGITAL IN(OPTICAL)...
- Page 149 附錄 Zhtw 系統 雷射 半導體雷射 訊號系統 標準 PAL/NTSC 彩色電視機系統 網路埠 乙太網路孔 x 1,10BASE-T/100BASE-TX 匯流排電源供應器(USB) DC 5 V 500 mA 揚聲器 HTZ-323BD S-BD422 • 前置揚聲器(左/右) 類型 雙向 淨尺寸 (寬 x 高 x 深 ) 250 mm x 1110 mm x 250 mm 額定阻抗 4 Ω 淨重 3.5 kg • 環繞揚聲器(左/右) 類型 單向 1 淨尺寸 (寬 x 高 x 深 ) 250 mm x 1110 mm x 250 mm 額定阻抗...
- Page 150 附錄 Zhtw 揚聲器 HTZ-222BD S-BD122 • 前置/環繞揚聲器(左/右) 類型 單向 1 淨尺寸 (寬 x 高 x 深 ) 95 mm x 80 mm x 90 mm 額定阻抗 4 Ω 淨重 0.3 kg • 中置揚聲器 類型 單向 1 淨尺寸 (寬 x 高 x 深 ) 230 mm x 80 mm x 90 mm 額定阻抗 3 Ω 淨重 0.7 kg •...
- Page 151 提供者” )獲得之任何資訊、 資料、 文件、 信函、 下載、檔案、文字、影像、圖片、圖形、視訊、 運送本機時 網路廣播、 出版品、 工具、 資源、 軟體、 代碼、 程式、小程式、小工具、應用程式、產品及 請保留原始運送用的紙箱及包裝材料。若您 其他內容(以下簡稱“內容” )及任何服務 需要運送本機,為求有最大的保護,請將本 及產品(以下簡稱“服務” )均為各該服務 機重新包裝為出廠時的模樣。 提供者之唯一責任。 保留外部表面的乾淨 對服務提供者經由 PIONEER Device 所提供 • 請勿在本機附近使用殺蟲劑等揮發液體。 之內容及服務之存在及使用變更,恕不另行 • 使用重力來擦拭可能會損壞表面。 通知。變更範圍包括但不限於全部或部份內 容或服務之暫停、取消或停止。 • 請勿使橡膠或塑膠製品長時間接觸本機。 對內容或服務如有任何查詢或疑慮,請參考 清潔本機 服務提供者網站上的最新資訊。PIONEER 對內容及服務相關之客戶服務不負責也不承 請使用柔軟的乾布清潔播放器。若表面沾染...
- Page 152 253 Alexandra Road, #04-01, Singapore 159936 TEL: 65-6472-7555 PIONEER ELECTRONICS AUSTRALIA PTY. LTD. 5 Arco Lane, Heatherton, Victoria, 3202, Australia, TEL: (03) 9586-6300 PIONEER ELECTRONICS DE MEXICO S.A. DE C.V. Blvd.Manuel Avila Camacho 138 10 piso Col.Lomas de Chapultepec, Mexico, D.F. 11000 TEL: 55-9178-4270 K002_B3_En...