Table of Contents
Troubleshooting

Related Manuals for Black & Decker CRISP and BAKE TOD6020B


Summary of Contents for Black & Decker CRISP and BAKE TOD6020B
- Page 1 AIR FRY TOASTER OVEN H ORN O TOSTADOR CO N FREID ORA D E AI RE u se and care m anual ma nual de uso y cuid ad o TOD6020B Recipes Included! Recipes Included! ¡Recetas Incluidas! ¡Recetas Incluidas!
-
Page 2: Important Safeguards
Please Read and Save this Use and Care Book. IMPORTANT SAFEGUARDS. When using electrical appliances, basic safety precautions should always be fol- lowed to reduce the risk of fire, electric shock, and/or injury, including the following: • READ ALL INSTRUCTIONS •... - Page 3 • Children should be supervised to • Do not leave unattended while ensure that they do not play with in operation. Food ignition may the appliance. occur. If this happens, unplug the unit, but DO NOT open door. To • The appliance is not intended reduce the risk of fire, keep oven to be operated by means of interior completely clean and free...
- Page 4 GE T T I N G TO K NOW YOUR AIR F RY TOASTE R OVE N Door handle Steam Clean button Wire rack Function knob (Part# TOD6020-01) Digital display Crumb/steam tray Time/Temp knob (Part# TOD6020-02) - rotate to change 10.
- Page 5 Crumb/steam tray Removing Food The crumb/steam tray must To easily remove food, use a be installed above the heat- utensil or oven mitts to pull ing elements to protect them the front edge of the crumb/ from crumbs. Place the wire steam tray outwards.
-
Page 6: Getting Started
G E T T I NG STARTE D This appliance is intended for household use only. • Remove all packing material, any stickers, and the plastic band around the power plug. • Remove and save literature. • Please go to www.prodprotect.com/blackanddecker to register your warranty. •... -
Page 7: Digital Display
STAN D BY/ P OWE R ON /PAU SE Sleep Mode: When the oven is not in use, the digital display and start/stop light are off. If the oven is not in use and the controls are not touched for 5 minutes, it will go to sleep. - Page 8 BA KE Note: For best results, when baking or cooking, preheat the oven for at least 5 minutes at the desired temperature setting. While the oven is preheating, the digital display will flash "PH" every 3 seconds. Note: This oven has been designed to cook rapidly. Please inspect your items earlier than the prescribed cook time for a conventional oven to ensure that they do not get overcooked.
- Page 9 Note: For best results when broiling meat, turn over the meat half-way through broiling. There are 2 beeps when the broiling cycle is complete. The Start/Stop light turns off. The digital display reads “0.00”. B AG EL It is not necessary to preheat the oven for toasting bagels. Open oven door and place rack in the up position on the crumb/steam tray.
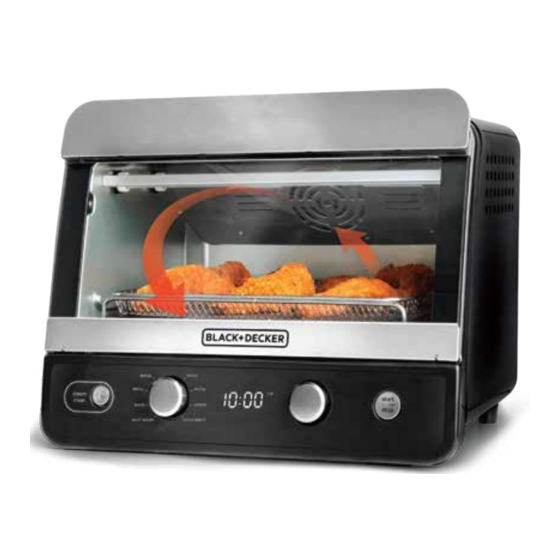
- Page 10 A IR F RY Air Fry technology uses high intensity hot air to bake, brown, and crisp your favorite fried foods with little to no oil. The default temperature for airfry is 425°F. The range for the airfry function is 350°F–450°F.
- Page 11 Press the Start/Stop button to begin cooking. The Start/Stop light illuminates. The digital display counts down while cooking, showing the time remaining. It will show the time in hours and cycle between showing the time and the text “Hr”. Once the time reaches 60 minutes remaining, the display will count down in minutes instead of hours.
-
Page 12: Care And Cleaning
K EE P WARM Note: This function is only designed to keep warm food that is already cooked. Do not use this function for cooking. Do not keep foods on the keep warm setting for more than 4 hours. The default temperature for keep warm is 150°F. The range for the keep warm function is 150°F–250°F. - Page 13 Close the door and press the steam clean button. This will illuminate the steam clean icon and change the display to show “SC”. Press the start/stop button to begin the steam clean cycle. The display will cycle between showing the time remaining and “SC”. The steam clean cycle runs for 5 minutes.
- Page 14 AIR FRYING GUIDE TIME based on 425°F air fry temperature FOOD Frozen Food Chicken Nuggets 13-16 min. or until crisp and golden brown Chicken Strips 25-28 min. or until crisp and golden brown Fish Sticks 10-12 min. or until crisp and golden brown Breaded Onion Rings 10-12 min.
-
Page 15: Troubleshooting
T RO UB L E SHO OTIN G PROBLEM SOLUTION Unit won’t turn on. • Make sure the unit is plugged in. Select a cooking function or bake temperature and ensure there is time on the digital display. Press the start/stop button. If the start/stop light is illuminated, your oven is powered on and heating. -
Page 16: Troubleshooting Continued
T RO UB L E SHO OTIN G CO N TIN UED PROBLEM SOLUTION Steam is coming from the • This is normal for foods with high moisture content, unit during cooking or including some bread types during toasting. toasting. •... - Page 17 Recipes Breakfast E Ro s Prep Time: 10 minutes Cook Time: 10 minutes Total Time: 20 minutes Servings: 5 egg rolls Serving Size: 1 egg roll Ingredients: ½ cup cheddar cheese, shredded 1 tsp. unsalted butter 5 egg roll wrappers 4 eggs Small bowl of water 1 tsp.
- Page 18 Garlic and Parmesan Green Bean Fries with Cajun Remoulade Prep Time: 15 minutes Cook Time: 15 minutes Total Time: 20 minutes Servings: 6 Serving Size: 2-3 fries Ingredients: Remoulade Sauce: ½ cup mayonnaise 1-pound fresh green beans 1 cup panko breadcrumbs 1 Tbsp.
- Page 19 Air Fried Potato Wedges with Fry Sauce Prep Time: 10 minutes Cook Time: 25 minutes Total Time: 35 minutes Servings: 4 Serving Size: 3-4 wedges Ingredients: Fry Sauce: ½ cup mayonnaise 1 lb. russet potatoes cut into wedges ¼ cup ketchup 2 Tbsp.
- Page 20 BBQ Chicken Flatbread Pi a Prep Time: 20 minutes Cook Time: 14–18 min. Total Time: 34–38 min. Servings: 4 Serving Size: 1 egg roll Ingredients: 8 ounces cooked shredded chicken 4 Naan flatbreads ½ cup sliced red onion 1 cup barbeque sauce 1 Tbsp.
- Page 21 Nashvi e Hot Chicken Tenders Prep Time: 20 minutes Cook Time: 20 minutes Total Time: 40 minutes Servings: 8 Serving Size: 2 tenders Ingredients: 2 cups panko breadcrumbs Sauce: 2 lbs. boneless chicken breast tenders 1 tsp salt 2 tbsp cayenne pepper ½...
- Page 22 8. Turn on the toaster oven and set it to Air Fry. Transfer some of the chicken tenders to the air fry basket, spritz with pan spray, and put it in the oven. Cook for 20 minutes, or until chicken is 165F. 9.
- Page 23 Cauliflower 'Rice' Ca erole with Broccoli Prep Time: 10 minutes Cook Time: 30 minutes Total Time: 40 minutes Serving Size: ½ cup Servings: 10-12 Ingredients: Panko topping: 2 heads of broccoli cut into florets 1 cup panko breading 1 (12oz) pkg of cauliflower rice, thawed 4 Tbsp.
-
Page 24: Need Help
NE ED HELP ? For service, repair or any questions regarding your appliance, please call our Customer Service Line at 1-800-465-6070. Please DO NOT return the product to the place of purchase. Also, please DO NOT mail product back to manufacturer, nor bring it to a service center. You may also want to consult the website listed in this pamphlet. -
Page 25: Instrucciones Importantes De Seguridad
Por favor lea este instructivo antes de usar el producto INSTRUCCIONES IMPORTANTES DE SEGURIDAD. Cuando se utilizan aparatos eléctricos, siempre se debe respetar ciertas me- didas de seguridad a fin de reducir el riesgo de incendio, descarga eléctrica y/o lesiones a las personas, incluyendo las siguientes: •... - Page 26 • Este aparato no está diseñado para ser • No deje el horno desatendido mientra usado por personas (incluído niños) esté funcionando. En caso de que con capacidad limitada física, mental ocurriera un incendio mientras se cocinan o sensoriales disminuidas y falta de los alimentos, desenchufe el horno pero experiencia o conocimiento que les NO abra la puerta.
- Page 27 CON OZCA S U HO R N O TOSTAD O R CON FR EI D OR A DE A IR E 1. Asa de la puerta 2. Botón Steam Clean (limpieza con vapor) 3. Perilla de la función 7. Bandeja para hornear 4.
- Page 28 Bandeja para migas/cocinar Cómo retirar de los alimentos al vapor Para retirar fácilmente los alimentos, La bandeja para migas/cocinar al utilice un utensilio o guantes de hor- vapor debe instalarse arriba de los no para tirar hacia delante del borde elementos de calentamiento para frontal de la bandeja para migas/ protegerlos de las migas.
-
Page 29: Antes Del Primer Uso
ANT ES DEL P RI ME R US O Este producto es solo para uso doméstico. • Retire todo material de empaque, todas las etiquetas y la tira plástica alrededor del enchufe. • Retire y conserve la literatura. • Por favor visite www.prodprotect.com/blackanddecker para registrar su garantía. •... -
Page 30: Pan Talla Di G Ita L
MOD O DE ES PE R A /E N C E ND I D O/PAU SA Modo de descanso: Cuando el horno no está en uso, la pantalla digital y la luz de la función Start/Stop (iniciar/detener) están apagadas. Si el horno no está... - Page 31 F U NC I Ó N BAK E (H ORN EA R ) Nota: Para los mejores resultados al hornear o cocinar, precaliente el horno por un mínimo de 5 minutos en el ajuste de temperatura deseado. Mientras el horno está...
- Page 32 Presione la perilla Time/Temp para cambiar de “TEMP” a “TIME”. Gire la perilla Time/Temp para ajustar el tiempo de cocción en la pantalla digital si desea un tiempo de cocción diferente al preprogramado de 10 minutos. Cuando termine el ciclo de asado, se emiten 2 bips. La luz de la función Start/ Stop (iniciar/detener) se ilumina.
- Page 33 claro y 7 el más oscuro. El nivel 4 es el preprogramado. Presione el botón Start/Stop (iniciar/detener) para comenzar el ciclo de tostado. La luz indicadora de la función Start/Stop se ilumina. La pantalla digital realiza un conteo regresivo durante la cocción, mostrando el tiempo de cocción restante.
- Page 34 FUNC IÓ N DEHY DR ATE (D E SHI D RATA R ) La temperatura preprogramada para deshidratar es 165°F. Las temperaturas disponibles para la función de deshidratar son de 120°F a 175°F. Nota: Corte los alimentos en tamaño y grosor uniformes.
-
Page 35: Func Ió N Pi Zz A
FUNC IÓ N PI ZZ A La función de pizza está diseñada para producir la mejor masa de pizza y uniformidad en la cocción. Supervise la pizza cerca del final del ciclo de cocción para evitar que se cocine demasiado. La temperatura preprogramada para pizza es 425°F. -
Page 36: Cuidado Y Limpieza
Presione el botón Start/Stop (iniciar/detener) para iniciar la función de mantener caliente. La luz de la función Start/Stop (iniciar/detener) se ilumina. La pantalla digital realiza un conteo regresivo mientras calienta los alimentos, mostrando el tiempo de cocción restante. Cuando termine el ciclo de mantener caliente, se emiten 2 bips. La luz indicadora del botón Start/Stop (iniciar/detener) se apaga. - Page 37 El ciclo de limpieza con vapor funciona por 5 minutos. Esto incluye el tiempo para que el horno se enfríe. Cuando termine el ciclo, el horno emitirá un bip por dos veces y la pantalla mostrará “0.00”. Abra la puerta del horno y utilice una toalla o esponja para limpiar las superficies interiores y la puerta de vidrio.
- Page 38 RE S O LU C IÓN DE P R OB L E MAS PROBLEMA SOLUCIÓN La unidad no se • Asegúrese de que la unidad esté enchufada. Seleccione la función enciende. de cocción o temperatura para hornear y asegúrese de que la pantalla muestre el tiempo de cocción.
- Page 39 RE S O LU C IÓN DE P R OB L E MAS CON T I N UA D O PROBLEMA SOLUCIÓN Los alimentos • Utilice la cesta de cocción de malla y asegure que los alimentos no están estén acomodados en una sola capa sin ninguna superposición. crujientes en el •...
- Page 40 RE S O LU C IÓN DE P R OB L E MAS CON T I N UA D O PROBLEMA SOLUCIÓN Se derramó • Nota: Si el agua se derrama sobre la parte inferior del horno, esto el agua por no dañará...
- Page 41 ALIMENTO TIEMPO basado en una temperatura para freír con aire de 425°F Alimentos Congelados Nuggets de pollo 13-16 min. o hasta que esté crujiente y dorado Tiras de pollo 25-28 min. o hasta que esté crujiente y dorado Palitos de pescado 10-12 min.
- Page 42 Recetas Ro itos de Prim a vera para el Desayuno Tiempo de preparación: 10 minutos Tiempo de cocción: 10 minutes Tiempo total: 20 minutos Porciones: 5 Tamaño de porción: 1 rollito Ingredientes: ½ taza de queso cheddar, rallado 1 cucharadita de mantequilla sin sal 5 envolturas para rollitos de primavera 4 huevos Recipiente pequeño de agua...
- Page 43 Judias o Habichuelas Verdes con Ajo y Queso Parmesano y Salsa Remoulade Tiempo de preparación: 15 minutos Tiempo de cocción: 5 minutos Tiempo total: 20 minutos Tamaño de porción: 2 a 3 judías o Porciones: 6 habichuelas fritas Ingredientes: Salsa remoulade: ½...
- Page 44 Cunas de Papas Fritas con Aire con Salsa para Fritos Tiempo de preparación: 10 minutos Tiempo de cocción: 25 minutos Tiempo total: 35 minutos Porciones: 4 Tamaño de porción: 3-4 papas fritas Ingredientes: Fry Sauce: ½ taza mayonesa 1 libra de papas tipo russet cortadas en cuñas ¼...
- Page 45 Pi a de Pan Plano con Po o a la Barbacoa Tiempo de preparación: 20 minutos Tiempo de cocción: 14 a 18 minutos Tiempo total: 34 a 38 minutos Porciones: 4 Ingredientes: 8 onzas de pollo cocinado, desmenuzado 4 panes planos Naan ½...
- Page 46 ras de Po o Empanizadas Picantes de Nashville Tiempo de preparación: 20 minutos Tiempo de cocción: 20 minutes Tiempo total: 40 minutos Porciones: 5 Tamaño de porción: 2 tiras Ingredientes: ½ cucharada de suero de leche 2 tazas de migajas de pan “panko” 2 libras de tiras de pechuga de pollo Salsa: deshuesadas...
- Page 47 7. Prepare la salsa: Bata todos los ingredientes en un recipiente pequeño hasta que estén combinados de forma uniforme o coloque todos ingredientes dentro de un frasco de conserva, cubra con la tapa y agite hasta que todos los ingredientes estén mezclados. Deje a un lado hasta que las tiras de pollo estén cocinadas.
- Page 48 Cacerola de ' A rroz' de Coliflor con Brócoli Tiempo de preparación: 10 minutos Tiempo de cocción: 30 minutes Tiempo total: 40 minutos Tamaño de porción: ½ taza Porciones: 10 a 12 Ingredientes: Cubierta de panko: 2 cabezas de brócoli cortadas en ramitos 1 taza de migajas de pan panko 1 paquete (12 onzas) de arroz de coliflor;...
- Page 49 Póliza de Garantía ¿NECESITA AYUDA? (Válida sólo para México) Para servicio, reparaciones o preguntas relacionadas al producto, por favor llame al número del centro de Duración servicio que se indica para el país donde usted compró su Spectrum Brands de México, SA de CV garantiza este producto.
- Page 50 Por favor llame al número correspondiente que aparece en la lista a continuación para solicitar que se haga efectiva la garantía y donde Ud. puede solicitar servicio, reparaciones o partes en el país donde el producto fué comprado. Argentina Honduras Atención al consumidor Serviteca 0800 444 7296...
- Page 51 Sello del Distribuidor: COMERCIALIZADO POR: SPECTRUM BRANDS DE MEXICO, S.A. DE C.V. Fecha de compra: Avenida 1° de Mayo No. 120 Piso 7, Oficina 702. Modelo: Colonia San Andres Atoto, C.P.53500 Naucalpan de Juárez, Estado de México, México Tel. 01-800-714-2503 Código de fecha / Date Code / Le code de date : SERVICIO Y REPARACIÓN Art.
- Page 52 © 2021 Spectrum Brands, Inc. All rights reserved. Spectrum Brands Inc., Middleton, WI 53562 T22-9002330-B © 2021 Spectrum Brands, Inc. Todos los derechos reservados. 28431 E/S Spectrum Brands Inc., Middleton, WI 53562...