Silvercrest SKT 2000 B1 Operating Instructions Manual
Hide thumbs
Also See for SKT 2000 B1:
- Operating instructions manual (40 pages) ,
- Operating instructions manual (82 pages)
Chapters
Table of Contents

Related Manuals for Silvercrest SKT 2000 B1


Summary of Contents for Silvercrest SKT 2000 B1
- Page 1 KONVEKTOR SKT 2000 B1 KONVEKTOR CONVECTEUR Bedienungsanleitung Mode d’emploi CONVETTORE CONVECTION HEATER Istruzioni per l’uso Operating instructions IAN 100157 RP1001057_Konvektor Timer_Cover_LB1.indd 2 11.04.14 12:10...
- Page 2 RP100157 Konvektor Timer LB1 Seite 1 Mittwoch, 11. Juni 2014 12:30 12 Deutsch ......... 3 Bitte beachten Sie die Ausklappseite Français .
- Page 3 RP100157 Konvektor Timer LB1 Seite 1 Mittwoch, 11. Juni 2014 12:30 12...
- Page 4 RP100157 Konvektor Timer LB1 Seite 2 Mittwoch, 11. Juni 2014 12:30 12...
-
Page 5: Table Of Contents
Das Gerät ist geeignet als Zusatzheizung. Als Alleinheizung für große Räume ist es nicht geeignet. diesem Konvektor SilverCrest Das Gerät darf ausschließlich auf dem SKT 2000 B1 können Sie trockene Wohn- Boden aufgestellt werden oder mit der mit- räume beheizen. gelieferten Wandhalterung an einer Wand Dieses Gerät ist für den Einsatz in Privat-... -
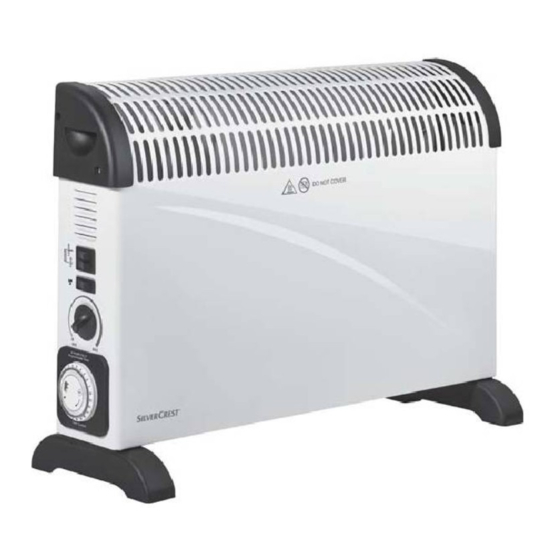
Page 6: Benennung Der Teile (Siehe Ausklappseite)
RP100157 Konvektor Timer LB1 Seite 4 Mittwoch, 11. Juni 2014 12:30 12 1.3 Kennzeichnungen am Gerät Nebenstehendes Symbol warnt davor, Gerät abzudecken, da der dabei ent- stehende Hitzestau zu Schäden und Brandgefahr führen könnte. 2. Benennung der Teile (siehe Ausklappseite) 1 Tragegriffe 8 Temperaturwähler 2 Luftaustritt... - Page 7 RP100157 Konvektor Timer LB1 Seite 5 Mittwoch, 11. Juni 2014 12:30 12 haben, vorausgesetzt, dass das Gerät in seiner Hitze zu Schäden an der elektrischen Installation normalen Gebrauchslage platziert oder installiert führen könnte. ist. • Dieses Heizgerät nicht mit einem Programmschal- •...
- Page 8 RP100157 Konvektor Timer LB1 Seite 6 Mittwoch, 11. Juni 2014 12:30 12 4.4 Schutz vor elektrischem Schlag • Fassen Sie das Gerät, die Netzan- schlussleitung oder den Netzstecker nie- mals mit feuchten Händen an. Warnung! Die folgenden Sicher- • Ziehen Sie die Netzanschlussleitung heitshinweise sollen Sie vor einem stets am Netzstecker heraus.
- Page 9 RP100157 Konvektor Timer LB1 Seite 7 Mittwoch, 11. Juni 2014 12:30 12 4.5 Schutz vor Brandgefahr • Achten Sie darauf, dass die Netzan- schlussleitung nie zur Stolperfalle wird oder sich jemand darin verfangen oder Warnung! Da das Gerät mit darauftreten kann. hohen Temperaturen arbeitet,...
-
Page 10: Auspacken Und Aufstellen
RP100157 Konvektor Timer LB1 Seite 8 Mittwoch, 11. Juni 2014 12:30 12 5. Auspacken und aufstellen 1. Nehmen Sie das Gerät aus der Ver- Hinweis: Wenn Sie das Gerät an einer packung. Wand montieren, dürfen die Füße nicht angeschraubt werden. 2. -
Page 11: Bedienen
RP100157 Konvektor Timer LB1 Seite 9 Mittwoch, 11. Juni 2014 12:30 12 – Schrauben Sie die beiden verbliebe- 3. Hängen Sie das Gerät in die Wand- nen Wandhaken an der Unterseite haken ein. des Gerätes fest. 4. Sie können die beiden Abstandshalter –... - Page 12 RP100157 Konvektor Timer LB1 Seite 10 Mittwoch, 11. Juni 2014 12:30 12 6.3 Temperatur wählen 1. Schalten Sie den Timer ein, indem Sie den Hauptschalter 14 auf das Uhr- symbol stellen. Mit dem Temperaturwähler 8 stellen Sie die gewünschte Temperatur ein. •...
-
Page 13: Reinigen
RP100157 Konvektor Timer LB1 Seite 11 Mittwoch, 11. Juni 2014 12:30 12 4. Um den Timer auszuschalten, schieben 6.7 Frostschutzeinstellung Sie den Hauptschalter 14 auf „I“ (Dauerbetrieb) oder „0“ (Gerät ausge- Mit dieser Funktion verhindert das Gerät, schaltet). dass die Raumtemperatur unter die Frost- grenze fällt. -
Page 14: Störungen Beheben
RP100157 Konvektor Timer LB1 Seite 12 Mittwoch, 11. Juni 2014 12:30 12 8. Störungen beheben Störung Ursache Beseitigung Gerät lässt sich nicht Sicherung oder Netzsteck- Andere Netzsteckdose wählen einschalten dose defekt Gerät defekt Durch Fachwerkstatt instand setzen lassen oder Gerät entsorgen. Die Ser- vice-Adresse finden Sie in „Service- Center”... -
Page 15: Garantie Der Hoyer Handel Gmbh
RP100157 Konvektor Timer LB1 Seite 13 Mittwoch, 11. Juni 2014 12:30 12 10. Garantie der HOYER Handel GmbH Sehr geehrte Kundin, sehr geehrter Kunde, Garantieumfang Sie erhalten auf dieses Gerät 3 Jahre Garantie ab Kaufdatum. Im Falle von Män- Das Gerät wurde nach strengen Qualitäts- geln dieses Gerätes stehen Ihnen gegen den richtlinien sorgfältig produziert und vor Verkäufer des Gerätes gesetzliche Rechte... - Page 16 RP100157 Konvektor Timer LB1 Seite 14 Mittwoch, 11. Juni 2014 12:30 12 • Die Artikelnummer entnehmen Sie dem Lieferant Typenschild, einer Gravur, dem Titelblatt ihrer Anleitung (unten links) oder einem Bitte beachten Sie, dass die folgende Aufkleber am Gerät. Anschrift keine Serviceanschrift ist. •...
-
Page 17: Description De L'appareil
1.1 Destination • par les clients dans des hôtels, motels ou autres établissements, • dans des pensions avec petit-déjeuner. Ce convecteur SilverCrest SKT 2000 B1 L'appareil est adapté comme chauffage vous permet de chauffer des pièces d'appoint. Il n'est pas adapté comme d'habitation sèches. -
Page 18: Désignation Des Pièces (Voir Rabat)
RP100157 Konvektor Timer LB1 Seite 16 Mittwoch, 11. Juni 2014 12:30 12 1.2 Volume de livraison 1.3 Marquages sur l'appareil • 1 convecteur Le symbole ci-contre 3 vous avertit de ne jamais couvrir • 2 pieds l'appareil, car l'accumulation de •... - Page 19 RP100157 Konvektor Timer LB1 Seite 17 Mittwoch, 11. Juni 2014 12:30 12 • Les surfaces métalliques de l’appareil peuvent 4.2 Consignes spéciales pour cet devenir brûlantes. Ne tenez l’appareil que par ses appareil poignées de transport 1. • Avant chaque nettoyage, débranchez la fiche Avertissement ! Respectez les consignes suivantes pour éviter secteur de la prise secteur.
- Page 20 RP100157 Konvektor Timer LB1 Seite 18 Mittwoch, 11. Juni 2014 12:30 12 • Assurez-vous que la tension secteur des personne de qualification similaire nécessaire (voir plaque signalétique sur afin d‘éviter un danger. l’appareil) concorde avec la tension • L’eau ou d’autres liquides ne peuvent en secteur de l’installation.
- Page 21 RP100157 Konvektor Timer LB1 Seite 19 Mittwoch, 11. Juni 2014 12:30 12 – la rallonge ne doit pas être posée risque de provoquer une accumulation « volante » : elle ne doit ni pouvoir de chaleur. provoquer de chute, ni pouvoir être 4.6 Protection contre les blessures atteinte par des enfants ;...
-
Page 22: Déballage Et Mise En Place
RP100157 Konvektor Timer LB1 Seite 20 Mittwoch, 11. Juni 2014 12:30 12 5. Déballage et mise en place 1. Retirez l’appareil de son emballage. 1. À l’aide des vis, fixez les crochets fournis sur un mur adapté : 2. Enlevez l'emballage de transport. 3. -
Page 23: Utilisation
RP100157 Konvektor Timer LB1 Seite 21 Mittwoch, 11. Juni 2014 12:30 12 – À l’aide des vis, fixez les deux 3. Accrochez l’appareil aux crochets. crochets restants sur la face inférieure 4. Vous pouvez également visser les deux de l’appareil. entretoises pour rendre... - Page 24 RP100157 Konvektor Timer LB1 Seite 22 Mittwoch, 11. Juni 2014 12:30 12 6.3 Sélection de la température 1. Enclenchez la minuterie en positionnant l'interrupteur principal 14 sur le symbole de l'heure. Avec le sélecteur de températures 8, vous réglez la température souhaitée. •...
-
Page 25: Nettoyage
RP100157 Konvektor Timer LB1 Seite 23 Mittwoch, 11. Juni 2014 12:30 12 4. Afin d'éteindre la minuterie, commutez 6.7 Réglage de protection antigel l'interrupteur principal 14 sur "I" (fonctionnement en continu) ou sur "0" Avec cette fonction, l’appareil empêche la (appareil arrêté). -
Page 26: Dépannage
RP100157 Konvektor Timer LB1 Seite 24 Mittwoch, 11. Juni 2014 12:30 12 8. Dépannage Problème Cause Elimination L'appareil ne veut Fusible ou prise Choisir une autre prise pas s'allumer défectueux Appareil Faire réparer l'appareil par un atelier spécialisé ou le défectueux mettre au rebut. -
Page 27: Garantie De La Société Hoyer Handel Gmbh
RP100157 Konvektor Timer LB1 Seite 25 Mittwoch, 11. Juni 2014 12:30 12 10. Garantie de la société HOYER Handel GmbH Chers clients, Durée de la garantie et dommages-intérêts légaux Ce produit est garanti pendant 3 ans à compter de la date d’achat. Si vous constatez des défauts, vous disposez d'un La durée de garantie n'est pas prolongée du recours légal à... - Page 28 RP100157 Konvektor Timer LB1 Seite 26 Mittwoch, 11. Juni 2014 12:30 12 Procédure d'application de la garantie Service après-vente Pour traiter rapidement votre demande Service France d'application de la garantie, merci de suivre Tel.: 0800 919270 les consignes suivantes : E-Mail: [email protected] •...
-
Page 29: Descrizione Dell'apparecchio
è indicato 1.1 Impiego previsto riscaldamento aggiuntivo. Non è indicato l’utilizzo come unica fonte Il termoconvettore SilverCrest SKT 2000 B1 riscaldamento in ambienti grandi. serve per riscaldare ambienti asciutti. L'apparecchio deve essere collocato Questo apparecchio è destinato all’uso in esclusivamente a pavimento oppure fissato abitazioni private e non può... -
Page 30: Denominazione Dei Componenti (Vedere
RP100157 Konvektor Timer LB1 Seite 28 Mittwoch, 11. Juni 2014 12:30 12 1.2 Entità della fornitura 1.3 Contrassegni sull’apparecchio • 1 Convettore Il simbolo riportato a fianco 3 indica coprire • 2 Piedi l’apparecchio, poiché il ristagno • 4 Viti per piedi di calore così... - Page 31 RP100157 Konvektor Timer LB1 Seite 29 Mittwoch, 11. Juni 2014 12:30 12 • Le superfici metalliche dell’apparecchio possono 4.2 Indicazioni particolari per questo diventare roventi. Afferrare quindi l’apparecchio prodotto esclusivamente corrispondenza delle maniglie 1. Osservare Avvertenza! seguenti indicazioni per evitare di •...
- Page 32 RP100157 Konvektor Timer LB1 Seite 30 Mittwoch, 11. Juni 2014 12:30 12 • Utilizzare l’unità solo per gli scopi ugualmente qualificata, per evitare applicativi descritti (vedi "1.1 Impiego pericoli. previsto" a pagina 27). • Evitare il contatto di acqua o di altri •...
- Page 33 RP100157 Konvektor Timer LB1 Seite 31 Mittwoch, 11. Juni 2014 12:30 12 – la prolunga non deve in nessun caso Altrimenti nel ventilatore si può formare essere danneggiata; ristagno di calore. – alla presa elettrica non devono essere 4.6 Protezione da lesioni allacciati altri apparecchi oltre a questo, poiché...
-
Page 34: Disimballaggio E Montaggio
RP100157 Konvektor Timer LB1 Seite 32 Mittwoch, 11. Juni 2014 12:30 12 5. Disimballaggio e montaggio 1. Estrarre l’apparecchio dalla confezione. Nota: caso fissaggio dell'apparecchio a parete, i piedi non 2. Rimuovere l’imballaggio di trasporto. devono essere montati. 3. Verificare l’apparecchio 1. -
Page 35: Funzionamento
RP100157 Konvektor Timer LB1 Seite 33 Mittwoch, 11. Juni 2014 12:30 12 parete, gli altri due ganci di fissaggio – Fissare i due ganci rimanenti sul lato vengono utilizzati come distanziatori: inferiore dell'apparecchio – Utilizzando le viti corte. 3. Appendere l'apparecchio ai ganci fissati a parete. - Page 36 RP100157 Konvektor Timer LB1 Seite 34 Mittwoch, 11. Juni 2014 12:30 12 L'apparecchio ha tre livelli di calore: Per accendere il ventilatore, azionare – Livello 1: 750 watt: accendere l'interruttore ventilatore l'interruttore 6; corrispondenza dell'interruttore – Livello 2: 1.250 watt: accendere ventilatore 7 si illumina quindi una spia di l'interruttore 5;...
- Page 37 RP100157 Konvektor Timer LB1 Seite 35 Mittwoch, 11. Juni 2014 12:30 12 dell'ora 11. 6.7 Impostazione della protezione antigelo Grazie a questa funzione l’apparecchio evita che la temperatura ambiente scenda al di sotto dei limiti di gelo. 1. Ruotare il selettore di temperatura 8 sul simbolo gelo9.
-
Page 38: Pulizia
RP100157 Konvektor Timer LB1 Seite 36 Mittwoch, 11. Juni 2014 12:30 12 7. Pulizia Per poter prolungare la durata dell’unità si 1. Rimuovere con cautela i depositi di consiglia di effettuare una pulizia regolare. polvere grossolani utilizzando aspirapolvere. Pericolo! Per evitare il pericolo di folgorazioni o di ustioni: 2. -
Page 39: Smaltimento
RP100157 Konvektor Timer LB1 Seite 37 Mittwoch, 11. Juni 2014 12:30 12 9. Smaltimento riciclaggio di apparecchiature elettriche ed 9.1 Apparecchio elettroniche. Il riciclaggio aiuta a ridurre notevolmente il consumo di materie grezze e Il simbolo con il bidone della soprattutto l'inquinamento ambientale. - Page 40 RP100157 Konvektor Timer LB1 Seite 38 Mittwoch, 11. Juni 2014 12:30 12 Ambito della garanzia telefonicamente o per e-mail il centro d'assistenza riportato di seguito. L’apparecchio è stato prodotto rispettando i • Il prodotto difettoso può essere spedito più severi standard di qualità ed è stato gratuitamente all'indirizzo di assistenza fornito, allegando la prova di acquisto scrupolosamente...
-
Page 41: Description
The appliance is floor-standing only or can 1.1 Intended purpose be wall-mounted using the wall brackets also supplied. This SilverCrest SKT 2000 B1 convector heater may be used to heat dry rooms. 1.2 Scope of supply This appliance is intended for private use and is not suitable for commercial purposes. -
Page 42: Names Of Parts (See Fold-Out Page)
RP100157 Konvektor Timer LB1 Seite 40 Mittwoch, 11. Juni 2014 12:30 12 1.3 Symbols on the appliance The adjacent symbol 3 warns against covering the appliance as this could cause a build up of heat leading to damage and the risk of fire. - Page 43 RP100157 Konvektor Timer LB1 Seite 41 Mittwoch, 11. Juni 2014 12:30 12 • Before cleaning, allow the appliance to cool 4.2 Special informations for this down to avoid the danger of burns. appliance • To prevent the heater overheating, do not cover it. •...
- Page 44 RP100157 Konvektor Timer LB1 Seite 42 Mittwoch, 11. Juni 2014 12:30 12 4.4 Protection against electric shock • Always pull the mains cord out by the plug. Never pull it by the cord itself. • Ensure that the mains cable is not kinked, Warning! The following safety twisted or crushed.
-
Page 45: Unpacking And Setting Up
RP100157 Konvektor Timer LB1 Seite 43 Mittwoch, 11. Juni 2014 12:30 12 • When deciding where to place the • Once hot, if you wish to transport the appliance on the floor, maintain a appliance, switch it off, pull out the minimum distance of 0.5 m from other mains plug, and wait until the appliance appliances or the wall. - Page 46 RP100157 Konvektor Timer LB1 Seite 44 Mittwoch, 11. Juni 2014 12:30 12 Warning! Check that there is – Drill a hole around 40 mm deep using sufficient distance from the wall, an 8 mm bit. fixtures and other appliances. – Insert a wall plug in each hole. When setting up on the floor, the –...
-
Page 47: Operation
RP100157 Konvektor Timer LB1 Seite 45 Mittwoch, 11. Juni 2014 12:30 12 6. Operation Notes: 6.2 Setting the heating setting • As the appliance and heating coils are supplied with a thin film of grease, there The heating settings are used to select how might be a small amount of smoke and quickly the appliance heats up. - Page 48 RP100157 Konvektor Timer LB1 Seite 46 Mittwoch, 11. Juni 2014 12:30 12 6.4 Fan function scale for the time 11. The appliance is equipped with a fan to distribute the air more quickly in the room. To switch on the fan, press the fan switch 7. A red indicator in the fan switch 7 will then light up.
-
Page 49: Cleaning
RP100157 Konvektor Timer LB1 Seite 47 Mittwoch, 11. Juni 2014 12:30 12 6.7 Frost protection setting 3. Use the switches 5 and 6 to select a heating level (see “6.2 Setting the heating setting” on page 45). With this function, the appliance prevents the room temperature falling below the frost line. -
Page 50: Troubleshooting
RP100157 Konvektor Timer LB1 Seite 48 Mittwoch, 11. Juni 2014 12:30 12 8. Troubleshooting Fault Cause Remedy Appliance cannot be Faulty fuse or wall socket Select another wall socket switched on Faulty appliance Have repairs carried out at a specialist workshop or dispose of the appliance. -
Page 51: Hoyer Handel Gmbh Warranty
RP100157 Konvektor Timer LB1 Seite 49 Mittwoch, 11. Juni 2014 12:30 12 10. HOYER Handel GmbH Warranty Dear Customer, Scope of warranty You have a warranty on this product which is valid for 3 years from the date of product been carefully purchase. - Page 52 RP100157 Konvektor Timer LB1 Seite 50 Mittwoch, 11. Juni 2014 12:30 12 • If malfunctions or any other defects Supplier should occur, in the first instance contact the Service Centre mentioned below by Please note that the address below is not a telephone or e-mail.
- Page 53 RP100157 Konvektor Timer LB1 Seite 51 Mittwoch, 11. Juni 2014 12:30 12...
- Page 54 HOYER HANDEL GMBH Kühnehöfe 5 22761 Hamburg Germany Stand der Informationen · Version des informations · Stato attuale delle conoscenze · Status of information: 04/2014 · Ident.-Nr.: SKT 2000 B1 IAN 100157 RP1001057_Konvektor Timer_Cover_LB1.indd 1 11.04.14 12:10...