Table of Contents
Quick Links
Table of Contents

Summary of Contents for Asus MCI-10G/82599-2S
- Page 1 MCI-10G/82599-2S 10 Gigabit/s Ethernet card User Guide...
- Page 2 Product warranty or service will not be extended if: (1) the product is repaired, modified or altered, unless such repair, modification of alteration is authorized in writing by ASUS; or (2) the serial number of the product is defaced or missing.
-
Page 3: Table Of Contents
Package contents ..................1-2 System requirements ................. 1-2 Card layout ....................1-3 LED indications ..................1-4 Installing the MCI-10G/82599-2S Ethernet card ........1-5 Chapter 2: Boot Agent Configuration Intel(R) Boot Agent XE ................2-2 Intel(R) iSCSI Remote Boot ............... 2-3 2.2.1... -
Page 4: About This Guide
How this guide is organized This guide contains the following parts: • Chapter 1: Product Introduction This chapter describes the MCI-10G/82599-2S Ethernet card features and the new technologies it supports. • Chapter 2: Boot Agent Configuration This chapter provides instructions on setting the Intel(R) Boot Agent XE. -
Page 5: Conventions Used In This Guide
Conventions used in this guide To make sure that you perform certain tasks properly, take note of the following symbols used throughout this manual. DANGER/WARNING: Information to prevent injury to yourself when trying to complete a task. CAUTION: Information to prevent damage to the components when trying to complete a task. -
Page 6: Mci-10G/82599-2S Specifications Summary
Passive Twin-AX up to 10m (SFP+ Direct Attach) PXE boot iSCSI boot Features NC-SI interface (Supported on port 1) to an external Manageability Controller (MC) * Please refer to ASUS website for Approved Vendor List (AVL). ** Specifications are subject to change without notice. -
Page 7: Chapter 1: Product Introduction
Product Introduction This chapter offers the MCI-10G/82599-2S Ethernet card features and the new technologies it supports. Chapter 1: Product Introduction... -
Page 8: Welcome
Standard Gift Box Pack ASUS MCI-10G/82599-2S Ethernet card Support CD 1 pc per carton Packing Quantity If any of the above items are damaged or missing, contact your retailer. System requirements Before you install the MCI-10G/82599-2S Ethernet card, check if the system meets the following requirements: • Server or workstation motherboard with an OCP slot. ® • Supported operating systems are Windows and Linux operating systems. Please refer to ASUS website for the latest updates. -
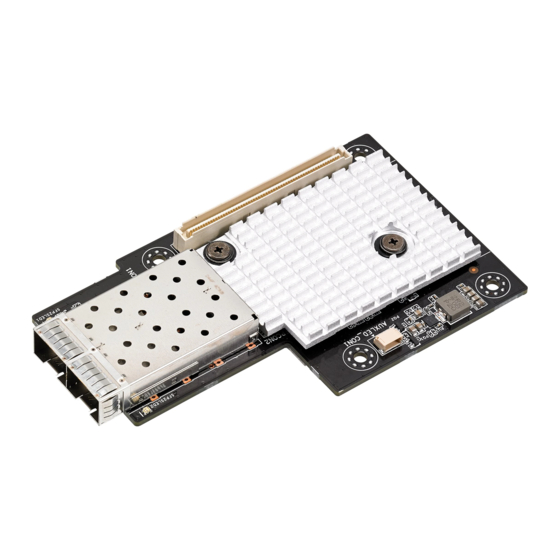
Page 9: Card Layout
Card layout Front view Back view SFP2SLED1 (Speed + Activity) 6. AUXLED_CON1 Connector SFPCON1 (LC Fiber Optic Connector 1) 7. SFP2SLED1_2 (Speed) SFPCON2 (LC Fiber Optic Connector 2) 8. SFP2SLED1_1 (Activity) SFP2SLED2 (Speed + Activity) 9. SFP2SLED2_2 (Speed) MPLUG1 (PCI Express Gen2 x8 interface) 10. SFP2SLED2_1 (Activity) ASUS MCI-10G/82599-2S... -
Page 10: Led Indications
LED indications Front view SFP2SLED1 (Speed + Activity) SFP2SLED2 (Speed + Activity) Activity / Link + Speed LED (SFP2SLED1 / SFP2SLED2) Status Description No link 100 Mb/s link Data activity and 100 Mb/s link Yellow 1 Gb/s link Blinking Yellow Data activity and 1 Gb/s link Green 10 Gb/s link Blinking Green Data activity and 10 Gb/s link Back view SFP2SLED1_2 (Speed) -
Page 11: Installing The Mci-10G/82599-2S Ethernet Card
Installing the MCI-10G/82599-2S Ethernet card To install a MCI-10G/82599-2S Ethernet card: Prepare the Mezannine card. Connect the black end of the signal cable to the OCP_LED1 header on the motherboard. Signal cable OCP_LED1 3. Connect the white end of the signal cable to the AUXLED_CON1 Connector on the card. AUXLED_CON1 Signal cable ASUS MCI-10G/82599-2S... - Page 12 Align and insert the screw holes of the MCI-10G/82599-2S Ethernet card into the stand screws, then insert the ports of the MCI-10G/82599-2S Ethernet card into the port slots on the server chassis as shown. Secure the MCI-10G/82599-2S Ethernet card with the four (4) bundled screws. Chapter 1: Product Introduction...
-
Page 13: Chapter 2: Boot Agent Configuration
Boot Agent Configuration This chapter provides instructions on setting the Intel(R) Boot Agent XE. Chapter 2: Boot Agent Configuration... -
Page 14: Intel(R) Boot Agent Xe
Intel(R) Boot Agent XE The Intel(R) Boot Agent XE provides hardware-based Ethernet card configurations. To start the Intel(R) Boot Agent XE and access the main screen: Turn on the system. During POST, press -
Page 15: Intel(R) Iscsi Remote Boot
From the iSCSI Port Configuration screen, use the Up/Down arrow key to select an item and press. Intel(R) iSCSI Remote Boot v3.0.84 iSCSI Port Configuration iSCSI Boot Configuration iSCSI CHAP Configuration Discard changes and Exit Save changes and Exit Copyright(c) 2003-2014 Intel Corporation. All rights reserved. ASUS MCI-10G/82599-2S... -
Page 16: Iscsi Boot Configuration
2.2.1 iSCSI Boot Configuration Intel(R) iSCSI Remote Boot v3.0.84 iSCSI Boot Configuration [ * ] Use dynamic IP configuration (DHCP) Initiator Name: ________________ Initiaor IP: Subnet Mask: Gateway: VLAN ID: [ * ] Use DHCP for iSCSI target information Target Name: Target IP: Target Port: Boot LUN:... -
Page 17: Iscsi Chap Configuration
When Enabled [ * ], the iSCSI boot host software uses a Mutual CHAP authentication when connecting to the iSCSI target. Key in the necessary parameters. When Disabled [ ], the iSCSI boot host software does not use a Mutual CHAP authentication when connecting to the iSCSI target. ASUS MCI-10G/82599-2S... -
Page 18: Intel(R) Ethernet Flash Firmware Utility
Intel(R) Ethernet Flash Firmware Utility The Intel(R) Ethernet Flash Firmware Utility allows you to switch between PXE option ROM and iSCSI option ROM. Note that only one option ROM can be used at a time. To install the PXE option ROM: Locate the BootIMG.FLB and Bootutil.exe files in the PXE folder on your SDVD. - Page 19 Programming flash on port 1 with flash firmware image Flash update successful Port Network Address Location Series WOL Flash Firmware Version ==== =============== ======== ======= === ============================= ======= 00E018122208 1:00.0 10GbE N/A UEFI,PXE Enabled 2.3.58 00E018122209 1:00.1 10GbE N/A UEFI,PXE Enabled 2.3.58 D:\> ASUS MCI-10G/82599-2S...
- Page 20 Chapter 2: Boot Agent Configuration...
-
Page 21: Chapter 3: Driver Installation
Driver Installation This chapter provides instructions for installing the Ethernet card drivers on different operating systems. Chapter 3: Driver Installation... -
Page 22: Windows ® Server Os Driver Installation
® Windows Server OS Driver Installation ® To update the Ethernet card driver for Windows Server OS: Restart the computer, and then log on with Administrator privileges. Insert the Support CD to the optical drive. The Support CD automatically displays the Drivers menu if Autorun is enabled in your computer. - Page 23 Toggle I accept the terms in the license agreement and click Next to continue. Follow the onscreen instructions to complete the installation. If the Windows Security window appears during the driver installation, click Install this driver software anyway to continue. ASUS MCI-10G/82599-2S...
- Page 24 Click Finish to exit the installation wizard. Restart the system. Chapter 3: Driver Installation...
-
Page 25: Linux Os Driver Installation
For Red Hat Enterprise Linux 6.5 (Red Hat Enterprise Linux 5.11): For SUSE Linux Enterprise Server 11.3: Enter the folder: cd/src For Red Hat Enterprise Linux 6.5 (Red Hat Enterprise Linux 5.11): For SUSE Linux Enterprise Server 11.3: ASUS MCI-10G/82599-2S... - Page 26 Install the driver: make install For Red Hat Enterprise Linux 6.5 (Red Hat Enterprise Linux 5.11): For SUSE Linux Enterprise Server 11.3: Install complete: For Red Hat Enterprise Linux 6.5 (Red Hat Enterprise Linux 5.11): For SUSE Linux Enterprise Server 11.3: Chapter 3: Driver Installation...
- Page 27 Check if the LAN card is detected: service network restart For Red Hat Enterprise Linux 6.5 (Red Hat Enterprise Linux 5.11): For SUSE Linux Enterprise Server 11.3: ASUS MCI-10G/82599-2S...
- Page 28 Chapter 3: Driver Installation...
-
Page 29: Appendix
Appendix Appendix... -
Page 30: Simplified Eu Declaration Of Conformity
доступний на: www.asus.com/support Cijeli tekst EU izjave o sukladnosti dostupan je na: www.asus.com/support Türkçe AsusTek Computer Inc., bu aygıtın temel gereksinimlerle ve ilişkili Čeština Společnost ASUSTeK Computer Inc. tímto prohlašuje, že toto Yönergelerin diğer ilgili koşullarıyla uyumlu olduğunu beyan eder. -
Page 31: Asus Contact Information
800 Corporate Way, Fremont, CA 94539, USA +1-510-608-4555 Web site http://usa.asus.com Technical Support Support fax +1-812-284-0883 General support +1-812-282-2787 Online support http://support.asus.com/techserv/techserv.aspx ASUS COMPUTER GmbH (Germany and Austria) Address Harkort Str. 21-23, D-40880 Ratingen, Germany +49-2102-959911 Web site http://www.asus.de Online contact http://www.asus.de/sales Technical Support Telephone +49-1805-010923*... - Page 32 CA 94539. Phone/Fax No: (510)739-3777/(510)608-4555 hereby declares that the product Product Name : 10G LAN Card Model Number : MCI-10G/82599-2S Conforms to the following specifications: FCC Part 15, Subpart B, Unintentional Radiators Supplementary Information: This device complies with part 15 of the FCC Rules. Operation is subject to the...