
Related Manuals for Philips 8000 Series


Summary of Contents for Philips 8000 Series
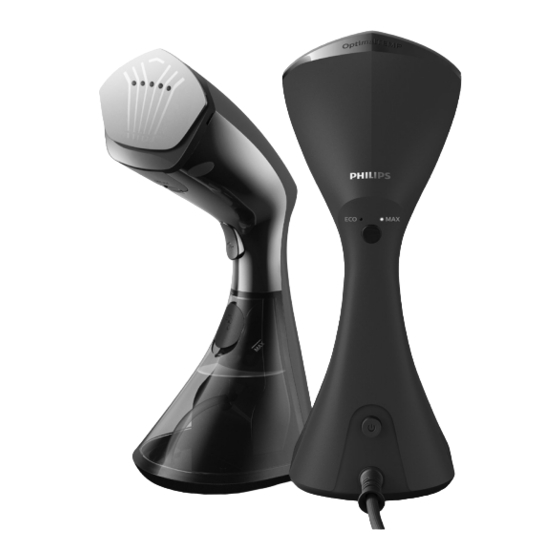
- Page 1 GC800, GC801 GC810 TH คู ่ ม ื อ ผู ้ ใ ช EN User manual Hướng dẫn sử dụng Buku Petunjuk Pengguna KO 사용 설명서 用户手册 MS Manual pengguna 使用手冊...
- Page 2 GC810...
- Page 3 GC810...
- Page 4 Do not use your bare hand as a supporting surface when you steam. Pull the sides of the garment to stretch it. Jangan menggunakan tangan kosong sebagai alas saat menguapi. Tarik sisi pakaian untuk merentangkannya. KO 스팀 다리미를 사용할 때는 맨손으로 옷감을 잡지 마십시오. 옷감의...
- Page 5 Once the power button is activated, the ‘steam-ready’ light flashes at MAX mode which indicates the appliance is heating up. The appliance is ready for use after 60 seconds when the light turns steady. begitu tombol daya diaktifkan, lampu ‘uap siap’ akan berkedip pada mode MAX, hal ini menunjukkan bahwa alat sudah siap digunakan.
- Page 6 电源按钮启动后,“蒸汽就绪”指示灯会在 MAX ( 最大 ) 模式闪 烁,指示产品正在加热。 当指示灯持续亮起时,产品将在 60 秒后准备就绪。 電源按鈕啟動後,MAX 模式的「蒸氣就緒」燈會閃爍,代表產品在 加熱中。 待指示燈持續亮起 60 秒後,代表產品可供使用。 60 sec. ECO mode (reduced amount of steam), is provided to save water and energy without compromising on ironing results. You can toggle to MAX setting for more steam power at any point of time.
- Page 7 KO ECO 모드(스팀 발생량 감소)는 다림질 효과에는 영향을 미치지 않으면서 물과 에너지를 절약할 수 있습니다. 언제든 더 많은 스팀량을 내는 MAX 설정으로 전환할 수 있습니다. MAX와 ECO 모드 사이에서 전환하려면 스팀 선택 버튼을 누릅니다. MS Mod ECO (jumlah stim dikurangkan), disediakan untuk menjimatkan air dan tenaga tanpa menjejaskan hasil penyeterikaan.
- Page 8 Press and hold the steam trigger to start steaming. Release the steam trigger for steam stop. Note: When appliance is ready, release the initial steam for a few seconds before you start as it may contain water droplets. Tekan dan tahan pemicu uap untuk mulai menguapi. Lepas pemicu uap untuk menghentukan uap.
- Page 9 按住蒸氣觸動器以開始熨燙。 放開蒸氣觸動器以停止釋出蒸氣。 注意:由於一開始的蒸氣可能含有水滴,因此當產品就緒時,請先釋 放開頭幾秒的蒸氣,再開始使用。 Type of water to use The appliance is suitable to be used with tap water. However, if you live in an area with hard water, we recommend that you mix an equal amount of tap water with distilled or demineralized water.This will prevent fast scale build up and prolong the lifetime of the appliance.
- Page 10 kerak dengan proses kimia, atau bahan kimia lain, karena dapat menyebabkan semburan air, noda coklat, atau kerusakan pada alat. Catatan: Jangan mengisi tangki air melewati tanda batas MAX. KO 사용할 물의 종류 이 제품은 수돗물을 사용하는 것이 적합합니다. 그러나 경수가 있는 지역에서...
- Page 11 Loại nước được sử dụng T hiết bị thích hợp để sử dụng với nước máy. Tuy nhiên, nếu bạn sống ở khu vực có nước cứng, chúng tôi khuyên bạn nên hòa chung một lượng nước máy vừa đủ với nước cất hoặc nước đã khử khoáng. Việc này sẽ giúp ngăn tích tụ cặn nhanh và kéo dài tuổi thọ của thiết bị. Cảnh báo: Không thêm nước hoa, nước từ máy sấy đảo, giấm, hồ vải, chất làm sạch cặn, chất phụ trợ ủi, nước đã được tẩy sạch bằng hóa chất hoặc các hóa chất khác, do các chất này có thể gây tình trạng phun nước, ố vàng hoặc làm hỏng thiết bị của bạn.
- Page 12 This appliance comes with OptimalTEMP technology steam plate. It enables you to steam all types of ironable fabrics, in any order and without sorting your garments. Warning: Do not steam on non-ironable fabrics. Alat ini dilengkapi pelat uap berteknologi OptimalTEMP. Teknologi ini memungkinkan Anda menguapi berbagai jenis kain yang bisa disetrika, dalam urutan apapun, tanpa perlu menyortir pakaian Anda.
- Page 13 本产品配有 OptimalTEMP 智能温控科技蒸汽面板。 可让您使用蒸汽熨各种类型的可熨烫面料,可采用任何顺序而无需分 类您的衣物。 警告:切勿用蒸汽熨不可熨烫的面料。 本產品隨附 OptimalTEMP 技術蒸氣噴頭。 讓您無需為衣物分類,便能以各種順序使用蒸氣熨燙各種可熨燙衣料。 警告:請勿以蒸氣熨燙不可熨燙的衣料。 You can dewrinkle garments more easily if you spread the laundry properly after you have washed it. Hang the garments on hangers to dry them with fewer wrinkles. Anda dapat menghilangkan kerut lebih mudah pada pakaian jika Anda merentangkan kain dengan baik setelah mencucinya.
- Page 14 如果在洗衣后正确展开衣物,衣物除皱将会更轻松。将衣物悬挂在衣 架上晾干以减少褶皱。 如果您在洗濯衣物之後將它妥善攤平,就可更輕鬆地整平衣物皺痕。 使用衣架晾掛衣物可減少皺痕。 When you are steaming, press the steamer head against the garment, and pull the sides of the garment with your other hand to stretch it. Saat Anda menguapi, tekan kepala penguap pada pakaian, dan tarik tarik sisi pakaian dengan tangan lain untuk merentangkannya KO 스팀을...
- Page 15 Keep the steamer head a slight distance away from dresses with frills, ruffles, ruching or sequins. Use only the steam to loosen the fabric. You can also steam from the inside. Jaga jarak kepala penyembur uap dari gaun dengan jumbai, kerutan, rajutan, atau payet.
- Page 16 For garments with buttons such as shirts, jackets and pants, close the first button to help straighten the fabric. To steam sleeves, start from the shoulder area and move the steamer head downwards. Steam while you pull the sleeve diagonally down with the other hand. For shirt pockets, move the steamer head upwards while pressing against the fabric.
- Page 17 셔츠 주머니는 스티머 헤드를 옷감에 대고 누르면서 위쪽으로 이동합니다. 참고: 이 제품을 사용하면 빠른 손질은 물론 자연스러운 연출이 가능합니다. 구김이 심한 옷감이나 격식을 갖춘 의복에는 일반 다리미를 사용하는 것이 좋습니다. MS Untuk pakaian dengan butang seperti kemeja, jaket dan seluar, tutup butang pertama untuk meluruskan fabrik.
- Page 18 对于带纽扣的衣物(例如衬衣、夹克和裤子),请扣上第一颗扣子, 以使衣物更挺直。 要对袖子进行蒸汽熨烫,请从肩膀区域开始,然后向下移动蒸汽喷 头。熨烫的同时,请用另一只手沿对角线向下拉衣袖。 对于衬衣口袋,请将蒸汽喷头按在布料上向上移动。 注意:本产品可用于打造自然衣物造型和快速除皱。对于具有顽固褶 皱的衣物,以及要获得更正式的造型,建议使用电熨斗。 對於有鈕扣的衣物,例如襯衫、外套及褲子,扣上第一顆鈕扣有助於 拉平布料。 如要以蒸氣熨燙袖子,請由肩部開始,並將蒸氣噴頭向下移動。一邊 熨燙,一邊用另一隻手將袖子往對角線方向往下拉。 針對襯衫口袋,請將蒸氣噴頭靠在布料上並向上移動。 注意:本產品可用於創造自然效果,並且迅速整飾衣物。對於衣物上 的頑強皺痕,或是需要更正式的造型,建議您改用熨斗。...
- Page 19 The appliance comes with horizontal steaming function. It allows you to better remove creases on difficult areas such as collar/cuffs and make crisp pleats on sleeves/pants. To protect your horizontal surface, do place a protective layer (eg: bedsheet, towel) before steaming your garment. This is to prevent direct contact of steam plate onto the horizontal surface.
- Page 20 เครื ่ อ งจะมาพร้ อ มกั บ ฟั ง ก์ ช ั น พลั ง ไอน� ้ า แนวราบ ให้ ค ุ ณ ขจั ด รอยยั บ ได้ ด ี ก ว่ า เดิ ม ใน บริ เ วณที ่ ร ี ด ได้ ย าก เช่ น ปกเสื ้ อ เชิ ้ ต /บริ เ วณข้ อ มื อ และรี ด รอยจี บ แขนเสื ้ อ /กางเกง เพื...
- Page 21 방문하십시오. MS Untuk mendapatkan petua selanjutnya berkenaan cara menstim pelbagai jenis pakaian, sila lawati, www.philips.com/ garmentsteamers. ส� า หรั บ เคล็ ด ลั บ เพิ ่ ม เติ ม เกี ่ ย วกั บ วิ ธ ี ก ารรี ด เสื ้ อ ผ้ า ชนิ ด ต่ า งๆ ด้ ว ยพลั ง ไอน� ้ า โปรดเยี ่ ย มชม...
- Page 22 The brush improves steam penetration to achieve faster and better steaming result on thick and heavy garment such as coat and jacket. Align the brush towards the top of the steam plate. Hold onto the gripping area of the brush to attach or detach it, one side at a time.
- Page 23 MS Berus menambah baik penembusan stim untuk mencapai hasil penstiman yang lebih cepat dan lebih baik pada pakaian tebal dan berat seperti kot dan jaket. Pastikan berus diletakkan sejajar dengan bahagian atas plat stim. Pegang tempat pemegang berus untuk memasang atau menanggalkan berus, satu sisi pada satu-satu masa.
- Page 24 毛刷可以改善蒸汽渗透率,从而更加快速地在外套、夹克等厚重衣物 上获得更出色的熨烫效果。 将毛刷对准蒸汽面板的顶部。 握住毛刷的抓握区域进行安装或拆卸,每次操作一侧。 毛刷应与蒸汽搭配使用,方法是按下蒸汽开关,然后沿着衣物慢慢地 移动刷毛。 注意:在安装或拆卸毛刷之前,请务必拔掉产品的电源插头。注意, 蒸汽喷头可能仍很烫。 毛刷可幫助蒸氣深入滲透至衣料中,對於大衣與外套等厚重衣物能更 快達到更好的效果。 將毛刷對準蒸氣噴頭的頂端。 握住毛刷的抓握處以安裝或拆卸,一次一邊。 毛刷應與蒸氣搭配使用,方法是按下蒸氣觸動器,並讓刷毛沿著衣物 緩慢移動。 注意:在安裝或拆除毛刷之前,請務必先拔掉產品的電源插頭。請小 心,蒸氣噴頭可能還是很燙。...
- Page 25 GC810 The StyleMat provides support that enhance steaming performance. Press the steamer head against the garment with the StyleMat behind it as a support. For vertical steaming, the StyleMat can be used with a clothes hanger by using the loop at the top of the mat. For horizontal steaming, the StyleMat serves as a protective layer.
- Page 26 MS StyleMat memberikan sokongan yang meningkatkan prestasi penstiman. Tekan kepala penstim pada pakaian dengan StyleMat sebagai sokongan. Untuk penstiman menegak, StyleMat boleh digunakan dengan penggantung pakaian dengan menggunakan gegelung pada bahagian atas alas. Untuk penstiman mendatar, StyleMat digunakan sebagai lapisan pelindung. Alas ini boleh diletakkan pada semua permukaan mendatar.
- Page 27 StyleMat 能提供支撐,讓熨燙效果更好。 請將蒸氣噴頭靠在衣物上,並以 StyleMat 作為支撐。 若要使用垂直蒸氣熨燙,可利用墊子上方的環孔搭配衣架來使用 StyleMat。 若要使用水平蒸氣熨燙,StyleMat 可作為保護層。這可以放置在任 何水平表面上。 注意:請勿清洗 StyleMat,因為這樣可能會損壞其泡棉材質。...
- Page 28 To prolong the life time of your appliance and to maintain good steaming performance, use Decalc (quick calc release) function once every 1 month. If water in your area is very hard, or you see scales coming out from the steamer head during steaming, use this function more frequently.
- Page 29 เพื ่ อ ยื ด อายุ ก ารใช้ ง านของอุ ป กรณ์ ข องคุ ณ และรั ก ษาประสิ ท ธิ ภ าพการท� า งานที ่ ด ี ข อง พลั ง ไอน� ้ า ให้ ใ ช้ ฟ ั ง ก์ ช ั ่ น ขจั ด ตะกรั น (การขจั ด ตะกรั น อย่ า งรวดเร็ ว ) ทุ ก ๆ 1 เดื อ น หากน�...
- Page 30 To use Decalc function, place the appliance down with Decalc function facing up. Once Decalc door and inlet stopper are opened, invert the appliance to shake off any scales and water deposited inside the chamber. If the Decalc hole is blocked by scales, you may use a tool to loosen the scales.
- Page 31 dan salur masuk penyumbat dibuka, terbalikkan perkakas untuk menggoncangkan kerak dan air yang termendap di dalam ruang. Jika lubang Decalc tersekat oleh kerak, anda boleh menggunakan alat untuk melonggarkan kerak. Amaran: Jangan tuang air, cuka, agen penanggal kerak atau kimia lain ke dalam bukaan fungsi Decalc. Apabila menyahkerak perkakas, anda mungkin mendapati lubang kecil (seperti yang dinyatakan dalam gambar amaran).
- Page 32 若要使用 Decalc 除鈣功能,請將產品放下,Decalc 功能朝上。當 Decalc 除鈣門和進氣阻隔皆已打開,將產品上下顛倒並搖動,使內 槽中任何堆積的鈣垢和水掉出。 如果 Decalc 除鈣孔被水垢阻塞,您可以使用工具清除鈣垢。 警告:請勿從 Decalc 除鈣功能開口處注入清水、醋、除垢劑或其他 化學物質。 進行除垢時,您可能會注意到有個小孔 (如警告圖所示)。 警告:請勿蓋住或插入任何東西。...
- Page 33 Note: Before cleaning, do wait for the appliance to cool down for about 60 minutes. Clean the appliance and wipe any deposits off the steamer head with a damp cloth and non-abrasive liquid cleaning agent. Warning: Do not use scouring pads, abrasive cleaning agents or aggressive liquids such as alcohol, petrol or acetone to clean the appliance.
- Page 34 MS Nota: Sebelum dibersihkan, tunggu sehingga perkakas sejuk selama kira-kira 60 minit. Bersihkan perkakas dan sapu mendapan daripada kepala penstim dengan kain lembap dan agen pencuci cecair tidak melelas. Amaran: Jangan gunakan pad penyental, agen pembersih yang melelas atau cecair yang agresif seperti alkohol, petrol atau aseton untuk membersihkan perkakas.
- Page 35 注意:清潔前,請先等待產品冷卻約 60 分鐘。 請使用濕布和非磨蝕性的液態清潔劑清潔本產品,並擦掉蒸氣噴頭上 所有的沉積物。 警告:請勿使用鋼絲絨、磨蝕性清潔劑或侵蝕性液體 (例如酒精、 汽油或丙酮) 清潔本產品。 每次使用後請務必清空水箱,以避免鈣質堆積並維持良好的蒸氣 效能。...
- Page 36 Problem Possible cause Solution The appliance The appliance is not Check if the mains plug is does not heat plugged in properly inserted properly and its or not switched on. wall socket is working. Check if the appliance is switched on. The appliance The appliance is not Check if the mains plug is...
- Page 37 Close the Decalc steam trigger and door. gripping area. If this persists, please stop using the appliance. Contact an authorized Philips service centre. Water tank filling Press down the filling door. door is not closed properly Steam gets Scales/calc are...
- Page 38 Problem Possible cause Solution Apart from tap Appliance is designed water, you have to be used with tap filled other liquids water. In area with hard / additives or water, it is recommended descaling agents to use distilled or into the water tank. demineralization water (50% demineralization/ distilled water mixed with...
- Page 39 Masalah Kemungkinan Solusi penyebab Alat tidak Alat terhubung ke Periksa apakah steker memanas. stopkontak dengan listrik terpasang benar atau tidak dengan benar dan dihidupkan. stopkontak dindingnya berfungsi. Periksa apakah alat dihidupkan. Alat tidak Alat terhubung ke Periksa apakah steker menghasilkan stopkontak dengan listrik terpasang uap.
- Page 40 Decalc, pemicu pintu Decalc. uap, dan area Jika hal ini masih genggaman. terjadi, harap hentikan penggunaan alat. Hubungi pusat servis Philips resmi. Pintu pengisian tangki Tekan pintu pengisian. air tidak ditutup dengan benar Semburan uap Kerak/calc terbentuk di Lakukan fungsi Decalc menjadi semakin dalam penyembur uap.
- Page 41 Masalah Kemungkinan Solusi penyebab Kerak/calc terbentuk di Lakukan fungsi Decalc meninggalkan dalam penyembur uap. (lihat bagian noda pada pakaian atau keluar kotoran dari kepala penyembur uap Selain air keran, Anda Alat ini dirancang untuk telah mengisi cairan / menggunakan air zat tambahan lain atau keran.
- Page 42 문제점 예상 원인 해결책 스팀기가 예열되지 제품의 플러그가 꽂혀 전원 플러그가 제대로 않습니다. 있지 않거나 전원이 꽂혀있으며 벽면 콘센트가 켜져 있지 않습니다. 작동하는지 확인하십시오. 제품이 켜져 있는지 확인하십시오. 제품에서 스팀이 제품의 플러그가 꽂혀 전원 플러그가 제대로 나오지 않습니다. 있지 않거나 전원이 꽂혀있으며...
- Page 43 문제점 예상 원인 해결책 물탱크의 수위가 너무 제품의 전원 코드를 뽑고 낮습니다. 물탱크를 다시 채우십시오. 석회질 제거 도어, 석회질 제거 주입구 석회질 제거 도어를 열고 스팀 버튼과 마개가 제대로 끼워져 석회질 제거 주입구 마개를 손잡이 부분에서 있지 않습니다. 누릅니다. 석회질 제거 스팀과...
- Page 44 Masalah Penyebab yang Penyelesaian mungkin Perkakas tidak Palam perkakas tidak Pastikan palam sesalur menjadi panas dipasang dengan betul kuasa dimasukkan dengan. atau tidak dihidupkan. dengan betul ke dalam soket dinding dan soket dinding itu berfungsi dengan betul. Pastikan perkakas dihidupkan. Perkakas tidak Palam perkakas tidak Pastikan palam sesalur...
- Page 45 Buka bukaan Decalc bocor pada masuk Decalc tidak dan tolak penyumbat bukaan Decalc, dimasukkan dengan salur masuk Decalc. picu stim betul. Tutup bukaan Decalc. dan kawasan Jika perkara ini pemegang. berterusan, sila berhenti menggunakan perkakas. Hubungi pusat servis Philips yang disah.
- Page 46 Masalah Penyebab yang Penyelesaian mungkin Penutup pengisi Tekan bukaan isian. tangki air tidak ditutup dengan betul Stim tidak begitu Kerak terbentuk di Gunakan fungsi kuat dari masa dalam perkakas. Decalc (rujuk bahagian ke masa Stim Kerak terbentuk di Gunakan fungsi meninggalkan dalam perkakas.
- Page 47 ปั ญ หา สาเหตุ ท ี ่ เ ป็ น ไปได้ การแก้ ป ั ญ หา เครื ่ อ งไม่ ร ้ อ น เครื ่ อ งอาจเสี ย บปลั ๊ ก ไม่ ถ ู ก ต้ อ ง ให้ ต รวจสอบว่ า ได้ เ สี ย บปลั ๊ ก ไฟ หรื...
- Page 48 งานเครื ่ อ ง ติ ด ต่ อ ศู น ย์ บ ริ ก ารที ่ ได้ ร ั บ การรั บ รองโดย Philips ปิ ด ฝาแท้ ง ค์ น � ้ า ไม่ ถ ู ก ต้ อ ง...
- Page 49 Sự cố Nguyên nhân có thể Giải pháp Thiết bị không nóng Thiết bị không được Kiểm tra xem phích cắm điện có lên. cắm điện đúng cách được cắm đúng cách không và hoặc không bật. xem ổ điện có hoạt động không. Kiểm tra xem thiết bị có được bật chưa. Thiết bị không phun Thiết bị không được Kiểm tra xem phích cắm điện có hơi nước. cắm điện đúng cách được cắm đúng cách không và hoặc không bật. xem ổ điện có hoạt động không. Kiểm tra xem thiết bị có được bật chưa. Thiết bị vẫn chưa đủ Để thiết bị làm nóng lên trong nóng. 60 giây (đèn báo ‘hơi nước sẵn sàng’ nhấp nháy). Khi thiết bị đã sẵn sàng để sử dụng, đèn sẽ sáng liên tục.
- Page 50 Rút phích cắm của thiết bị và đổ chứa nước quá thấp. nước vào ngăn chứa nước. Hơi phun và nước rỉ Nút gài đầu châm nước Mở cửa Decalc và nhấn nút gài ra xung quang cửa Decalc không được lắp đầu châm nước Decalc. Đóng Decalc, nút bấm hơi đúng cách. cửa Decalc lại. nước và khu vực kẹp. Nếu lỗi vẫn tiếp diễn, hãy ngừng sử dụng thiết bị. Vui lòng liên hệ với trung tâm dịch vụ ủy quyền của Philips. Cửa châm ngăn chứa Ấn cửa châm nước xuống. nước không được đóng đúng cách Hơi nước yếu dần Có cặn vôi tích tụ bên Thực hiện chức năng Decalc theo thời gian trong thiết bị. (tham khảo mục Hơi nước để lại các Có cặn vôi tích tụ bên Thực hiện chức năng Decalc vết ố trên vải hoặc trong thiết bị.
- Page 51 问题 可能的原因 解决方法 产品无法加热。 产品未正确插入电源插 检查电源插头是否正确插 头或未打开电源。 入,以及墙壁插座是否正常 工作。 检查是否已打开产品电源。 蒸汽挂烫机不能产 产品未正确插入电源插 检查电源插头是否正确插 生蒸汽 头或未打开电源。 入,以及墙壁插座是否正常 工作。 检查是否已打开产品电源。 产品未充分加热。 让产品加热 60 秒(“蒸汽 就绪”指示灯闪烁)。当产 品可供使用时,指示灯将持 久亮起。 您没有完全按下蒸汽 完全按下蒸汽开关数秒钟。 开关。 水箱中的水位太低。 拔掉产品的电源插头,然后 为水箱加水。 有水滴从产品的蒸 产品内部有水垢形成。 执行除垢功能(请参阅 汽喷头中滴出。 部分)。 蒸汽喷头长期水平 在每次使用后,请将产品竖 放置。 直放在平坦的表面上。 产品会产生抽水...
- Page 52 问题 可能的原因 解决方法 除垢门、蒸汽开关 未正确插入除垢入 打开除垢门并推入除垢入口 和握紧区域周围泄 口塞。 塞。关上除垢门。 漏蒸汽和水。 如果此问题仍然存在,请停 止使用本产品。请与经授权 的飞利浦服务中心联系。 水箱注水门未关好 按下注水门。 随着时间的推移, 产品内部有水垢形成。 执行除垢功能(请参阅 蒸汽变弱 部分)。 蒸汽在衣物上留下 产品内部有水垢形成。 执行除垢功能(请参阅 污渍,或蒸汽喷头 部分)。 中掉出杂质 除了自来水外,您在水 根据设计,本产品适合使用 箱中注入了其它液体 / 自来水。在水质较硬的区 添加剂或除垢剂。 域,建议使用蒸馏水或软化 水(也可将 50% 的软化水 / 蒸馏水与自来水混合 使用)。 所用的水硬度很高和 / 除垢孔被水垢...
- Page 53 問題 可能原因 方法 產品未加熱。 產品未正確插上電源, 檢查電源插頭是否正確插上, 或電源未開啟。 以及插座供電正常。 檢查產品電源是否已開啟。 產品不會產生 產品未正確插上電源, 檢查電源插頭是否正確插上, 蒸氣。 或電源未開啟。 以及插座供電正常。 檢查產品電源是否已開啟。 讓產品加熱 60 秒 (「蒸氣就 產品加熱溫度不夠。 緒」指示燈閃爍)。產品準備 就緒可供使用時,指示燈會持 續亮起。 您尚未完全按下蒸氣觸 將蒸氣觸動器完全按到底 動器。 數秒。 水箱內的水位過低。 拔除產品插頭,並添加水箱內 的水。 使用 Decalc 除鈣功能 (請參閱 產品蒸氣噴頭 產品內部有鈣垢。 會滴水。 小節)。 蒸氣噴頭已平放一段長 每次使用後,將產品直立放置...
- Page 54 問題 可能原因 方法 未正確插入 Decalc 除 打開 Decalc 除鈣門,將除鈣 蒸氣和水會從 Decalc 除鈣 進氣阻隔推入。關上 Decalc 鈣進氣阻隔。 門、蒸氣觸動 除鈣門。 器和手握處 如果持續發生此狀況,請停止 漏出。 使用本產品。請聯絡飛利浦授 權服務中心。 水箱注水口沒有關好 將注水口門下壓。 使用 Decalc 除鈣功能 蒸氣隨著時間 產品內部有鈣垢。 (請參閱 變弱 小節)。 使用 Decalc 除鈣功能 蒸氣在衣物上 產品內部有鈣垢。 (請參閱 留下汙漬,或 小節)。 是蒸氣噴頭噴...
- Page 56 ©2020 Koninklijke Philips N.V. All rights reserved. 4239 001 17803...