Table of Contents
Quick Links
Genesis™ DM Clinician Guide
Honeywell HomMed Customer Service
Toll-free: 888-353-5404
Phone: 262-252-5840
Fax: 262-252-6105
Honeywell HomMed Corporate Offices
Honeywell HomMed
3400 Intertech Drive, Suite 200
Brookfield, WI 53045
Phone: (262) 783-5440 Fax: (262) 252-6105
© 2007-2008 by Honeywell HomMed. All rights reserved.
Table of Contents

Related Manuals for Honeywell GENESIS DM


Summary of Contents for Honeywell GENESIS DM
- Page 1 Genesis™ DM Clinician Guide Honeywell HomMed Customer Service Toll-free: 888-353-5404 Phone: 262-252-5840 Fax: 262-252-6105 Honeywell HomMed Corporate Offices Honeywell HomMed 3400 Intertech Drive, Suite 200 Brookfield, WI 53045 Phone: (262) 783-5440 Fax: (262) 252-6105 © 2007-2008 by Honeywell HomMed. All rights reserved.
-
Page 3: Table Of Contents
If you have any difficulties that you cannot resolve, call Honeywell HomMed Customer Service at 1-888- 353-5404, preferably from the monitor location. Customer Service will make every attempt to resolve the issue over the phone. - Page 4 GENESIS DM CLINICAL GUIDE Table Of Contents Genesis DM Monitor Voice and Text Prompts ..............39 Disease Specific Symptom Management ................39 Patient Reminders ........................40 New Voice Prompts ....................... 40 Taking the patient’s vitals......................42 Concluding the monitoring session .................... 45 Patient-initiated Monitoring Sessions..................
-
Page 5: Getting Started
Honeywell HomMed Genesis™ DM Monitor. Indications for use The Genesis DM monitor is intended for use as a medical data collection and transmission system for adult and pediatric patients over twelve years of age. The Genesis DM monitor is an integrated medical device that measures weight, blood pressure, and heart rate. - Page 6 We are available 24/7/365, and we will work quickly to resolve issues with you as they arise. When you call, please have this guide and a copy of the Genesis DM Field Reference handy. We will walk you through various troubleshooting techniques to assist you in identifying causes and resolutions.
- Page 7 For repair of peripheral medical devices, contact the manufacturer of the device. Shipping equipment back to Honeywell HomMed If Customer Service requests that you ship equipment back to Honeywell HomMed, please follow the directions below. Carefully pack the equipment in the original box. If you do not have the original box, you may use any sturdy box that allows at least a one-inch clearance around the equipment for packing materials.
-
Page 8: Safety Information
WARNING NOT AN EMERGENCY RESPONSE DEVICE The Genesis DM monitor is not intended to be an emergency response device. The monitor does not alarm and it does not transmit alarms, In case of a medical emergency, patients should call local Emergency Medical Service and/or their health care provider. - Page 9 WARNING NOT A NEONATAL UNIT Using the Genesis DM monitor on infants or small children could cause serious injury. DO NOT use the monitor, temperature probe, blood pressure cuff, or any monitor accessory on infants or small children.
- Page 10 Electromagnetic compatibility of electrical equipment at very close distances to the Genesis DM has not been evaluated. DO NOT use the Genesis DM adjacent to or stacked with other equipment. If it is necessary to do so, observe the monitor and verify normal operation prior to use with the patient.
- Page 11 IEC 60950 approved equipment must be placed outside of the “patient environment.” The patient environment is defined as an area 1.5 meters (4.92 feet) from the patient. For a list of Honeywell HomMed equipment and compatible peripheral medical devices, refer to Appendix E.
- Page 12 When you set up a monitor for demo use When you use a Genesis DM monitor to demonstrate the monitor, the potential exists for demo data to transmit to an actual patient record. LifeStream holds data packets for 48 hours, attempting to find the patient that matches the monitor’s serial number.
-
Page 13: Equipment Overview
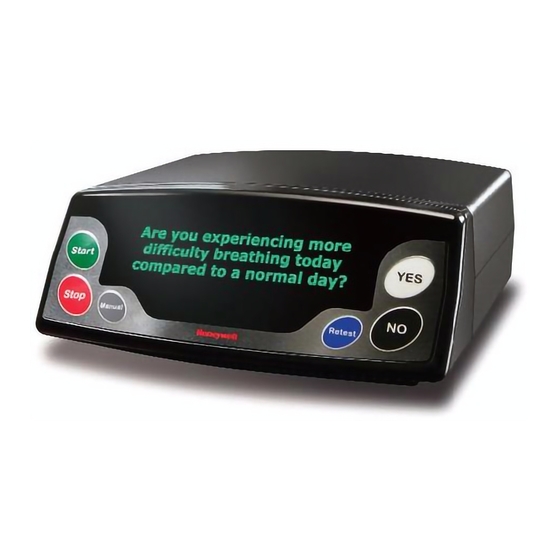
Equipment Overview Equipment Overview When you receive your shipment from Honeywell HomMed, carefully remove each piece of equipment from the box. Save the carton and packing materials in case you need to return any of the contents. As you inventory the contents of the box, check each piece of equipment for damage. If anything is damaged or missing, contact Customer Service. - Page 14 GENESIS DM CLINICIAN GUIDE Equipment Overview The figure below and the following chart explain the monitor features and key functions. Feature Function Displays the systolic and diastolic in mmHg Green START key starts a blood pressure reading; Green START key...
-
Page 15: Monitor Ports
(2) GPRS Communications In addition to the standard modem, the Genesis DM monitor will support a wireless GPRS modem that will automatically connect to available secure wireless networks without additional client setup. In the event that the unit fails to connect automatically, the user will receive a relevant error message. -
Page 16: Side Ports
Connector cables for external devices only fit the port appropriate for the device. Side ports The following figure shows the ports located on the side of the Genesis DM monitor. (1) Genesis DM SmartMedia Card slot The card slot holds a SmartMedia Flash Memory card that stores voice and text prompts and customizable patient questions. -
Page 17: Scales
Scales There are two scales: a Fairbanks scale and the Honeywell HomMed scale. Both scales have a capacity of 500 lb (227 kg) and collect weight using four load cells, one in each corner of the scale. The accuracy of the weight is +/- 0.5 lb (0.2kg). - Page 18 GENESIS DM CLINICIAN GUIDE Equipment Overview Note: Proper cuff size is a variable affecting the accuracy of NIPB measurements. To order cuffs, refer to Appendix C Parts List. Power supply and strip The AC adapter converts alternating current to direct current to power the monitor. The adapter is medical grade and UL and IEC compliant.
-
Page 19: Programming The Genesis Dm Monitor
Programming the Genesis DM Monitor Operations and Communications To program the Genesis DM monitor for patient use, you must enter Setup Mode and navigate through the menus and menu options to customize patient settings. This section provides information about communication providers, describes the menus, and provides programming instructions.PIN and phone... -
Page 20: Genesis™Dm Programming Guide
GENESIS DM CLINICIAN GUIDE Programming the Genesis DM Monitor Genesis™DM Programming Guide 12/5/2007 P.4510EN.01... -
Page 21: Setup Wizard
Factory Default Reset Users of the Genesis DM monitor will be able to easily reset the unit to the factory default settings when moving a unit from patient to patient. At any time following start up, the user will be able to reset the unit Depressing and holding the “Retest”... - Page 22 You can enter Setup Mode anytime the Genesis DM monitor is idle. However, if you are in Setup Mode during a scheduled report time, the monitor will skip the monitoring session and will not transmit any information.
- Page 23 If you choose one time per day, Genesis DM collects the scheduled data during the first monitoring session initiated by a scheduled Report Time or by pressing RETEST. Once the scheduled data is collected, the monitor will not collect it again until the next day. Genesis DM resets to a new day at midnight.
-
Page 24: Time Menu
Access Level: General The Report Time is the scheduled time for the Genesis DM monitor to collect and transmit patient vitals. Patients can have up to four report times in one 24-hour period. If you set more than one time, make sure that you schedule report times at least one hour apart to accommodate the Scheduled Reading window in LifeStream. - Page 25 GENESIS DM CLINICIAN GUIDE Programming the Genesis DM Monitor Each report time is followed by this option that allows you to set a report time frequency. The default is daily. However, you can program any combination of days. In the Time Menu, scroll to the Report Time # (1-4) Days option that you wish to set (1, 2, 3, or 4).
- Page 26 START + YES until you exit Setup Mode. Date Format Options: MMDDYY or DDMMYY Default: MMDDYY Access Level: General The Date Format allows you to set the Genesis DM monitor to a United States format of month/day/year, or to a European format of day/month/year. 12/5/2007 P.4510EN.01...
- Page 27 GENESIS DM CLINICIAN GUIDE Programming the Genesis DM Monitor In the Time Menu, scroll to Date Format, and press RETEST to enter. The currently programmed format blinks. Press either YES or NO to change the format, and press RETEST to accept the new setting.
-
Page 28: System Settings
GENESIS DM CLINICIAN GUIDE Programming the Genesis DM Monitor System Settings After entering Setup Mode, press YES to scroll to System Settings, and then press RETEST to enter the System Settings menu. Volume Options: Lowest, Low, Med, High, And Highest... - Page 29 Access Level: General You can set the Genesis DM to display either English or metric units. Genesis DM monitors should default to what is customary in your locale. However, if you need to change the units, follow the steps below.
-
Page 30: Questions Menu
NIBP on the patient ID card.) Genesis DM uses this initial setting only for the first blood pressure collection because the monitor stores the latest BP reading in memory to use as a setting for the next blood pressure. The monitor inflates the cuff to 35 mmHg higher than the last systolic reading. - Page 31 With LifeStream a number of duplicate questions are available that have DSSM educational content attached For a list of all of the questions, refer to Appendix A: Subjective Questions or to the Genesis DM Field Reference. The menu also offers a block of questions for sleep apnea. It is an on/off option only. If you turn the option on, the monitor will ask all twelve questions in the block.
- Page 32 Programming the Genesis DM Monitor Questions/Reminders Options: Off or Questions 1 – 51(Classic mode only); Questions 1 – 61(Genesis DM with DSSM activated) Default: Access Level: General As you scroll through the block of questions and/or reminders, you see blinking cue text and the question ID number.
-
Page 33: Password
The password protected menu options are found in the Service and Transmit menus. All Genesis DM monitors use the same password. If you do not know the password, contact your supervisor. Follow the steps below to enter the password. -
Page 34: Transmit Menu
The PIN number identifies your organization’s mailbox where monitor vitals and configurations are stored until retrieved by Honeywell HomMed. This PIN is provided by Honeywell HomMed. The Genesis DM monitor sends data to this mailbox address and the LifeStream™ checks this same address to retrieve the data. - Page 35 Access Level: General The transmit mode determines how the Genesis DM transmits data. When set to ISP, the monitor sends data over a phone line to your mailbox. An ISP is required to transmit data to LifeStream via a phoneline or the GPRS modem If the monitor is going to transfer patient data to a local server, set the transmit mode to Local Gateway.
- Page 36 GENESIS DM CLINICIAN GUIDE Programming the Genesis DM Monitor ISP2 Phone # (C) This is the phone number to be dialed to connect to the secondary ISP account for transmission of information to LifeStream/Central Station. Transmit Phone # (C) Used for custom setups only.
-
Page 37: Option Menu
After assigning a com port, you can then program how often the Genesis DM collects test results from the device. The default is daily. However, you can program any combination of days. You must have at least one day selected or the monitor will not prompt for the device. - Page 38 Load Factory Default (C) Returns the monitor to the original factory settings at the date of delivery. Classic Mode (C) Activates Classic Mode. This turns off any additional features specific to the Genesis DM monitor. Also complies with Central Station 3.5 12/5/2007...
-
Page 39: Installing The Genesis Dm Monitor
Installing the Genesis DM Monitor It is important to set up the Genesis DM monitor in an area where it can successfully measure vital signs and transmit results. If a patient uses peripheral medical devices, ensure there will be enough room for the patient to attach them without any difficulty. -
Page 40: Attaching The Scale
GENESIS DM CLINICIAN GUIDE Installing the Genesis DM Monitor Attaching the scale Make sure that you use the appropriate equipment for each monitor. Pay special attention to the scale cords, keeping in mind that there are two different cords depending on your configuration. -
Page 41: Attaching The Blood Pressure Cuff
Plug the patient’s telephone into one side of the duplex jack. Plug the Genesis DM phone cord into the other side of the duplex jack. Plug the remaining end of the Genesis DM phone cord into the MODEM plug located on the back of the monitor. -
Page 42: Powering Up
As soon the monitor powers up, it displays the current software version. If the monitor detects any problems, the Genesis DM displays an error code. For a list of error codes, refer to the Genesis DM Monitor Field Reference. A serious error will halt the system. If a serious error occurs, contact Customer Service. -
Page 43: Patient Training
Patient Training Patient Training It is important to review the benefits of the using the Genesis DM with patients and their caregivers. Explain how the system empowers patients to take an active part in managing their health care. They can log and track their vitals and have the security of knowing that their health care provider is daily viewing their data. -
Page 44: Patient Reminders
Patient Training Patient Reminders The Genesis DM monitor will play audio patient reminders which can be scheduled with the monitor. These reminders will present an audio and textual prompts at the conclusion of vitals acquisition. An example of a patient reminder would be: “Please remember your physician appointment this week”... - Page 45 GENESIS DM CLINICAL GUIDE Patient Training The following list describes the basic prompts and text displays. For a list of all possible prompts, refer to Appendix B: Prompt Text. The monitor says a greeting and announces that it is time to take vital signs.
-
Page 46: Taking The Patient's Vitals
Patient data is transmitted automatically. If the transmission is successful, the display reads: “Transmission success” The Genesis DM monitor continues to display patient weight, BP, and if collected, SpO2 for five minutes to allow the patient to record vitals. To clear the display and return to idle mode right away, press any key once. - Page 47 STOP key. To restart inflation, press the green START key. Inflation pressure The Genesis DM monitor has a preset default inflation pressure of 175 mmHg. However, it only uses this setting once because the Genesis DM monitor saves the last BP reading in memory. The next inflation pressure is 35 mmHg above the last saved systolic.
- Page 48 GENESIS DM CLINICAL GUIDE Patient Training If the patient has an ID card, the monitor uses the inflation setting on the card each time it takes a blood pressure. Once the monitor is powered down the default setting of 175 mmHg is re-established.
-
Page 49: Concluding The Monitoring Session
Stress again that this is not an emergency response device. Partial Retest The Genesis DM monitor allows users to select a portion of vital signs acquisition via the monitor’s “Retest” button. When retesting patients will be prompted: •... - Page 50 GENESIS DM CLINICAL GUIDE Patient Training Manual mode Clinicians can use Manual mode to take vitals without transmitting the data to LifeStream. Technicians also use Manual mode when they calibrate the monitor. When in Manual mode, the monitor only collects vitals. It does not prompt, display text, or collect test results from peripheral devices.
-
Page 51: Routine Maintenance
Clean only the surfaces of the monitor and the accessories. Qualified service technicians must perform any cleaning, servicing, or repairs that require disassembly. Cleaning the Genesis DM Monitor Unplug the Genesis DM monitor. The monitor’s memory retains all programmed settings even when powered down. Detach all accessories and peripheral medical devices. -
Page 52: Inspection
To obtain accurate blood pressure readings, you must insert the correct bladder size for the cuff. Inspection Any time you visit a patient, it is a good idea to inspect the Genesis DM monitor and accessories. You should check the following: •... - Page 53 (227kg). To verify the scale’s calibration: Make sure that there is no weight on the scale. With the scale attached to the Genesis DM monitor, power up the monitor. From idle mode, press MANUAL to enter Manual Mode. Place a calibrated weight on the scale.
-
Page 54: Remote Upgrades
GENESIS DM CLINICAL GUIDE Patient Training Press START + YES to exit Setup Mode. Optional finger sensor calibration verification To verify oximeter calibration requires a pulse oximeter tester. Refer to the manufacturer’s manual for testing procedures. For information about ordering testers, contact Customer Service. -
Page 55: Peripheral Medical Devices
Patient Training Peripheral Medical Devices This section discusses each of the peripheral medical devices that are compatible with the Genesis DM monitor. Specific instructions are included with the cables for each peripheral. Please refer to the manufacturer’s manual for each peripheral for detailed care and maintenance instructions. -
Page 56: Health Frontier Ecg@Home
Patient Training Health Frontier ecg@home This section explains how to program the Genesis DM monitor to prompt for an ECG recording, setup the ecg@home device, and instruct the patient in obtaining an ECG recording. For information about viewing ECG recordings in LifeStream, refer to your LifeStream Clinician Guide. - Page 57 The cable that connects the ecg@home to the Genesis DM monitor has a 4-pin connector on one end and a jack on the other. The pin connector plugs into a com port on the Genesis DM, and the jack plugs into the RS232 connection on the ecg@home.
- Page 58 • Do not move or talk during the recording. After the initial prompt informing the patient that it is time to take an ECG, the Genesis DM monitor prompts the patient through the following steps: Apply two to three drops of the electrode solution on both electrodes of the ECG device. Be careful to drop liquid onto the electrode rather than touch the bottle tip to the electrode.
- Page 59 Cleaning the ecg@home Always disconnect the device from the Genesis DM monitor prior to cleaning. Clean the device with a soft cloth moistened with the K2 solution. Do not use water, detergent or any other cleaning product.
-
Page 60: Glucose Meters
Home Diagnostics TrueTrack Smart System® The Genesis DM monitor uploads up to twelve of the most recent, valid glucose test results from a glucose meter. A valid reading has the test time and date. If any reading is missing a time and date stamp, the monitor will not collect it. - Page 61 The following instructions assume you know how to navigate in Setup Mode. If you have not programmed a monitor, refer to Section 3 Programming the Genesis DM Monitor for complete programming instructions.
- Page 62 If the patient fails to attach the device and the monitor times out, Genesis DM moves on to onto the next scheduled activity in the monitoring session. The following table contains glucose meter prompts.
- Page 63 GENESIS DM CLINICAL GUIDE Patient Training Patient Instructions Before the monitoring session the patient should finish collecting test results, turn their glucose meter off, and place their glucose meter next to the monitor before the monitoring session. When it is time for the monitor to collect glucose test results, the monitor will prompt for the device. If the monitor does not detect the device after the initial prompt, it will also prompt the patient to make sure that the cable is connected to the com port programmed for the device.
-
Page 64: Oximeter
LifeStream stores both values in the database but only displays the oximeter heart rate. Assigning a COM port You must assign an isolated COM port in order for the Genesis DM to prompt for collection during the monitoring session. To assign a COM port, follow the instructions below. - Page 65 Point out the raised finger design on the top of the oximeter, and explain that the finger sensor is worn with the design on the top of the finger. Honeywell HomMed recommends using the middle finger to make it easier for the patient to press monitor keys. However, when necessary, the patient may use a different digit.
-
Page 66: Peak Flow Meters
Attaching the peak flow meter cradle to the Genesis DM monitor The peak flow meter transmits data to the Genesis DM monitor via its cradle and a Honeywell HomMed connector cable. The Honeywell HomMed cable has a black, 9-pin connector that matches the cradle cable connector, and a round, 6-pin connector that matches COM-A on the rear of the Genesis DM monitor. - Page 67 If the patient fails to turn the peak flow meter on and place it into the cradle, Genesis DM skips peak flow collection and moves on to the next device. If the Genesis DM has collected all data from all devices, the monitor concludes the monitoring session.
-
Page 68: Prothrombin Meters
Disconnect the prothrombin time meter before use. Always follow the manufacturer’s instructions for proper use. Instruct the patient to never use their prothrombin meter when it is attached to the Genesis DM monitor. Remind patients to thoroughly read the user documentation provided by the manufacturer and to pay close attention to any cautions or warnings. - Page 69 For a complete list of possible prothrombin prompts, refer to Appendix C: Prompt Text. Patient Instructions Instruct the patient to complete all tests, and place the meter next to the Genesis DM monitor before the session. Have the patient turn the meter on before connecting it to its cable. Otherwise, the meter will open PC menus that the patient would not normally use.
- Page 70 Go to THIS RESULT and press to transmit. If the latest reading collected by the prothrombin time meter was an error reading, the Genesis DM monitor collects the error reading inserting zeros for values. A common prothrombin time meter error is Error #81 which occurs when there was an insufficient amount of blood for accurate testing.
-
Page 71: Temporal Temperature
In the External Temp Time menu, set the collection frequency. Exit Setup Mode. Attaching the TemporalScanner to the monitor The scanner has a cord with a 4-pin mini-DIN connector that plugs into a Genesis DM com port. To attach the scanner: 12/5/2007... - Page 72 GENESIS DM CLINICAL GUIDE Patient Training Plug the temperature cable’s connector into the com port that you programmed for the TemporalScanner (COM-1 or COM-2). Place the scanner to the side of the monitor so that it is easily accessible to the patient.
-
Page 73: Appendices
GENESIS DM CLINICAL GUIDE Appendix A: Subjective Questions APPENDICES Appendix A: Subjective Questions The following chart lists the fifty-one subjective questions offered in the Genesis DM Questions menu. Subjective Questions Number Questions Are you experiencing more difficulty breathing today compared to a normal day? - Page 74 GENESIS DM CLINICAL GUIDE Appendix A: Subjective Questions Has your wound changed in size or color? Have you noticed a change in odor from your wound? Have you noticed a change in the drainage from your wound? Have you had to use your nitroglycerin in the last day?
- Page 75 GENESIS DM CLINICAL GUIDE Appendix A: Subjective Questions 12 New Questions and DSSM, these question are repeats of existing questions and will trigger the DSSM Educational Components to be displayed during vitals transmission Are you experiencing more difficulty breathing today compared to a normal day? (same as Question Number 1) Common causes for increased difficulty breathing may be caused by strenuous activity, anxiety or not following recommendations made by your health care provider.
- Page 76 GENESIS DM CLINICAL GUIDE Appendix A: Subjective Questions Dizziness can be caused by many medical conditions. Sudden changes in blood pressure, heart rate or blood sugar can cause dizziness as can side effects from certain medications. Dizziness, when accompanied by headache or blurred...
- Page 77 GENESIS DM CLINICAL GUIDE Appendix A: Subjective Questions Please remember to keep feet and legs elevated while sitting. Please remember to eat foods low in Sodium. Please remember to wear your oxygen as prescribed. Please remember to use your nebulizer as prescribed.
-
Page 78: Appendix B: Sleep Apnea Questions
Sleep apnea questions are a single block of twelve questions that are either on or off. When turned on, the Genesis DM monitor will go through all of the questions. The questions are listed below. Do you snore nearly every day? -
Page 79: Appendix C: Prompt Text
Appendix C: Prompt Text Appendix C: Prompt Text The following is a compilation of all Genesis DM monitor audio prompts. What the patient hears depends on monitor programming. Good Morning (Afternoon, Evening), it is now time to record your vital signs. - Page 80 GENESIS DM CLINICAL GUIDE Appendix A: Subjective Questions No peak flow detected. It is now time to take your ECG reading. Apply two to three drops of the electrode solution on both electrodes of the ECG device. Press the start key on the ECG device.
-
Page 81: Appendix D: Genesis Dm System Supplies
Appendix D: Genesis DM System Supplies Use only supplies authorized by Honeywell HomMed, as other equipment may result in increased emissions or decreased immunity of the Genesis DM. To order supplies, contact Customer Service and include the part number and name. -
Page 82: Appendix E: Medical Device Specifications
Appendix E: Medical Device Specifications Appendix E: Medical Device Specifications The following peripheral medical devices are compatible with the Genesis DM monitor. For instructions on how to use any peripheral medical device, please refer to manufacturer’s product materials. Specifications may be changed by individual manufacturers without notice from Honeywell HomMed. - Page 83 GENESIS DM CLINICAL GUIDE Index Battery LI+ (lithium-Ion), 3.0DC non-rechargeable for memory backup and real-time clock power; not a primary power source when AC power is not present Environment The monitor may not meet its performance specifications if stored or used outside the temperature and humidity ranges listed below.
-
Page 84: Appendix F: Electromagnetic Guidances
Guidance and Manufacturer’s Declaration – Electromagnetic Emissions The Genesis DM is intended for use in the electromagnetic environment specified below. The customer or the user of the Genesis DM should assure that it is used in such an environment. Emissions Test... - Page 85 Guidance and Manufacturer’s Declaration – Electromagnetic Immunity The Genesis DM is intended for use in the electromagnetic environment specified below. The customer or the user of the Genesis DM should assure that it is used in such an environment. IEC 60601 Test...
- Page 86 RF transmitters, and electromagnetic site survey should be considered. If the measured field strength in the location in which the Genesis DM is used exceeds the applicable RF compliance level above, the Genesis DM should be observed to verify normal operation. If abnormal performance is observed, additional measures may be necessary, such as reorienting or relocating the Genesis DM.
- Page 87 Recommended Separation Distances Between Portable and Mobile RF Communications Equipment and the Genesis DM The Genesis DM is intended for use in the electromagnetic environment in which radiated RF disturbances are controlled. The customer or the user of the Genesis DM can help prevent...